
On this page
- 🏥 What happens on the day of surgery and before discharge?
- ⚠️ Warning signs: when should you seek help?
- 🩹 Care during the first days after surgery
- 🛡️ First two weeks
- ↔️ Second two weeks
- 🌱 Days 31 to 60: foundational strength and high-quality walking
- 🏋️ Days 61 to 90: balance and single-leg control
- 🎯 After month 3: a sustainable return to activity
- 🚗 Daily life and return to activity
- ❓ Frequently asked questions
- ✅ Summary
- 📚 Scientific sources
Total Hip Replacement Surgery: Postoperative Care and Rehabilitation
A complete, criteria-based guide to surgery day and care after total hip replacement—from wound care, medicines, and warning signs to the first 90 days of rehabilitation and a safer return to activity.
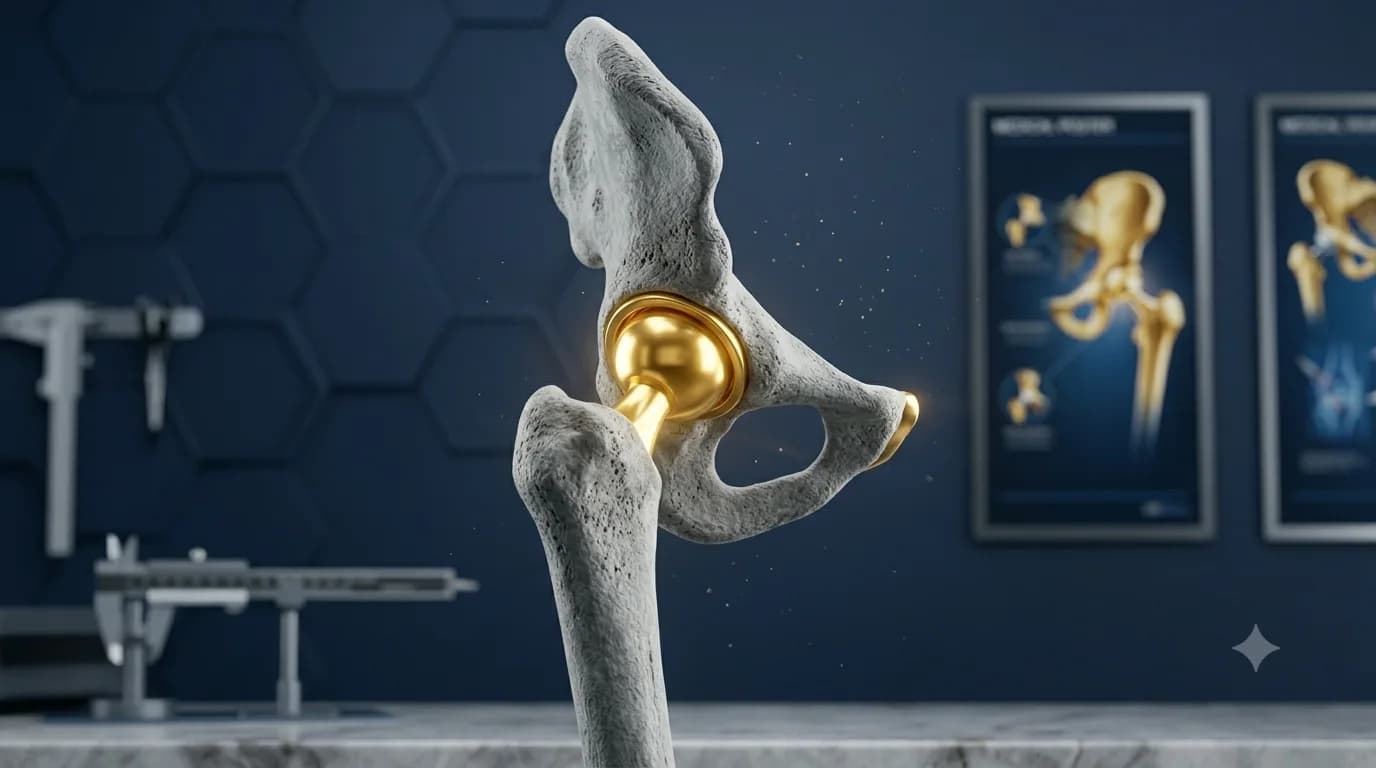
🏥 What happens on the day of surgery and before discharge?
Anesthesia and pain control: Total hip replacement may be performed under spinal anesthesia with sedation or under general anesthesia. After surgery, the recovery team checks your alertness, blood pressure, nausea, pain, circulation, and movement in the leg, and continues a multimodal pain-control plan.
Early movement: After an uncomplicated primary replacement, physiotherapy usually begins on the day of surgery or within 24 hours. You will first practise sitting down and standing up, then standing and taking a few steps with a walker. The amount of weight you may place on the leg will be stated on your discharge instructions.
Ability-based discharge: Discharge is safe when pain and nausea are manageable with the home plan, you can eat, drink, and pass urine, the wound and vital signs show no urgent problem, and you can use the appropriate aid to get in and out of bed or a chair, walk, and practise stairs if needed. This may happen on the same day or after a short hospital stay; the pathway is not identical for everyone.
What you should take home: Your discharge paperwork should clearly list your prescriptions and medication schedule, dressing-care instructions, weight-bearing status, walking aid, any movement precautions specific to you, starter exercises, and follow-up date. Whether you need “hip precautions” depends on the surgical approach and the tissues repaired; it cannot be decided from one universal rule.
This guide is written for a primary, uncomplicated total hip replacement. If your surgeon or discharge sheet sets a specific restriction, that takes precedence — and when anything is unclear, ask your care team.
⚠️ Warning signs: when should you seek help?
Contact your surgeon or treatment centre the same day for: wound redness, warmth, or swelling that is spreading; thick or foul-smelling drainage, ongoing bleeding, or separation of the wound edges; a temperature at or above the threshold on your discharge sheet or chills; pain not controlled by the prescribed plan; new numbness or weakness; a sudden reduction in walking ability; or new one-sided calf pain or swelling.
Seek emergency care for: sudden shortness of breath, chest pain, coughing up blood, fainting, a cold or blue foot, uncontrolled bleeding, or sudden severe hip pain with apparent shortening or abnormal rotation of the leg and inability to stand. In Iran, call emergency medical services on 115.
For an individual assessment, call Dr Jalil Emad’s office at 09137825207 or book an appointment online. In an emergency, do not wait for a response from the office.
Learn more about this area of care on the Joint Replacement & Reconstruction page.
🩹 Care during the first days after surgery
During the first few days, soreness around the hip, bruising, tiredness, and some leg swelling are expected; they are not meant to disappear all at once. The goals are to keep the wound dry and protected, keep pain manageable, and gradually increase short, safe periods of movement. Your own discharge sheet and surgeon’s instructions take priority over any general time or number in this article.
Important exceptions: Written for a first-time, uncomplicated replacement. Your surgeon's own instruction outranks it — if nothing is written, ask.
🩹 Wound care and dressing changes
Seeing the dressing, or changing it for the first time, may feel a little unsettling, but you do not need to uncover the wound repeatedly. Your main job is to keep its covering clean, dry, and in place and to avoid unnecessary handling of the skin. Gather everything you need before you begin and work calmly through the steps.
More detailLess detail
- First identify the type of dressing on your discharge sheet. A long-wear waterproof dressing usually remains in place until about day 7 to 10 or until the wound check. Change a simple gauze dressing at the time written by your centre and whenever it becomes wet or soiled.
- Wash your hands with soap and water and place the fresh dressing, tape, and a waste bag on a clean surface. Do not touch the inner surface of the new dressing.
- Gently peel the outer dressing from one corner, keeping close to the skin. Do not pull off skin glue, narrow adhesive strips, stitches, staples, or scabs, and do not pull the wound edges apart to look inside.
- Look briefly without pressing on the wound. A small pink or clear spot that stays stable and then decreases may be seen in the first days. Do not scrub it or squeeze fluid from the wound.
- Clean only in the way you were instructed. Do not independently apply alcohol, hydrogen peroxide, povidone-iodine, a new ointment, cream, or powder to the incision; these products can irritate healing skin.
- Apply the fresh dressing dry and not too tightly. The tape should not pull on the skin, and the leg should remain warm, its usual colour, and normally sensitive.
- If the dressing becomes wet, dirty, loose, or soaked with drainage, do not wait for the scheduled day. Replace it with a clean dressing as instructed, or contact the treatment centre the same day for help.
- Take worsening changes seriously: a rapidly enlarging stain, ongoing bleeding, thick or foul-smelling drainage, separation of the wound edges, or spreading redness and warmth differs from normal healing and warrants same-day contact.
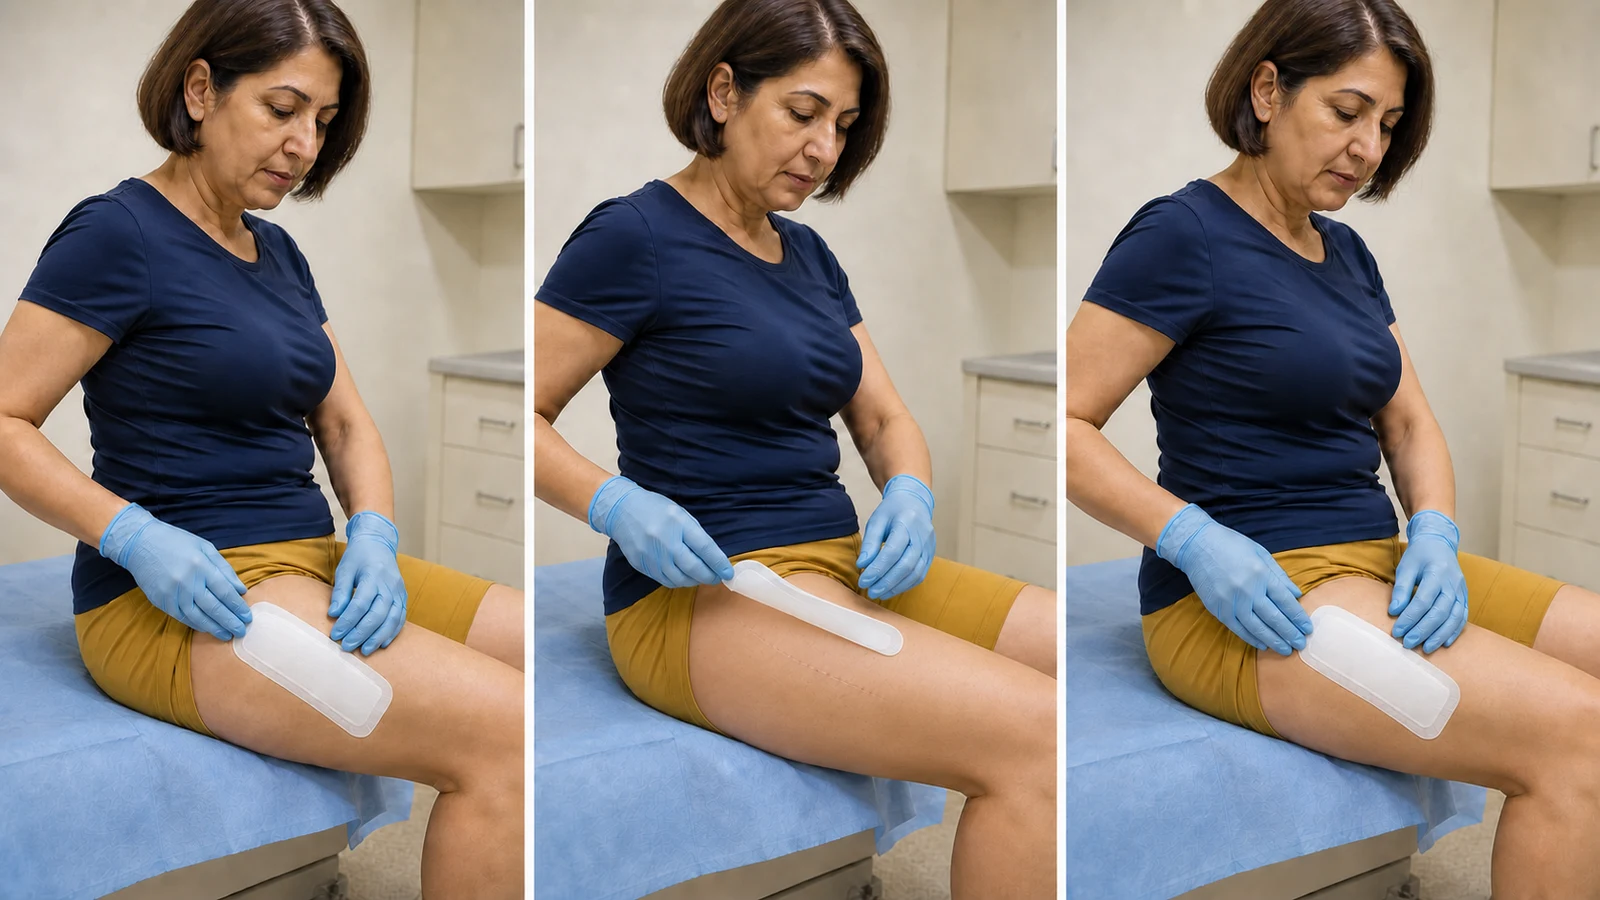
🚿 Waterproof dressings, showering, and soaking
A brief shower is not the same as soaking the wound. If a waterproof dressing is intact and completely sealed, some centres allow showering from the next day. With a standard dressing, the wound often needs to remain dry for about 5 to 7 days.
More detailLess detail
- Make the bathroom safe before showering: use a nonslip surface, a grab bar, or a stable shower seat, and do not shower alone the first few times.
- Do not aim high-pressure water directly at the dressing or rub the wound with a washcloth, sponge, or soap. After showering, pat the area around the covering dry with a towel.
- If water gets under the dressing or the covering softens and lifts, do not leave it damp. Replace it with a dry dressing as instructed or ask the treatment centre for help.
- Do not soak in a bath, pool, or hot tub until the incision is fully closed and dry, with no unstable scab. This usually takes at least 3 to 4 weeks.
💊 Medicines: regular, simple, and free of avoidable interactions
Take only the medicines listed on your discharge prescription. Make a paper chart or phone reminder with each medicine’s name, time, and last dose so that a dose is neither missed nor taken twice.
More detailLess detail
- Take pain medicines in the prescribed amount and at the prescribed interval. Pain and cold remedies may share an ingredient such as acetaminophen; read the labels before taking them together.
- Continue your clot-prevention medicine at a consistent time for the full prescribed course. If you miss a dose, do not double it; follow that medicine’s instructions or contact the treatment centre.
- Do not add aspirin, ibuprofen, naproxen, supplements, or a new herbal medicine until potential interactions with a blood thinner, kidney or stomach disease, and your other medicines have been checked.
- Sedating pain medicines can cause dizziness, nausea, and constipation. Do not drink alcohol or drive while taking them, rise slowly, and remember fluids, fibre, and any prescribed treatment for constipation.
- Uncontrolled pain, or a side effect that prevents safe eating, drinking, or walking, is not a reason to increase the dose yourself. Contact the team the same day so the plan can be adjusted.
🧊 Managing pain, swelling, and fatigue
Swelling can travel from the hip into the thigh, knee, and even the ankle, and may be greater at the end of the day. The overall pattern should improve from week to week. How you feel the following morning helps show whether the previous day’s activity was appropriate or excessive.
More detailLess detail
- Apply a cold pack to the sore area for 15 to 20 minutes. Keep a thin cloth between your skin and the pack, do not use cold while asleep, and check skin colour and sensation after each session.
- To reduce swelling, lie down and support the whole leg with pillows so that the ankle is above heart level. Do not position the leg in a way that breaks your specific movement precautions.
- Break activity into small portions. Several short walks and exercise sessions are usually better tolerated than one long session; complete bed rest also increases stiffness, weakness, and clot risk.
- If pain, swelling, or limping is noticeably worse the next day, shorten or simplify that activity, and do not increase intensity, range, and repetitions at the same time.
🫀 Preventing blood clots and recognising unusual bleeding
After joint replacement, clot prevention usually combines prescribed medication, early movement, ankle pumps, and sometimes stockings or a compression device. The medicine and its duration are selected for your individual risk; there is no single regimen for everyone.
More detailLess detail
- Take the anti-clot medicine exactly and for the full prescribed course. Do not stop it, substitute it, or double a dose without guidance.
- If compression stockings are part of your plan, wear them without wrinkles and check the skin and the colour and sensation of your toes every day.
- Break up prolonged sitting with ankle movements and a few safe steps. In the AAHKS home programme, ankle pumps are commonly taught as 3 sets of 10 repetitions with a 3-second hold; your discharge plan remains the deciding instruction.
- Prolonged bleeding, red or brown urine, red or black stools, vomiting blood, or a very large bruise requires prompt contact so your medication can be assessed.
🚶 Walking, walker, cane, and stairs
After a stable primary total hip replacement, weight bearing as tolerated with a walker often begins on the day of surgery or the next day. “As tolerated” means walking with an aid and a controlled pattern—not immediately discarding the walker.
More detailLess detail
- Take short, frequent walks. Move the walker slightly forward first, then the operated leg, and then the unaffected leg. Take several small steps to turn and never pivot on a planted foot.
- Once you can walk with the walker without hanging through your arms or showing an obvious limp, cane practice may begin. Hold the cane in the hand opposite the operated hip and advance it with the operated leg.
- Give up an aid only when your gait is symmetrical. Meaningful pain, pelvic drop, imbalance, or clearly shortened steps means you still need support.
- On stairs, lead with the unaffected leg going up; going down, move the aid and operated leg first. Use the handrail and take one step at a time until control is sufficient.
- Reduce hazards at home: remove loose rugs and cables, light the nighttime route to the bathroom, and use a firm chair with arms at an appropriate height.
🛏️ Sitting, sleeping, and dressing
A comfortable position must still fit the precautions written for your approach. The aim is to prevent falls and end-range combinations, not to keep you immobile for long periods.
More detailLess detail
- Sit in a firm chair that is not too low and change position or take a few safe steps every 30 to 45 minutes.
- For sleep, lie on your back or in a position allowed by your treatment team. If side sleeping is permitted, a suitable pillow between the legs may prevent unintended rotation.
- Dress while seated: put the operated leg into clothing first and take it out last. If bending is restricted, use a long-handled shoehorn, sock aid, or assistance from another person.
- Do not bend and twist to pick something up from the floor. Use a long-handled reacher, and never pivot on the operated leg while reaching downward.
🛡️ First two weeks
🛡️ 0 to 72 hours: protection and early movement
Goal and entry criteria: Control pain and nausea, protect the wound, activate circulation and the gluteal muscles, and complete short transfers with the prescribed aid. Begin after your vital signs are stable and the treatment team has cleared you.
Daily activity and restrictions: Use the walker and another person’s help for transfers and walking, keep routes through the home clear, and bear only the permitted amount of weight. Do not pivot on a planted foot, use a very low chair, perform any bend or combined movement prohibited on your discharge sheet, or exercise into sharp pain.
Exercises for this period
1) Ankle pumps (Ankle Pumps)
Moving the calf muscles during a period of reduced mobility supports circulation and reduces ankle stiffness. It does not replace prescribed… you develop new calf pain or tightness, one-sided swelling, persistent numbness,…
More detailLess detail
Goal and why it matters: Moving the calf muscles during a period of reduced mobility supports circulation and reduces ankle stiffness. It does not replace prescribed clot-prevention medicine or walking.
Stage and starting criteria: From the first hours, once sensation and control have returned to the foot and the treatment team has given permission.
Equipment and environmental safety: A bed or firm chair. If you still feel dizzy or numb, perform the exercise lying down with another person present.
Starting position: Lie on your back or recline, with both lower legs supported, knees facing the ceiling, and ankles free. Do not rotate the operated leg.
- Keep the thigh and knee relaxed.
- Pull your toes up towards your face.
- Then gently point them away from you.
- Return to the starting position smoothly, without jerking or rotating the whole leg.
Range, side, and restrictions: Move both ankles only through a comfortable range. Do not force the end of range, and maintain your hip precautions.
Breathing, speed, and rhythm: Do not hold your breath; keep the up-and-down movement smooth and continuous.
Documented dose: The AAHKS home guide shows 3 sets of 10 ankle pumps with an approximately 3-second hold. Space sessions through the day as directed by your discharge plan.
Rest: Relax the legs between sets and wait for calf fatigue to settle.
Signs of correct technique and expected response: Only the ankle moves, with a mild calf stretch or muscle effort that eases soon after stopping.
Stop immediately if: you develop new calf pain or tightness, one-sided swelling, persistent numbness, shortness of breath, or chest pain.
Common mistakes: Fast, jerky movement; rotating the whole leg from the hip; pushing into pain; or holding your breath.
Easier version/regression: Reduce the range and number of repetitions, and move one ankle at a time.
Progression criteria and next stage: Smooth movement without unusual symptoms. Continue ankle pumps alongside short walking sessions, not instead of them.
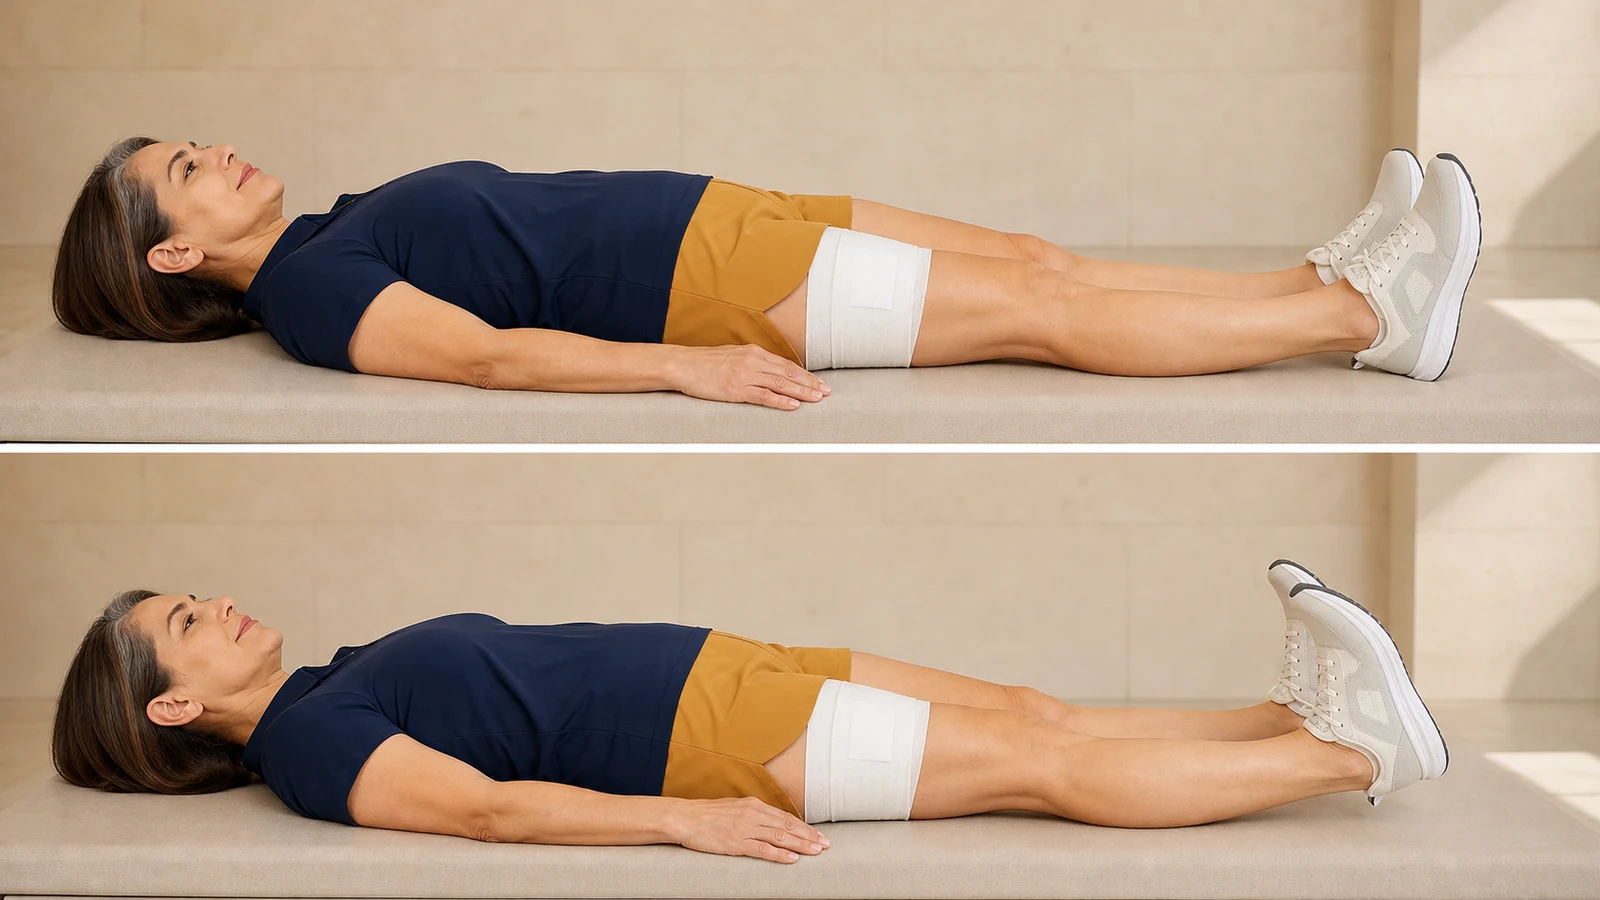
2) Gluteal sets (Gluteal Sets)
This contraction reactivates the gluteal muscles without a large joint movement so they can resume their role in standing, pelvic stability, and… sharp groin or surgical-site pain, persistent cramping, dizziness, or a clear increase in…
More detailLess detail
Goal and why it matters: This contraction reactivates the gluteal muscles without a large joint movement so they can resume their role in standing, pelvic stability, and walking.
Stage and starting criteria: Once you are fully alert and a gentle gluteal contraction does not cause sharp pain or pull on the wound.
Equipment and environmental safety: A flat bed. Do not use a pillow or prop that places the legs in a prohibited position.
Starting position: Lie on your back with the legs in the permitted alignment and the knees comfortable. Keep the pelvis on the bed and the lower back in a natural position.
- Relax your body and breathe normally.
- Gently squeeze both sides of the buttocks.
- Hold the contraction without lifting the pelvis or rotating the legs.
- Slowly release the muscles and relax fully before the next repetition.
Range, side, and restrictions: No visible pelvic movement is needed. Both sides engage, and none of your approach-specific precautions should be broken.
Breathing, speed, and rhythm: Exhale gently as you tighten and inhale as you release. Do not hold your breath.
Documented dose: AAHKS teaches 3 sets of 10 repetitions with an approximately 5-second hold. In the first hours, begin with fewer repetitions and good form.
Rest: Release the muscle completely between repetitions and rest between sets until any cramping has gone.
Signs of correct technique and expected response: A symmetrical gluteal contraction without lifting the pelvis. Mild muscle fatigue is normal and should settle promptly.
Stop immediately if: sharp groin or surgical-site pain, persistent cramping, dizziness, or a clear increase in pain or wound drainage occurs.
Common mistakes: Holding the breath, bracing the abdomen forcefully, bridging and lifting the pelvis, or turning the toes outward.
Easier version/regression: Use a shorter, gentler contraction and fewer repetitions.
Progression criteria and next stage: Ten controlled contractions without increasing pain. Next, use the same activation during weight transfer and standing exercises.
Expected and adverse responses: Fatigue, bruising, and manageable pain are expected. Pain that keeps increasing, dizziness during a transfer, reduced sensation or movement in the foot, or any warning sign calls for stopping and assessment.
Surgical branch: If restricted weight bearing, a fracture, or trochanteric repair is documented, progress standing and later exercise only through your individual plan.
Criteria to advance: Bed and chair transfers and short walks are safe with the prescribed aid and assistance, you can follow the simple medication and exercise plan correctly, and symptoms return to baseline before the next session.
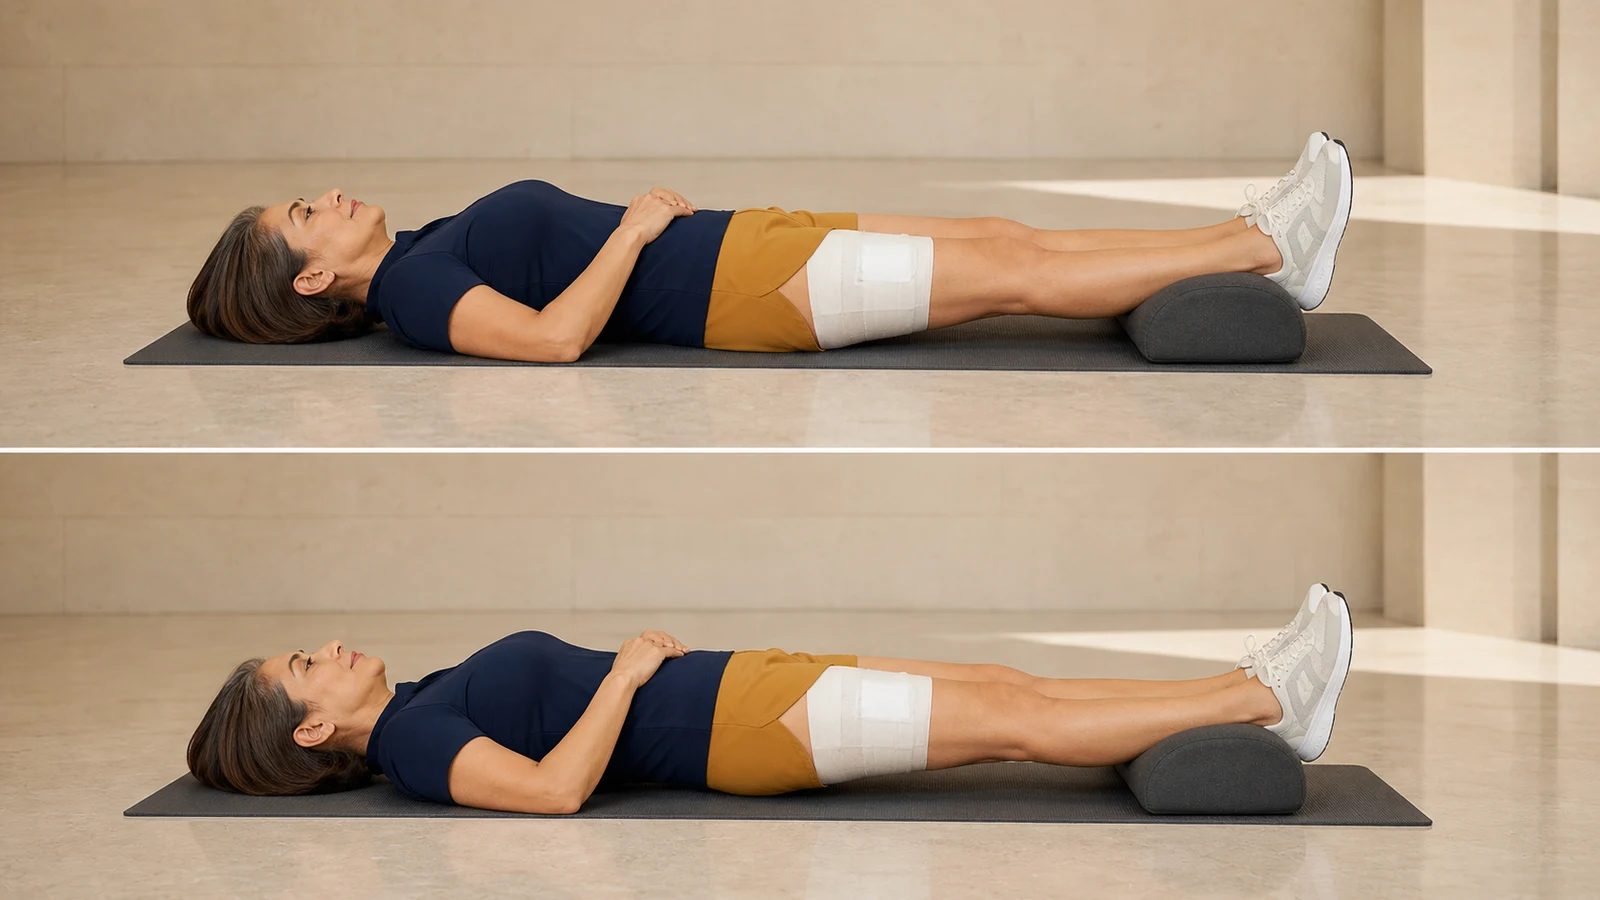
🧊 Days 4 to 7: settling pain and building a walking pattern
Goal and entry criteria: Continue protecting the wound, become more independent with transfers, and practise short, symmetrical steps. Enter this stage once dizziness is controlled and you can bear the prescribed weight with an aid.
Daily activity and restrictions: Take several short walks at home and rest between them. Do not carry items in your hands while using a walker, walk on loose rugs, turn abruptly, or discard the aid while you still limp.
Exercise for this period
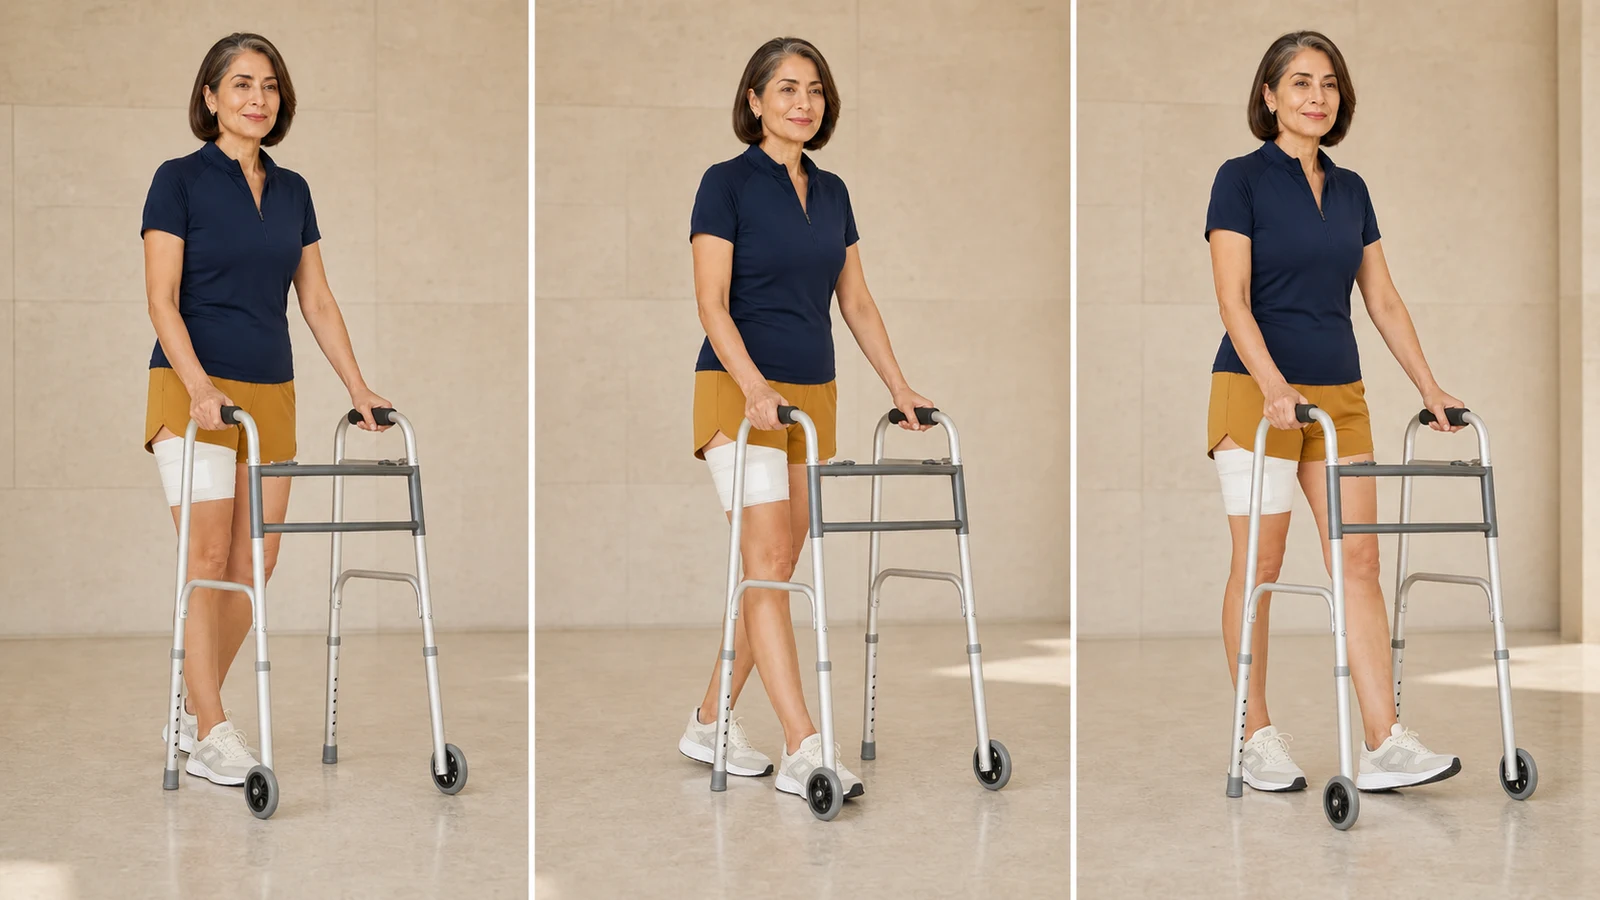
3) Safe walker gait (Walker Gait)
A walker lets you practise the sequence of steps with balance and controlled loading and helps prevent a protective limp from becoming established. you develop dizziness, leg buckling, sharp pain, a sensation that the joint has shifted,…
More detailLess detail
Goal and why it matters: A walker lets you practise the sequence of steps with balance and controlled loading and helps prevent a protective limp from becoming established.
Stage and starting criteria: After weight bearing has been permitted, dizziness is controlled, and you can stand with help. The treatment team selects the type of walker.
Equipment and environmental safety: A correctly adjusted walker, closed shoes, a dry floor, and a well-lit route. At first, another person should stand on the operated side.
Starting position: Stand inside the walker frame with elbows slightly bent, trunk upright, both feet in a natural alignment, and weight distributed through the hands and feet.
- Move the walker one short step forward and make sure it is stable.
- Advance the operated leg without rotating it, bringing it into the middle of the frame, and place the heel down gently.
- Bring the unaffected leg forward without stepping too far beyond the walker frame.
- Take several small steps to turn; never pivot on a planted foot.
- To sit, step back until you feel the chair, move your hands to the armrests, and lower yourself slowly.
Range, side, and restrictions: Keep steps short enough for the pelvis to stay level. Follow the exact weight-bearing status and any rotation or flexion restrictions on your discharge sheet.
Breathing, speed, and rhythm: Breathe freely and keep the unhurried rhythm “walker, operated leg, unaffected leg.”
Documented dose: The Mass General protocol emphasises frequent short walks and gradual increases in distance according to tolerance; it does not prescribe one daily dose for everyone. Your physiotherapy plan determines the number of sessions.
Rest: Sit down before pain changes into a limp. Begin the next session only after breathing and step quality return to baseline.
Signs of correct technique and expected response: An upright trunk, steps of nearly equal length, and toes facing forward. Mild thigh or gluteal fatigue is expected.
Stop immediately if: you develop dizziness, leg buckling, sharp pain, a sensation that the joint has shifted, shortness of breath, or a sudden loss of weight-bearing ability.
Common mistakes: Pushing the walker too far ahead, hanging through the arms, dragging the toes, taking an excessively long step, or twisting on the operated leg.
Easier version/regression: Use a shorter level route, closer supervision, and more rest. If form deteriorates, return to the previous level of support.
Progression criteria and next stage: When you walk without heavy arm support, imbalance, or an obvious limp, the physiotherapist may assess progression to a cane held in the opposite hand.
Expected and adverse responses: Fatigue and a mild rise in pain at the end of a session should settle with rest. A greater limp, pain lasting into the next morning, or increasing swelling means the route or duration was excessive.
Surgical branch: After a lateral approach or abductor repair, active sideways movement of the leg may be restricted. Do not reposition the leg with a sudden sideward movement while walking.
Criteria to advance: Essential routes through the home are completed with the walker and without a near fall, transfers are controlled, and the next-day response is no worse.
↔️ Week 2: gentle movement and greater independence
Goal and entry criteria: Preserve comfortable hip movement within the permitted range, reduce stiffness, and make dressing and getting in and out of bed easier. Enter when the wound is settled and you tolerate short walking sessions.
Daily activity and restrictions: Brief, light tasks at waist height are reasonable. Avoid deep bending, crossing the leg past the midline, or end-range rotation only when these movements are specifically restricted for you; do not force a movement to reach a general target angle.
Exercise for this period
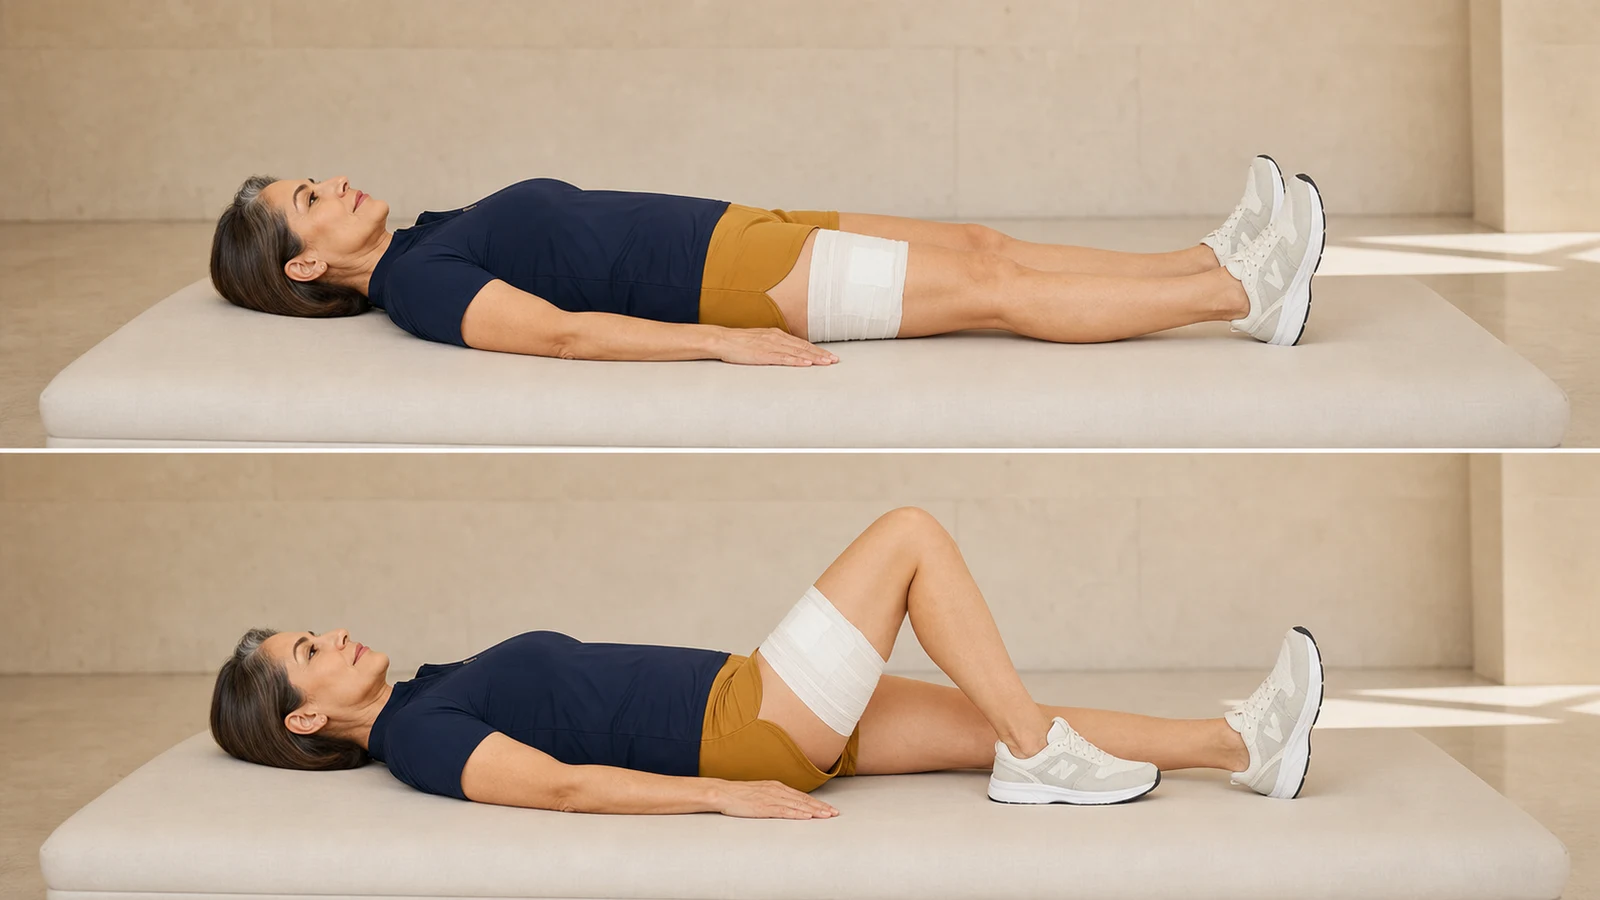
4) Heel slides (Heel Slides)
Controlled bending and straightening of the hip and knee helps reduce stiffness and makes transfers easier without placing body weight through the… sharp pain, painful clicking, catching, a sensation that the joint has shifted, increased…
More detailLess detail
Goal and why it matters: Controlled bending and straightening of the hip and knee helps reduce stiffness and makes transfers easier without placing body weight through the joint.
Stage and starting criteria: When the wound is protected, movement does not cause sharp pain, and the permitted hip-flexion range for your approach is clear. If “anterior precautions” apply to you, early heel slides may be restricted; do not begin until the instruction has been clarified.
Equipment and environmental safety: A flat bed and, if needed, a smooth bag or cloth under the heel. Forceful pulling with a strap is unnecessary.
Starting position: Lie on your back with both legs in the permitted alignment, the operated heel on the surface, and toes pointing to the ceiling.
- Gently engage the gluteal muscles and keep the pelvis still.
- Slowly slide the operated heel towards the buttocks.
- Stop before pain or before crossing your specific restriction.
- Pause briefly, then slowly slide the heel forwards along the same path.
- Finish with the leg relaxed in a neutral alignment.
Range, side, and restrictions: Move only the operated leg and only through a comfortable permitted range. The pelvis should not rotate, and the knee should not fall inward or outward.
Breathing, speed, and rhythm: Exhale as the heel comes closer and inhale as it returns. Keep the movement slow and free of jerks.
Documented dose: AAHKS gives a pattern of 3 sets of 10 heel slides with an approximately 5-second hold. Start with less range and volume, approaching that pattern only if symptoms stay settled.
Rest: Straighten the leg and relax the muscles between sets. End the session if pain does not ease with a short rest.
Signs of correct technique and expected response: The heel slides in a straight line, with a gentle stretch at the front of the thigh or groin that does not persist.
Stop immediately if: sharp pain, painful clicking, catching, a sensation that the joint has shifted, increased wound drainage, or new numbness occurs.
Common mistakes: Pulling into pain, letting the knee fall inward, rotating the toes, lifting the pelvis, or using a jerky motion.
Easier version/regression: Reduce the range and hold, or give gentle support with the unaffected leg without moving out of the permitted alignment.
Progression criteria and next stage: Ten smooth movements without increasing pain or causing a next-day reaction. Then use this range during controlled sitting and standing.
Expected and adverse responses: A gentle stretch and brief fatigue are expected. Deep joint pain, a sense of instability, or a sustained increase in pain and swelling means reducing the range and contacting the treatment team.
Approach-specific branch: If flexion, adduction, or rotation has been restricted for you, the same boundary applies to heel slides and daily tasks; a general number does not replace it.
Criteria to advance: Transfers and sitting are controlled within the permitted range, and exercise is tolerated without an adverse change in the wound, pain, or gait quality.
↔️ Second two weeks
⚖️ Week 3: controlling sitting and standing
Goal and entry criteria: Coordinate the legs and trunk during weight transfer and reduce reliance on the arms. Enter when you can rise safely from a suitable chair without dizziness and with the appropriate walking aid.
Daily activity and restrictions: Prepare a simple meal or do a light task with breaks. Avoid soft, low chairs, letting the knees collapse inward, dropping suddenly into the chair, or standing without support when balance is uncertain.
Exercise for this period
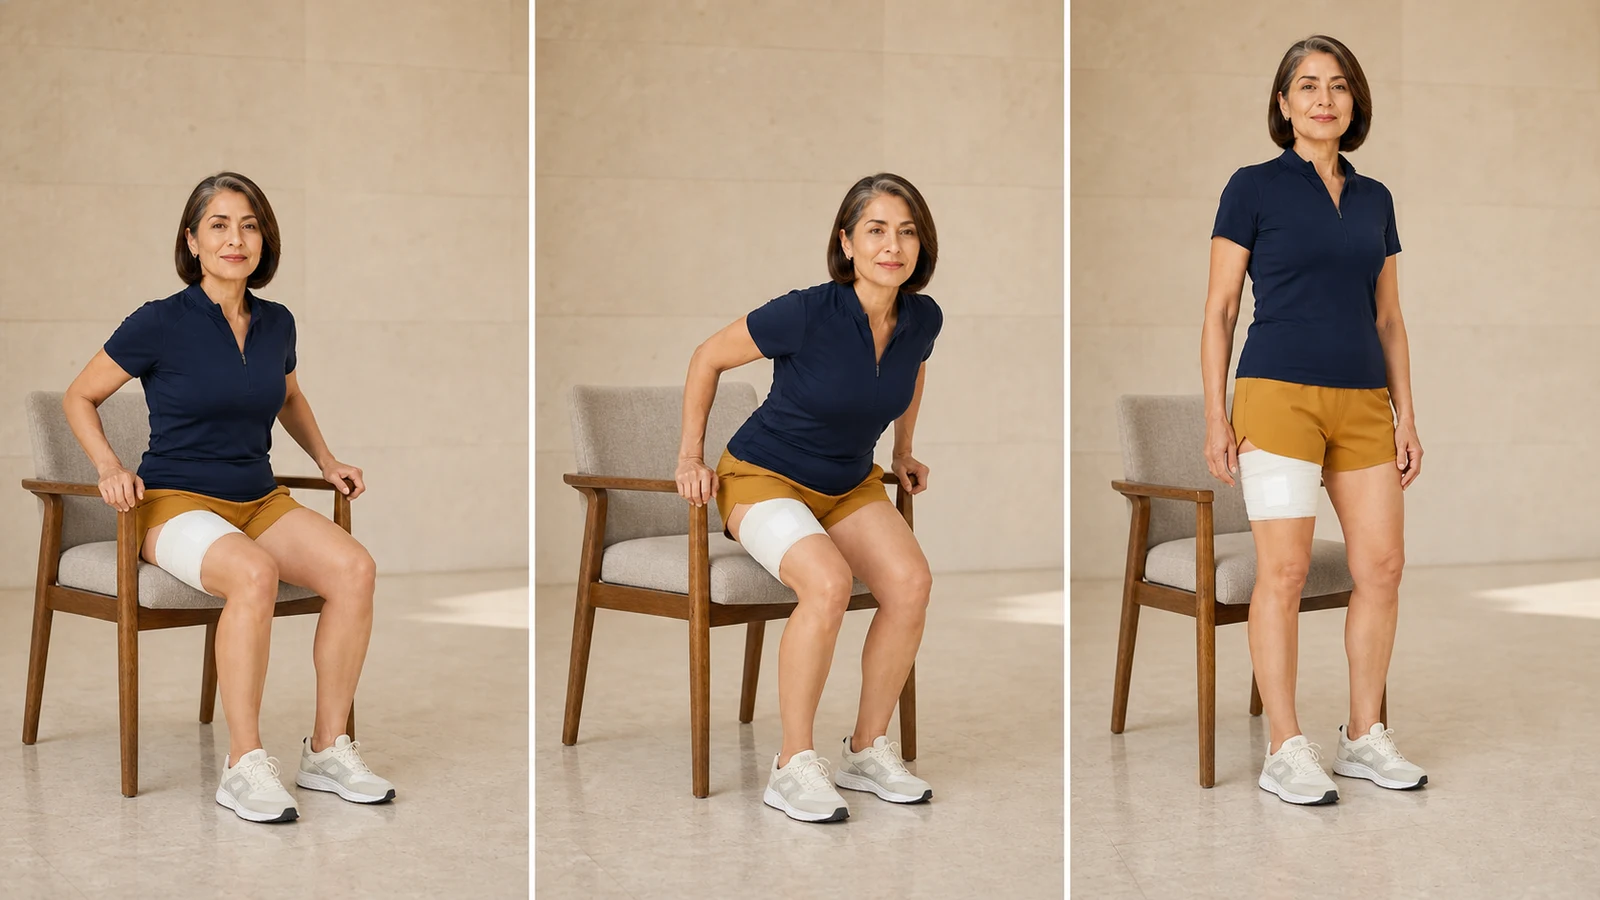
5) Sit to stand (Sit to Stand)
This practical movement improves gluteal and thigh strength and weight-transfer control for the toilet, chair, and bed, while gradually reducing… sharp hip pain, dizziness, leg buckling, loss of balance, or a sensation that the joint…
More detailLess detail
Goal and why it matters: This practical movement improves gluteal and thigh strength and weight-transfer control for the toilet, chair, and bed, while gradually reducing reliance on the arms.
Stage and starting criteria: Once weight bearing is permitted and you can stand at a walker or counter without the leg giving way.
Equipment and environmental safety: A firm, relatively high chair with armrests, placed against a wall; keep the walker in front and another person nearby.
Starting position: Sit near the edge, feet in the permitted alignment and slightly back, the operated foot a little farther forward if needed, trunk upright, and hands on the armrests.
- Move towards the front of the chair and plant both feet.
- Lean the trunk slightly forward from the hips without bending beyond the permitted range.
- Push through the armrests while engaging the gluteal and thigh muscles.
- Once fully upright, move one hand at a time to the walker.
- To sit, step back until you feel the chair, reach for the armrests, and lower yourself slowly.
Range, side, and restrictions: Adjust sitting depth through chair height and your precautions. Keep knees and toes facing forward, and do not let the legs cross the midline.
Breathing, speed, and rhythm: Exhale while standing and inhale while sitting; keep both directions slow and controlled.
Documented dose: The Mass General protocol progresses transfers and sit-to-stand practice according to movement quality and does not specify a fixed dose for everyone. Your physiotherapist should adjust repetitions to chair height and your ability.
Rest: Sit fully after every few repetitions and rest until breathing and form have recovered.
Signs of correct technique and expected response: Weight is shared through both feet, the pelvis stays level, and mild gluteal or thigh fatigue develops.
Stop immediately if: sharp hip pain, dizziness, leg buckling, loss of balance, or a sensation that the joint has shifted occurs.
Common mistakes: Pulling on the walker to stand, dropping into the chair, letting the knees collapse inward, twisting the trunk, or starting from a chair that is too low.
Easier version/regression: Raise the chair, reduce the range, and use more support from the arms or another person.
Progression criteria and next stage: Complete several repetitions with symmetrical weight distribution and no increase in pain or loss of control, then reduce arm support gradually.
Expected and adverse responses: Fatigue in the thigh and gluteal muscles is acceptable. Increasing pain, a greater limp, or a sudden need for more assistance is a sign to regress.
Surgical branch: Chair height and hip flexion must match the precautions for your approach. Some people temporarily need a high chair or raised toilet seat.
Criteria to advance: Sitting and standing are completed without dropping, twisting, or sharp pain, and walking does not deteriorate after exercise.
🌱 Week 4: building an endurance base
Goal and entry criteria: Gently increase endurance and practise cyclical, low-impact movement. Enter when the wound is closed and dry, sitting is comfortable, and a short walk causes no lasting reaction.
Daily activity and restrictions: Increase walking distance or the duration of a light task one at a time. Avoid heavy resistance, outdoor cycling, an incorrectly adjusted saddle, and pedalling through pain or a restriction.
Exercises for this period
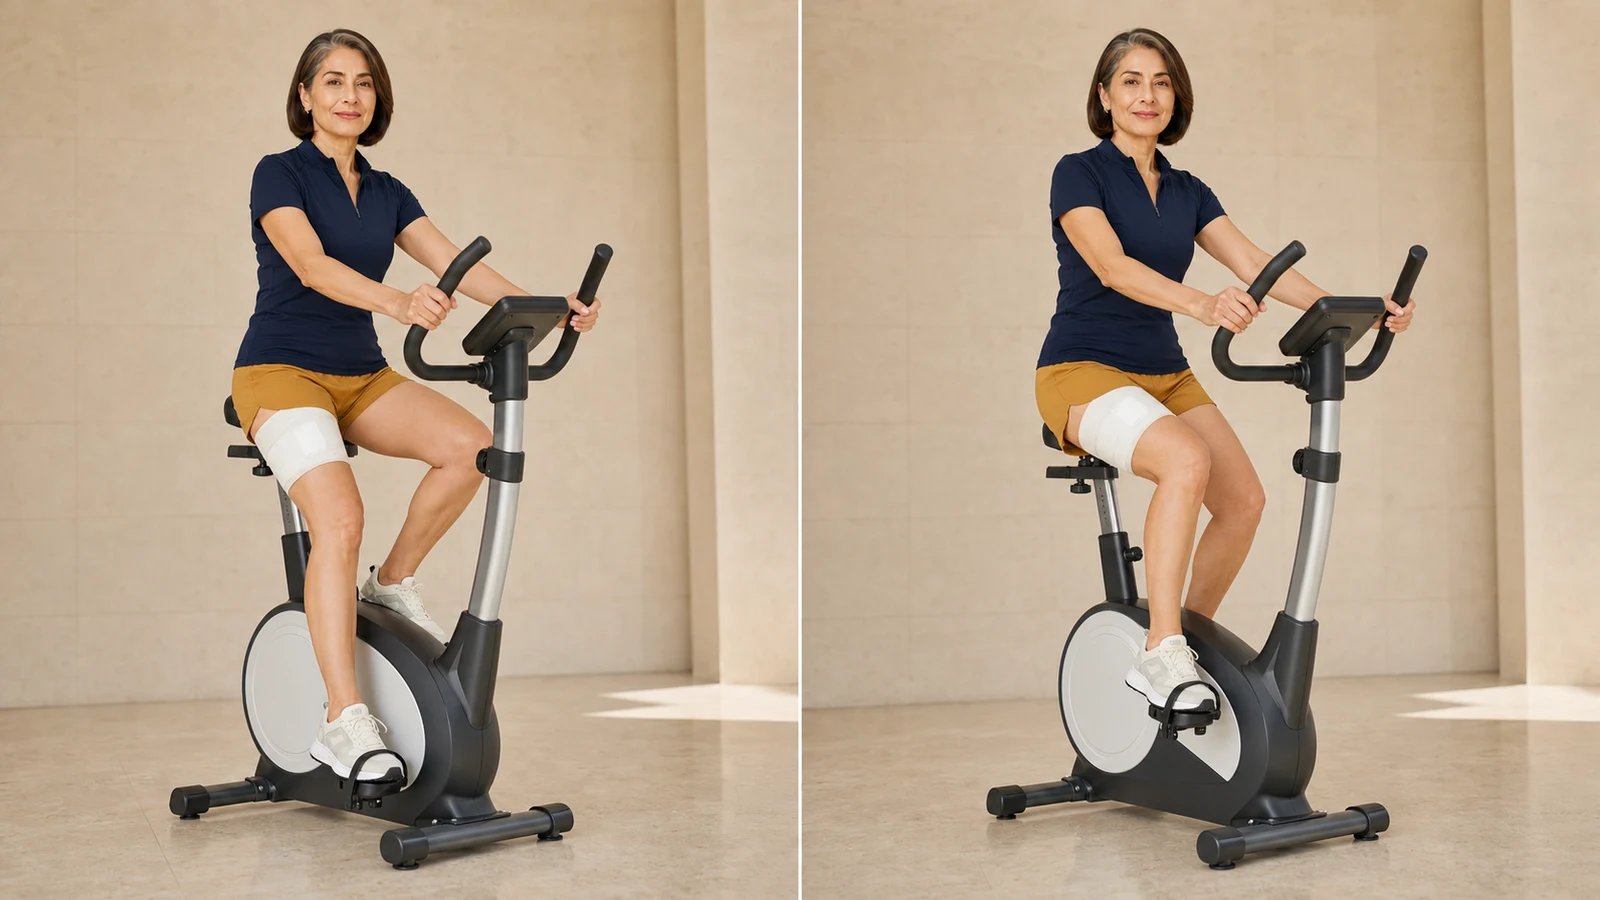
6) Stationary bike (Stationary Bike)
A stationary bike provides repetitive low-impact movement and endurance training and can build confidence in a comfortable range of hip and knee… sharp groin or hip pain, catching, dizziness, a sense of instability, increasing…
More detailLess detail
Goal and why it matters: A stationary bike provides repetitive low-impact movement and endurance training and can build confidence in a comfortable range of hip and knee motion.
Stage and starting criteria: After the wound has closed, the treatment team has given permission, you can mount and dismount safely, and you have enough range to turn the pedals without breaking precautions.
Equipment and environmental safety: A stable stationary bike with a high saddle and resistance near zero, plus another person during the first session. Keep the pedals and floor dry.
Starting position: Set the saddle so the knee remains slightly bent at the bottom of the pedal stroke. Keep the pelvis level on the saddle and toes facing forward.
- Mount from the side and in the manner taught by the treatment team, then place the feet securely on the pedals.
- Begin turning the pedals slowly without resistance.
- If a full revolution is not comfortable, rock the pedals forwards and backwards through the permitted range.
- Pedal evenly for a few minutes while keeping the pelvis level.
- Before dismounting, slow down, steady the pedals, and use a support.
Range, side, and restrictions: The pelvis should not rock on the saddle or reach prohibited flexion or rotation. Add resistance only after duration is well controlled.
Breathing, speed, and rhythm: Breathe freely and use a slow, even cadence. Do not kick through a difficult point.
Documented dose: AAHKS suggests starting at about 5 minutes and gradually adding 5 minutes over the following several weeks until approximately 20 minutes is tolerated before resistance is added. Increase only when symptoms remain settled that day and the next.
Rest: Wait between sessions until pain, breathing, and walking have returned to baseline.
Signs of correct technique and expected response: A level pelvis, smooth pedal stroke, and mild muscle fatigue without a limp after dismounting.
Stop immediately if: sharp groin or hip pain, catching, dizziness, a sense of instability, increasing swelling, or clearly worse walking occurs.
Common mistakes: A low saddle, adding resistance too soon, rocking the pelvis, turning the toes, or pedalling quickly to force past a restriction.
Easier version/regression: With your physiotherapist’s guidance, raise the saddle, shorten the session, or use only short forward-and-backward arcs without a full revolution.
Progression criteria and next stage: Complete revolutions and the baseline duration without reactive pain, swelling, or limping. Increase time first and then a small amount of resistance, one variable at each stage.
Expected and adverse responses: Brief fatigue and a gentle stretch are expected. Persistent pain, increased limping, or swelling that does not settle by the next morning means the volume was too high.
Surgical branch: If mounting the bike or completing a revolution conflicts with your approach-specific precautions, postpone cycling and continue short, controlled walks.
Criteria for entering month 2: The wound is settled, basic tasks and routes through the home are safe, the appropriate walking aid is being used, and month-1 exercises are tolerated without a meaningful reaction lasting into the next day.
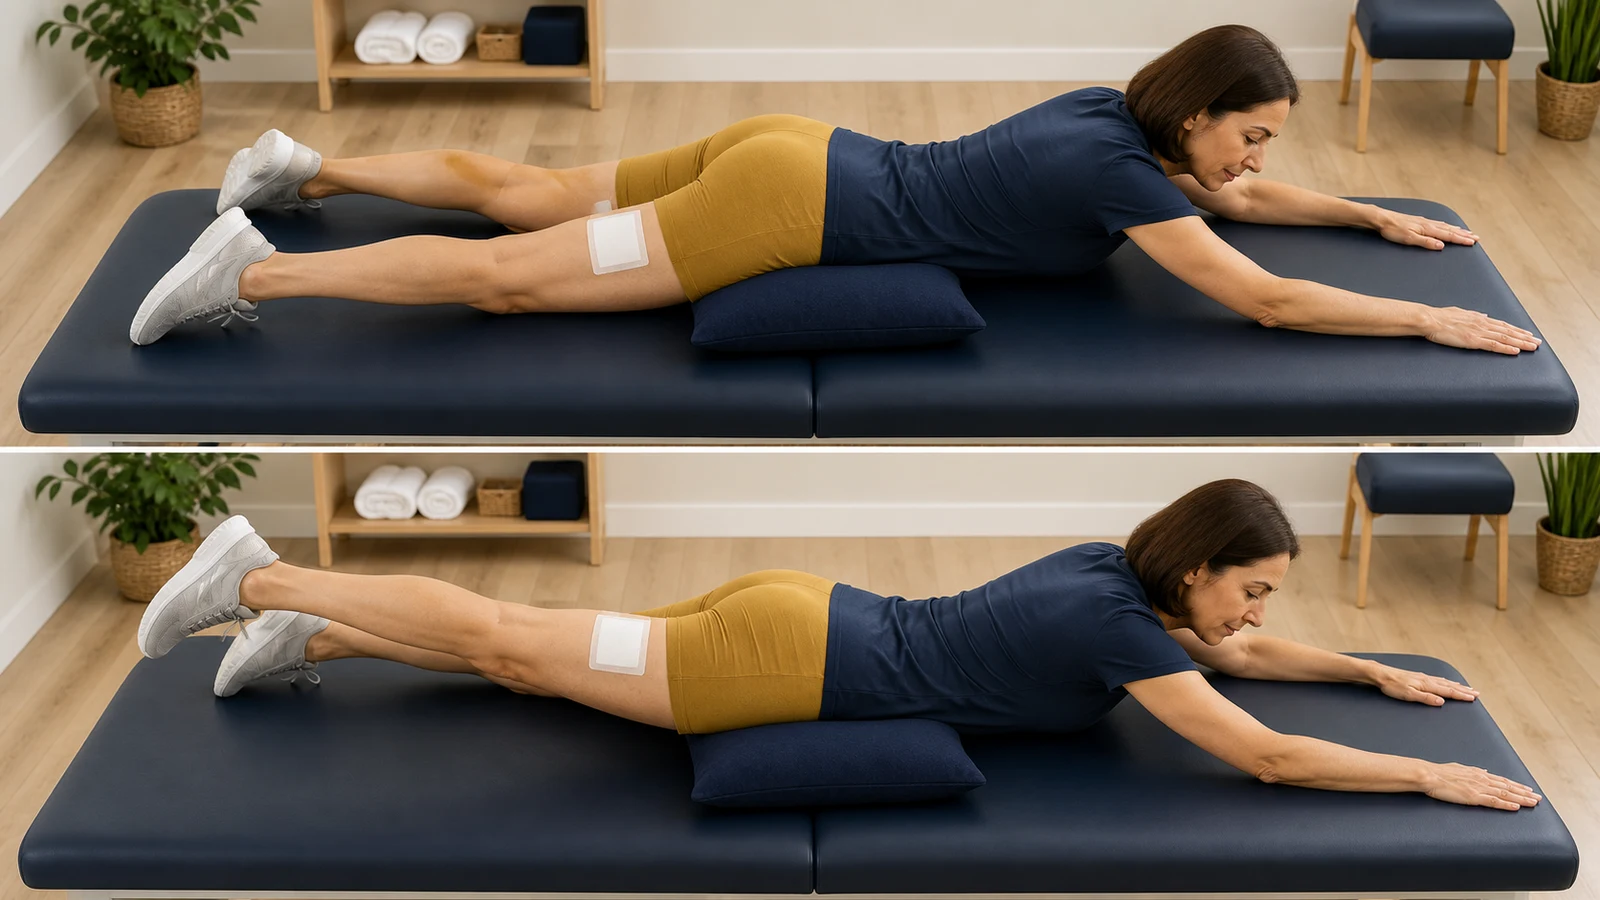
7) Prone Hip Extension (Prone Hip Extension)
Strengthens the buttock and back-of-thigh muscles that steady the hip when you stand and walk. 10 repetitions, twice a day. Back pain, sharp groin pain, or a feeling of instability in the hip.
More detailLess detail
Goal and why it matters: Strengthens the buttock and back-of-thigh muscles that steady the hip when you stand and walk.
Stage and starting criteria: From week four, if lying face down is comfortable and the wound is closed. If lying on your front still hurts, postpone this one and tell your care team.
Equipment and environmental safety: A firm bed or mat and a thin pillow under the hips; keep the floor clear so getting up from lying face down is safe.
Starting position: Face down, a thin pillow under the hips, both legs in their natural line and toes pointing down; head and neck relaxed.
- Gently tighten the buttock on the operated side so the pelvis is set before anything moves.
- Keep the knee straight and lift the operated leg only a few centimetres off the bed.
- Hold there for one or two seconds without arching the back or letting the pelvis rotate.
- Lower the leg slowly and under control.
- Let the muscles release completely before the next repetition.
Range, side, and restrictions: Only the operated leg, and only as high as the pelvis can stay on the bed; the leg does not cross the midline and does not rotate inward. Lifting higher moves the work from the buttock to the lower back.
Breathing, speed, and rhythm: Breathe out as the leg lifts and in as it lowers; never hold your breath and never swing the leg up.
Documented dose: 10 repetitions, twice a day.
Rest: Take a few slow breaths between sets and let the buttock release; if the lower back starts to grip, end the session there.
Signs of correct technique and expected response: You feel the work in the buttock and back of the thigh, not in the lower back, and the pelvis stays flat on the bed throughout.
Stop immediately if: Back pain, sharp groin pain, or a feeling of instability in the hip.
Common mistakes: Arching the back to lift higher, bending the knee, twisting the pelvis to one side, and lifting the shoulders at the same time.
Easier version/regression: Reduce the lift to a couple of centimetres, or simply tighten the buttock without lifting at all until lying face down feels easier.
Progression criteria and next stage: Ten smooth repetitions with no back pain and no next-day reaction; then lengthen the hold rather than raising the leg higher.
Expected and adverse responses: Mild buttock fatigue is expected; back pain, groin pain or a sense of the joint shifting is not — stop and raise it with your care team.
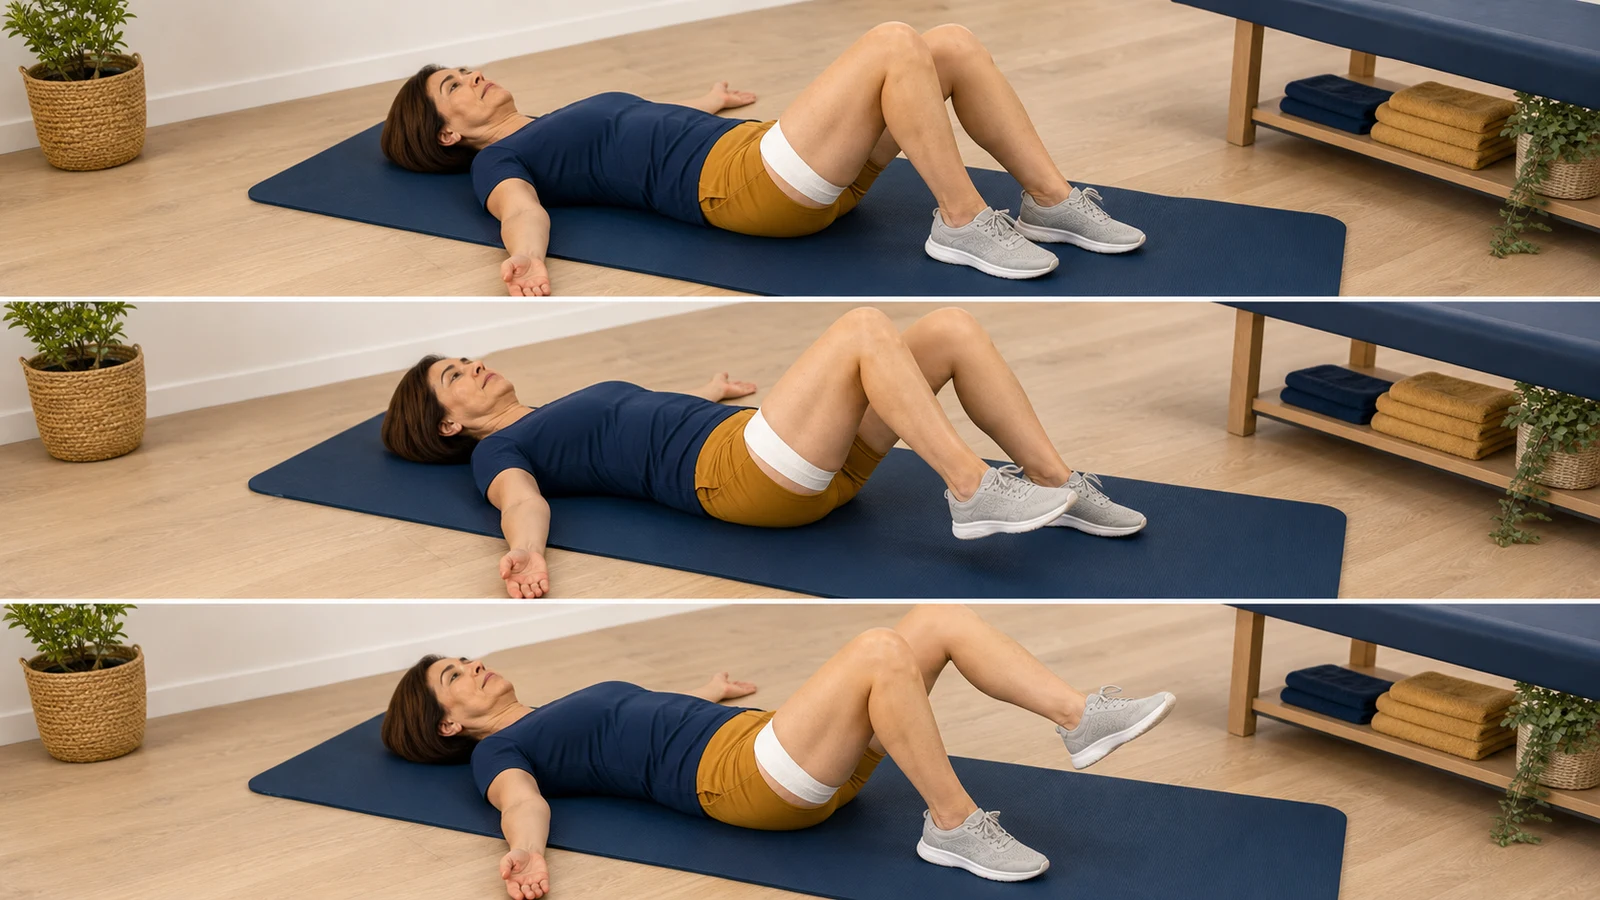
8) Supine Marching (Supine Marching)
Retrains the stepping pattern and wakes the front-of-thigh muscles without any weight through the joint. 10 repetitions each leg, twice a day. If lifting the leg forces the hip past its permitted angle, or you feel a clunk or sudden…
More detailLess detail
Goal and why it matters: Retrains the stepping pattern and wakes the front-of-thigh muscles without any weight through the joint.
Stage and starting criteria: From week four, strictly within your hip flexion limit. If a specific restriction was written for you, that is the limit — not a general number.
Equipment and environmental safety: A flat bed or mat; if lifting is hard, rest your hands beside you and use them only for steadiness.
Starting position: On your back, knees bent, both feet flat, feet hip-width apart and the lower back in its natural position.
- Engage the abdominal muscles very gently so the pelvis cannot twist as you move.
- Lift one foot slightly, keeping the knee no higher than hip level.
- Pause for a moment, then lower the foot along the same path.
- Settle both feet fully on the bed before starting the other leg.
- Repeat with the other leg, keeping the rhythm even.
Range, side, and restrictions: The knee never rises above hip level and the thigh never crosses the midline; if lifting forces more hip flexion, reduce the range rather than the restriction.
Breathing, speed, and rhythm: Breathe out as the foot lifts and in as it lowers; keep the pace slow and deliberate.
Documented dose: 10 repetitions each leg, twice a day.
Rest: Between sets, let both feet rest on the bed until the pull at the front of the thigh settles.
Signs of correct technique and expected response: The leg lifts lightly without help from your hands and the pelvis stays level as you change sides; you feel a mild pull at the front of the thigh.
Stop immediately if: If lifting the leg forces the hip past its permitted angle, or you feel a clunk or sudden pain.
Common mistakes: Drawing the knee up towards the chest, letting the pelvis tip to one side, holding the breath, and pulling the thigh up with a hand.
Easier version/regression: Slide the heel a few centimetres instead of lifting, or halve the range so the pelvis stays completely still.
Progression criteria and next stage: Ten repetitions per leg with a level pelvis and no next-day reaction; then carry the same pattern into standing with support.
Expected and adverse responses: Brief fatigue at the front of the thigh is expected; groin pain, a painful clunk or a catching sensation means stop and contact your care team.
🌱 Days 31 to 60: foundational strength and high-quality walking
Goal: Strengthen the hip and thigh muscles, improve gait symmetry, control a low step, and gradually gain independence in daily tasks.
Entry criteria: The wound is closed and settled, pain and swelling are trending down, transfers are safe, and month-1 exercises do not cause meaningful pain or limping that lasts into the next day.
Restrictions and daily activity: Keep using a walking aid until the limp has resolved, and increase walking distance or standing time gradually. Heavy lifting, high steps, rapid twisting, running, and any combination prohibited for your surgical approach are still not allowed.
Approach- and repair-specific branch: After a posterior approach, deep flexion combined with adduction and internal rotation is avoided only if it is prohibited in your instructions. After an anterior approach, end-range extension with external rotation may be limited. After a lateral approach, abductor repair, or trochanteric repair, active abduction and bridging may begin later. Research reviews do not conclusively support identical routine precautions for everyone; your operation report and individual instructions are decisive.
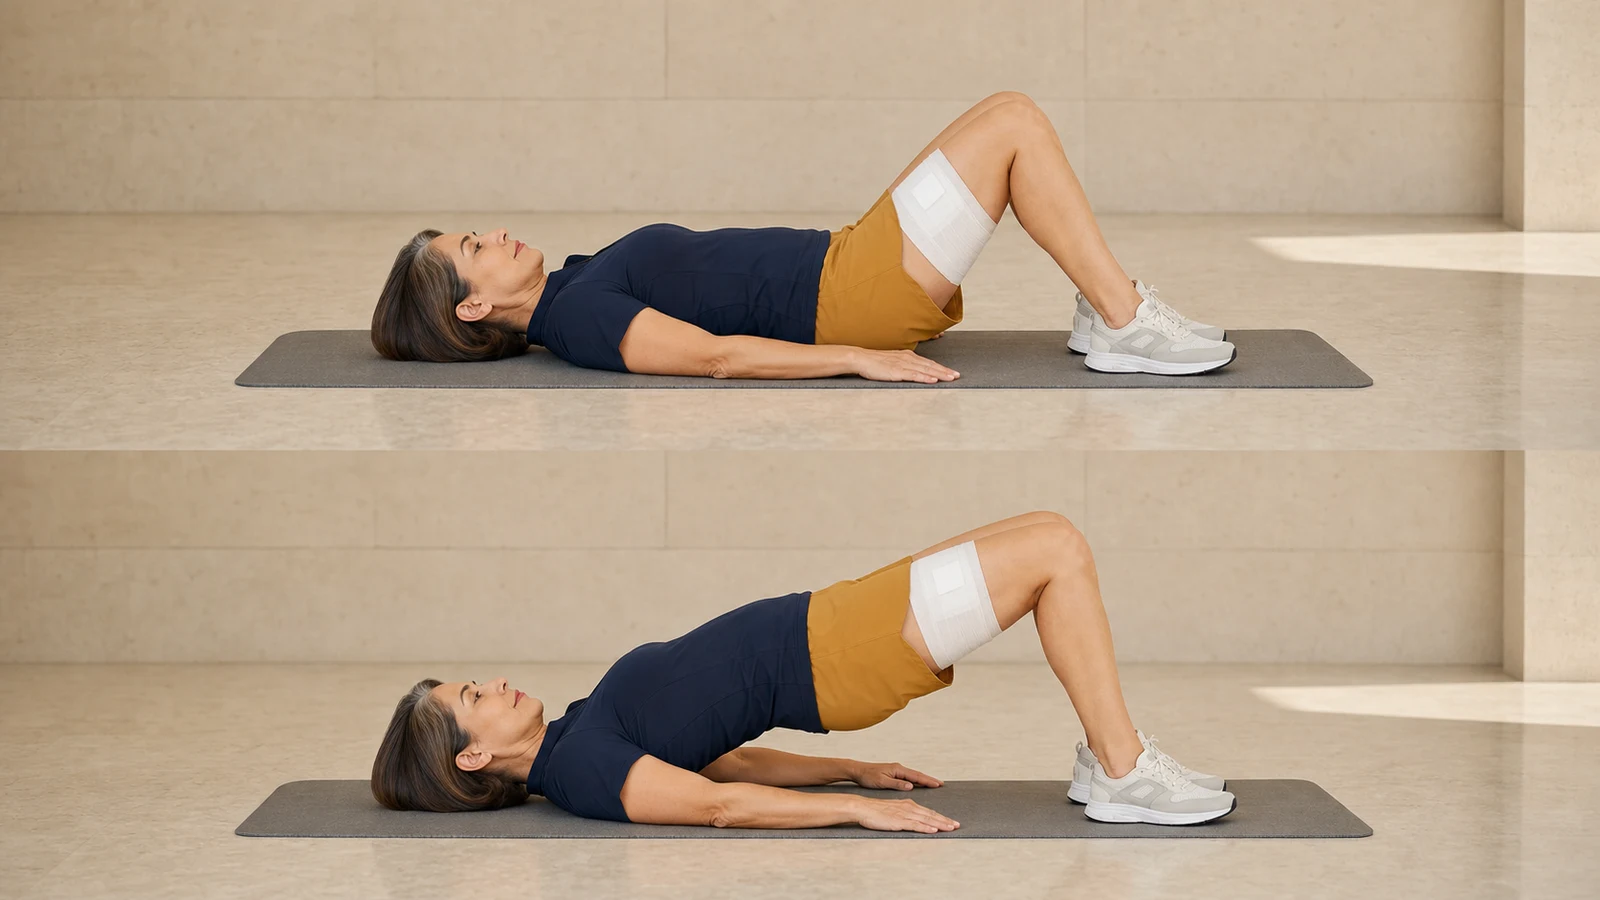
9) Double-leg bridge (Double-Leg Bridge)
Bridging activates the gluteal and hamstring muscles for pelvic stability, standing, and walking while sharing the load between both legs. sharp pain in the groin, side of the hip, or back; persistent cramping; a sensation that…
More detailLess detail
Goal and why it matters: Bridging activates the gluteal and hamstring muscles for pelvic stability, standing, and walking while sharing the load between both legs.
Stage and starting criteria: After your physiotherapist permits it, the wound has closed, lying on your back is comfortable, and you can bend the knees without crossing an approach-specific limit. It may be delayed after an abductor or trochanteric repair. With a direct anterior approach, a full bridge may be restricted; clarify the permitted range before starting.
Equipment and environmental safety: A firm bed or nonslip exercise mat. Ask for help getting to and from the floor, or perform the exercise on a suitable bed.
Starting position: Lie on your back with the knees bent through the permitted range, feet hip-width apart, toes forward, and arms beside the body.
- Gently engage the abdominal and gluteal muscles.
- Press evenly through both heels.
- Lift the pelvis only until the trunk and thighs form a comfortable line.
- Pause briefly without rotation or dropping one side.
- Lower the pelvis slowly, one segment at a time, and relax the muscles.
Range, side, and restrictions: Keep weight symmetrical. Do not overarch the lower back or move into prohibited end-range hip extension, and do not let the knees cross the midline.
Breathing, speed, and rhythm: Exhale while rising and inhale while lowering; control both directions.
Documented dose: The AAHKS guide suggests 3 sets of 10 bridges with an approximately 5-second hold. Begin with less volume and approach that pattern only while maintaining good form.
Rest: Rest between sets until gluteal or hamstring cramping has settled and breathing is normal; the source does not prescribe a fixed rest time.
Signs of correct technique and expected response: Equal pressure through both feet, a level pelvis, and mild gluteal fatigue. The lower back should not carry most of the effort.
Stop immediately if: sharp pain in the groin, side of the hip, or back; persistent cramping; a sensation that the joint has shifted; or increased pain and limping after exercise occurs.
Common mistakes: Lifting too high, pushing more through the unaffected leg, letting the knees collapse inward, holding the breath, or driving the movement from the lower back.
Easier version/regression: Perform a gluteal set only, or lift the pelvis just a few centimetres and reduce the repetitions.
Progression criteria and next stage: Complete the sets with a level pelvis and no pain or gait reaction lasting into the next day. Then, with your physiotherapist’s guidance, lengthen the hold or progress to standing work.
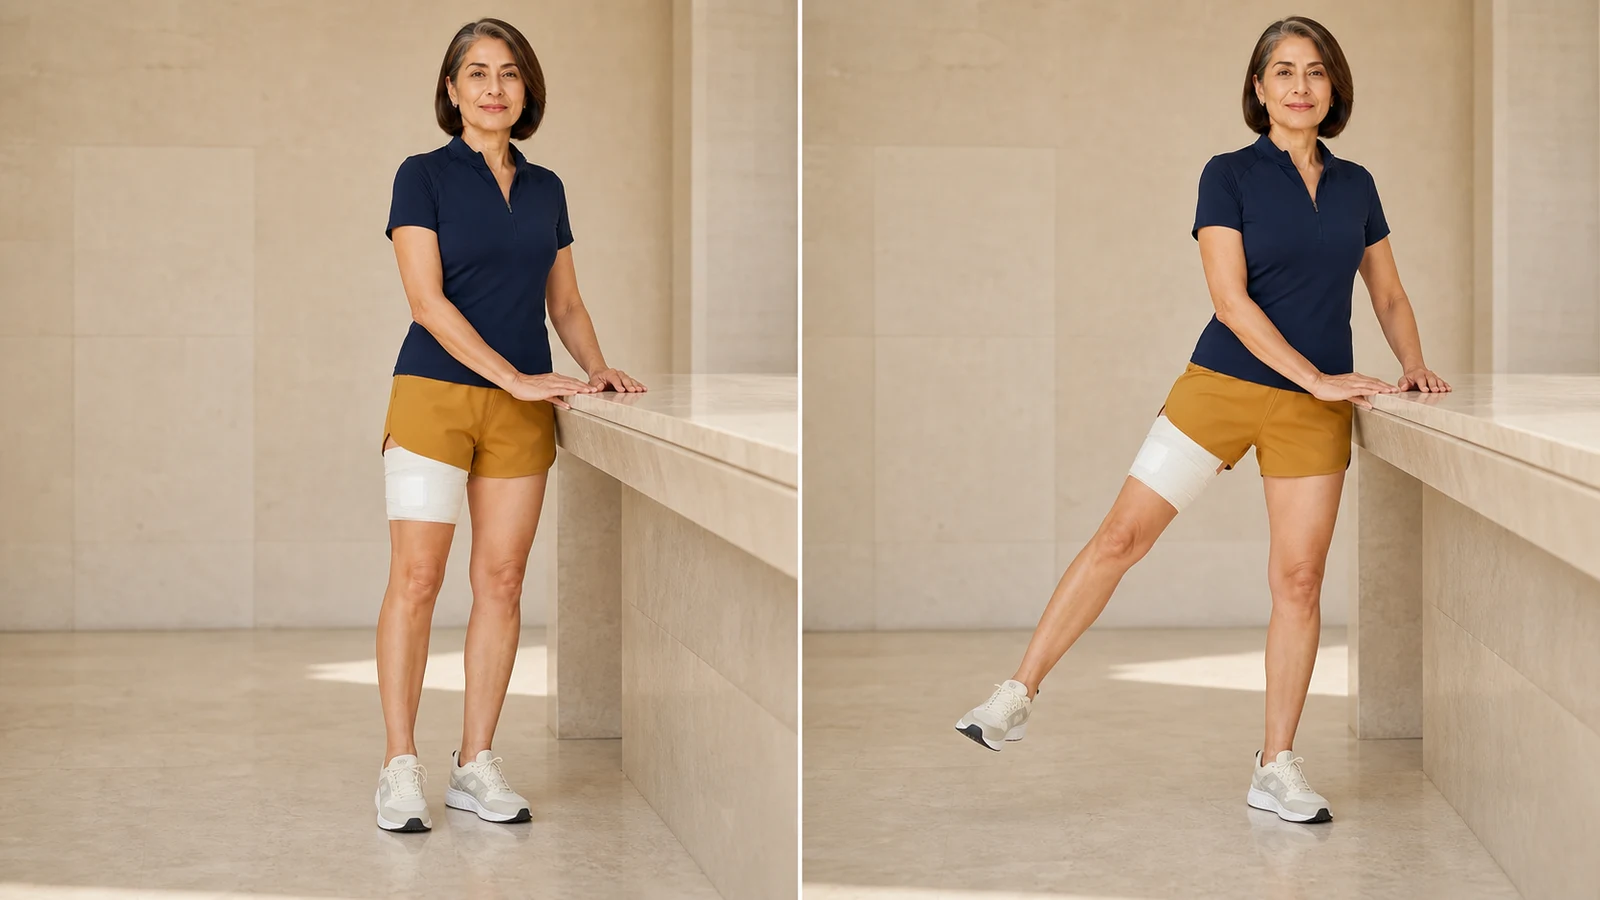
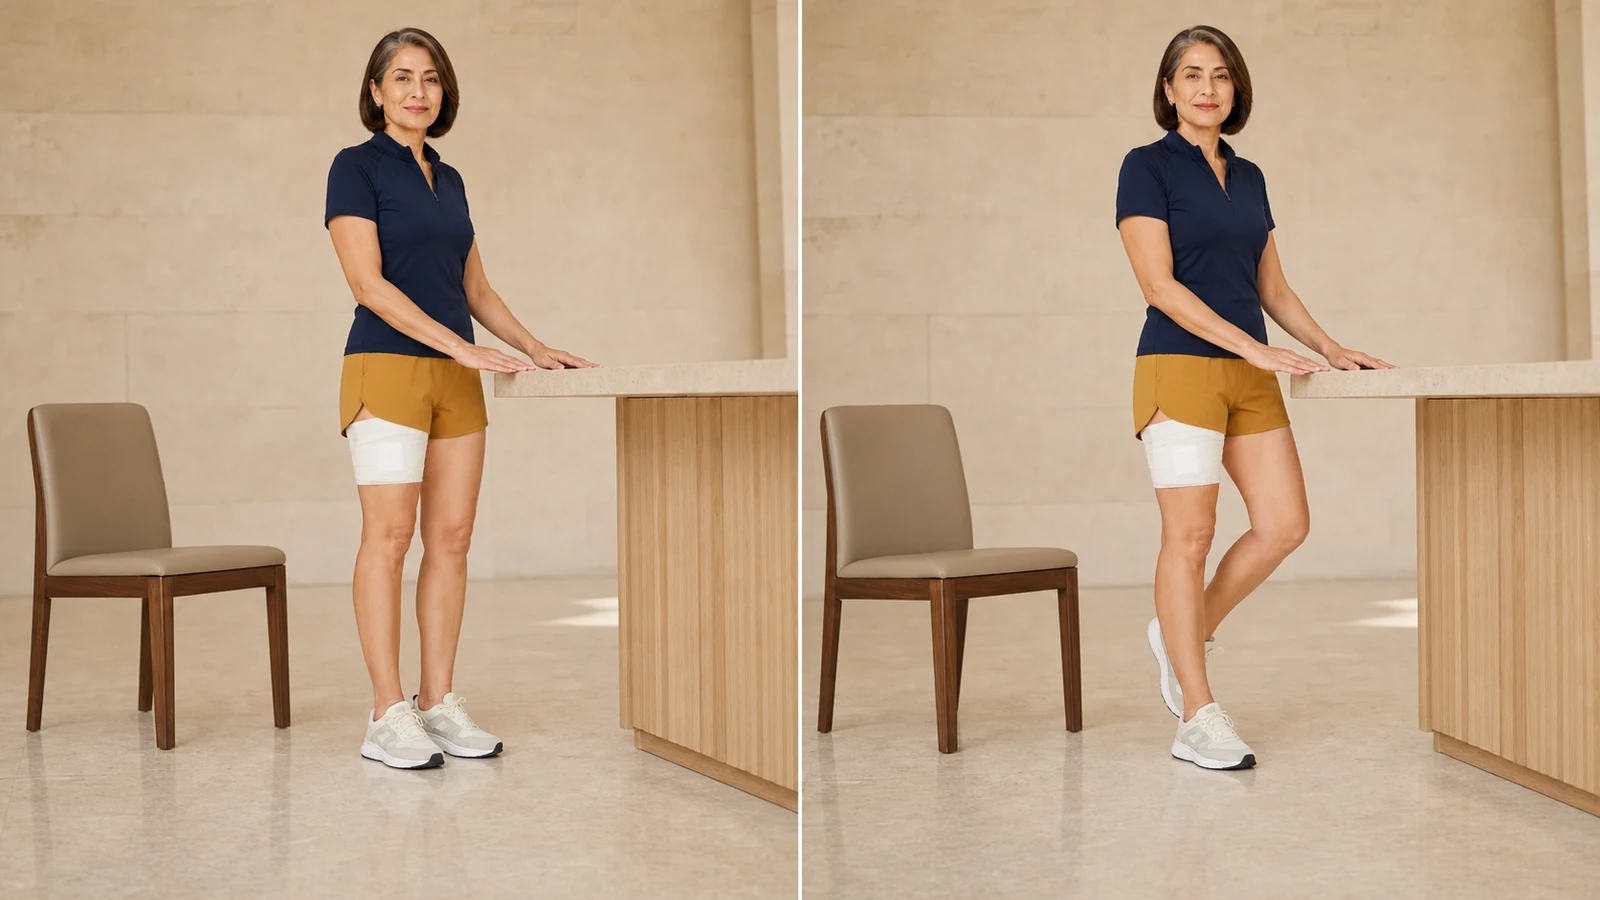
10) Standing hip abduction (Standing Hip Abduction)
Strengthening the muscles at the side of the hip helps keep the pelvis level over one leg and reduces pelvic drop and limping during walking. sharp lateral hip or groin pain, loss of balance, a sensation that the joint has shifted,…
More detailLess detail
Goal and why it matters: Strengthening the muscles at the side of the hip helps keep the pelvis level over one leg and reduces pelvic drop and limping during walking.
Stage and starting criteria: Only after the treatment team has specifically cleared the exercise and supported standing is safe. Following a lateral approach, abductor repair, or trochanteric repair, this movement may be prohibited or permitted later.
Equipment and environmental safety: A fixed counter or the back of a heavy chair, closed shoes, and a level surface. Keep the support within reach throughout.
Starting position: Stand tall with weight on the unaffected leg, both toes facing forward, the supporting knee slightly soft, and hands on the support.
- Gently engage the abdominal and gluteal muscles and keep the pelvis level.
- Move the operated leg a few centimetres out to the side with the knee straight.
- Keep the trunk upright and toes pointing forward.
- Pause briefly within the controlled range.
- Slowly return the foot beside the other one without striking the floor or crossing the midline.
Range, side, and restrictions: Use a small range without leaning the trunk. Add band resistance only after permission, and any restriction on active abduction overrides this exercise.
Breathing, speed, and rhythm: Exhale as the leg moves out and inhale as it returns. Keep the movement even and slow.
Documented dose: AAHKS describes 3 sets of 10 standing hip-abduction repetitions with an approximately 5-second hold. The side, volume, and starting time must be confirmed for your approach.
Rest: Return to standing on two feet between sets and wait until shaking or fatigue at the side of the hip has settled.
Signs of correct technique and expected response: The trunk stays nearly still and the pelvis level. Mild muscle work is felt at the side of the buttock, not sharp pain over the wound.
Stop immediately if: sharp lateral hip or groin pain, loss of balance, a sensation that the joint has shifted, increased limping, or inability to control the returning leg occurs.
Common mistakes: Leaning the trunk, turning the toes outward, swinging the leg, using too much range, or releasing the support.
Easier version/regression: Practise two-leg weight shifts or a shorter movement without fully lifting the foot. Omit this exercise if the repair imposes a restriction.
Progression criteria and next stage: Complete repetitions without trunk lean or a next-day reaction. Add light resistance or progress to single-leg control only with your physiotherapist’s guidance.
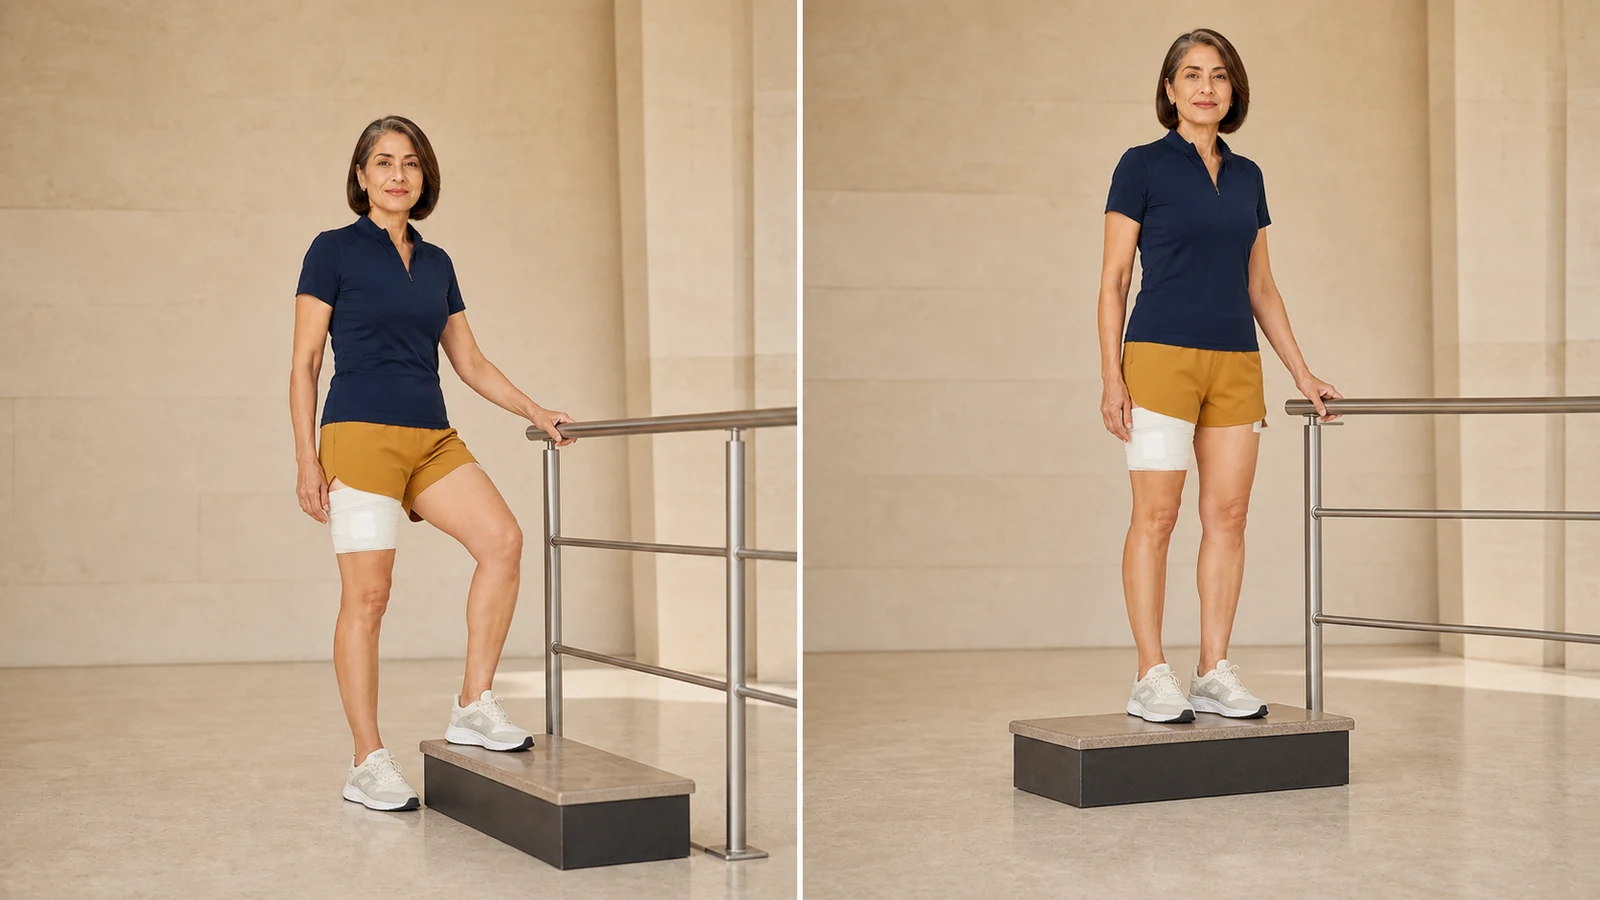
11) Low step-up (Low Step-Up)
A step-up builds functional gluteal and thigh strength and weight-transfer control for household stairs and a low kerb. the leg gives way, you lose balance, sharp hip or knee pain occurs, you have to haul on…
More detailLess detail
Goal and why it matters: A step-up builds functional gluteal and thigh strength and weight-transfer control for household stairs and a low kerb.
Stage and starting criteria: When walking on a level surface shows no obvious pelvic drop, full or prescribed weight bearing is permitted, and the physiotherapist has chosen an appropriate step height.
Equipment and environmental safety: A stable low step, handrail or counter, closed shoes, and another person nearby. Do not use an unstable stool.
Starting position: Face the step with the operated foot on it, the unaffected foot on the floor, pelvis level, and one or both hands on the support.
- Place the whole operated foot on the step.
- Lean the trunk slightly forward and engage the gluteal and thigh muscles of that leg.
- Push up in a controlled way until both feet are on the step.
- To return, use the rail and gently place the unaffected foot on the floor.
- Control the weight, then bring the operated foot down.
Range, side, and restrictions: Keep the step low and the knee aligned over the toes. Do not twist on a planted foot or pull yourself up mainly with the arms.
Breathing, speed, and rhythm: Exhale while stepping up and inhale while stepping down. Make the lowering phase slower than the rise.
Documented dose: The Mass General protocol introduces step-ups in the 3-to-6-week strengthening phase according to movement quality but does not prescribe one set-and-repetition dose for everyone. Your physiotherapist should set the dose.
Rest: Between rounds, stand on both feet on level ground or sit until shaking and fatigue have settled.
Signs of correct technique and expected response: The pelvis stays level, the knee faces forward, and the main effort is felt in the gluteal and thigh muscles. Mild fatigue is expected.
Stop immediately if: the leg gives way, you lose balance, sharp hip or knee pain occurs, you have to haul on the rail, or limping worsens after exercise.
Common mistakes: Using a high step, pushing mainly from the back leg, letting the knee collapse inward, throwing the trunk, or twisting on the operated leg.
Easier version/regression: Use a lower step, more arm support, or practise weight transfer on level ground without stepping up.
Progression criteria and next stage: Step up and down at the selected height with controlled pelvis and knee and no next-day reaction. Increase either repetitions or height, not both at once.
Expected response: Mild muscle fatigue or soreness that settles with rest. Adverse response: New deep pain, lasting swelling, increased limping, poorer transfer control, or a greater need for the walking aid.
Do not: discard the cane while pelvic drop persists, use heavy resistance, stretch to end range, use a high step, or perform any movement that conflicts with your individual precautions.
Criteria for entering month 3: Transfers and a low step are performed with good control, level-surface gait is more symmetrical, and increasing exercise does not cause clear pain, swelling, or limping by the following morning.
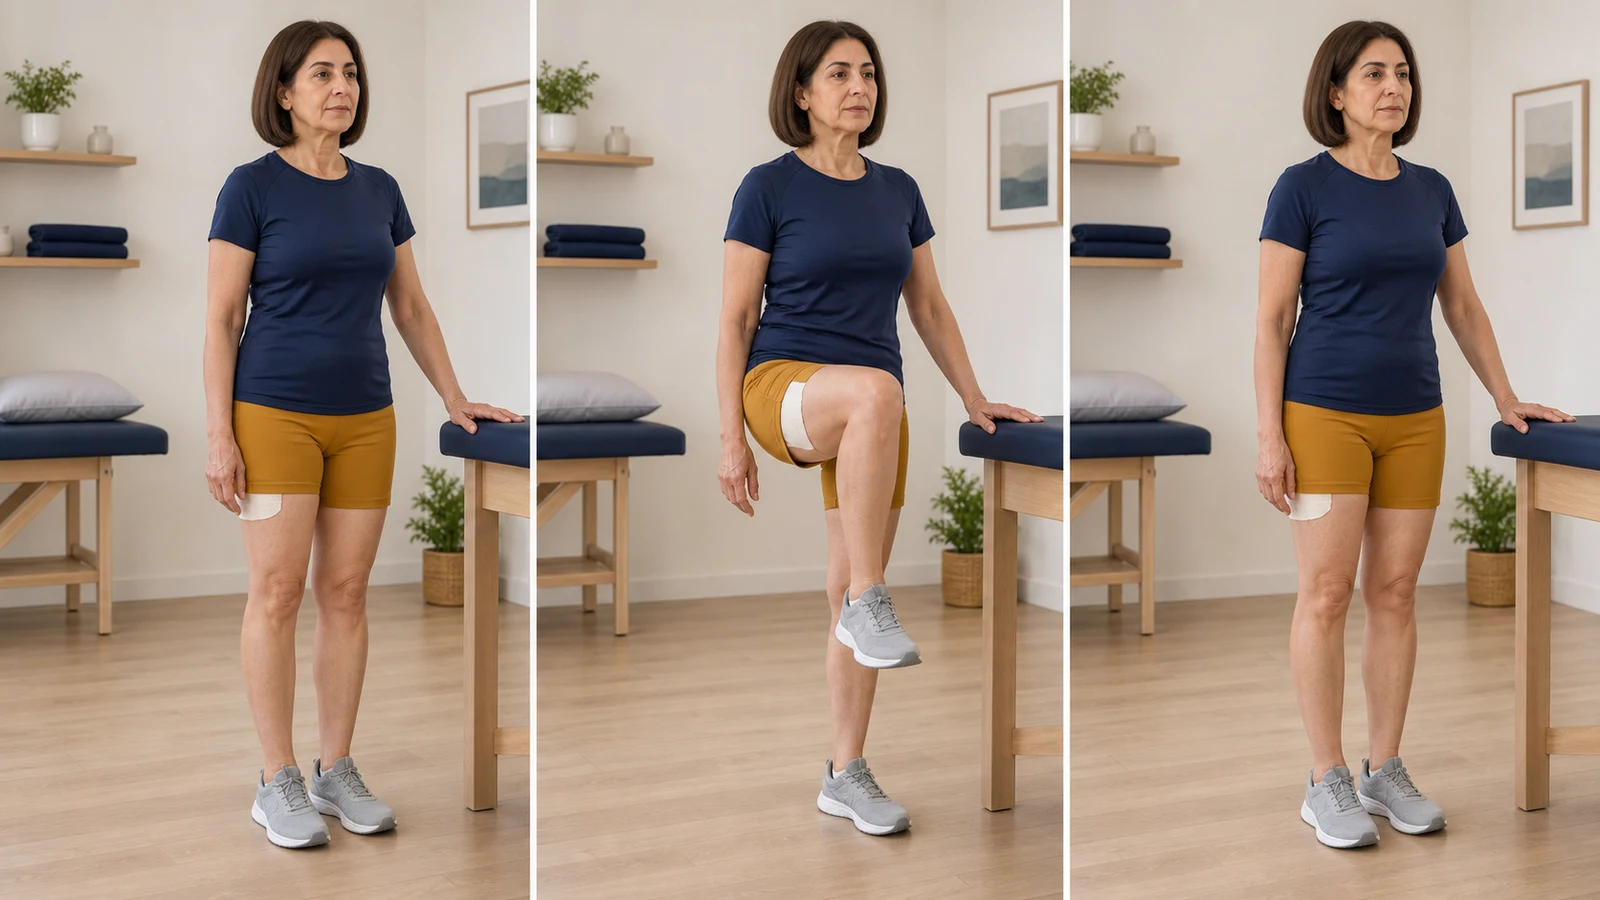
12) Standing Hip Flexion (Standing Hip Flexion)
Builds the hip flexors you need for stairs and for getting into a car. 10 repetitions, twice a day. Groin pain, a catching sensation in the joint, or loss of balance.
More detailLess detail
Goal and why it matters: Builds the hip flexors you need for stairs and for getting into a car.
Stage and starting criteria: From week five, holding a table or the back of a chair, and once standing no longer brings dizziness.
Equipment and environmental safety: A firm table or a stable chair back, closed shoes and a non-slip floor; for the first sessions have someone stand on the operated side.
Starting position: Stand tall, weight through both feet, one hand on the support, shoulders loose and eyes forward.
- Shift your weight gently onto the unoperated leg without letting the pelvis drop to one side.
- Raise the knee on the operated side until the thigh lifts from vertical, without passing your permitted hip angle.
- Pause for a moment at that permitted height, keeping the trunk upright.
- Lower the leg slowly and place the whole foot back on the floor.
- Regain your balance before the next repetition.
Range, side, and restrictions: Only to your permitted hip angle; the thigh does not rotate inward and does not cross the midline. Leaning the trunk back to lift the knee higher is not allowed.
Breathing, speed, and rhythm: Breathe out as the knee rises and in as it lowers; keep the movement measured, never swung.
Documented dose: 10 repetitions, twice a day.
Rest: Between sets, stand on both feet or sit until the fatigue and any tremor in the thigh settle.
Signs of correct technique and expected response: The trunk stays upright, the pelvis stays level, and the effort is felt at the front of the thigh rather than in the lower back.
Stop immediately if: Groin pain, a catching sensation in the joint, or loss of balance.
Common mistakes: Leaning the trunk backwards, lifting past the permitted angle, dropping the pelvis towards the lifted leg, and gripping the support instead of resting a hand on it.
Easier version/regression: Lower the knee height, or hold the support with both hands until balance is secure.
Progression criteria and next stage: Ten repetitions with an upright trunk, a level pelvis and no heavy leaning; then reduce the support to a fingertip rather than raising the knee higher.
Expected and adverse responses: Fatigue at the front of the thigh is expected; groin pain, locking or instability means stop and review it with your care team.
🏋️ Days 61 to 90: balance and single-leg control
Goal: Improve balance, endurance, and pelvic control for stairs, everyday turns, and outdoor environments while keeping activity low impact.
Entry criteria: You can walk on a level surface without an obvious limp, tolerate month-2 exercises, and stand on both feet and shift weight without fear of falling.
Restrictions and daily activity: Increase work or walking time in stages, and use support on uneven ground. Avoid jumping, running, contact sport, rapid turning, and removing the support before control is adequate.
13) Supported single-leg balance (Supported Single-Leg Balance)
Controlled standing on the operated leg trains coordination between the lateral hip and trunk muscles for stepping, dressing, and negotiating uneven… balance is lost, sharp pain, dizziness, leg buckling, clear pelvic drop, or increased…
More detailLess detail
Goal and why it matters: Controlled standing on the operated leg trains coordination between the lateral hip and trunk muscles for stepping, dressing, and negotiating uneven ground.
Stage and starting criteria: Once full weight bearing is permitted and you can transfer weight onto the operated leg for a few seconds without obvious pelvic drop.
Equipment and environmental safety: A firm counter, closed shoes, a level surface, and another person nearby at first. Do not practise beside stairs, loose rugs, or an unstable surface.
Starting position: Stand behind the counter with both hands near the support, feet hip-width apart, the operated knee slightly soft, and gaze forward.
- Shift weight slowly onto the operated leg without leaning the trunk.
- Engage the gluteal muscles and keep the pelvis level.
- Lift the unaffected foot only a few centimetres from the floor.
- Hold only while good form is maintained.
- Gently replace the unaffected foot and return to standing on both feet.
Range, side, and restrictions: The operated leg is the support. Avoid pelvic rotation, locking the knee, or moving the free leg beyond an approach-specific restriction.
Breathing, speed, and rhythm: Breathe normally, shift weight slowly, and finish with control. Do not hold your breath to prolong the time.
Documented dose: The AAHKS guide sets a goal of holding balance for up to about 30 seconds and does not specify a fixed repetition count. Begin with shorter holds and both hands on the support, and progress only with stable form.
Rest: Stand on both feet or sit between repetitions until shaking and fatigue have settled.
Signs of correct technique and expected response: The pelvis and shoulders remain nearly level, and muscle work is felt at the side of the buttock rather than as joint pain.
Stop immediately if: balance is lost, sharp pain, dizziness, leg buckling, clear pelvic drop, or increased limping occurs.
Common mistakes: Moving away from the support, locking the knee, leaning the trunk, staring continuously at the feet, or lifting the unaffected foot too high.
Easier version/regression: Keep both hands on the counter, leave the toes of the unaffected foot on the floor, or practise weight shifting without lifting the foot.
Progression criteria and next stage: Hold with a level pelvis and less hand contact without a next-day reaction, then practise brief multidirectional taps under supervision.
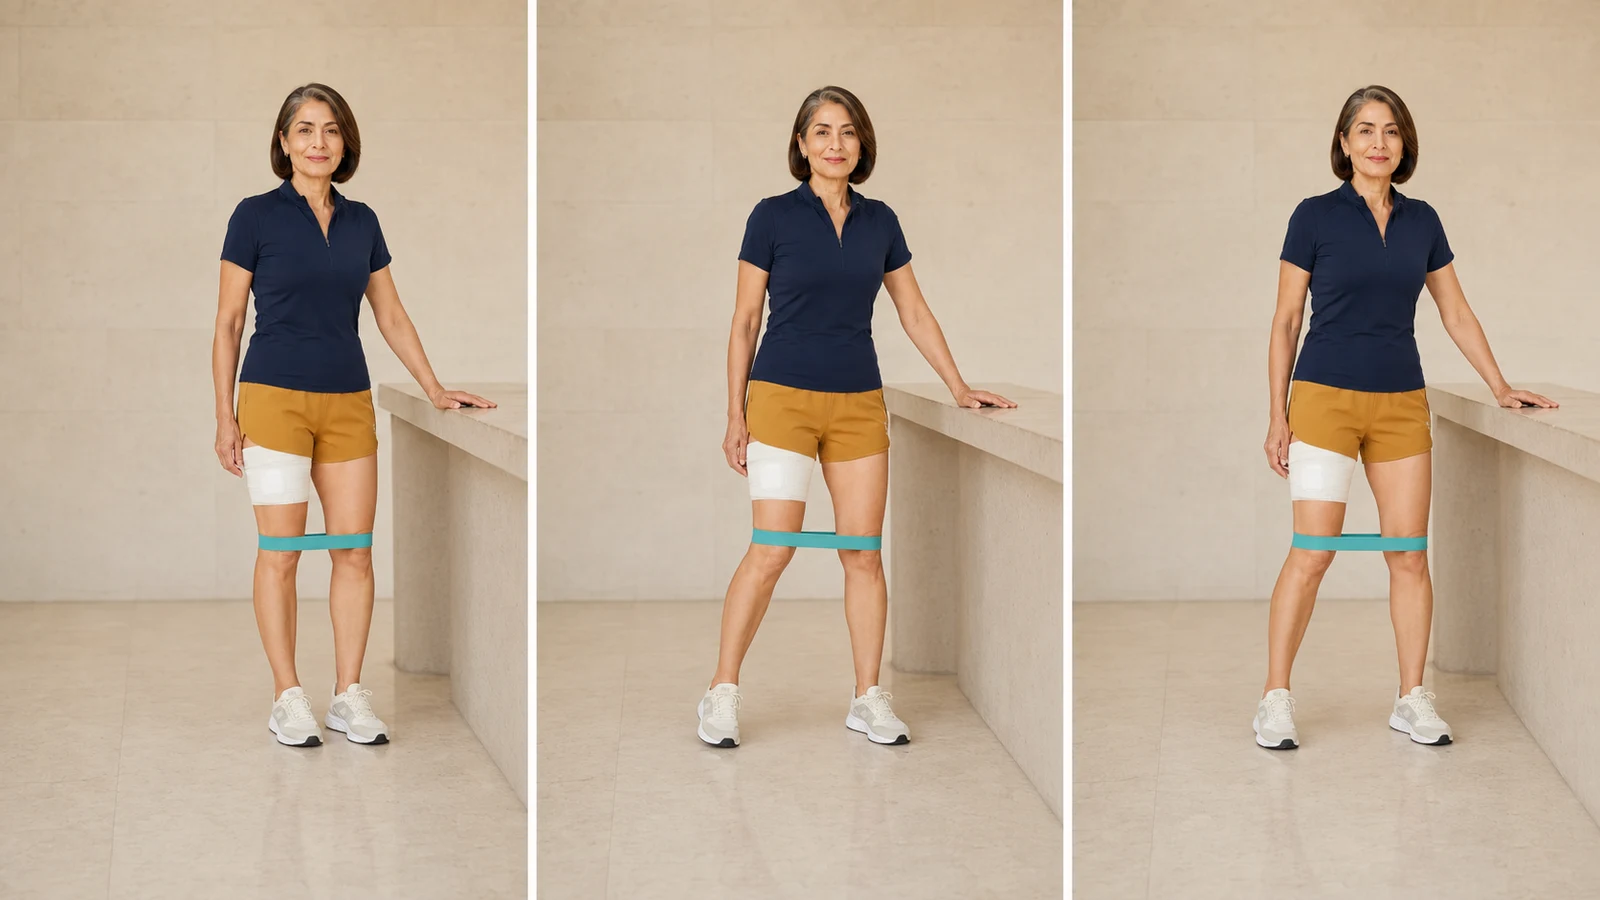
14) Lateral band walk (Lateral Band Walk)
Controlled side steps strengthen the lateral hip muscles for stability during direction changes and help prevent pelvic drop. sharp lateral hip or groin pain, catching, loss of balance, increased limping, or…
More detailLess detail
Goal and why it matters: Controlled side steps strengthen the lateral hip muscles for stability during direction changes and help prevent pelvic drop.
Stage and starting criteria: After your physiotherapist gives permission, standing abduction is painless, and there is no restriction on active abduction. This exercise may begin later after an abductor or trochanteric repair.
Equipment and environmental safety: A light band above the knees or in the prescribed position, a long counter, closed shoes, and a level route. Place the band around the ankles only at a more advanced stage.
Starting position: Stand beside the counter with feet hip-width apart, knees slightly soft, trunk tall, and gentle tension in the band. Keep both toes facing forward.
- Engage the abdominal and gluteal muscles and keep the pelvis level.
- Take a short side step with the leading leg.
- Bring the other foot in under control without letting the feet touch.
- Continue for several short steps in the same direction.
- Reset your posture, then return in the opposite direction with control.
Range, side, and restrictions: Keep steps short without rotating the toes or trunk. Do not cross the feet, drag the trailing foot, or move through a painful range.
Breathing, speed, and rhythm: Breathe freely and complete each step separately and slowly. Do not let the band snap the leg back.
Documented dose: The Mass General protocol introduces lateral band walking in the 6-to-12-week phase according to control and does not prescribe a universal fixed dose. Your physiotherapist should select route length, resistance, and rounds.
Rest: Stand on both feet or sit between passes until form and breathing have fully recovered.
Signs of correct technique and expected response: Even band tension, an upright trunk, and mild fatigue on both sides of the buttocks without limping.
Stop immediately if: sharp lateral hip or groin pain, catching, loss of balance, increased limping, or inability to control the leg occurs.
Common mistakes: Using a band that is too heavy, taking long steps, letting the knees collapse inward, dragging the trailing foot, or swaying the trunk.
Easier version/regression: Remove the band, shorten the step, or continue supported standing abduction.
Progression criteria and next stage: Complete the outward and return paths with toes forward and pelvis level and without reactive pain or limping. Increase either resistance or distance at one time.
15) Controlled step-down (Controlled Step-Down)
This exercise develops eccentric control and strength in the hip and thigh of the operated leg for walking down stairs and slopes. sharp pain, buckling, loss of balance, clear knee or pelvic collapse, or worse walking…
More detailLess detail
Goal and why it matters: This exercise develops eccentric control and strength in the hip and thigh of the operated leg for walking down stairs and slopes.
Stage and starting criteria: Once a low step-up, supported balance, and walking without obvious pelvic drop are controlled and the treatment team has approved starting.
Equipment and environmental safety: A very low stable step, a handrail or counter, closed shoes, and another person nearby. A wet surface or stool is not suitable.
Starting position: Stand with the operated foot on the step, the unaffected foot near the edge ready to touch the floor, pelvis level, and a hand on the rail.
- Engage the gluteal and thigh muscles of the operated leg.
- Move the hips slightly backwards and gently bend the supporting knee.
- Bring the unaffected heel towards the floor or touch it lightly without fully transferring weight.
- Keep the knee in line with the second toe and the pelvis level.
- Press through the operated leg to return to standing on the step.
Range, side, and restrictions: Keep the step height and knee bend small. Do not let the knee collapse inward, rotate the pelvis, or twist the planted operated foot.
Breathing, speed, and rhythm: Inhale while lowering and exhale while returning. Lower slowly without dropping.
Documented dose: The Mass General protocol places step-downs in the 6-to-12-week phase and uses movement-quality criteria, but it does not specify one dose. Choose height and repetitions according to form.
Rest: Stand on both feet after each round and rest until muscle shaking has settled.
Signs of correct technique and expected response: Smooth lowering, a level pelvis, and an aligned knee. Fatigue at the front of the thigh and in the gluteal muscles is expected.
Stop immediately if: sharp pain, buckling, loss of balance, clear knee or pelvic collapse, or worse walking after exercise occurs.
Common mistakes: Using a high step, dropping quickly, pushing too hard on the rail, letting the knee collapse inward, or twisting the trunk.
Easier version/regression: Use a lower step and shorter touch, increase hand support, or return to the step-up.
Progression criteria and next stage: Lower with a steady rhythm and alignment and no next-day reaction, then practise everyday stairs or a short slope under supervision.
Functional branch: If your work involves prolonged standing, stairs, or carrying loads, return to duties gradually with controlled simulation. Exercise in water only after the wound has completely closed and the surgical team has approved it.
Expected response: Muscle fatigue and a gentle stretch that ease with rest. Adverse response: New joint pain, increased limping, reduced stair control, or greater pain and swelling lasting into the next day.
Do not: use an unstable surface without supervision, increase resistance and duration simultaneously, run or jump, or perform any movement prohibited for your surgical approach.
Criteria for entering the longer-term stage: Daily activities and stairs are controlled, increases in exercise cause no lasting reaction, and the chosen low-impact programme has been agreed with the treatment team.
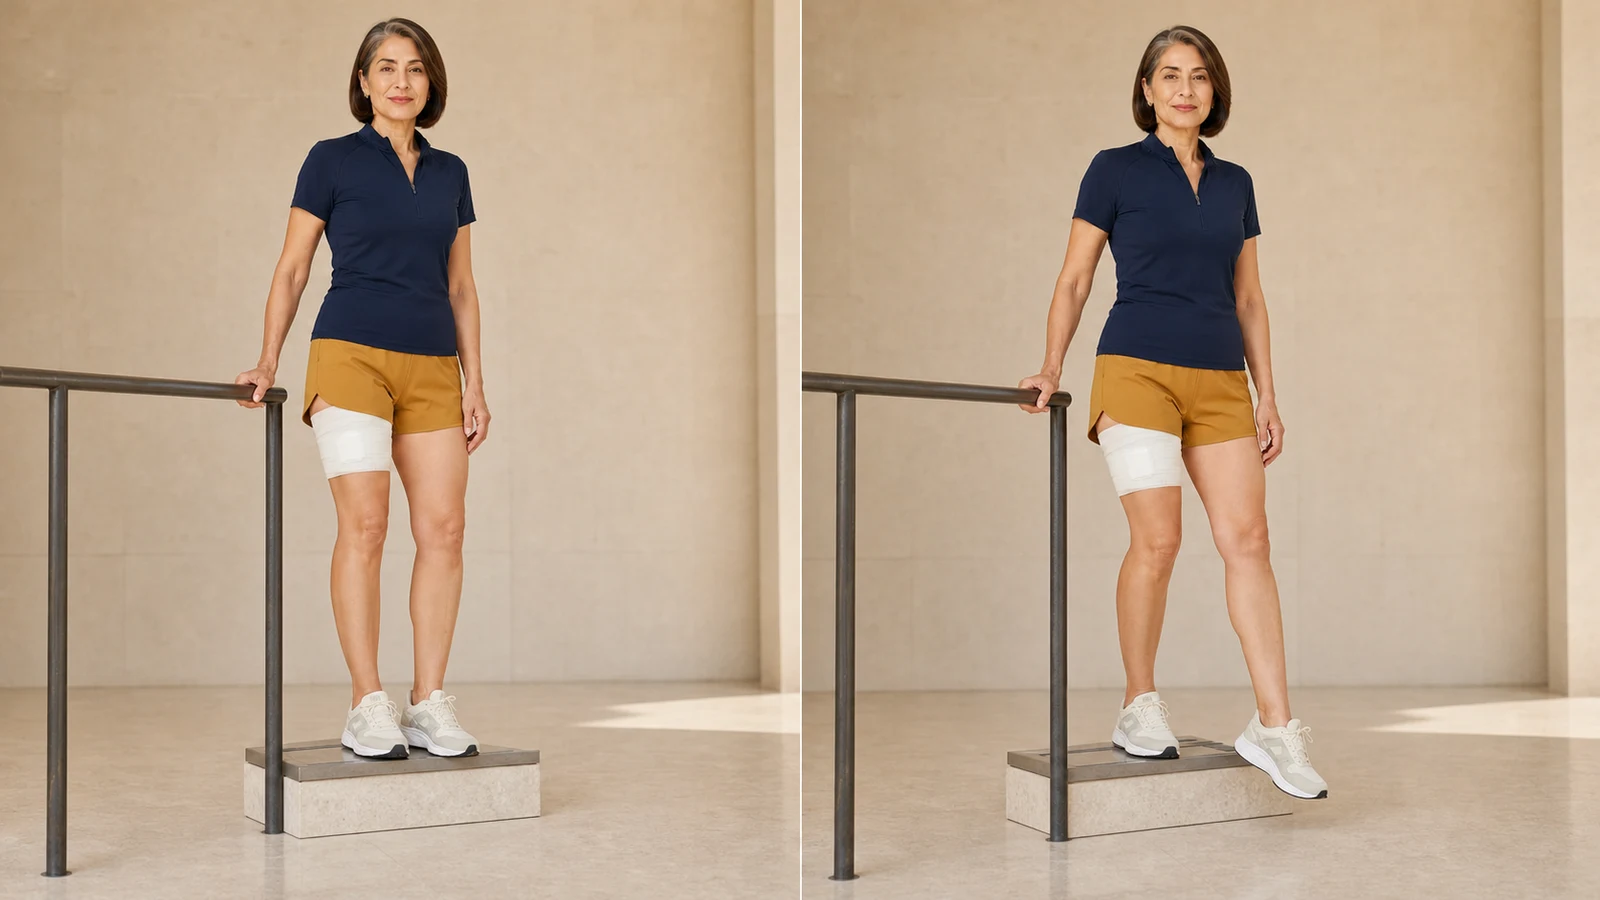
16) Heel-Toe Raises (Heel-Toe Raises)
Strengthens the calf and steadies your balance while walking; the calf carries you forward over the foot at every step and weakens quickly after a… 10 repetitions, twice a day, holding a table. Painful calf cramping or dizziness.
More detailLess detail
Goal and why it matters: Strengthens the calf and steadies your balance while walking; the calf carries you forward over the foot at every step and weakens quickly after a period of reduced activity.
Stage and starting criteria: Once standing is dizziness-free and within your permitted weight bearing — usually from week four — holding a table.
Equipment and environmental safety: A firm table or counter, closed shoes with a low heel and a non-slip floor; keep a chair behind you so you can sit if you tire.
Starting position: Stand at the table, feet hip-width apart, both hands resting lightly on it, weight even and trunk upright.
- Balance your weight over both feet and keep the knees soft rather than locked.
- Rise slowly onto the balls of the feet until the heels clear the floor by a few centimetres.
- Hold for a second at the top without leaning your weight onto the table.
- Lower the heels slowly, then lift the toes and stand briefly on the heels.
- Return to the start and regain your balance before the next repetition.
Range, side, and restrictions: The movement comes from the ankles only; hips and knees stay almost still and the trunk does not lean forward. Rising on one leg is not part of this stage.
Breathing, speed, and rhythm: Breathe out as you rise and in as you lower; never hold your breath, and keep one steady rhythm up and down.
Documented dose: 10 repetitions, twice a day, holding a table.
Rest: Between sets, stand on both feet or sit until the calf tightness settles; if cramp starts, stretch the calf gently and end the session.
Signs of correct technique and expected response: The rise and fall is even, the ankles do not roll outward, and the work is felt in the back of the calf rather than in the groin.
Stop immediately if: Painful calf cramping or dizziness.
Common mistakes: Leaning heavily on the table instead of resting on it, rolling the ankles outward, bending the trunk forward, and bouncing up and down.
Easier version/regression: Halve the range, or lift the heels only a few millimetres; if needed, practise the same ankle movement seated in a chair.
Progression criteria and next stage: Ten smooth repetitions with light support and no cramping; then reduce the support to one hand and then to fingertips, rather than moving to one leg.
Expected and adverse responses: Mild calf fatigue and tightness are expected; severe calf pain, one-sided swelling or dizziness are not — stop and contact your care team.
🎯 After month 3: a sustainable return to activity
Strength, endurance, and confidence in the hip continue to recover beyond three months. The aim is to build a programme you can maintain over the long term without sudden spikes in load.
- Strength: Train the gluteal, thigh, and trunk muscles 2 to 3 days per week with resistance and range that preserve good form. Use your physiotherapy programme to select the exercises and amount.
- Low-impact aerobic activity: Walking, stationary cycling, swimming after the wound has fully healed, elliptical training, and gentle hiking are generally suitable options. Increase duration and incline gradually.
- Balance and fall prevention: Maintain suitable footwear, good lighting, lateral hip strength, and safe balance training. Use support on slippery or uneven surfaces.
- Sport: Repetitive jumping, regular running, and contact sports place greater loads through the artificial joint and are generally not preferred. Starting a new activity or returning to a previous sport requires an individual assessment.
- Follow-up: Continue appointments and periodic imaging on your surgeon’s schedule even if you have no pain. Do not delay reporting new pain, reduced function, or a sense of instability.
Branch and progression criteria: A history of dislocation, persistent abductor weakness, revision surgery, bone quality, or a neurological condition may alter the goals and permitted activities. Progress depends on movement quality and your body’s response, not automatic arrival at a date.
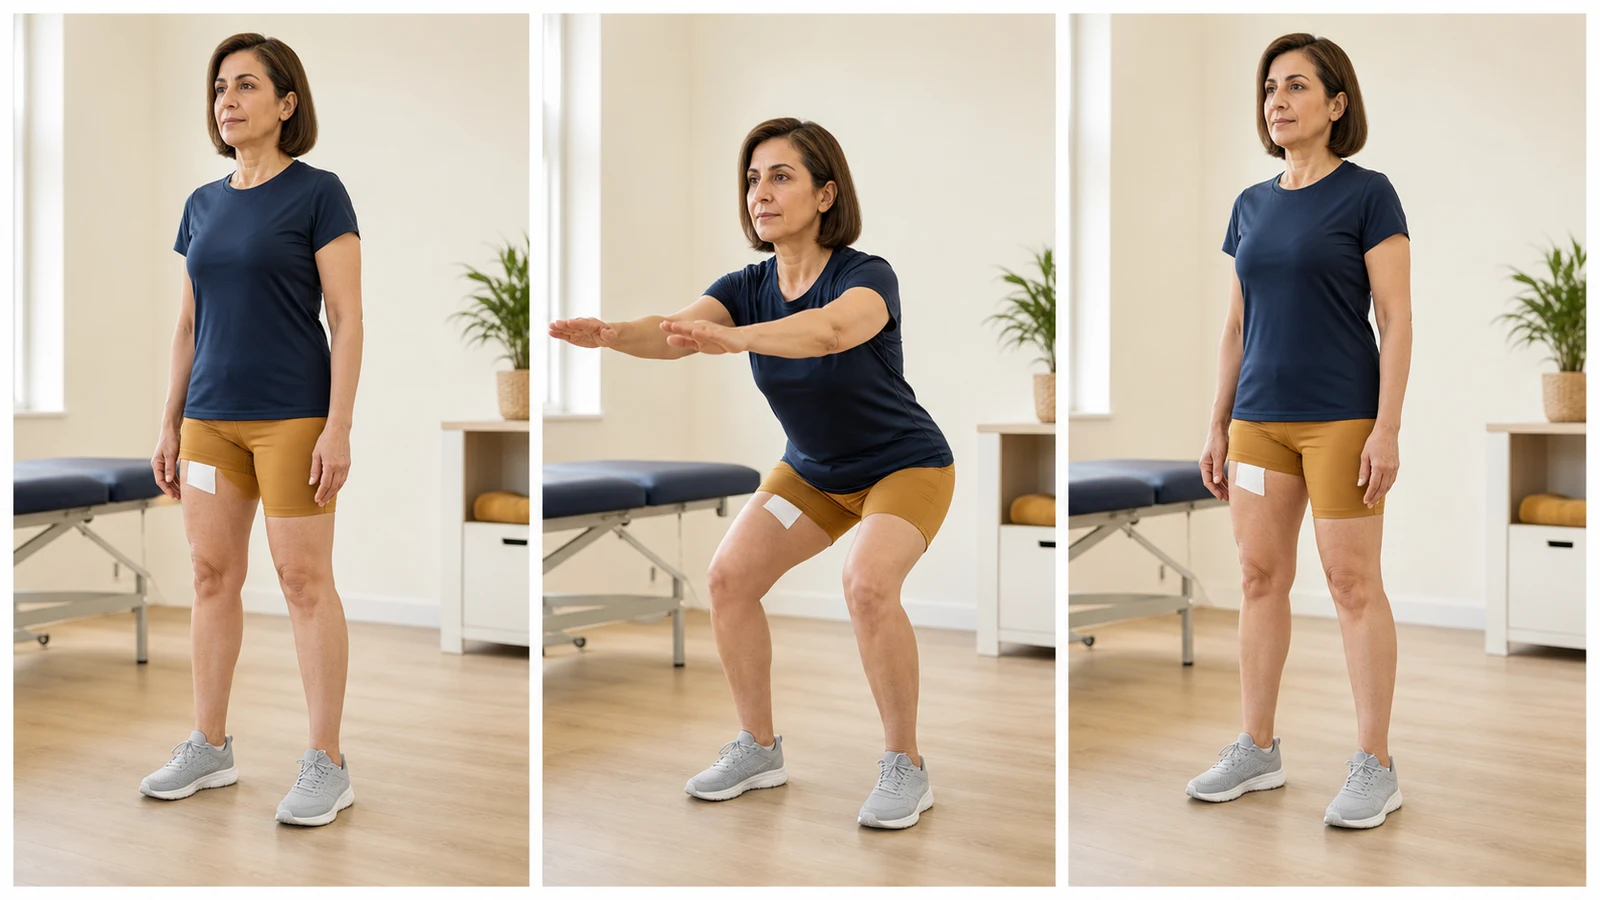
17) Double-Leg Squat (Double-Leg Squat)
Base strength for sitting, standing and stairs in everyday life — the same pattern you repeat dozens of times a day. 12–15 repetitions, two to three times a week. Groin pain, knees falling inward, or being unable to keep the back straight.
More detailLess detail
Goal and why it matters: Base strength for sitting, standing and stairs in everyday life — the same pattern you repeat dozens of times a day.
Stage and starting criteria: From month three onward, once your care team agrees; the prerequisite is rising from a chair without pushing up with your hands.
Equipment and environmental safety: A non-slip floor and a firm chair behind you as both a depth guide and a safety net; at the start you can stand with your back to a wall.
Starting position: Feet shoulder-width, toes forward or turned slightly out, weight through the middle of the foot, trunk upright and eyes forward.
- Engage the abdominal muscles gently and keep the chest open.
- Push the hips back as though you were about to sit on the chair behind you.
- Bend the knees only as far as your permitted hip angle allows.
- Pause for a moment at that lowest permitted point and check the knees have not fallen inward.
- Press through the heels and rise slowly to standing.
Range, side, and restrictions: Depth is set by your permitted hip angle, not by how strong the legs feel; knees track over the toes, heels stay down and the back stays straight.
Breathing, speed, and rhythm: Breathe in on the way down and out on the way up; never hold your breath, particularly if you have high blood pressure.
Documented dose: 12–15 repetitions, two to three times a week.
Rest: Stand or walk gently for a minute or two between sets; never start a set on shaking legs.
Signs of correct technique and expected response: The heels stay on the floor, the knees travel over the toes, and the effort is felt in the thighs and buttocks rather than the lower back.
Stop immediately if: Groin pain, knees falling inward, or being unable to keep the back straight.
Common mistakes: Going deeper than permitted, letting the knees collapse inward, lifting the heels, and rounding the back at the bottom.
Easier version/regression: Reduce the depth to sitting on the edge of a chair and rising again, or practise with your back against a wall and a ball behind the low back.
Progression criteria and next stage: Twelve repetitions with unchanged form and no next-day reaction; then add repetitions or permitted depth, not both at once.
Expected and adverse responses: Mild thigh fatigue and next-day soreness are expected; deep groin pain, catching or new swelling means stop and review it with your care team.
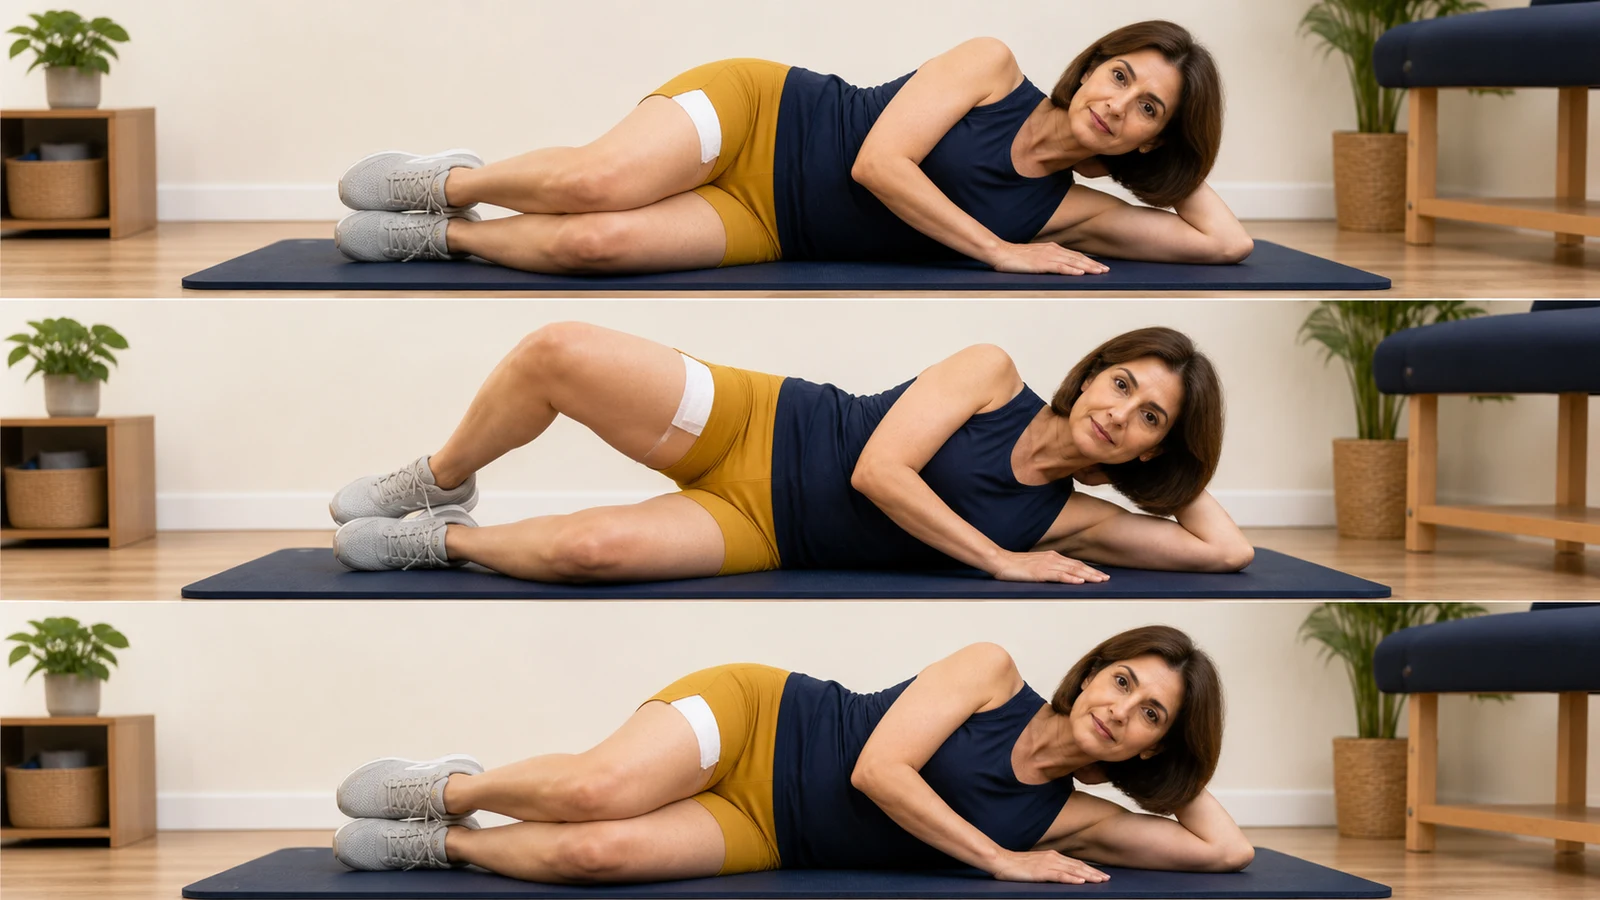
18) Clamshell (Clamshell)
Strengthens the hip rotators that keep the pelvis level when you stand on one leg; weakness here is what drops the pelvis and produces a limp. 12–15 repetitions, twice a day. Hip pain, the low back rolling, or a feeling of joint instability.
More detailLess detail
Goal and why it matters: Strengthens the hip rotators that keep the pelvis level when you stand on one leg; weakness here is what drops the pelvis and produces a limp.
Stage and starting criteria: From month three onward, once the wound is fully healed; if lying on your side is still painful, delay the start.
Equipment and environmental safety: A mat or a not-too-soft bed and a thin pillow under the head; if the pelvis rolls back as you lie down, put a pillow between your back and the wall.
Starting position: On your unoperated side, knees stacked and slightly bent, heels together, pelvis square to the bed and the lower back in its natural position.
- Rest your upper hand on the bed in front of you so the pelvis cannot roll.
- Keep the heels touching and open the top knee like a clam.
- Open only as far as the pelvis stays still, and hold there for a second.
- Return the knee slowly and under control to the starting position.
- Check the pelvis and lower back again before the next repetition.
Range, side, and restrictions: The limit is pelvic roll, not joint flexibility; the moment the pelvis rolls back or the low back twists, you have passed the useful range. If a rotation restriction was written for you, that is the boundary.
Breathing, speed, and rhythm: Breathe out as the knee opens and in as it closes; keep the movement slow and unsprung.
Documented dose: 12–15 repetitions, twice a day.
Rest: Between sets, roll onto your back and let the legs relax; if the side of the hip starts to burn, wait before the next set.
Signs of correct technique and expected response: You feel the work at the side of the hip rather than in the lower back, and the pelvis stays square to the bed throughout.
Stop immediately if: Hip pain, the low back rolling, or a feeling of joint instability.
Common mistakes: Rolling the pelvis back to open further, letting the heels separate, opening with a flick, and holding the breath.
Easier version/regression: Halve the range, or bend the knees a little more to make the movement easier; if needed, practise the contraction without any movement.
Progression criteria and next stage: Twelve repetitions with a completely still pelvis and no pain; then add a light band above the knees rather than more range.
Expected and adverse responses: A mild burn at the side of the hip is expected; joint pain, a sense of shifting or back pain means stop and review it with your care team.
19) Stair Climbing (Stair Climbing)
Rebuilds endurance and confidence in the leg for everyday activity; stairs are a movement you cannot avoid at home or outside, so they should be… As tolerated from month three, using the handrail when you need it. Increasing pain, a limp, or sudden fatigue in the leg.
More detailLess detail
Goal and why it matters: Rebuilds endurance and confidence in the leg for everyday activity; stairs are a movement you cannot avoid at home or outside, so they should be practised rather than improvised.
Stage and starting criteria: From month three onward, once walking on the flat is limp-free and the low practice step feels settled.
Equipment and environmental safety: A staircase with a firm handrail and good light, closed shoes, and nothing carried in your hands; for the first attempts have someone stand one step below you.
Starting position: Face the stairs, one hand on the rail, weight through both feet, trunk upright and eyes a few steps ahead rather than on your feet.
- To go up, place the unoperated leg on the next step first.
- Press up through that leg under control, then bring the operated leg alongside it.
- Pause before the next step and check your balance and the level of your pelvis.
- To come down, reverse the order: the operated leg goes to the lower step first, then the unoperated one.
- Keep a hand on the rail throughout, and never run or take two steps at a time.
Range, side, and restrictions: Up with the unoperated leg, down with the operated leg; the knee stays in line with the toes and the thigh does not pass your permitted hip angle. Never pivot on the standing leg on a step.
Breathing, speed, and rhythm: Breathe out on the way up and in on the way down; keep a steady rhythm and do not hold your breath between steps.
Documented dose: As tolerated from month three, using the handrail when you need it.
Rest: If you become breathless or the leg tires, stop on the landing until both settle; continuing on a tired leg is where a slip happens.
Signs of correct technique and expected response: The pelvis stays level on the way up, the trunk does not lean to one side, and coming down is as controlled as going up.
Stop immediately if: Increasing pain, a limp, or sudden fatigue in the leg.
Common mistakes: Pulling yourself up by the rail instead of pressing through the leg, leading with the operated leg going up, staring at your feet, and descending too fast.
Easier version/regression: Reduce the number of steps, or take them one at a time with both feet on each step, resting between flights.
Progression criteria and next stage: One flight up and down with no limp and no next-day reaction; then add flights rather than speed.
Expected and adverse responses: Muscle fatigue in the thigh and calf is expected; deep joint pain, a new limp or the leg giving way means stop and contact your care team.
20) Walking Progression (Walking Progression)
The best long-term exercise for a replaced joint and for general health; regular walking rebuilds the stepping pattern and keeps a protective limp… No distance limit as long as it stays pain-free; add time gradually week by week. Pain that is still there the next day, or swelling that does not settle with rest.
More detailLess detail
Goal and why it matters: The best long-term exercise for a replaced joint and for general health; regular walking rebuilds the stepping pattern and keeps a protective limp from setting in.
Stage and starting criteria: It begins as the short sessions of the first weeks and becomes a regular programme after month three; add time only when the previous session passed without pain and without a next-day reaction.
Equipment and environmental safety: Closed, low-heeled shoes, a flat well-lit route and whichever walking aid your care team specified; in cold weather or on slippery ground, walk indoors instead.
Starting position: Stand tall with weight through both feet, shoulders loose, eyes forward and the walking aid — if you use one — a short step ahead.
- Start each session with a few slow steps to let the joint warm up.
- Keep the steps even in length and spend the same time on each leg.
- Land on the heel and roll the weight smoothly through the foot.
- To change direction, take several small steps rather than pivoting on the standing leg.
- End the session before you are tired, not when you can no longer continue.
Range, side, and restrictions: Distance is set by pain, not by a number; a limp appearing means you have reached your limit. Sudden turns, uneven ground and carrying heavy loads have no place at this stage.
Breathing, speed, and rhythm: Your breathing should stay comfortable enough to talk throughout; if you are too breathless to speak, slow down.
Documented dose: No distance limit as long as it stays pain-free; add time gradually week by week.
Rest: Several short sessions a day beat one long one; sit between them and elevate the leg if it swells.
Signs of correct technique and expected response: Step length is equal on both sides, the pelvis does not drop as you step, and pain returns to its pre-walk level afterwards.
Stop immediately if: Pain that is still there the next day, or swelling that does not settle with rest.
Common mistakes: Adding a lot of distance after one good day, walking on through a limp, dropping the walking aid too early, and starting out on uneven ground.
Easier version/regression: Shorten each session and take more of them, or keep to flat ground indoors.
Progression criteria and next stage: A week of sessions with no pain and no next-day reaction; then add roughly a tenth to the time — not to time and speed together.
Expected and adverse responses: General fatigue and some stiffness afterwards are expected; lasting pain, swelling that does not settle or a returning limp mean you have done too much and should review it with your care team.
🚗 Daily life and return to activity
A return is safe when you can complete the activity with adequate balance and control, without sharp pain or an obvious limp, and symptoms are no worse the next morning. General timeframes are only a guide; the operated side, surgical approach, type of work, and operation report change the plan.
🚗 Driving
Research reviews commonly place return to driving at about 4 to 6 weeks after hip replacement, but reaching that date alone is not clearance. You must be off sedating pain medicines, be able to get in and out without breaking precautions, and react quickly enough for an emergency stop; the treatment team, your insurer, and local law must also permit driving. Right-sided surgery, a manual-transmission vehicle, and remaining weakness may lengthen the interval.
💼 Work and household tasks
Desk work can usually resume sooner than work involving prolonged standing, stairs, professional driving, or carrying loads. A systematic review of return to work shows wide differences according to occupation and individual circumstances, so one date does not suit everyone. Begin with fewer hours, walking breaks, and lighter duties; reduce the workload if pain or limping is worse the next day. Leave heavy vacuuming, moving loads, and twisting while bent to someone else until control has recovered.
🛏️ Sleeping
Sleep on your back or in another position that respects your precautions. Once side sleeping is allowed, the non-operated side with a pillow between the thighs and knees is often comfortable first. Before sleeping on the operated side, the wound must tolerate pressure and the treatment team must give permission. A pillow should not rotate the leg or draw it into a prohibited position.
❤️ Sexual activity
Sexual activity is reasonable when transfers, weight bearing, and leg control are possible without sharp pain. Choose a position that supports the operated hip and does not place it into prohibited flexion, adduction, or rotation.
🕌 Prayer
For prayer, use a chair or another adapted position until sitting on the floor, bending, and rising are safe. Return to floor-level positions gradually after range and balance have been assessed.
✈️ Travel
The timing of a long journey depends on your clot risk, preventive medicine, and ability to move. Check with the treatment team before buying a ticket. In a car or plane, when possible, break up prolonged sitting with ankle pumps and a few safe steps, stay hydrated, and continue prescribed medicine on schedule. Tell airport security that you have an artificial joint; an implant card does not replace security screening.
🏊 Long-term sport
Walking, cycling, swimming, golf, elliptical exercise, and other low-impact activities are generally preferred. Start any sport at low duration and intensity, considering skill, balance, and the next-day response. Regular running, repeated jumping, and contact sports can increase joint loading; discuss the activity you want to do and your previous experience with your surgeon or physiotherapist.
❓ Frequently asked questions
1) How long are pain and swelling normal after total hip replacement?
Pain, bruising, and swelling are expected in the first weeks and may be greater after activity or in the evening, but the overall trend should be downward. Swelling can extend into the lower leg. New severe pain or swelling, one-sided calf pain, fever, wound drainage, or shortness of breath is not part of the usual course.
2) Why does one leg feel longer after surgery?
Swelling, muscle tightness, a pre-existing pelvic tilt, and an established walking pattern can create a sense of leg-length difference in the first weeks. This often decreases as strength and gait improve. Do not add a shoe lift yourself; a persistent obvious difference or increasing pain and limping needs examination and measurement.
3) Is clicking from the artificial joint dangerous?
An occasional sound without pain, swelling, catching, or instability may come from contact between implant components and does not necessarily mean damage. A new sound with pain, a sensation of displacement, apparent shortening or abnormal rotation of the leg, or sudden loss of function needs prompt assessment.
4) Will numbness in the skin beside the incision recover?
A small area of numbness around the wound is common because fine skin-nerve branches are divided. The numb area may become smaller over several months, although some numbness can remain. Spreading numbness, new weakness of the ankle or toes, severe burning pain, or a cold or discoloured foot needs early assessment.
5) When can I stop using the walker or cane?
Your physiotherapist can assess reducing the aid when you walk without heavy reliance on it, meaningful pain, imbalance, shortened steps, or pelvic drop. Hold the cane in the hand opposite the operated hip. Progress is based on gait quality, not simply on the number of days since surgery.
6) What should I do if I think the joint has dislocated?
Sudden very severe pain, deformity or abnormal rotation of the leg, apparent shortening, and inability to stand can be consistent with dislocation. Do not walk or try to put the joint back yourself. In Iran, call 115 or go to an emergency department immediately.
7) When may I sleep on the operated side?
When the wound is closed, direct pressure does not cause meaningful pain, and the treatment team has allowed it in view of the surgical approach. The non-operated side with a pillow between the legs is usually tolerated earlier. If side sleeping causes pain, pulls on the wound, or places the leg in a prohibited position, return to the previous permitted position.
8) When are showers, baths, and swimming allowed?
Showering depends on the dressing: an intact waterproof covering sometimes permits a shower from the next day, whereas a standard dressing often requires the wound to remain dry for about 5 to 7 days. Avoid baths, pools, and hot tubs until the wound is fully closed and dry—usually at least 3 to 4 weeks. Your centre’s instructions take priority.
9) When may I drive?
Many sources suggest approximately 4 to 6 weeks, but you must be off sedating pain medicine, enter and leave the car safely, and be able to make an emergency stop without delay. The operated side and type of vehicle matter; also follow treatment-team clearance and your insurer’s requirements.
10) How long does return to work take?
There is no fixed interval. Seated work with regular breaks usually resumes sooner than work involving standing, stairs, prolonged driving, or carrying loads. A staged return, shorter hours, and modified duties help; walking ability, sleep, medicines, and the next-day response matter more than a calendar date.
11) What precautions are needed for sexual activity?
Once transfers and weight bearing are safe, choose a position that supports the hip and does not create a movement or combination prohibited for your surgical approach.
12) What precautions are needed for prayer?
A chair may be used temporarily for prayer. Sitting on the floor and rising can return once range, balance, and strength are sufficient.
13) Do I always need antibiotics before dental treatment?
No. The 2024 joint AAOS and AAHKS guideline does not support routine preventive antibiotics for every person with a joint replacement. Tell your dentist about the artificial joint. A history of prosthetic-joint infection, immune status, and the planned procedure may individualise the decision. Do not take leftover antibiotics on your own.
14) Can I have an MRI with an artificial hip?
A hip implant by itself does not usually prevent MRI, but tell the imaging centre the implant type and location. Metal can reduce image quality near the hip, and the imaging centre is responsible for the final safety check and selection of imaging sequences.
15) Will the hip implant trigger an airport metal detector?
It may trigger an alert. Tell security staff about the artificial joint before screening and allow time for an additional check. An implant card or operation report can provide useful information, but it does not exempt you from security procedures, and screening does not damage the implant.
16) How can I support implant longevity, and what follow-up is needed?
Maintaining a suitable weight, regular low-impact activity, strength and balance, fall prevention, and prompt attention to infections can help. Avoid repeated impact or jumping unless cleared, and continue appointments and periodic imaging on your surgeon’s schedule. The exact lifespan of an implant cannot be guaranteed for an individual.
✅ Summary
After total hip replacement, three tasks matter at the same time: manage the wound and medicines consistently, recognise warning signs promptly, and increase movement and strength step by step according to gait quality and your body’s response. The calendar is a guide; the approach, any additional procedures, and your discharge instructions set the true boundary for each stage.
For an assessment and a plan tailored to you, call Dr Jalil Emad’s office at 09137825207 or use the online booking system.
This content is provided for general education only and does not replace an examination, the advice of your treating clinician, your discharge sheet, or your surgeon’s individual protocol. Timing, range of motion, weight bearing, and exercise dose vary with the operation, additional procedures, and each person’s circumstances. Do not change your medicines, dressing, or exercise programme without consulting the treatment team.
📚 Scientific sources
📚 View scientific sources
- NICE NG157: Joint replacement (primary), recommendations.
- ERAS Society consensus statement for perioperative care in total hip and knee replacement.
- AAOS OrthoInfo: Activities after total hip replacement.
- AAHKS HipKneeInfo: Total hip replacement.
- AAHKS: Home therapy exercises after total hip replacement.
- Mass General Brigham: Rehabilitation protocol for total hip arthroplasty, 2025.
- Korfitsen et al.: Hip precautions after posterior-approach THA, systematic review.
- Konnyu et al.: Rehabilitation for total hip arthroplasty, systematic review.
- NICE NG89: Venous thromboembolism prevention.
- Systematic review of return to driving after total hip arthroplasty.
- Systematic review of return to work after total hip arthroplasty.
- AAOS/AAHKS 2024 guideline: Dental procedures and periprosthetic joint infection prevention.

Dr. Jalil Emad
Orthopedic specialist and surgeon, board-certified in bone and joint surgery; years of experience in knee and hip replacement, sports injuries and arthroscopy in Isfahan.
Related articles
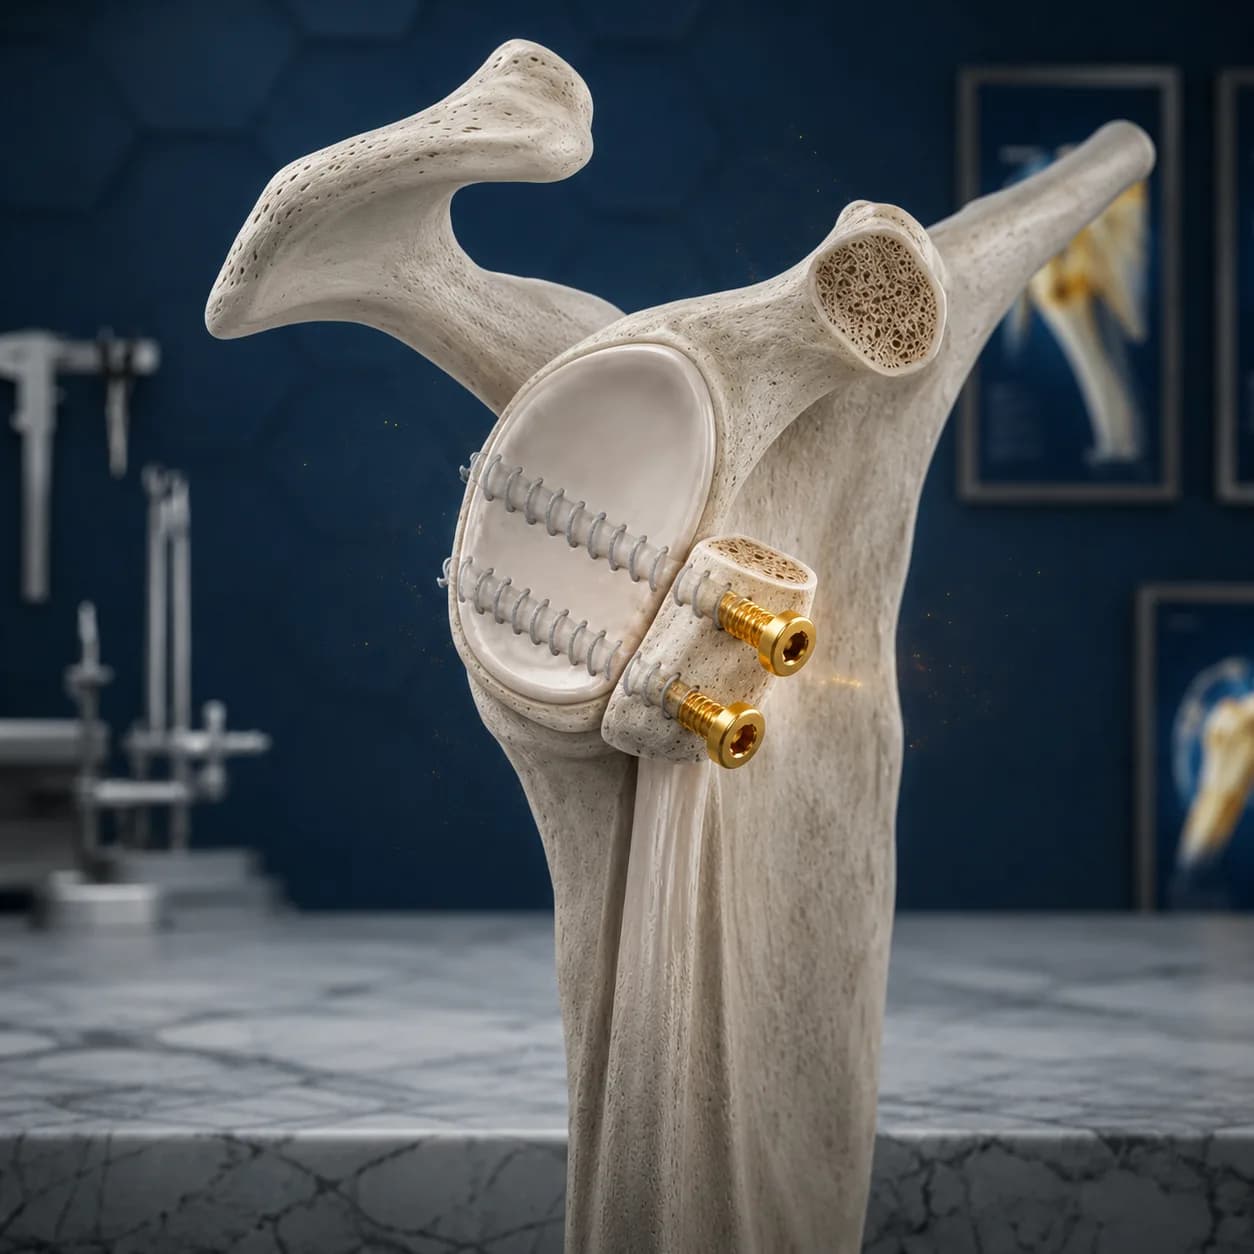
Latarjet Shoulder Surgery: Postoperative Care and Rehabilitation
A complete, criteria-based guide to surgery day and care after Latarjet shoulder surgery—from wound care, sling use, medicines, and warning signs to the first 90 days of rehabilitation and a safer return to activity.
Arthroscopic Rotator Cuff Tendon Repair Surgery: Postoperative Care and Rehabilitation
A complete, criteria-based guide to care after arthroscopic rotator cuff repair—from dressing changes, sling use, and warning signs to the first 90 days of rehabilitation and a safer return to activity.
ACL Reconstruction Surgery: Postoperative Care and Rehabilitation
An evidence-informed, criteria-based guide to surgery day and care after ACL reconstruction—from wound care, medicines and warning signs to the first 90 days of rehabilitation and a safer return to driving, work and sport.