
On this page
- 🏥 What happens on surgery day?
- 2Care during the first days after surgery
- ⚠️ Warning signs: when should you call urgently?
- 🗓️ Criteria-based plan: days 0–30
- 🌱 Month 2: days 31–60
- 🏋️ Month 3: days 61–90
- 🎯 After 90 days: running and return to sport
- Driving, work, prayer and daily activities
- Frequently asked questions
- Summary and appointments
- Scientific sources
ACL Reconstruction Surgery: Postoperative Care and Rehabilitation
An evidence-informed, criteria-based guide to surgery day and care after ACL reconstruction—from wound care, medicines and warning signs to the first 90 days of rehabilitation and a safer return to driving, work and sport.
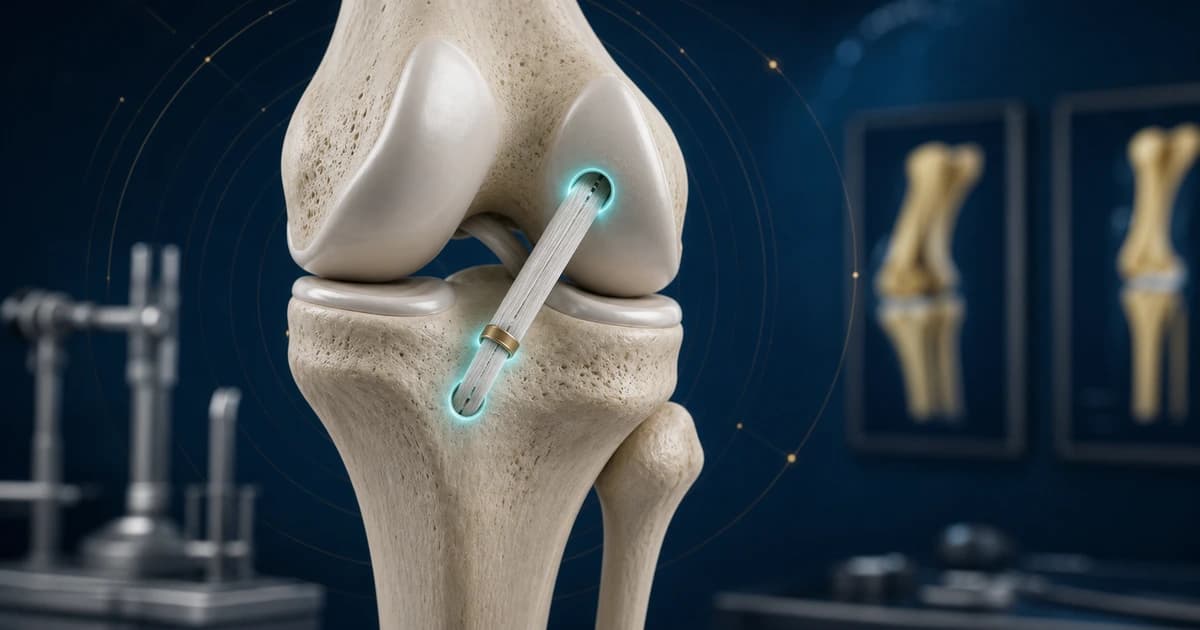
🏥 What happens on surgery day?
Anaesthesia: general or spinal anaesthesia may be used. A nerve block is sometimes added for early pain control; the anaesthetist will explain the appropriate option.
Recovery and stay: pain, nausea, alertness, circulation and sensation in the foot, and safe crutch use are checked. Same-day discharge or a short stay depends on your condition, associated procedures and centre criteria.
At discharge: you receive written instructions, prescribed medicines, walking aids and a brace if required. Arrange an adult to take you home.
Pain and swelling: both are expected early, but steadily increasing or uncontrolled pain and unusual swelling must not automatically be labelled normal.
2Care during the first days after surgery
During the first few days, the knee is not expected to be completely free of pain or swelling. The aim is to keep both manageable, keep the incision clean and dry, and begin simple movement without adding unnecessary stress. Work through the steps below calmly and consistently; that routine usually makes the early days more predictable.
🩹 Wound care and dressing changes
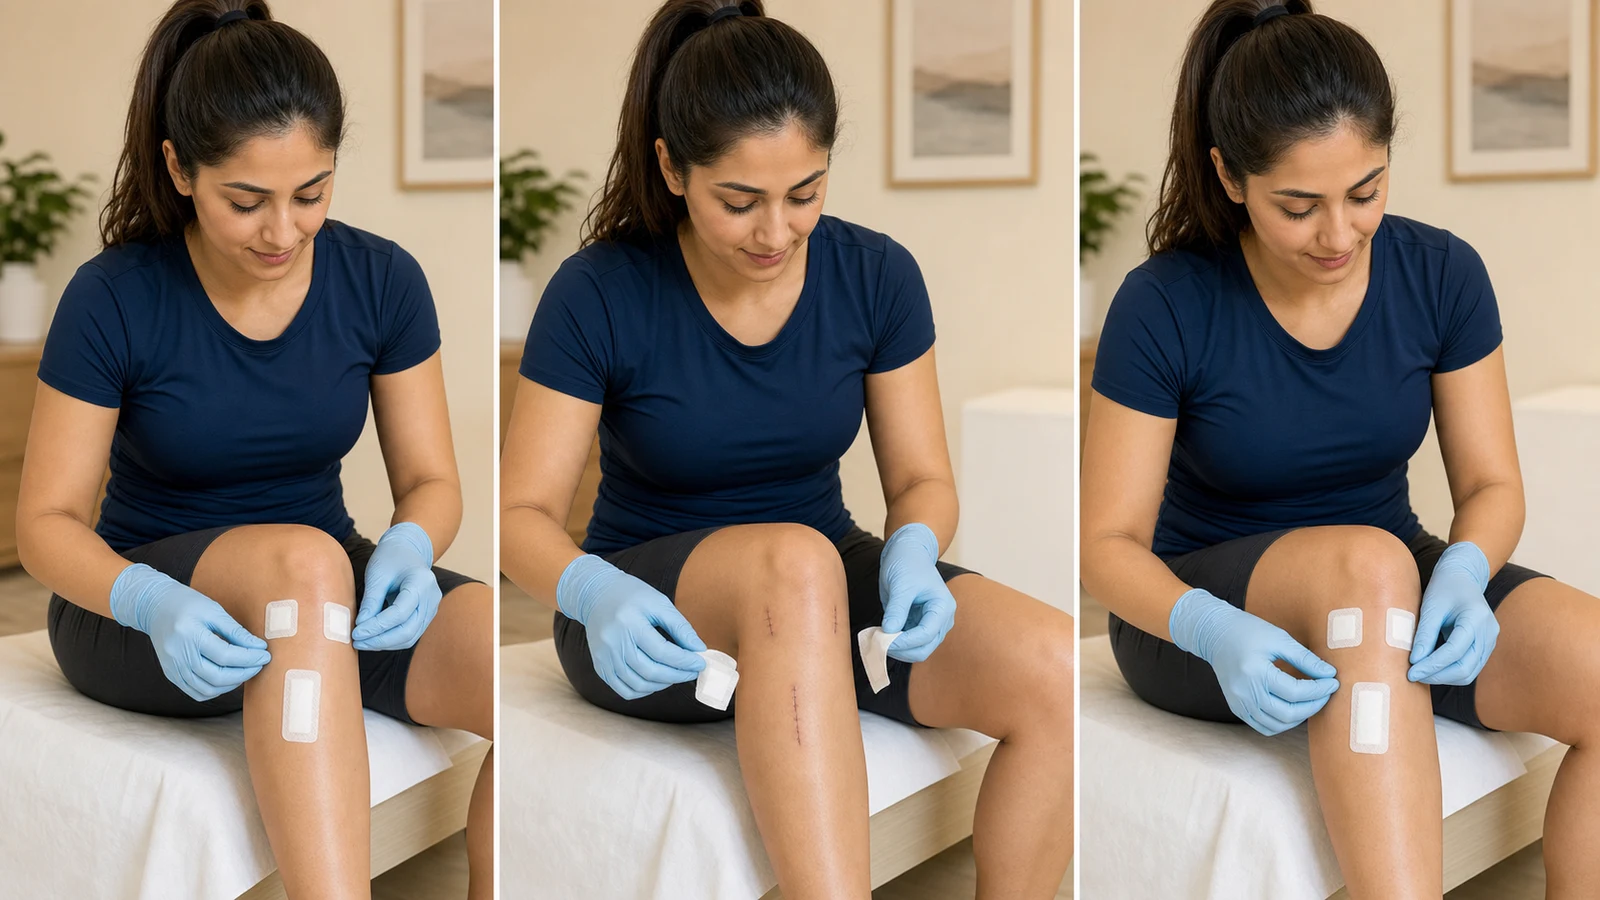
Seeing the incision or changing the first dressing can feel unsettling, but there is no need to rush. Set out the supplies first and work through each step calmly; the aim is simply to keep the wound clean and dry without unnecessarily disturbing healing skin.
- Before you begin, wash your hands with soap and water and prepare the supplies on a clean surface.
- Usually leave the first dressing undisturbed for 48–72 hours. Change it sooner if it becomes wet, dirty or fully soaked with drainage, using a clean, dry dressing.
- Peel the outer layer slowly from one corner. If an area sticks, do not pull suddenly; sutures, skin adhesive, narrow closure strips and scabs should remain in place.
- Look briefly at the wound and surrounding skin without pressing. Do not touch the incision line, pull the edges apart or leave the dressing off longer than needed.
- Clean the wound only in the way written on the discharge sheet. Do not add alcohol, hydrogen peroxide, ointment or a new solution, as these may irritate healing skin.
- Finish with a clean, dry dressing that is not tight. The tape should hold it in place without pulling the skin or causing numbness or a colour change.
- A small clear or pale-pink stain can appear during the first few days, but it should lessen from day to day. Increasing redness or warmth, wound-edge separation, or thick foul-smelling drainage is covered in the warning-sign section.
🚿 Waterproof dressings and showering
A short shower is different from soaking the wound in a bath or pool. The key is to stop water getting underneath the dressing and avoid rubbing healing skin.
- You can usually take a short shower after 48 hours when the incision is dry and the waterproof dressing is intact.
- Do not aim a forceful stream directly at the knee or scrub the incision with soap or a washcloth. Afterwards, pat around the dressing dry with a towel.
- A clean, firmly attached waterproof dressing can remain for 5–7 days. Replace it the same day if an edge lifts, water gets underneath or it becomes dirty.
- Avoid baths, pools and hot tubs until the incisions have fully closed. Prolonged immersion softens healing tissue and makes it more vulnerable.
💊 Your medicines and how to take them
Use the prescription you received at discharge. You do not need to memorise every tablet: a simple chart or phone alarm reduces the chance of missing a dose or taking it twice.
- Record the medicine name, scheduled time and last dose. If a dose is missed, do not double the next one; check the instructions on the prescription or package.
- Take pain medicine at the amount and interval written on the prescription. Combining pain relievers or cold remedies can accidentally duplicate an ingredient such as acetaminophen/paracetamol.
- If the prescription contains an antibiotic or clot-prevention medicine, continue it regularly for the written duration. These medicines are not the same for every patient.
- Do not add a new over-the-counter medicine, anti-inflammatory pain reliever, supplement or herbal product until you have checked for interactions, especially with a blood thinner.
- Some pain medicines cause drowsiness, dizziness, nausea or constipation. Do not drive or drink alcohol while affected, stand up slowly, and take enough fluid and fibre.
🧊 Managing pain and swelling
Some swelling, bruising and warmth around the knee is common at first. The overall trend should be towards improvement. If today’s activity leaves pain or swelling clearly worse the next morning, reduce the amount of activity by one step.
- Apply a cold pack for 15–20 minutes every 2–3 hours while awake. Keep a thin cloth between the pack and the skin, and never exceed 20 minutes in one session.
- Check skin colour and sensation after each session. Marked whitening, persistent numbness or burning pain means remove the pack and wait until the skin is normal before using it again.
- When resting, place the calf and heel on several pillows so the knee is above heart level. Do not put the pillow directly behind the knee; the knee needs an opportunity to regain full extension.
- A compression wrap should support the leg, not squeeze it. The toes should remain warm, pink and normally sensitive; loosen a wrap that is too tight.
- Do not stay completely still. Alternate rest with brief, regular movement to reduce knee stiffness and sluggish circulation.
🚶 Walking, brace and everyday activity
After an isolated ACL reconstruction, weight-bearing as tolerated commonly begins with two crutches and the brace locked straight. The early goal is not to walk farther; it is to walk short distances safely and without a limp.
- Take several short walks through the day. When turning, use small steps; do not pivot on the operated leg or change direction suddenly.
- Do not stop using the crutches simply because a date has arrived. After an isolated reconstruction they are commonly needed for 1–2 weeks and are removed when you can walk without a limp or an increase in pain or swelling.
- On stairs, lead with the unoperated leg going up. Going down, place the crutches and operated leg first, then the unoperated leg. Use the rail until balance is reliable.
- Begin ankle pumps and gentle quadriceps tightening in short sessions during the first days. Keep the knee straight when resting and do not place a pillow directly underneath it.
- Keep pathways at home clear and well lit. Remove loose rugs and cables, keep essentials within reach and switch on a light for night-time trips to the bathroom.
⚠️ Warning signs: when should you call urgently?
Contact the surgeon or treating centre the same day: steadily increasing wound redness or drainage, fever at the threshold listed on your discharge sheet, pain not controlled by the prescribed plan, increasing swelling, new numbness or sudden loss of a previously possible movement.
Seek emergency help: shortness of breath, chest pain, coughing blood, fainting, a cold or blue foot, progressive weakness/numbness, or substantial calf pain and swelling. In Iran, call emergency medical services on 115.
For a knee assessment, call Dr Jalil Emad’s office on +98 913 782 5207 or use online booking. Do not wait for the office in an emergency.
🗓️ Criteria-based plan: days 0–30
This sample applies to isolated ACL reconstruction. A meniscus repair, multiligament injury, specific graft restriction or a different surgeon protocol takes priority. Unless a source provides an example, exercise dose is set by the surgeon or physiotherapist.
🛡️ 0–72 hours
Protect the knee, control pain and swelling, preserve extension, begin quadriceps activation and avoid prolonged immobility. Do not pivot on the planted foot, walk without the prescribed aid or leave a pillow directly under the knee.
Exercises for this period
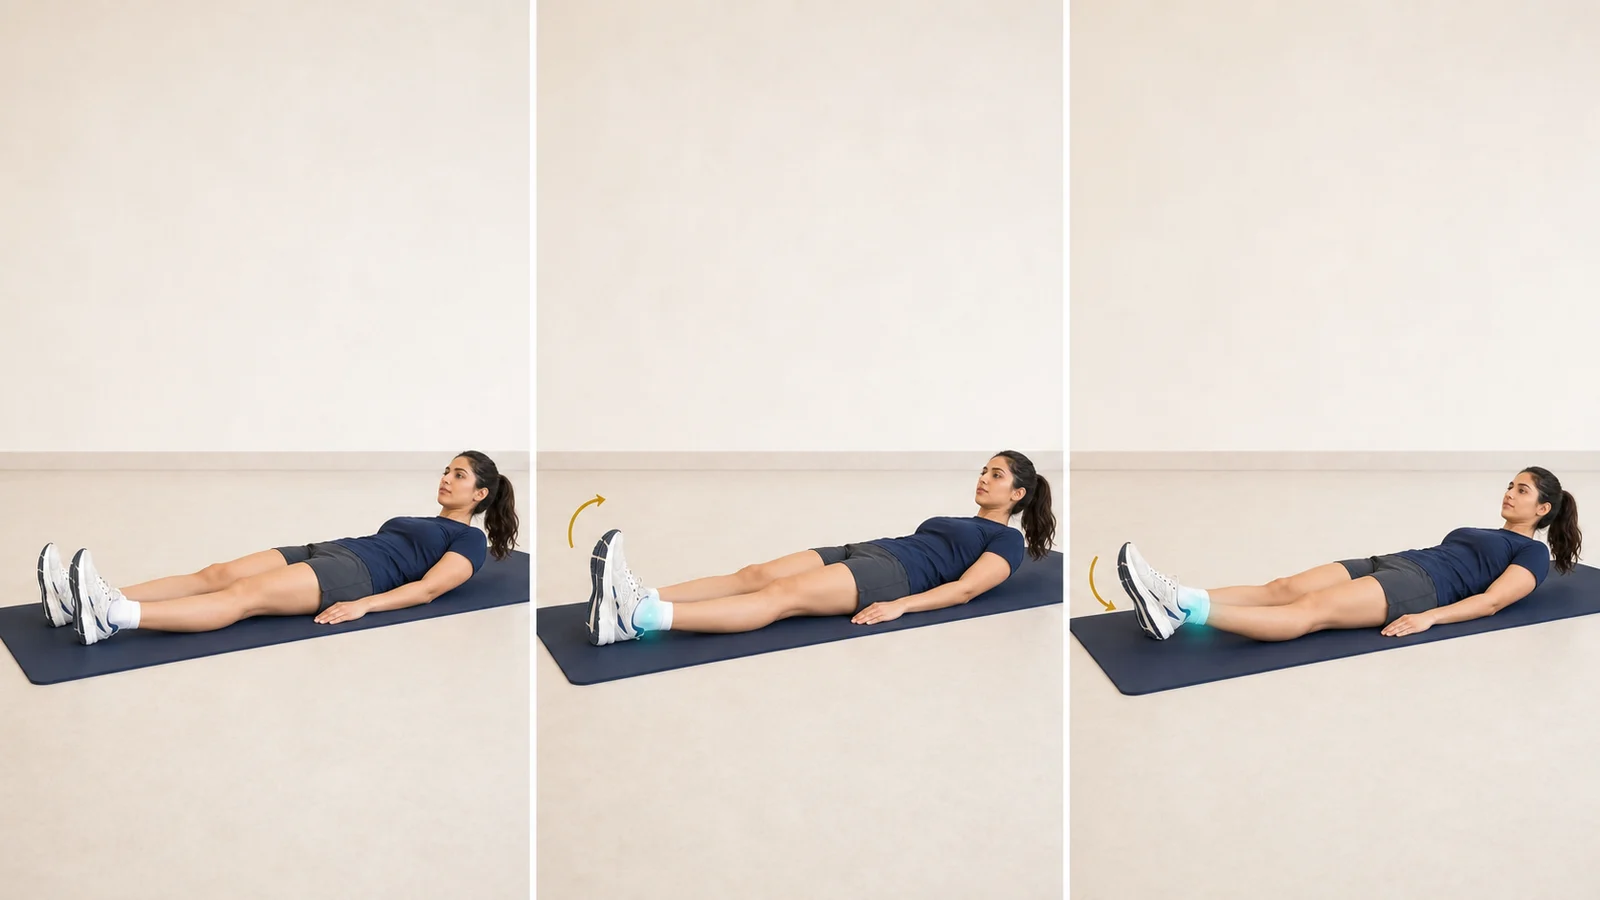
Ankle pumps
- Entry/setup: after clearance, lie or sit supported with the knee and brace in the prescribed position and the whole leg facing upward.
- Steps: keep the thigh still; draw the toes slowly toward you, point them away without rotating the leg, then return to neutral.
- Breathing/tempo: breathe freely and use a smooth, non-forceful rhythm.
- Dose/rest: repetitions and frequency are prescribed; pause briefly if the calf fatigues.
- Correct response: movement comes from the ankle only and a mild calf stretch may be felt.
- Avoid/stop: fast whole-leg rotation or breath-holding; stop and seek assessment for new calf pain/tightness, one-sided swelling or breathlessness.
- Easier/progress: reduce the range; continue during prolonged sitting only if advised.
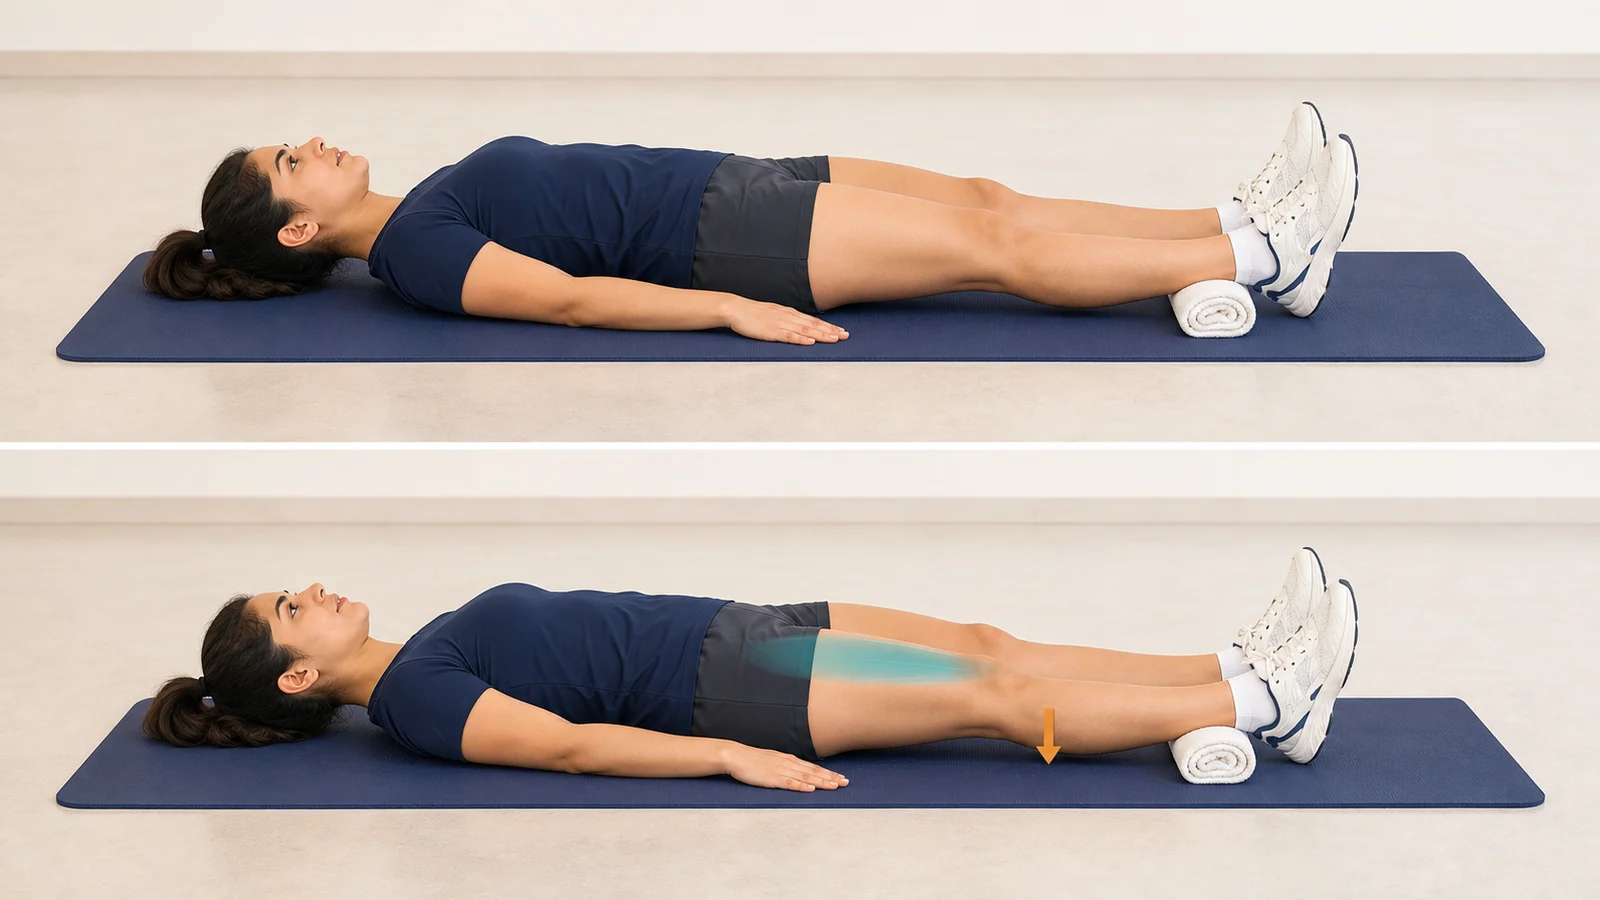
Quadriceps set
- Entry/setup: lie with the leg facing upward, heel supported and the back of the knee close to the surface.
- Steps: keep the toes up, tighten the front thigh, draw the back of the knee down without lifting the heel, hold as prescribed, then fully relax.
- Breathing/tempo: breathe out while tightening and do not brace the trunk.
- Dose/rest: hold time, repetitions and frequency are prescribed; fully relax between efforts.
- Correct response: the quadriceps visibly firms or the kneecap moves slightly while the pelvis stays still.
- Avoid/stop: buttock substitution, heel lift or breath-holding; stop for sharp joint pain or clear swelling increase.
- Easier/progress: use a shorter contraction or tactile feedback; progress to a strong contraction and then a straight-leg raise without lag.
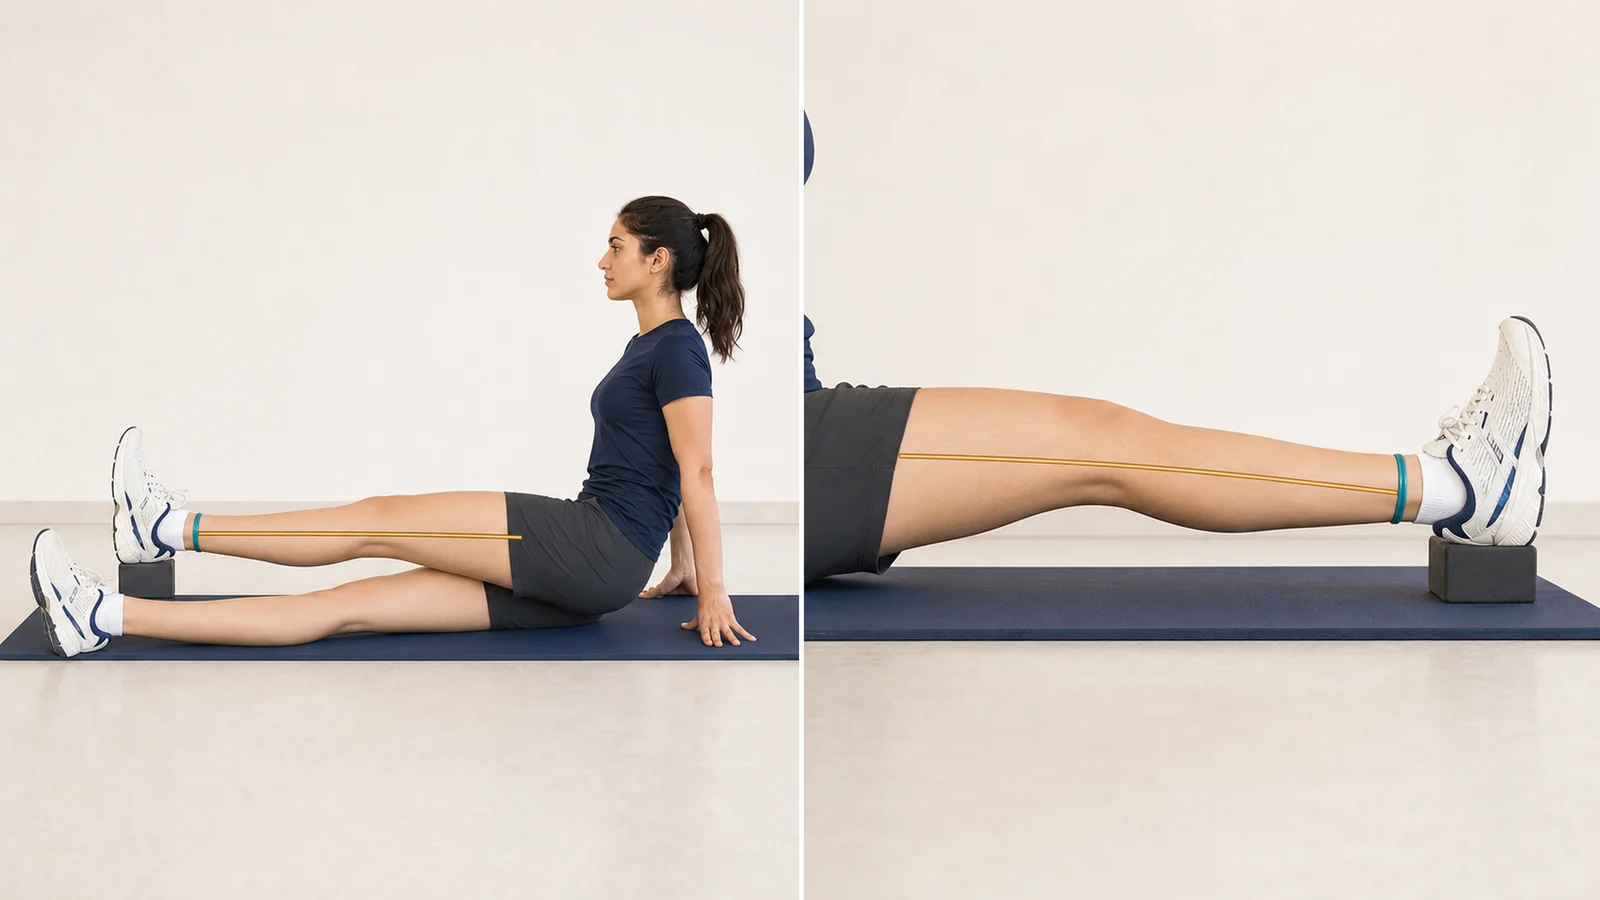
Heel prop for extension
- Entry/setup: use only if the team allows passive extension; support the heel on a firm towel/bolster with the knee free and toes upward.
- Steps: relax the thigh, allow the leg’s weight to straighten the knee gently, never press with the hands or a weight, then use the other leg for help when leaving the position.
- Breathing/tempo: breathe slowly; this is a gentle sustained position, not a bouncing stretch.
- Dose/rest: MOON gives about five minutes as an example; duration, frequency and recovery are prescribed.
- Correct response: a mild stretch behind the knee without sharp pain or outward leg rotation.
- Avoid/stop: support directly under the knee or added force; stop for tingling, numbness, colour change or sharp pain.
- Easier/progress: use a lower support or shorter duration; progress toward extension similar to the opposite knee without swelling increase.
🧊 Days 4–7
Continue swelling control, work toward full extension, increase flexion within the allowed range and practise safe gait. More pain or swelling that persists into the next day usually means the activity dose was too high.
Exercise for this period
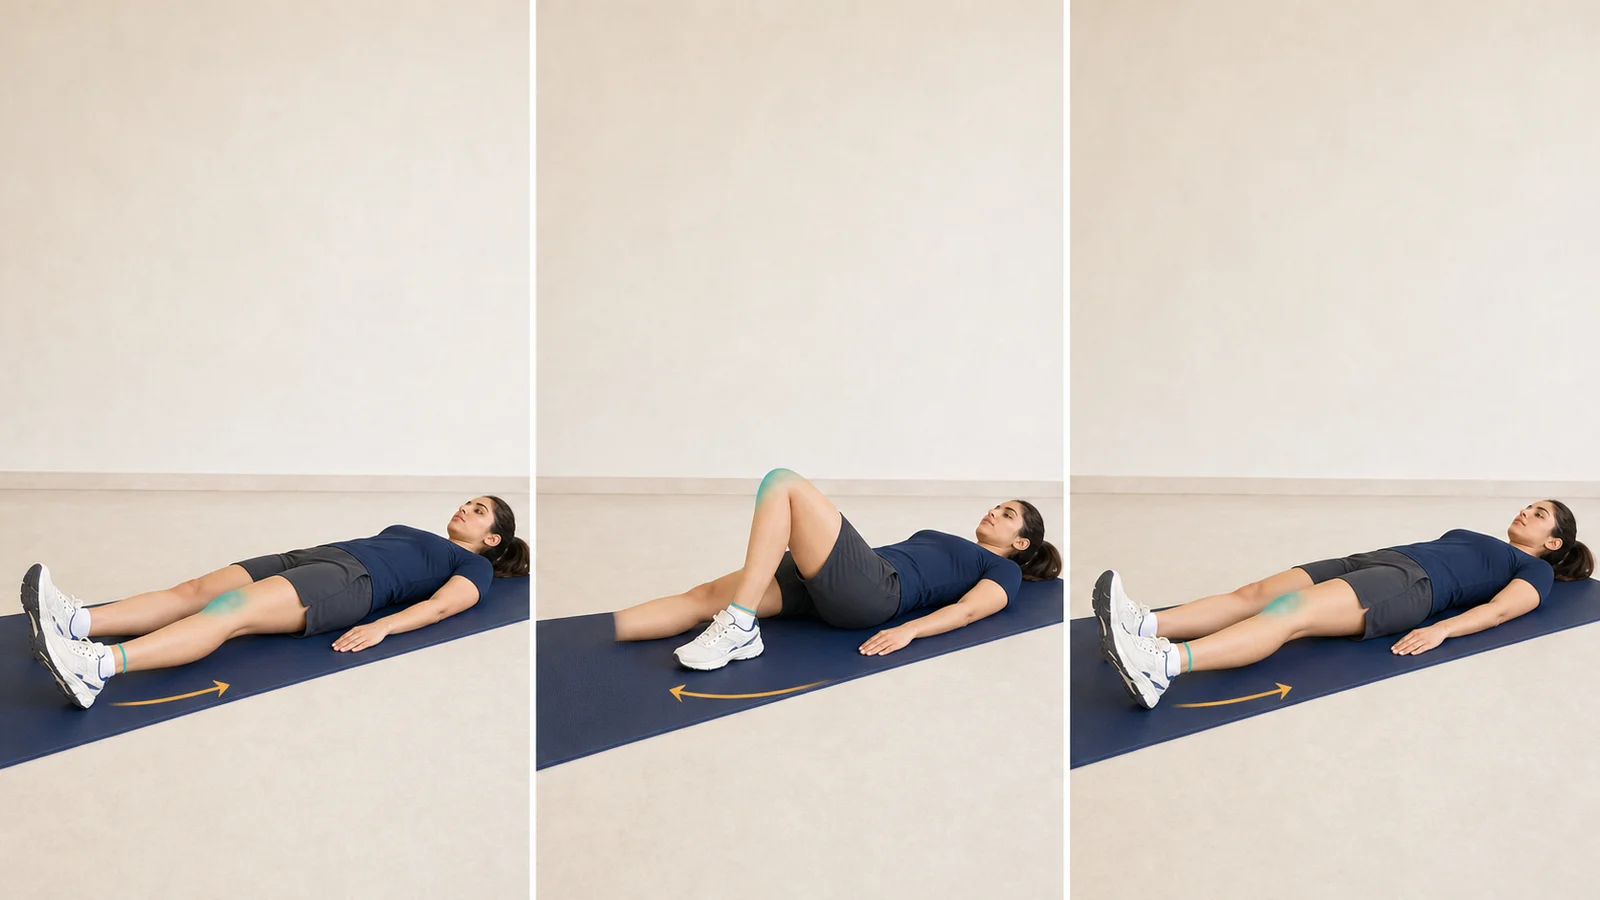
Heel slide
- Entry/setup: confirm the permitted flexion range; lie with the heel on a towel or sliding surface and the toes upward.
- Steps: slide the heel toward the body, keep the knee over the second toe, pause briefly at the permitted limit without forcing, then straighten with control.
- Breathing/tempo: breathe out during flexion and in during return; keep both directions slow.
- Dose/rest: range, repetitions and frequency are protocol-specific; reduce volume if swelling persists into the next day.
- Correct response: smooth sliding, stable pelvis and tolerable pressure without catching.
- Avoid/stop: forceful pulling, pelvic lifting or leg rotation; stop for sharp pain, locking/catching or clear swelling increase.
- Easier/progress: use a shorter range or assistance from the other leg; progress to a larger smooth range with a quiet next-day response.
↔️ Week 2
Priorities are clear quadriceps activation, a straight-leg raise without lag, improving range and a more normal walking pattern. Unlocking a brace or stopping crutches requires both criteria and permission.
Exercise for this period
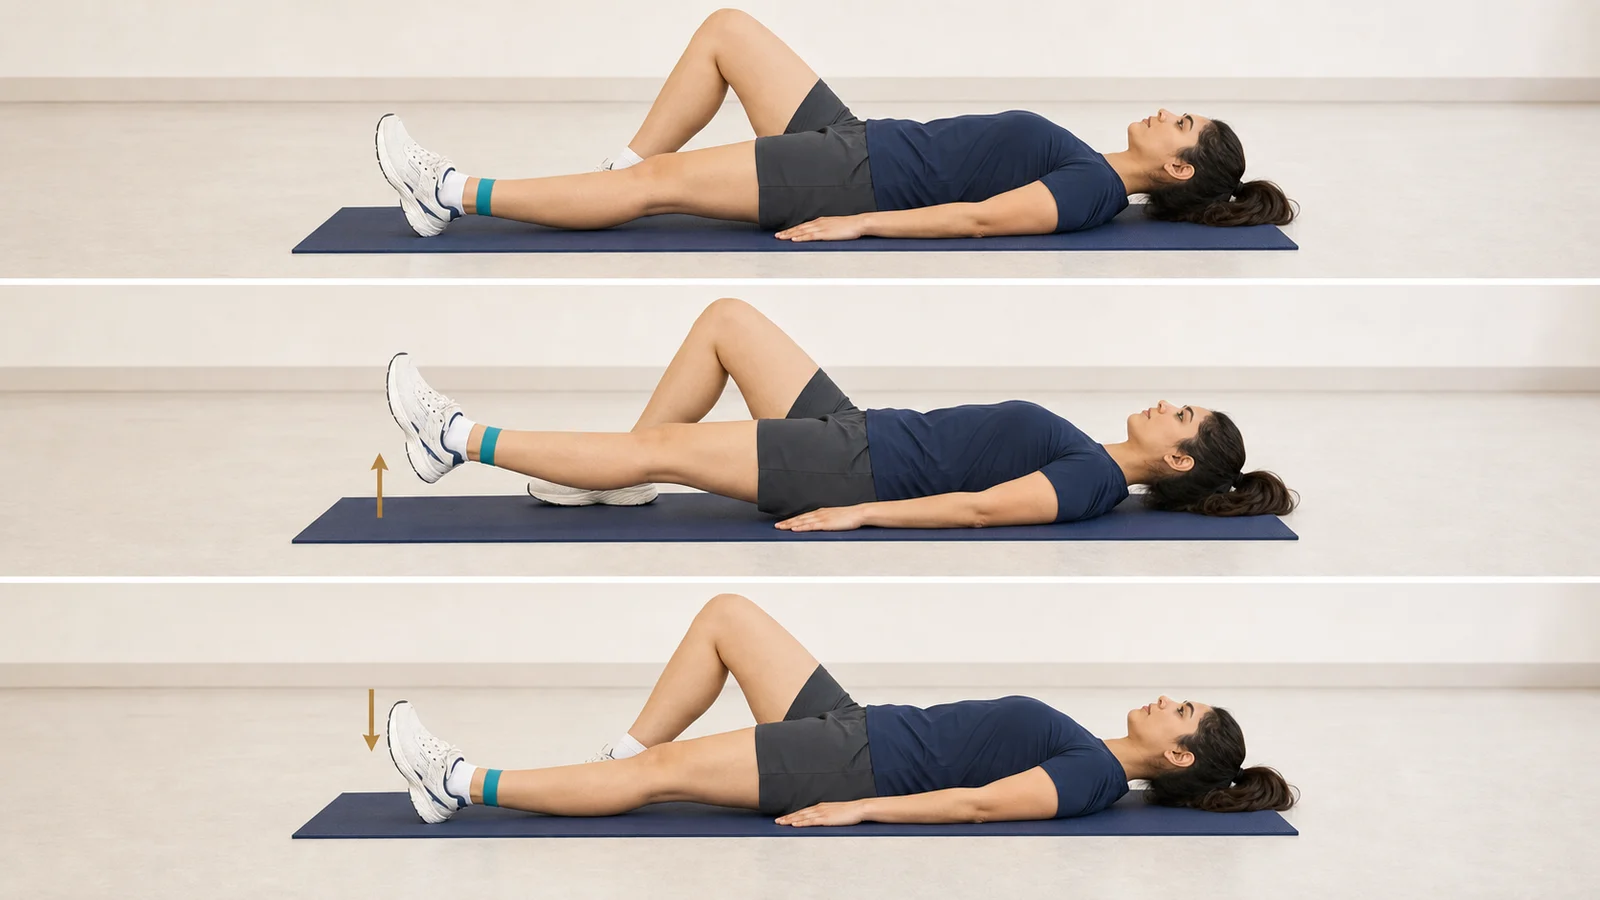
Straight-leg raise
- Entry/setup: start only with clear quadriceps activation and no extension lag, or after therapist clearance; lie with the other knee bent.
- Steps: tighten the quadriceps, confirm the knee is straight, lift the whole leg a short distance, pause, then lower slowly and re-check extension.
- Breathing/tempo: breathe out on the lift and in on the descent; do not swing.
- Dose/rest: sets, repetitions and rest are prescribed; do not add ankle weight independently.
- Correct response: the knee remains fully straight and the pelvis/back stay quiet.
- Avoid/stop: knee lag, back arch or momentum; stop if the knee bends or pain/swelling clearly rises.
- Easier/progress: return to quadriceps sets or use assisted lifting; progress repetitions, then resistance only when cleared.
⚖️ Week 3
If swelling and movement quality are satisfactory, low-range closed-chain exercise such as a supported mini-squat may be added. Meniscus repair restrictions may delay this.
Exercise for this period
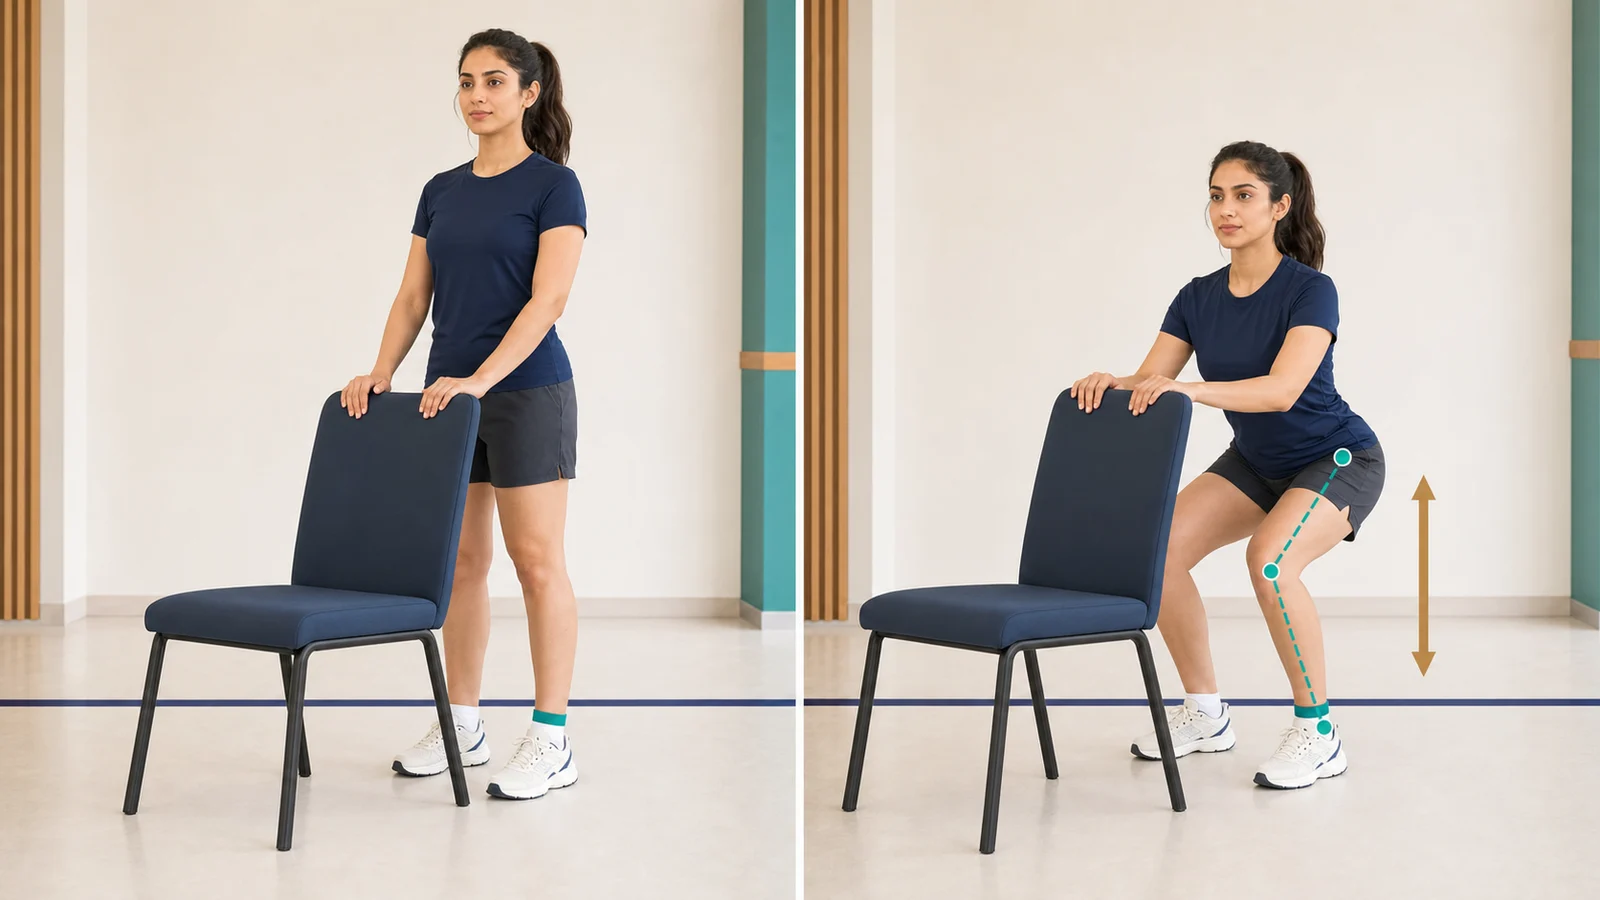
Supported mini-squat
- Entry/setup: begin after weight-bearing is allowed and gait/swelling are controlled; stand at a fixed counter with feet hip-width apart.
- Steps: use light hand support, send the hips slightly back, bend both knees only through the allowed range, track over the second toes, then rise with even foot pressure.
- Breathing/tempo: breathe in down and out up; control both phases.
- Dose/rest: start time, depth, sets, repetitions and rest require clearance.
- Correct response: level pelvis, heels down and nearly even pressure through both feet.
- Avoid/stop: inward collapse, heel lift or unloading the operated side; stop for giving way, sharp pain or persistent next-day swelling.
- Easier/progress: use a smaller range or more hand support; increase depth/resistance only with symmetry and clearance.
🌱 Week 4
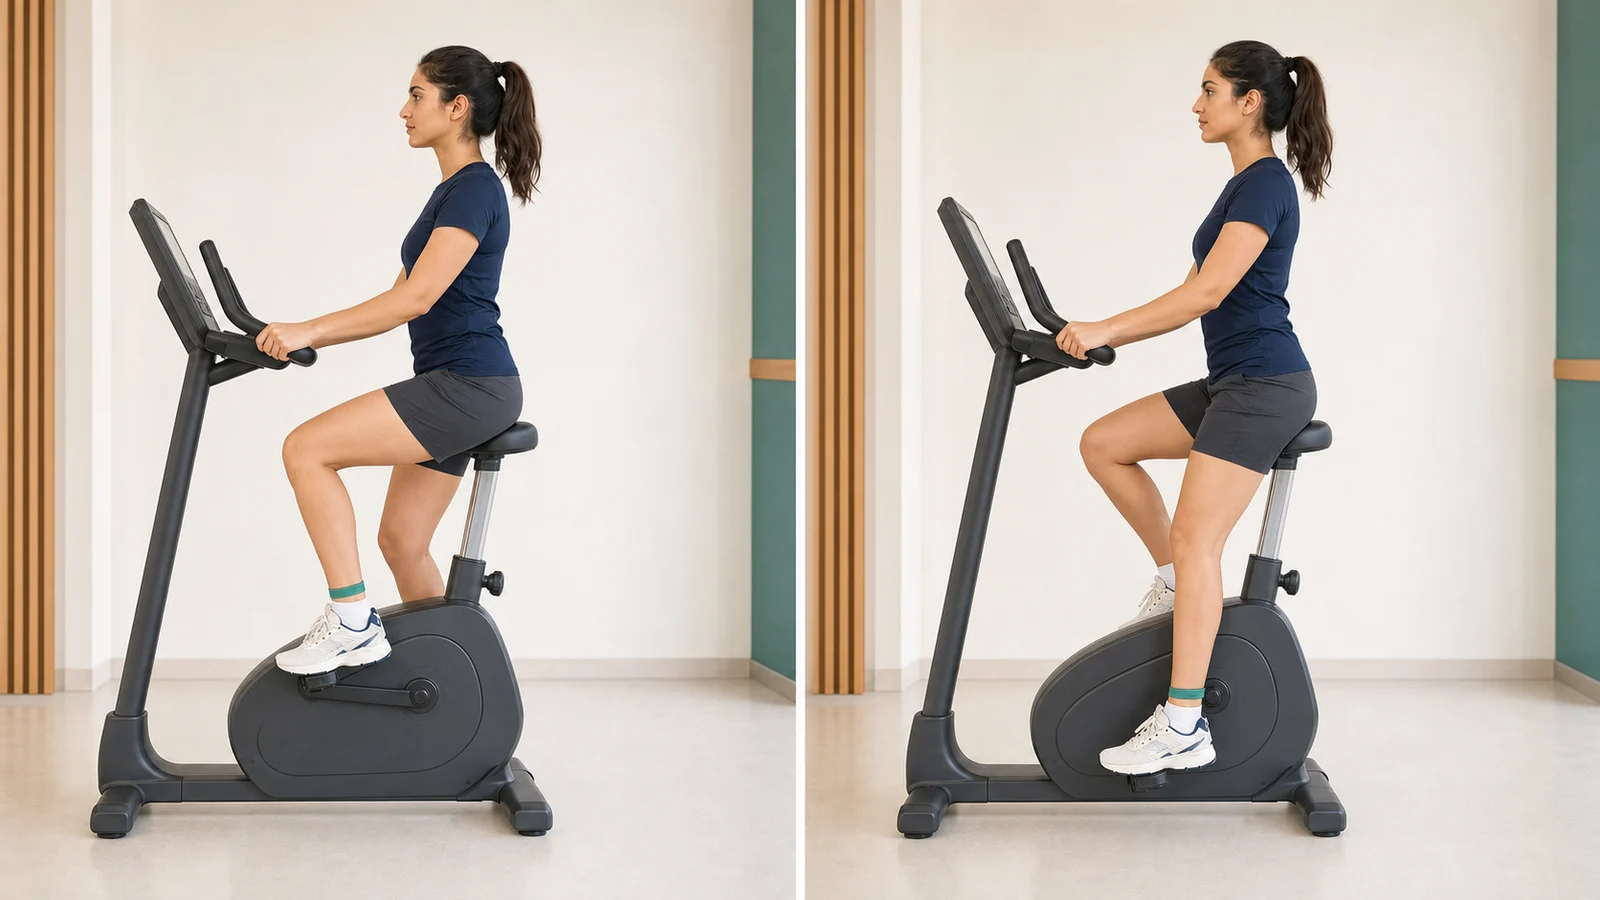
With enough range and physiotherapy clearance, a stationary bicycle with a relatively high saddle and low resistance may begin. This is not an automatic running milestone.
Exercise for this period
Stationary bicycle
- Entry/setup: begin only after adequate flexion and therapist clearance; use a stable bike, relatively high saddle and safe handhold.
- Steps: start at minimum resistance, pedal slowly, use permitted rocking arcs if a full revolution is not yet possible, keep the pelvis level and slow down gradually before stopping.
- Breathing/tempo: breathe normally and maintain an even cadence without surges.
- Dose/rest: time, cadence, resistance and frequency are prescribed; do not increase resistance independently.
- Correct response: smooth revolutions without pelvic lift or an adverse same-/next-day knee response.
- Avoid/stop: low saddle, pelvic rocking, speed or resistance; stop for sharp pain, catching, swelling or compensation.
- Easier/progress: use permitted arcs or shorter time; progress time first and resistance later.
🌱 Month 2: days 31–60
Goals are to maintain full extension, advance flexion gradually, walk without a limp, control swelling and build foundational strength. Progress depends on a quiet knee response and good movement quality—not simply reaching day 60.
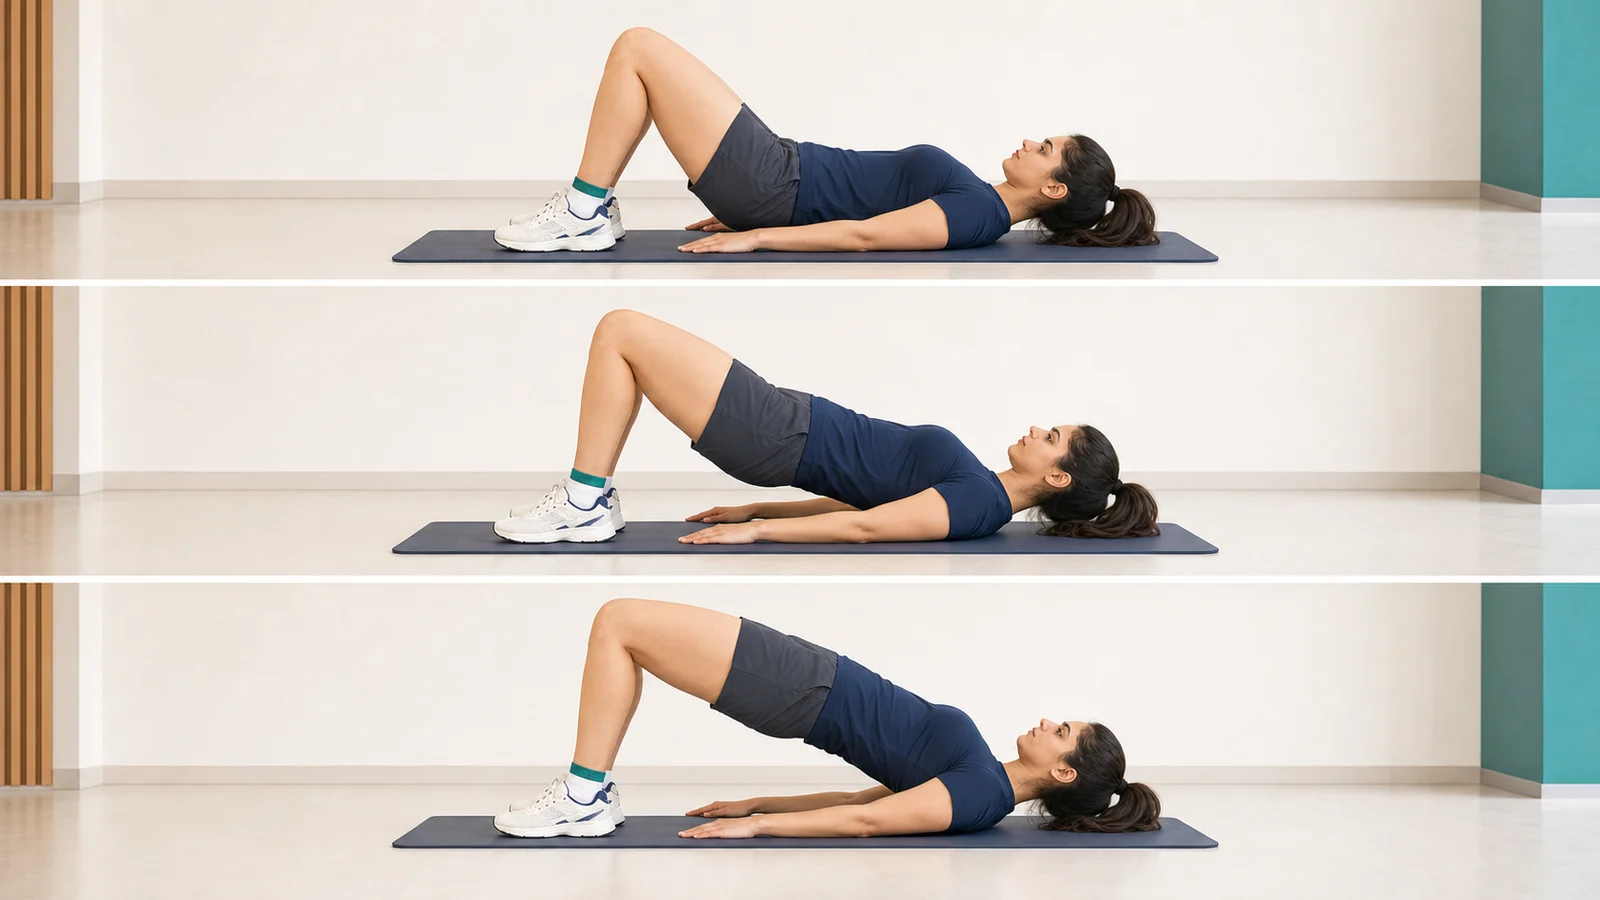
Double-leg bridge
- Entry/setup: begin after swelling is controlled and flexion/loading are permitted; hamstring load depends on graft choice.
- Steps: lie with feet hip-width, gently brace the trunk, press evenly through both feet, lift to a shoulder–hip–knee line, pause without arching, then lower slowly.
- Breathing/tempo: breathe out up and in down; keep the pelvis level.
- Dose/rest: sets, repetitions, hold and rest are prescribed.
- Correct response: gluteal effort and even foot pressure without back or neck strain.
- Avoid/stop: excessive back arch, knees drifting apart or unequal pressure; stop for knee/hamstring pain or persistent cramp.
- Easier/progress: reduce height or hold; single-leg versions only after symmetrical repetitions and clearance.
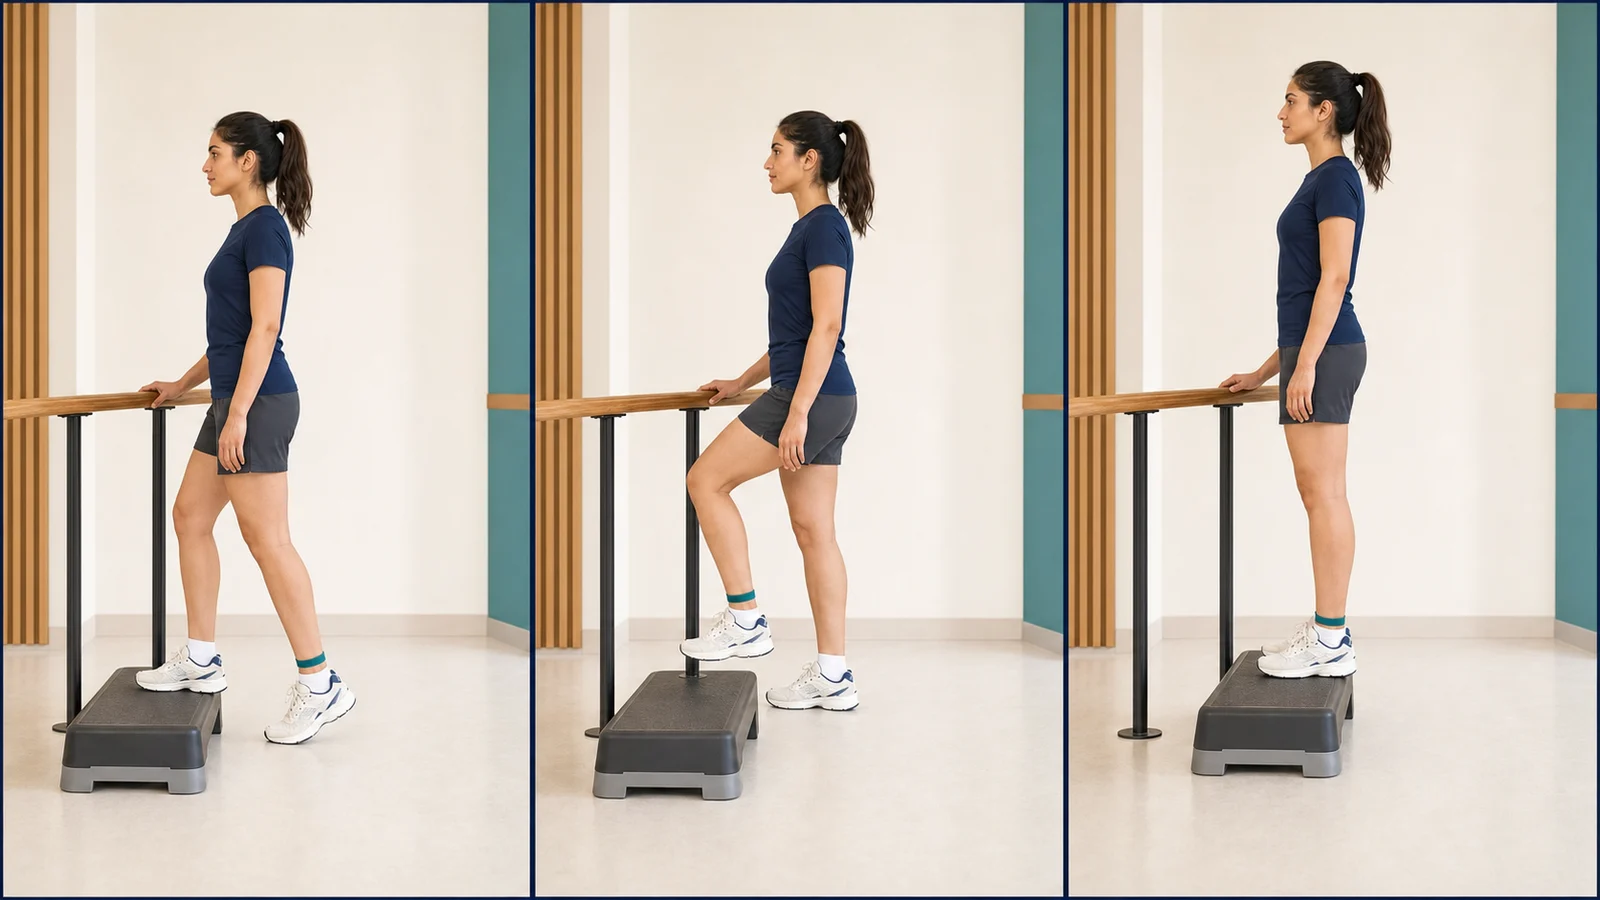
Low step-up
- Entry/setup: use after gait is acceptably even and the prescribed step height is permitted; keep a rail nearby.
- Steps: place the whole operated foot on the step, shift weight gradually, track the knee over the second toe, rise without jumping, level the pelvis, then descend with control.
- Breathing/tempo: breathe out up and in down; make the descent especially slow.
- Dose/rest: height, sets, repetitions and rest are prescribed; do not increase height and volume together.
- Correct response: the back leg contributes little and the trunk/knee remain aligned.
- Avoid/stop: pushing off, partial foot placement or inward collapse; stop for giving way, sharp pain or swelling.
- Easier/progress: lower the step or use more rail assistance; progress when ascent and descent are smooth.
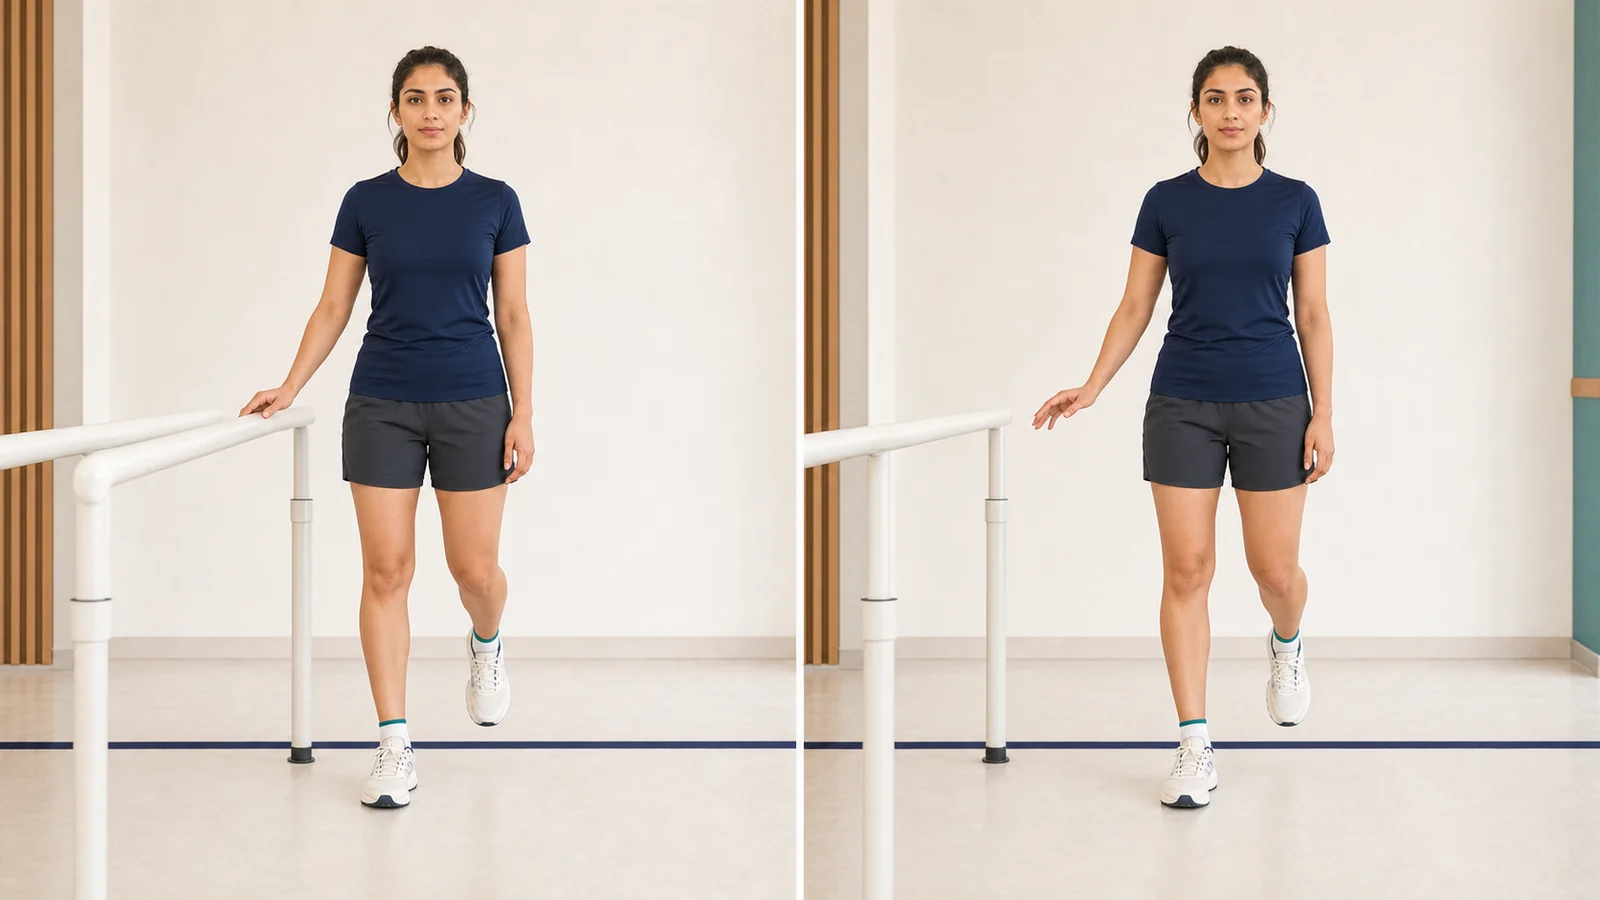
Single-leg balance with support nearby
- Entry/setup: begin when weight transfer and single-leg standing are safe; use shoes, a flat surface and a secure rail.
- Steps: shift onto the operated leg, lift the other foot slightly, keep a soft knee/level pelvis/upright trunk, focus on a fixed point, and finish before form deteriorates.
- Breathing/tempo: breathe normally; small ankle corrections are expected but avoid large sways.
- Dose/rest: hold time, repetitions and rest are prescribed.
- Correct response: light fingertip support, level pelvis and knee aligned over the foot.
- Avoid/stop: knee locking, pelvic drop or early unstable surfaces; stop for giving way or unsafe balance.
- Easier/progress: use more hand contact or a split stance; increase time/reduce contact before supervised unstable surfaces.
After meniscus repair, squat range, step height and weight-bearing may remain restricted. Hamstring loading may also differ after a hamstring-tendon graft.
🏋️ Month 3: days 61–90
The focus shifts toward strength, single-leg control and greater activity tolerance. Sudden pivoting, contact sport and unsupervised running are still inappropriate. Running is considered only when swelling is minimal, range is adequate, basic tasks are pain-free and quadriceps strength meets the treating team’s criteria.
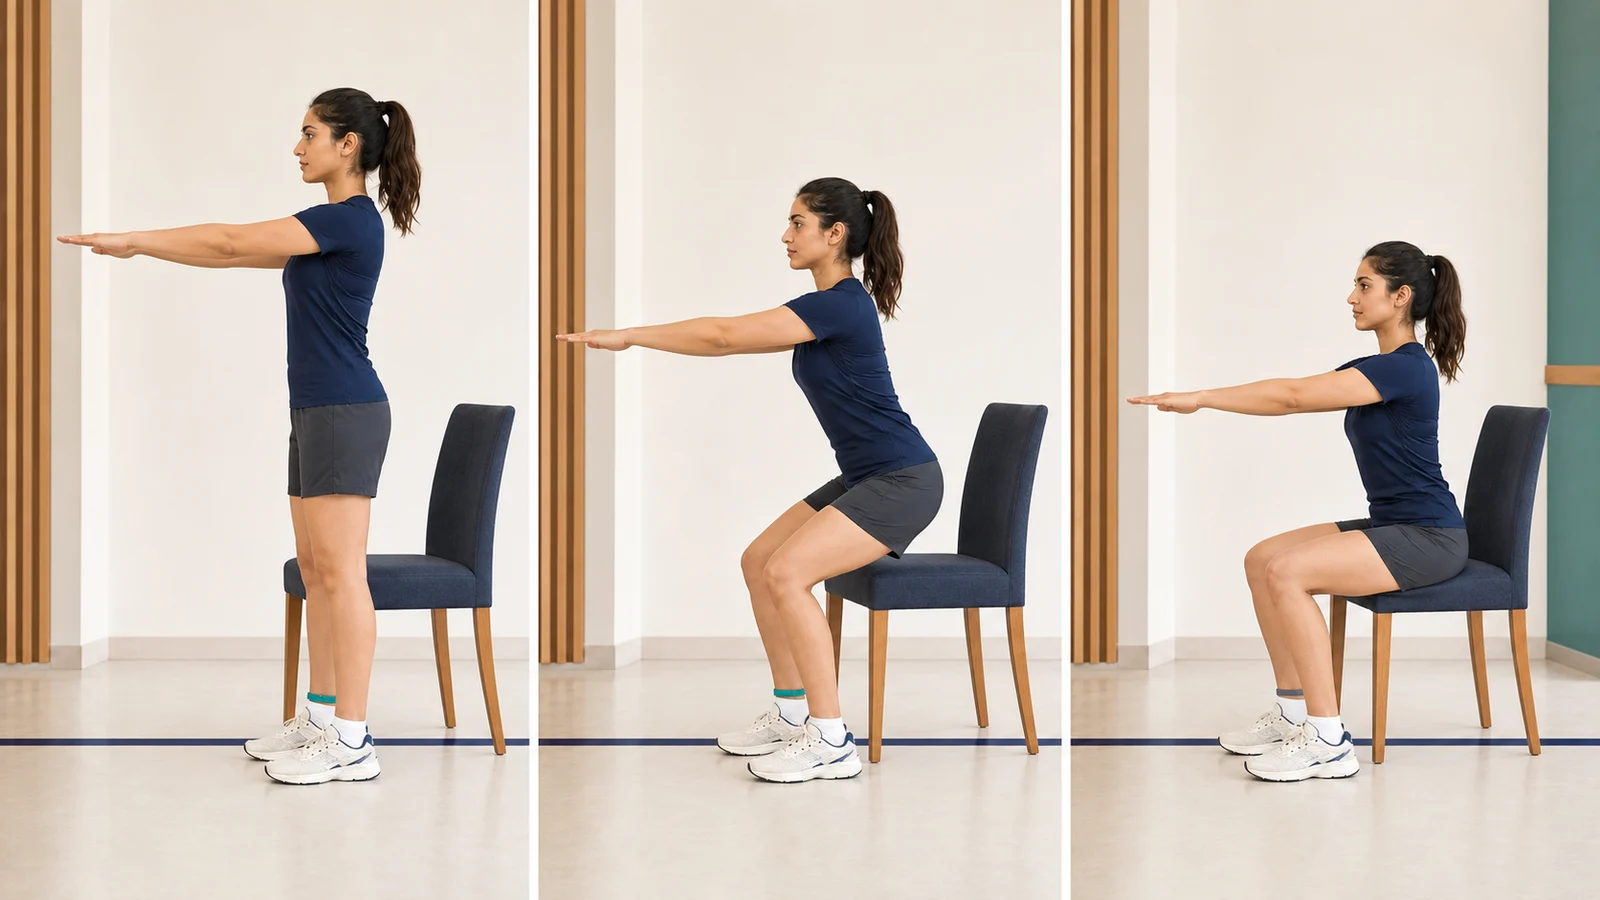
Squat to chair
- Entry/setup: begin after supported squats are well controlled; use a stable chair against a wall and feet hip-width apart.
- Steps: spread pressure across both feet, move the hips back and trunk slightly forward, track knees over toes, touch the chair lightly, then rise with even loading.
- Breathing/tempo: breathe in down and out up; lower more slowly than you rise.
- Dose/rest: depth, sets, repetitions and rest are prescribed; progress one variable at a time.
- Correct response: soft chair contact, heels down and symmetrical loading.
- Avoid/stop: dropping, inward collapse or healthy-side shift; stop for sharp pain, giving way or next-day swelling.
- Easier/progress: use a higher chair or light hand support; lower chair/load only after movement quality is approved.
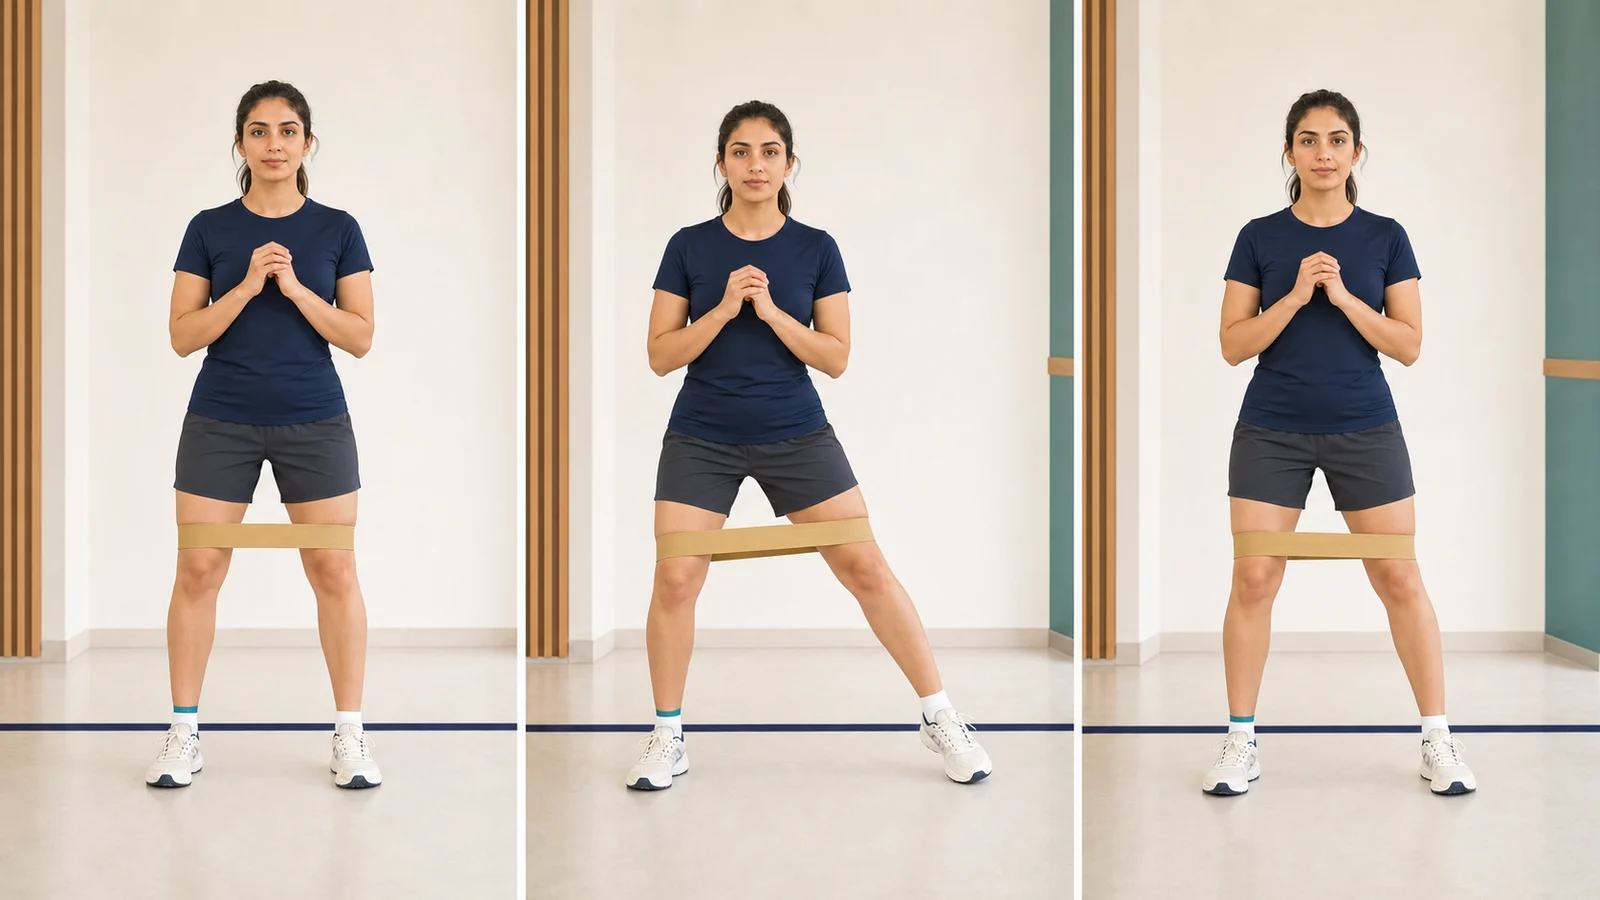
Lateral band walk
- Entry/setup: begin after controlled standing and shallow squatting; use the therapist-selected band position and a clear path.
- Steps: maintain light band tension, send hips slightly back, take a short side step, bring the trailing foot in without losing all tension, and keep toes/kneecaps forward.
- Breathing/tempo: breathe normally; use short equal steps without bouncing.
- Dose/rest: band position, resistance, steps, trips and rest are prescribed.
- Correct response: stable trunk/level pelvis and knees staying over the feet.
- Avoid/stop: dragging, oversized steps, toe turn-out or knee collapse; stop for knee/hip pain or loss of form.
- Easier/progress: lighter/higher band or shorter steps; increase steps before resistance.
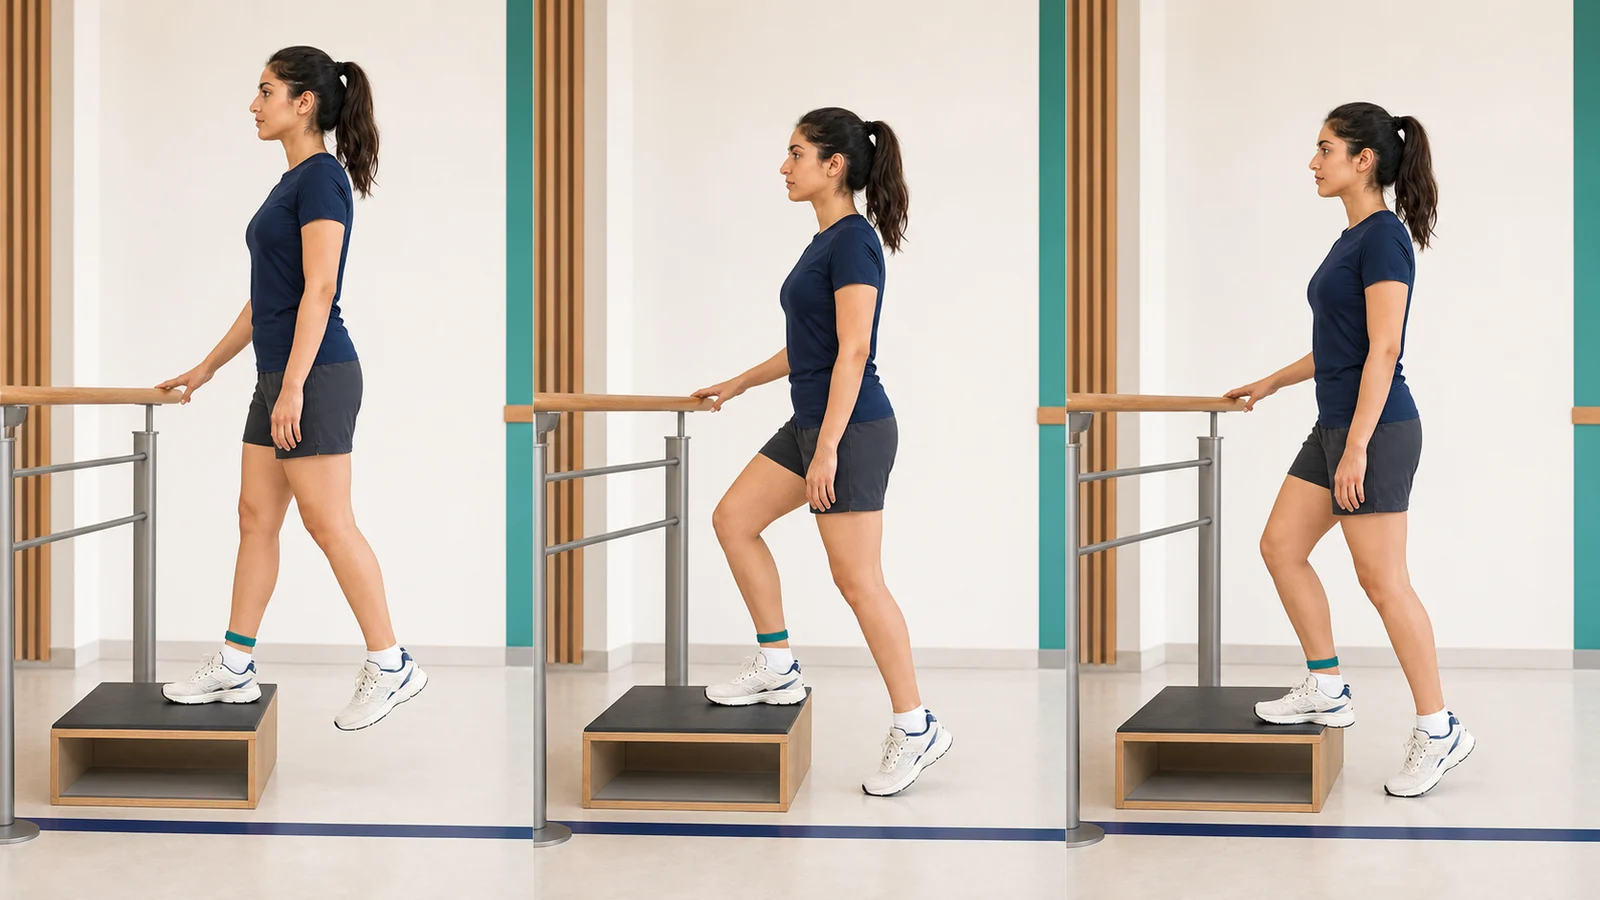
Controlled step-down
- Entry/setup: begin after low step-ups and squats show good alignment; use a low fixed step and rail.
- Steps: keep the whole operated foot on the step, level the pelvis, guide the knee over the second toe, bend slowly until the opposite heel taps, then return without a push-off.
- Breathing/tempo: breathe in down and out up; emphasise a slow descent.
- Dose/rest: height, sets, repetitions and rest are prescribed; reassess form as fatigue begins.
- Correct response: no pelvic drop or inward knee motion and only a light tap by the other heel.
- Avoid/stop: collapse, pelvic drop or pushing off the other foot; stop for anterior knee pain, giving way or swelling.
- Easier/progress: lower the step or use more rail assistance; increase height/volume only after full control.
🎯 After 90 days: running and return to sport
Assessment may include pain and swelling, range, clinical stability, quadriceps/hamstring strength, squat and landing quality, hop testing and psychological readiness. The AAOS considers a functional test such as a hop test only one factor in the decision.
In young athletes, return to knee-strenuous sport before nine months was associated with about a 6.7-fold higher rate of a second ACL injury. This was observational, so nine months is neither a guarantee nor proof of causation. Full return generally requires sufficient time and functional criteria.
Driving, work, prayer and daily activities
- Driving: only when an emergency stop is safe, no brace/crutch interferes and no sedating medicine is being used. Aspetar reports approximate ranges of 4–6 weeks for right ACL reconstruction and 2–3 weeks for the left; the real decision is individual.
- Work: desk work may be possible before standing, stair-based or heavy work.
- Prayer: until deep flexion, kneeling and rising are safe, use an acceptable alternative such as a chair according to your religious guidance. Do not force pain to reach a position.
- Long travel: ask about clot risk, movement breaks and prescribed medication.
Frequently asked questions
Is the ACL repaired or reconstructed?
For many complete tears selected for surgery, reconstruction with a graft is more common. Tear pattern and remaining tissue may change the options.
Which graft is best?
There is no universal answer. Age, sport, work, anterior knee symptoms, tendon quality and surgeon experience all matter. Autograft is usually preferred for young active patients.
When will full flexion return?
Timing is individual. Forcing the knee to reach a number can be harmful, particularly after meniscus repair.
Is clicking dangerous?
Painless clicking without swelling is not necessarily dangerous; locking, giving way, sharp pain or new swelling should be assessed.
Can I run in month three?
Not automatically. Swelling control, range, quadriceps strength, movement quality and clearance from the treating team matter.
What if my meniscus was repaired?
Weight-bearing, flexion and exercise restrictions are often more conservative. The surgeon’s specific protocol takes priority.
How long is knee swelling expected?
Swelling is common in the first days and may rise slightly after activity, but the overall trend should be downward. Sudden or progressive swelling, especially with calf pain or breathlessness, needs assessment.
When should I change the dressing and take a shower?
In this guide’s baseline protocol, the first dressing usually remains for 48–72 hours and a short shower may be possible after about 48 hours if the wound is dry and the waterproof cover is intact. Replace a wet, dirty or loose dressing sooner.
How long will I need crutches?
After an isolated reconstruction they are often used for one to two weeks, but the criterion for stopping is walking without a limp or an increase in pain or swelling—not reaching a fixed date.
Must the brace stay on all the time?
Brace use depends on the procedure and discharge instructions. Some protocols initially lock it for walking and later unlock or remove it once quadriceps control is adequate; do not change the setting yourself.
When does physiotherapy start?
Simple movements commonly begin in the first days, while the surgical centre sets the first formal appointment. Meniscus repair or another associated procedure can change the schedule.
When can I drive?
Only when you can perform an emergency stop promptly and without pain, no brace or crutch interferes with control, and you are not taking sedating medicine. Timing differs for the right and left knee and for manual versus automatic cars.
When can I return to work?
Desk work is usually possible before standing, stair-based or heavy work. Safe travel, comfortable sitting and swelling control matter more than a fixed date.
When can I kneel or pray in the usual position?
Use an alternative until deep flexion, kneeling and rising are possible without excessive stress or loss of balance. Anterior knee pain, especially after patellar-tendon graft harvest, may delay this.
What should I do if the knee will not fully straighten?
Extension is an important goal in the first weeks. Do not leave a pillow directly under the knee, perform the prescribed exercises consistently, and contact the treating team if extension is not improving or is getting worse.
Summary and appointments
In the weeks and months after ACL reconstruction, consistent wound care, swelling control, restoration of extension, quadriceps activation and criteria-based progression matter more than getting ahead of the calendar. If a meniscus or another structure was also repaired, that repair’s specific protocol takes priority over the general timings in this guide.
For postoperative follow-up and rehabilitation planning, call +98 913 782 5207, use online booking, or see the knee arthroscopy service.
Scientific sources
View scientific sources
- AAOS Management of ACL Injuries CPG, 2022
- Aspetar ACL reconstruction rehabilitation guideline, 2023
- Mass General Brigham ACL protocol, revised 2024
- MOON ACL rehabilitation guidelines
- Systematic review of prehabilitation
- KANON randomised trial, five-year follow-up
- Return before nine months and second ACL injury
- Accelerated versus delayed weight-bearing review
- Swedish National Knee Ligament Registry cohort
- Mass General FAQ: knee care and rehabilitation
- AAOS Patient Guide to Safe Orthopaedic Surgery
- FDA guidance on prescribed opioid pain medicine
- WHO EMRO emergency contacts for Iran
This content is provided for general education only and does not replace an examination, advice from your treating clinician, your discharge sheet or your surgeon’s specific protocol. Timing, range of motion, weight-bearing and exercise dose vary with the procedure, additional treatment and each person’s condition. Do not change medication, dressing care or your exercise plan without consulting your treating team.

Dr. Jalil Emad
Orthopedic specialist and surgeon, board-certified in bone and joint surgery; years of experience in knee and hip replacement, sports injuries and arthroscopy in Isfahan.
Related articles
Total Knee Replacement Surgery: Postoperative Care and Rehabilitation
A complete, criteria-based guide to surgery day and care after total knee replacement—from wound care, medicines, and warning signs to the first 90 days of rehabilitation and a safer return to activity.
Latarjet Shoulder Surgery: Postoperative Care and Rehabilitation
A complete, criteria-based guide to surgery day and care after Latarjet shoulder surgery—from wound care, sling use, medicines, and warning signs to the first 90 days of rehabilitation and a safer return to activity.
Arthroscopic Rotator Cuff Tendon Repair Surgery: Postoperative Care and Rehabilitation
A complete, criteria-based guide to care after arthroscopic rotator cuff repair—from dressing changes, sling use, and warning signs to the first 90 days of rehabilitation and a safer return to activity.