
On this page
- 🏥 Surgery day and discharge
- ⚠️ Warning signs and when to call
- 🩹 Care during the first days after surgery
- 🛡️ First two weeks
- ↔️ Second two weeks
- 🌱 Days 31 to 60: restoring passive and assisted motion
- 🏋️ Days 61 to 90: gradually restoring active motion
- 🎯 After day 90: criteria-based strengthening, work, and sport
- 🚗 Driving, work, and return to activity
- ❓ Frequently asked questions
- ✅ Practical summary
- 📚 Scientific sources
Arthroscopic Rotator Cuff Tendon Repair Surgery: Postoperative Care and Rehabilitation
A complete, criteria-based guide to care after arthroscopic rotator cuff repair—from dressing changes, sling use, and warning signs to the first 90 days of rehabilitation and a safer return to activity.
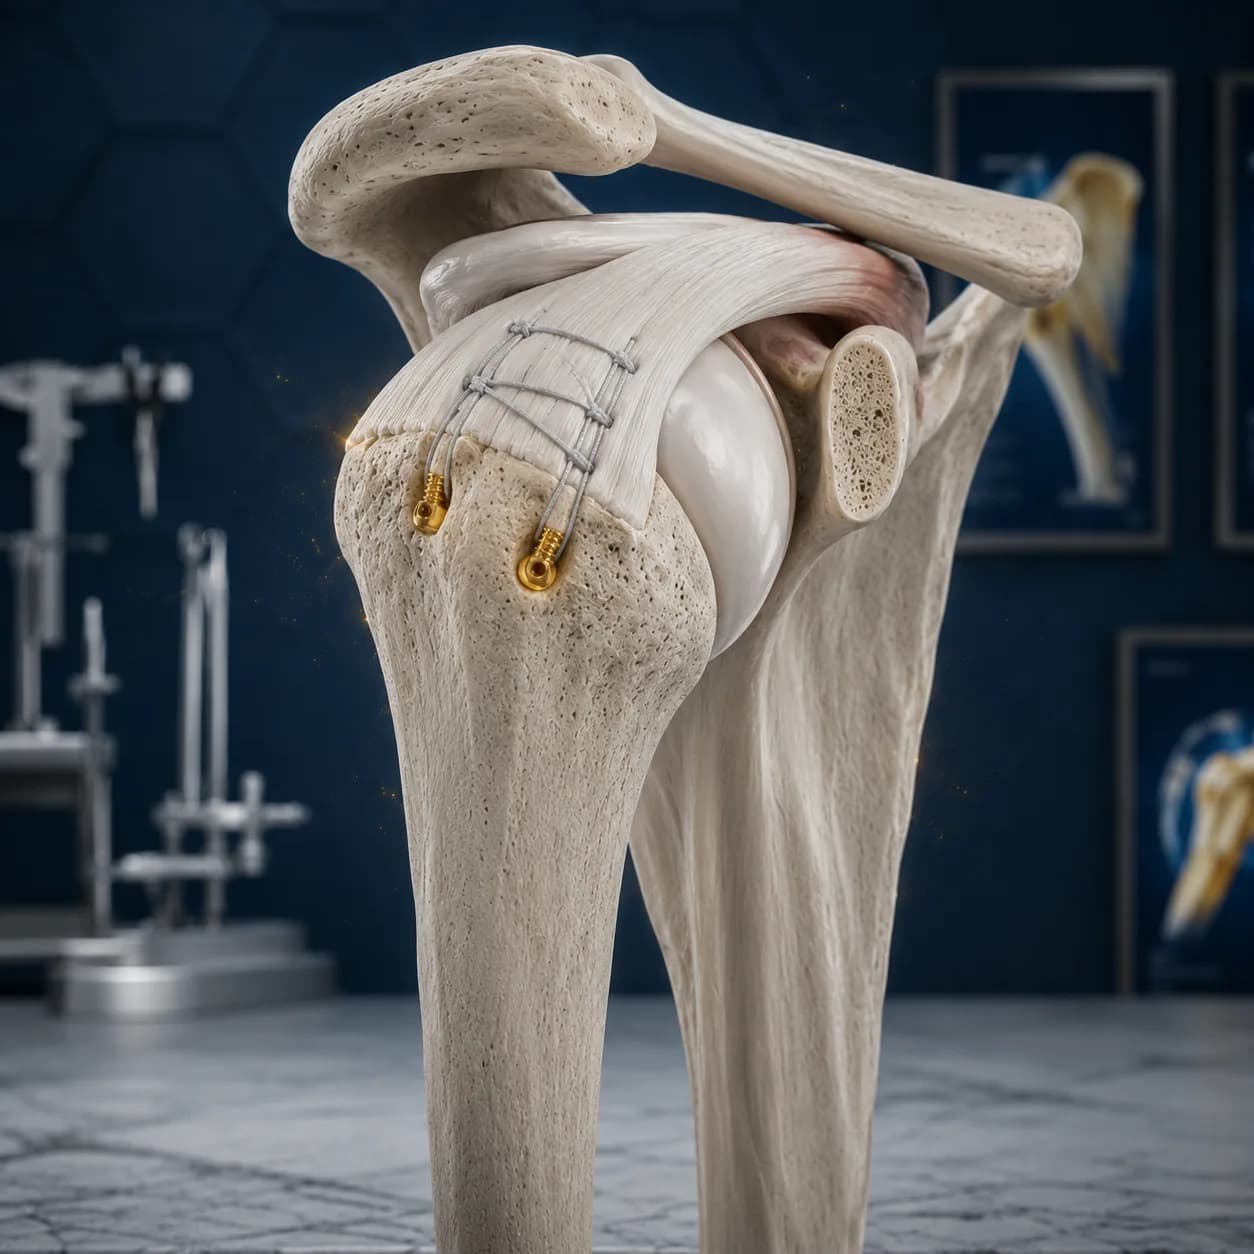
🏥 Surgery day and discharge
This operation is usually performed under general anesthesia, and a regional shoulder nerve block may be added for better pain control. After surgery, you will stay in recovery for a few hours while the team monitors your alertness, breathing, blood pressure, nausea, and pain. The operated shoulder is placed in a sling, usually with a small abduction pillow. If you received a nerve block, your arm and hand may feel heavy, numb, or weak for a while. Until sensation returns, protect the hand from heat, impact, pressure, and hanging unsupported.
- Discharge criteria: Many patients leave on the day of surgery once their vital signs are stable, they are sufficiently alert, they can tolerate fluids, pain and nausea can be managed with the home plan, and they can walk safely with any help they need. A responsible adult must take you home and stay with you for the first night.
- As the block wears off: Pain may become more noticeable as numbness fades. Take your medicines exactly as prescribed and timed on your discharge sheet; do not wait for severe pain.
- Equipment and written instructions: Before leaving, you should receive or have recorded your prescription, written dressing and activity instructions, sling and abduction pillow, follow-up time, and physiotherapy start plan. Keep that personal plan beside your medicines.
- Protecting the repair: Having little pain does not mean the tendon has healed. Do not lift anything, pull a door, or push through the operated palm to stand up.
- Your individual plan: The size and number of repaired tendons, tissue quality, and any simultaneous biceps tenodesis or subscapularis repair change when movement may begin and when the sling can be discontinued.
This guide is written for arthroscopic rotator cuff repair. If your surgeon or discharge sheet sets a specific restriction, that takes precedence — and when anything is unclear, ask your care team.
⚠️ Warning signs and when to call
Contact the surgical team the same day
- Fever, chills, spreading redness or warmth, heavy, foul-smelling, yellow or green drainage, or opening of a portal
- Uncontrolled pain, a sudden pain surge, severe hand swelling, or pressure that does not improve after adjusting the sling
- Increasing numbness or weakness after the block should be fading, or new persistent tingling
- A fall, sudden pull on the arm, unplanned use of the hand to stop a fall, or a sudden sound followed by loss of function
Seek emergency help
Shortness of breath, sudden chest pain, coughing blood, fainting, swelling of the face or tongue after a medicine, or a hand that is becoming progressively cold and blue requires emergency care. In Iran, call 115.
🩹 Care during the first days after surgery
Night pain, bruising around the shoulder, and a small amount of swelling tracking down the arm can occur in the first few days. The overall trend should gradually settle rather than worsen each day. Your main tasks are simple: keep the small portal sites clean and dry, support the arm in its sling, take medicines on schedule, and do not test shoulder strength. Your discharge sheet and your surgeon's instructions always take priority over the general timelines and advice in this guide.
Important branches: With a large or massive tear, multi-tendon repair, revision repair, or poor tissue quality, no shoulder motion may be allowed for up to six weeks or progression may be slower. If you had a biceps tenodesis, active elbow bending and turning the palm upward may also be restricted for a period. After a subscapularis repair, the external-rotation limit is usually lower.
🩹 Wound care and dressing changes
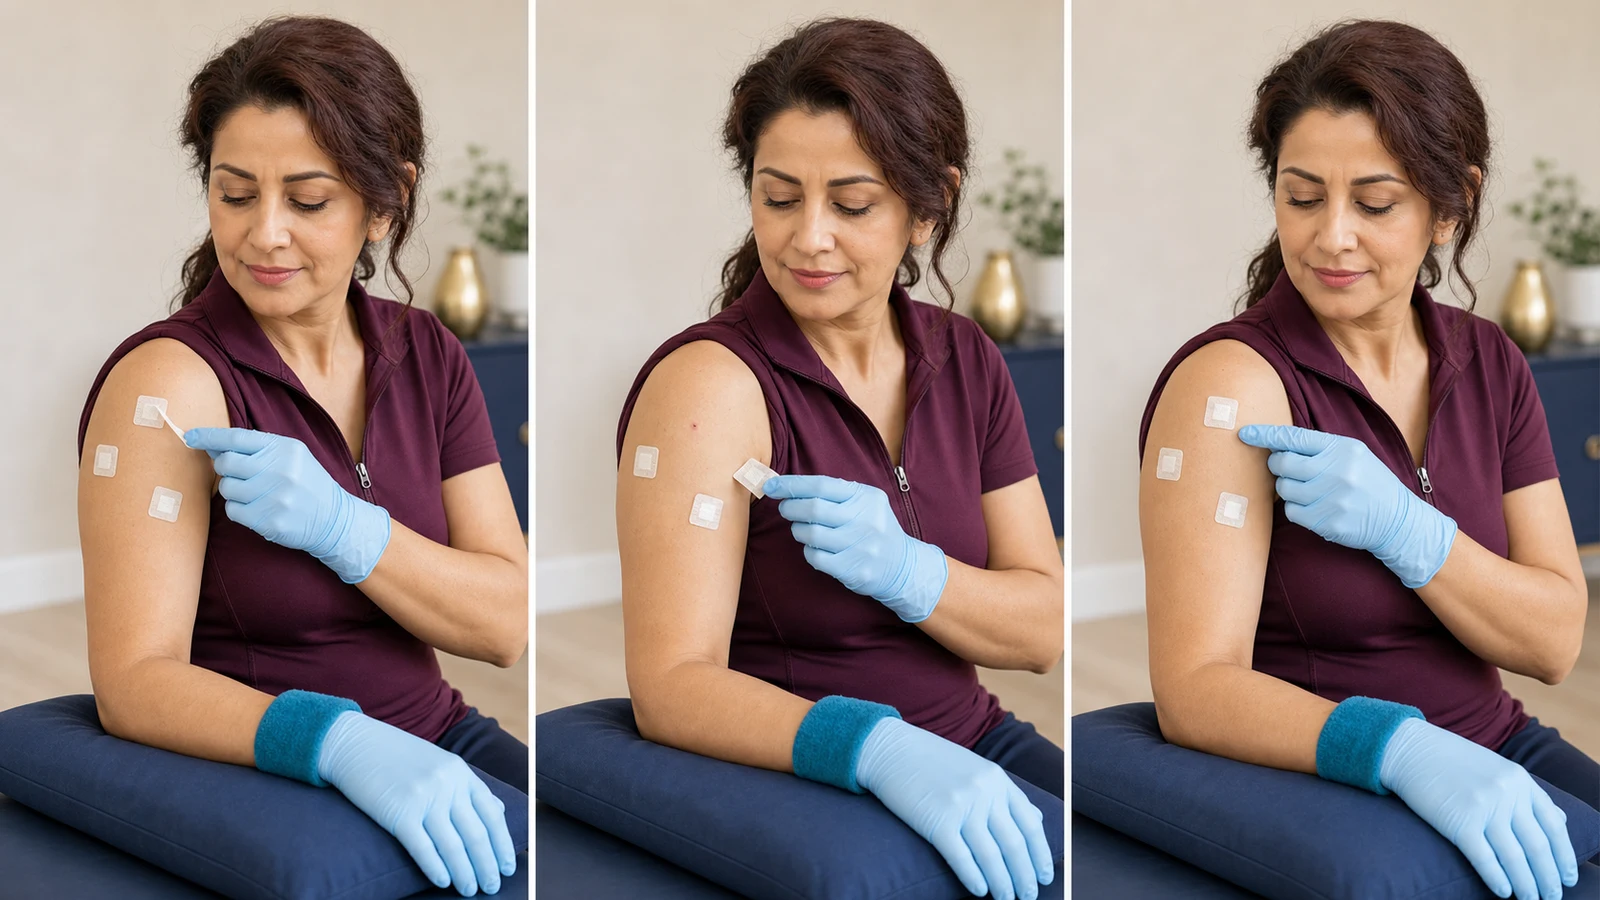
This procedure usually leaves several small, separate portals around the shoulder; their exact positions vary with the camera angle and the work performed. One small dressing over each portal is enough, and a single large patch over the whole shoulder is unnecessary. The first change may feel intimidating, but there is no need to rush. Keep the arm beside the body and supported on a pillow. If you cannot see one of the portals clearly, ask a trained helper. The goal is not to handle the wound; it is simply to replace a soiled dressing, or one that is due for change, using a clean technique.
More detailLess detail
- Keep the original dressing undisturbed and dry until the time written on your discharge sheet. In many protocols, the bulky dressing is replaced with smaller coverings after about two days, but your surgical center's timing is the one to follow.
- If a dressing becomes wet, loose, dirty, or saturated with blood or drainage, change it sooner as your center taught you. A small stable spot is different from a stain that continues to spread.
- Clean the work surface, arrange all supplies before starting, and wash and dry your hands with soap and water. The person who touches the clean field must wear sterile gloves on both hands.
- Remove each adhesive separately and gently, in the direction of the skin. Do not lift, pull back, or move the operated arm away from the body to see a side or posterior portal.
- Briefly inspect each portal without touching it directly. The edges should be closed and relatively dry. Limited redness should remain stable or shrink, not form an enlarging red ring.
- Do not pick at skin strips, tissue adhesive, scabs, or the end of a buried suture. Use alcohol, hydrogen peroxide, povidone-iodine, powder, cream, or ointment only if that specific product is written in your instructions.
- Do not touch the inner surface of the fresh dressing. Place one small, separate dressing over each portal with an even adhesive border. The adhesive should not bunch the skin or wrap tightly around the arm.
- Report thick or foul-smelling drainage, ongoing bleeding, separation of portal edges, repeated soaking of a dressing, or spreading redness and warmth on the same day.
🚿 Showering and getting the portals wet
When you may shower depends on the dressing and whether there is an additional incision. Some fully arthroscopic protocols allow a brief shower after about 48 hours, but if you had a mini-open tenodesis or different instructions, follow the written timing you were given.
More detailLess detail
- Use a waterproof cover only if the surgical center recommends it and its edges remain sealed. A dressing being waterproof does not by itself mean you have permission to shower.
- Do not direct high-pressure water at the portals or scrub them. After showering, pat the area dry gently with a clean towel.
- If water gets underneath the cover, do not leave a wet dressing in place; replace it using the method you were taught.
- Avoid baths, pools, hot tubs, and saunas until every portal is fully closed and your care team approves.
💊 Medicines and preventing complications
Take medicines only according to your discharge prescription, and record the time of each dose. Some combination pain medicines already contain acetaminophen. Before adding any over-the-counter medicine, ask a pharmacist to check the label and possible interactions.
More detailLess detail
- Do not make up for a missed dose by doubling the next one, and never take another person's prescription medicine.
- Stronger pain medicines may cause drowsiness, nausea, and constipation. Do not combine them with alcohol or another sedative, and do not drive while taking them.
- If you were prescribed a blood-clot preventive, antibiotic, or stomach-protection medicine, follow the full course and dosing interval on that prescription.
- Hives, swelling of the lips or tongue, wheezing, or shortness of breath after a medicine is an emergency.
🧊 Pain, swelling, and safe use of cold
A temporary increase in pain is expected as the nerve block wears off. Cold can help, but numb skin is vulnerable, so always place a layer of cloth between the cold pack and your skin.
More detailLess detail
- Apply a cloth-wrapped cold pack around the shoulder for about 20 minutes, then let the skin warm fully. Early protocols commonly suggest four to five sessions a day.
- Never place cold directly on the skin, a portal, or a numb area, and do not fall asleep with a cold pack in place.
- Check skin color and sensation after every session. Persistent paleness, blistering, or increased numbness means you should stop using cold.
- Pain that is not controlled by the prescribed plan and rest, suddenly surges, or worsens each day requires a call.
🦾 Sling, abduction pillow, and hand movement
The sling is not merely a reminder; it keeps the arm's weight off the fresh repair. In protective protocols, it is usually worn day and night and removed only for hygiene and authorized exercises.
More detailLess detail
- Slide the elbow all the way into the closed end of the sling and support the entire forearm. Do not remove the abduction pillow on your own.
- When the sling is open, keep the upper arm beside the trunk and support the forearm on a pillow or with the unaffected hand. Do not raise the operated arm to get dressed.
- Move the fingers and wrist gently. Elbow motion is allowed after many isolated repairs, but following biceps tenodesis the elbow may need to move only with help from the other hand.
- Do not hold a bag, kettle, child, or heavy phone with the operated hand. Do not push, pull, or bear weight through that hand.
- The hand should be warm and its usual color. A cold or blue hand, pressure-related swelling, or a new loss of finger movement needs urgent assessment.
🛏️ Sleep, clothing, and everyday tasks
A semi-reclined position is often more comfortable for the first few nights. The aim is to prevent the elbow from falling behind the body and the arm's weight from hanging through the shoulder.
More detailLess detail
- Sleep with several pillows behind your torso and a small pillow beneath the forearm and behind the elbow. Do not sleep on the operated shoulder.
- Keep using the sling at night for as long as your plan states. Sleeping more comfortably is not enough reason to discontinue it early.
- Choose front-opening clothes. When dressing, put the operated-side sleeve on first; when undressing, free the unaffected side first.
- Ask someone else to vacuum, hang laundry, lift pots, reach to a high shelf, or fasten a belt behind your back.
🛡️ First two weeks
Baseline pathway: This plan is written for primary repair of a small-to-medium tear. With a large or massive tear, a multi-tendon repair, revision repair, or poor tissue quality, shoulder motion may be delayed until week 6 or later. No shoulder exercise begins simply because a date has arrived.
🛡️ 0 to 72 hours: circulation and swelling control
Goal and entry requirement: The arm stays in the sling, and only the fingers and wrist move through a comfortable range. Do not actively move the shoulder in any direction.
Exercises for this period
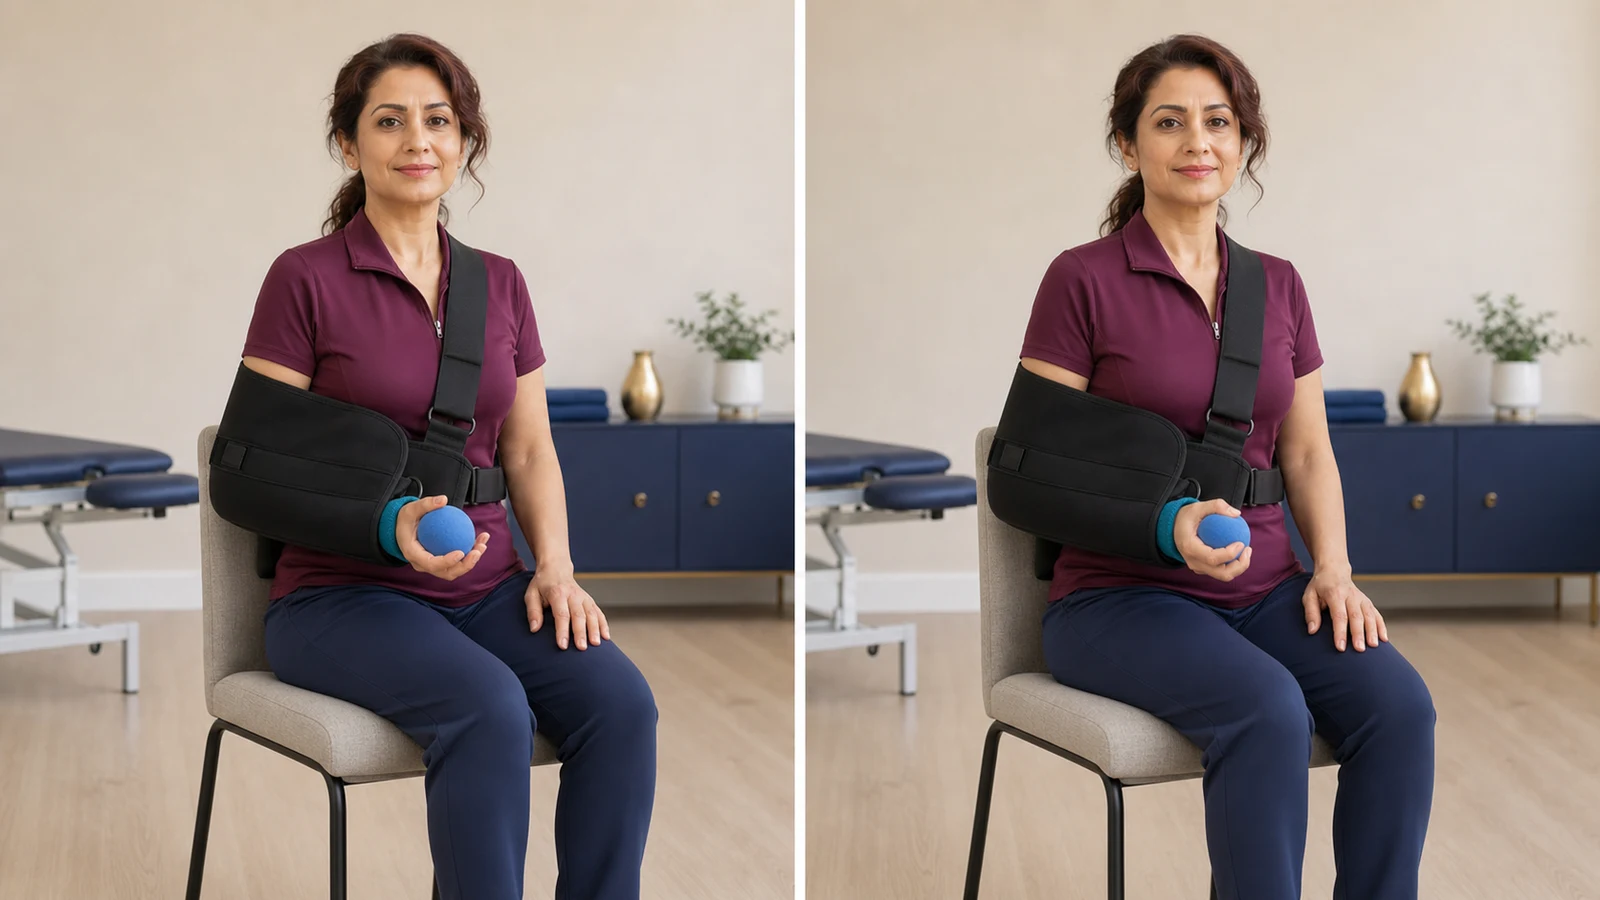
1) Gentle hand-grip squeeze (Gentle Hand-Grip Squeeze)
Gentle finger contraction supports circulation and reduces hand stiffness without moving the shoulder. Early programs perform hand and wrist movement four to six times a day; use your… tingling, color change, portal pain, or unintended shoulder motion increases.
More detailLess detail
Goal and why it matters: Gentle finger contraction supports circulation and reduces hand stiffness without moving the shoulder.
Stage and starting criteria: Begin on the day of surgery once enough hand sensation has returned to hold the ball safely. If the hand is still completely numb, only monitor its position.
Equipment and environmental safety: A very soft foam ball.
Starting position: Keep the right elbow and entire forearm fixed in the sling or on a pillow; the left hand rests on the thigh.
- Place your fingers around the ball.
- Squeeze it gently without tensing the shoulder.
- Hold for two seconds while breathing normally.
- Release all pressure.
- Open and relax the fingers between repetitions.
Range, side, and restrictions: The squeeze should be light and pain-free.
Breathing, speed, and rhythm: Exhale as you squeeze, build the pressure slowly, and release it slowly.
Documented dose: Early programs perform hand and wrist movement four to six times a day; use your physiotherapy sheet for the number in each session.
Rest: Relax the fingers fully between repetitions; if no rest interval is written, ask your care team what interval to use.
Signs of correct technique and expected response: Only the fingers work, and the arm does not shift in the sling.
Stop immediately if: tingling, color change, portal pain, or unintended shoulder motion increases.
Common mistakes: A firm ball, maximal squeezing, or hiking the shoulder are errors.
Easier version/regression: Return to a softer ball and fewer repetitions.
Progression criteria and next stage: Progress is appropriate when the hand remains settled without extra swelling or pain until the next session. Smooth performance without extra swelling or pain before the next session. Only unresisted finger and wrist movements; greater resistance is unnecessary during this phase.
Expected and adverse responses: Mild work in the palm that resolves when you release the ball.
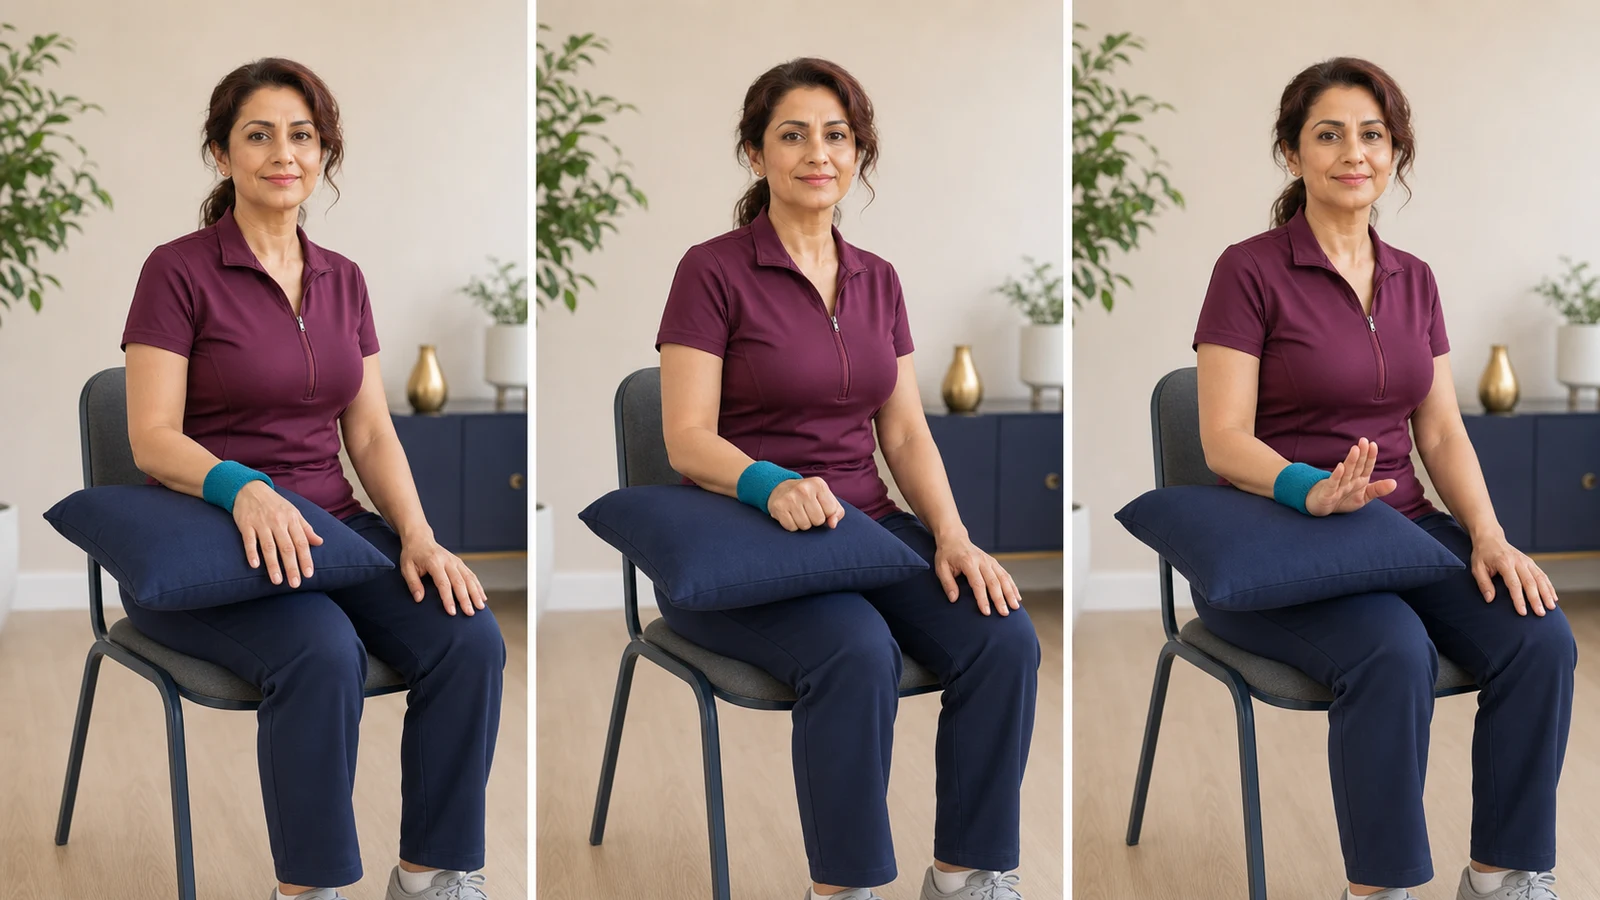
2) Opening and closing the fingers and moving the wrist (Finger and Wrist Motion)
Smooth motion at the small joints reduces hand stiffness and swelling while leaving the shoulder repair undisturbed. Four to six brief sessions a day within a comfortable range. Each movement is slow,… the hand becomes cold or blue, swelling suddenly increases, or hand movement increases…
More detailLess detail
Goal and why it matters: Smooth motion at the small joints reduces hand stiffness and swelling while leaving the shoulder repair undisturbed.
Stage and starting criteria: From the day of surgery once enough sensation has returned. Rings and other tight items should already have been removed.
Equipment and environmental safety: A firm pillow or a correctly fitted sling and a stable chair; no equipment, weight or hand spring is involved, and rings and watches should already have been removed.
Starting position: Sit with the upper arm beside the trunk and the full right elbow and forearm supported on a pillow or inside the sling. Do not let the wrist hang over the edge of the support.
- Open the fingers gently.
- Make a soft fist without squeezing.
- Release the fist.
- Move the wrist up and down through a short range.
- Keep the forearm and elbow still throughout.
Range, side, and restrictions: The movement happens only at the right fingers and wrist while the elbow and shoulder stay still throughout; do not push into the end of the wrist range.
Breathing, speed, and rhythm: Keep breathing freely, perform every movement slowly, and after several movements let the hand relax on the pillow.
Documented dose: Four to six brief sessions a day within a comfortable range. Each movement is slow, without an end-range stretch. If the hand becomes more swollen, reduce the repetitions and check the sling fit.
Rest: If the source plan gives no rest number, follow your care team's program.
Signs of correct technique and expected response: The wrist and fingers move without the shoulder muscles tightening.
Stop immediately if: the hand becomes cold or blue, swelling suddenly increases, or hand movement increases shoulder pain.
Common mistakes: Forceful forearm rotation, holding a heavy object, or taking the elbow out of the sling are errors.
Easier version/regression: Move only the fingers and reduce the wrist range.
Progression criteria and next stage: A comfortable range with stable hand color and swelling. Supported elbow motion only if your instruction sheet allows it. Progress means making the same range smoother, not adding resistance.
Expected and adverse responses: A very mild finger or wrist stretch that settles with rest.
🧊 Days 4 to 7: supported elbow motion
Entry requirement: Pain and nausea are controlled, and your plan permits briefly opening the sling for exercise.
Exercise for this period
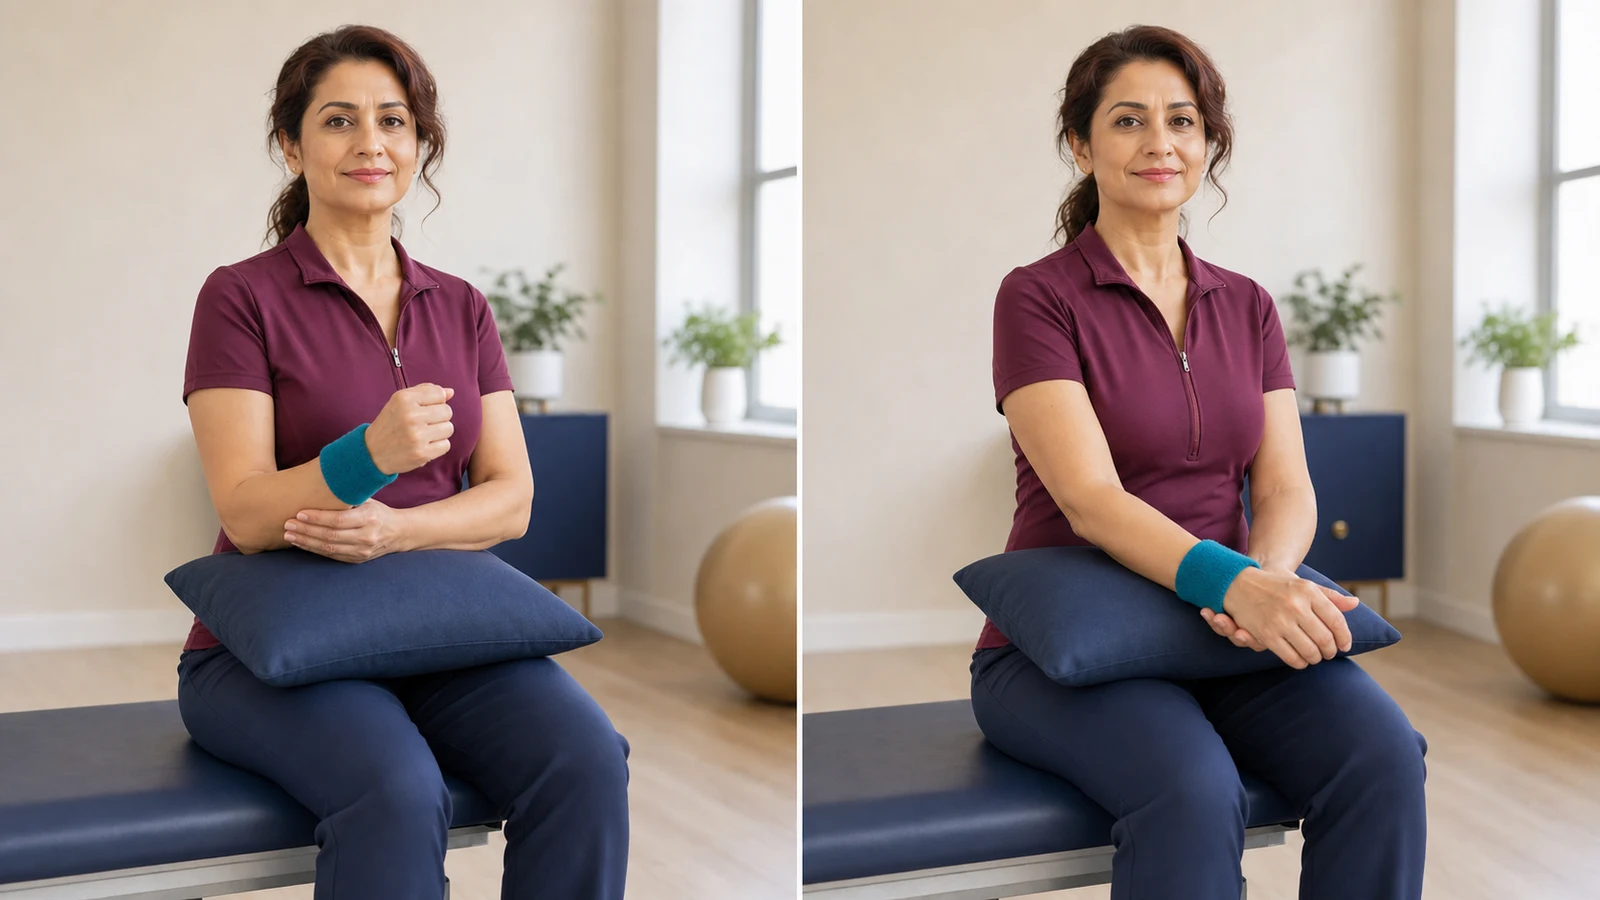
3) Supported elbow bending and straightening (Supported Elbow Range of Motion)
Preserving elbow motion prevents stiffness while the upper arm stays beside the trunk and the shoulder remains inactive. Early programs schedule elbow motion four to six times a day, but after tenodesis the… you feel pain at the front of the arm, pulling at the portals, a painful sound, or…
More detailLess detail
Goal and why it matters: Preserving elbow motion prevents stiffness while the upper arm stays beside the trunk and the shoulder remains inactive.
Stage and starting criteria: Days 4 to 7, after brief sling opening is permitted and with the biceps-tenodesis branch observed. If you had a biceps tenodesis, do not actively bend the elbow during the first four weeks. The left hand must carry the full weight of the right forearm, and your specific instructions take priority.
Equipment and environmental safety: Use a stable chair and firm pillow; do not perform this exercise standing.
Starting position: Sit securely. Open the sling only for the exercise, keep the right upper arm against the side, support the elbow and forearm on a pillow, and place the left hand beneath the right wrist.
- Relax the shoulder and keep the upper arm still.
- Using the left hand, gently straighten the right elbow a little.
- Stop before you feel a stretch at the shoulder or biceps.
- Return to the starting angle with the same support.
- Place the forearm fully back in the sling.
Range, side, and restrictions: Use no weight and stay in a comfortable range.
Breathing, speed, and rhythm: Exhale as the elbow straightens, keep both directions slow, and rest the forearm fully on the pillow between repetitions.
Documented dose: Early programs schedule elbow motion four to six times a day, but after tenodesis the type and timing of movement must come directly from your own instruction sheet.
Rest: The exact interval comes from your care team's plan.
Signs of correct technique and expected response: The upper arm and shoulder stay in place.
Stop immediately if: you feel pain at the front of the arm, pulling at the portals, a painful sound, or shoulder movement.
Common mistakes: Letting the forearm's weight drop, resisted palm-up rotation, or forcing full straightening are errors.
Easier version/regression: Shorten the range and increase support from the left hand.
Progression criteria and next stage: Smooth range with the upper arm still and no next-day reaction. Return fully to the sling and continue only within the same range until the next assessment.
Expected and adverse responses: A mild elbow stretch without pulling at the front of the shoulder.
↔️ Week 2: neck and trunk posture
Goal: Improve the forward head and rounded trunk posture that a sling can encourage, without involving the shoulder.
Exercise for this period
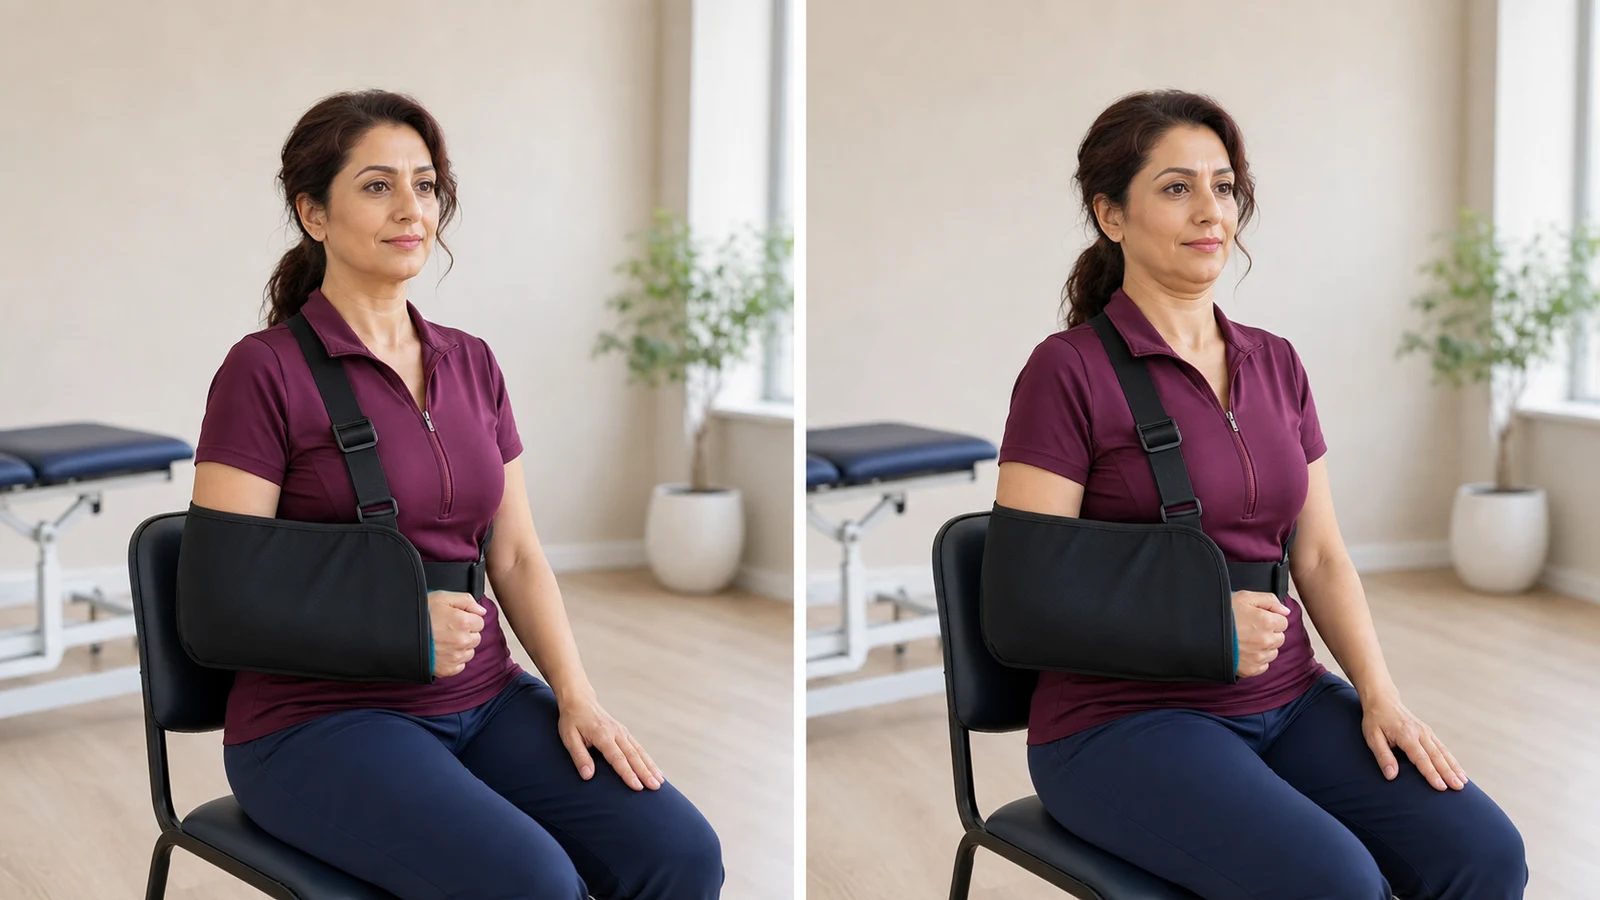
4) Gentle chin tuck (Gentle Chin Tuck)
A sling can draw the head forward and fatigue the neck. This small movement improves neck alignment without shifting the arm. Use your physiotherapy plan for repetitions and frequency; do not hold for a long time or… dizziness, headache, arm tingling, or increased neck pain occurs.
More detailLess detail
Goal and why it matters: A sling can draw the head forward and fatigue the neck. This small movement improves neck alignment without shifting the arm.
Stage and starting criteria: From week 2, provided you have no dizziness, radiating neck pain, or another restriction identified by your care team.
Equipment and environmental safety: Use a chair with a backrest or a wall, with no slippery surface.
Starting position: Stand against a wall or sit in a chair with a backrest. Fit the sling correctly, relax the shoulders, and look straight ahead.
- Without nodding down, move your chin a few millimeters backward.
- Imagine the back of the neck gently lengthening.
- Take two calm breaths.
- Return to your usual position.
- Relax the jaw and shoulders between repetitions.
Range, side, and restrictions: The movement is very small.
Breathing, speed, and rhythm: Create the movement slowly while exhaling, hold for two normal breaths, and rest the head in neutral between repetitions.
Documented dose: Use your physiotherapy plan for repetitions and frequency; do not hold for a long time or press the head into the wall.
Rest: Let the head rest in neutral between repetitions and let the jaw and shoulders go; if your programme gives no set interval, take it from your care team.
Signs of correct technique and expected response: The head moves only backward, and the right shoulder does not rise.
Stop immediately if: dizziness, headache, arm tingling, or increased neck pain occurs.
Common mistakes: Dropping the chin toward the chest, holding the breath, or hiking the shoulder are errors.
Easier version/regression: Halve the range and use the chair back for support.
Progression criteria and next stage: Perform the movement without dizziness or shifting the sling. Maintain only this postural control; no shoulder motion is added to this exercise.
Expected and adverse responses: A very gentle stretch at the back of the neck without arm symptoms.
↔️ Second two weeks
⚖️ Week 3: gentle scapular setting
Precaution branch: Scapular exercises may need to be modified after a subscapularis or teres minor repair. Do not begin without your physiotherapist's approval.
Exercises for this period
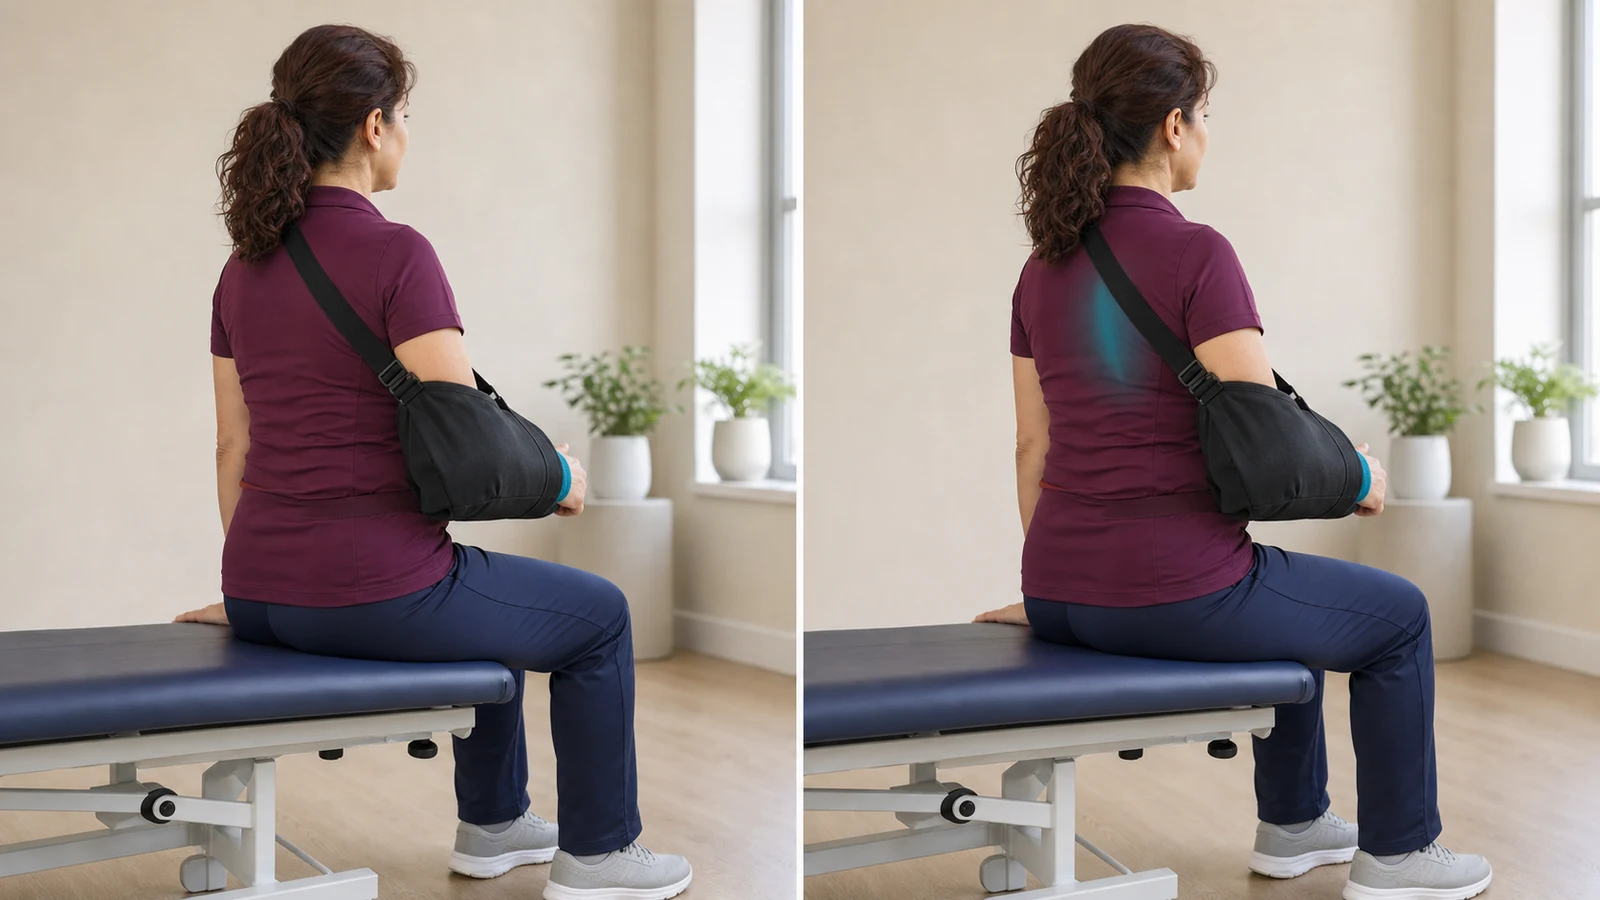
5) Gentle scapular setting in the sling (Gentle Scapular Setting)
Very gentle activation of the muscles between the shoulder blade and spine helps preserve shoulder-girdle posture without active motion at the… your physiotherapist sets the repetitions. Quality and keeping the arm still matter more… portal pain, pulling at the front of the shoulder, or arm movement occurs.
More detailLess detail
Goal and why it matters: Very gentle activation of the muscles between the shoulder blade and spine helps preserve shoulder-girdle posture without active motion at the shoulder joint.
Stage and starting criteria: From week 3 only when your individual plan allows it, the wound is settled, and there is no sharp pain at the front or back of the shoulder.
Equipment and environmental safety: Use a stable chair or bed and a correctly fitted sling; stand only if your balance is reliable.
Starting position: Stand or sit in a rear three-quarter view, with the right arm fully inside the sling, the neck relaxed, and both shoulder blades in a natural position.
- Inhale gently.
- As you exhale, move the right shoulder blade just slightly toward the spine and a little downward.
- Do not pull the arm, elbow, or sling backward.
- Pause for two seconds.
- Release the shoulder blade completely.
Range, side, and restrictions: The movement should be subtle and pain-free.
Breathing, speed, and rhythm: Set the shoulder blade very slowly while exhaling, and release it fully between repetitions.
Documented dose: your physiotherapist sets the repetitions. Quality and keeping the arm still matter more than doing more repetitions.
Rest: Release the shoulder blade completely between repetitions so it returns to its natural position; the exact rest interval comes from your physiotherapy programme.
Signs of correct technique and expected response: You feel a mild contraction between the right shoulder blade and spine, and the shoulder does not approach the ear.
Stop immediately if: portal pain, pulling at the front of the shoulder, or arm movement occurs.
Common mistakes: Strongly pinching both shoulder blades, arching the lower back, or drawing the elbow backward are errors.
Easier version/regression: Practice only the idea of the movement through a smaller range.
Progression criteria and next stage: A subtle movement without arm displacement or increased night pain. Pendulums require separate permission and are not an automatic continuation of this exercise.
Expected and adverse responses: A mild contraction behind the shoulder blade that resolves on release.
6) Seated Low Row (Seated Low Row)
The shoulder blade is the base the shoulder moves on, and in the weeks the arm stays still the blade forgets how to travel down and back. This keeps… The reference protocol lists this among the periscapular exercises but gives no… Pain at the front of the shoulder, the shoulder riding up towards the ear, neck pain, or…
More detailLess detail
Goal and why it matters: The shoulder blade is the base the shoulder moves on, and in the weeks the arm stays still the blade forgets how to travel down and back. This keeps that path alive without any movement at the shoulder joint itself. It differs from scapular setting in direction: there the blade only eased backwards, here it also travels downwards, as though you were bringing its tip towards your back pocket.
Stage and starting criteria: From about week three, and only once gentle scapular setting is pain-free and without shrugging. If your subscapularis or teres minor was repaired, do not start this unless your physiotherapist clears it separately — the reference protocol sets scapular retraction exercises aside for those two repairs.
Equipment and environmental safety: A firm chair without wheels or high arms, on a non-slip floor. No weight, band or support in the hand, and no body weight taken through the arm.
Starting position: Sitting upright, both feet on the floor, the right arm in the sling beside the trunk and the left hand on the thigh.
- Let your breathing stay free and let both shoulders drop once, completely.
- Without letting the arm move, ease the right shoulder blade downwards and slightly back.
- Hold there for a few seconds, still breathing freely.
- Release the blade completely and let it return to neutral.
- Take one full breath before the next repetition.
Range, side, and restrictions: The movement must stay very small and happen only at the right shoulder blade; if anyone watching can see the trunk or the arm shift, you have gone too far.
Breathing, speed, and rhythm: Breathe out as the blade travels down, build the movement over two to three seconds and release it just as slowly.
Documented dose: The reference protocol lists this among the periscapular exercises but gives no repetitions or hold time; take the count and the daily frequency from your own physiotherapy sheet.
Rest: Let the shoulder go completely slack between repetitions and allow the blade to settle back to neutral.
Signs of correct technique and expected response: You feel gentle work low down and behind the shoulder blade while the neck and upper trapezius stay soft; the sensation settles quickly once you let go.
Stop immediately if: Pain at the front of the shoulder, the shoulder riding up towards the ear, neck pain, or an increase in night pain.
Common mistakes: Pressing hard hoping to feel more, holding the breath, poking the head forward, and taking the elbow out of the sling.
Easier version/regression: Go back to gentle scapular setting in the sling and stay with it until your physiotherapist reviews you.
Progression criteria and next stage: A longer hold at the same quality with no reaction by the next morning; the next stage is a band row, only once you reach the strengthening phase.
Expected and adverse responses: Gentle work behind the blade is expected; pain at the front of the shoulder, neck pain or worse night pain means the effort was too high or this exercise is still early for you.
7) Postural Setting with the Sling On (Postural Setting with the Sling On)
Weeks in a sling round the upper back and turn the shoulder inwards, and that position is what builds neck and trapezius pain and makes raising the… The reference protocol lists this as a posture screen and correction and sets no sets or… Straightening the trunk brings sharp shoulder pain or pins and needles in the hand; the…
More detailLess detail
Goal and why it matters: Weeks in a sling round the upper back and turn the shoulder inwards, and that position is what builds neck and trapezius pain and makes raising the arm harder later. This is not a shoulder exercise; it is a habit that returns the body to neutral several times a day.
Stage and starting criteria: From week three, and for every pathway including large/massive repairs and subscapularis repairs. Because it creates no movement at the shoulder joint it usually carries no separate restriction; even so, if your own sheet specifies a trunk position, that takes precedence.
Equipment and environmental safety: A mirror or window in which you can see your upper body, and a chair with a back or a wall to stand against. Do not lean on the hand and do not take body weight through the arm.
Starting position: Sitting on a chair with a back, or standing beside a wall; the right arm in the sling and the left arm free at your side.
- Look in the mirror and see how far the head has come forward and how rounded the shoulders are.
- Draw the crown of the head gently towards the ceiling, so the neck lengthens rather than the chin lifting.
- Lift the breastbone a few millimetres so the upper back is less rounded.
- Lift the shoulders once, roll them back, and let them drop completely.
- Take a few calm breaths in that position and check the sling still supports the whole elbow.
Range, side, and restrictions: The correction should be small and comfortable; a stiff military posture is not the goal, and the operated shoulder is not moved in any direction.
Breathing, speed, and rhythm: Never hold the breath; the correction should ride on a slow breath out and last only a few seconds.
Documented dose: The reference protocol lists this as a posture screen and correction and sets no sets or repetitions for it; tie it instead to something you already repeat, such as every time you sit down or drink water.
Rest: Let the body go completely between corrections; holding the corrected position permanently is not the aim.
Signs of correct technique and expected response: The neck and jaw feel easy, the breath deepens, and the sling — not the neck — carries the weight of the arm.
Stop immediately if: Straightening the trunk brings sharp shoulder pain or pins and needles in the hand; the sling straps then need checking.
Common mistakes: Lifting the chin instead of lengthening the neck, tightening the shoulders, and holding a stiff military posture.
Easier version/regression: Do it seated with full back support and keep it brief.
Progression criteria and next stage: Holding a neutral position without the mirror to remind you; this same position is the base of every standing exercise in the months ahead.
Expected and adverse responses: A lighter neck and less trapezius tension through the day are expected; sharp shoulder pain or pins and needles means the sling or the trunk position needs review.
Avoid: forceful shoulder-blade pinching, pulling the sling backward, hiking the shoulder, or continuing if night pain increases.
🌱 Week 4: completely passive pendulum
Entry requirement: Only begin when the operative report or your physiotherapist specifically permits pendulums. With a large or massive tear, this movement may remain prohibited until week 6.
Exercise for this period
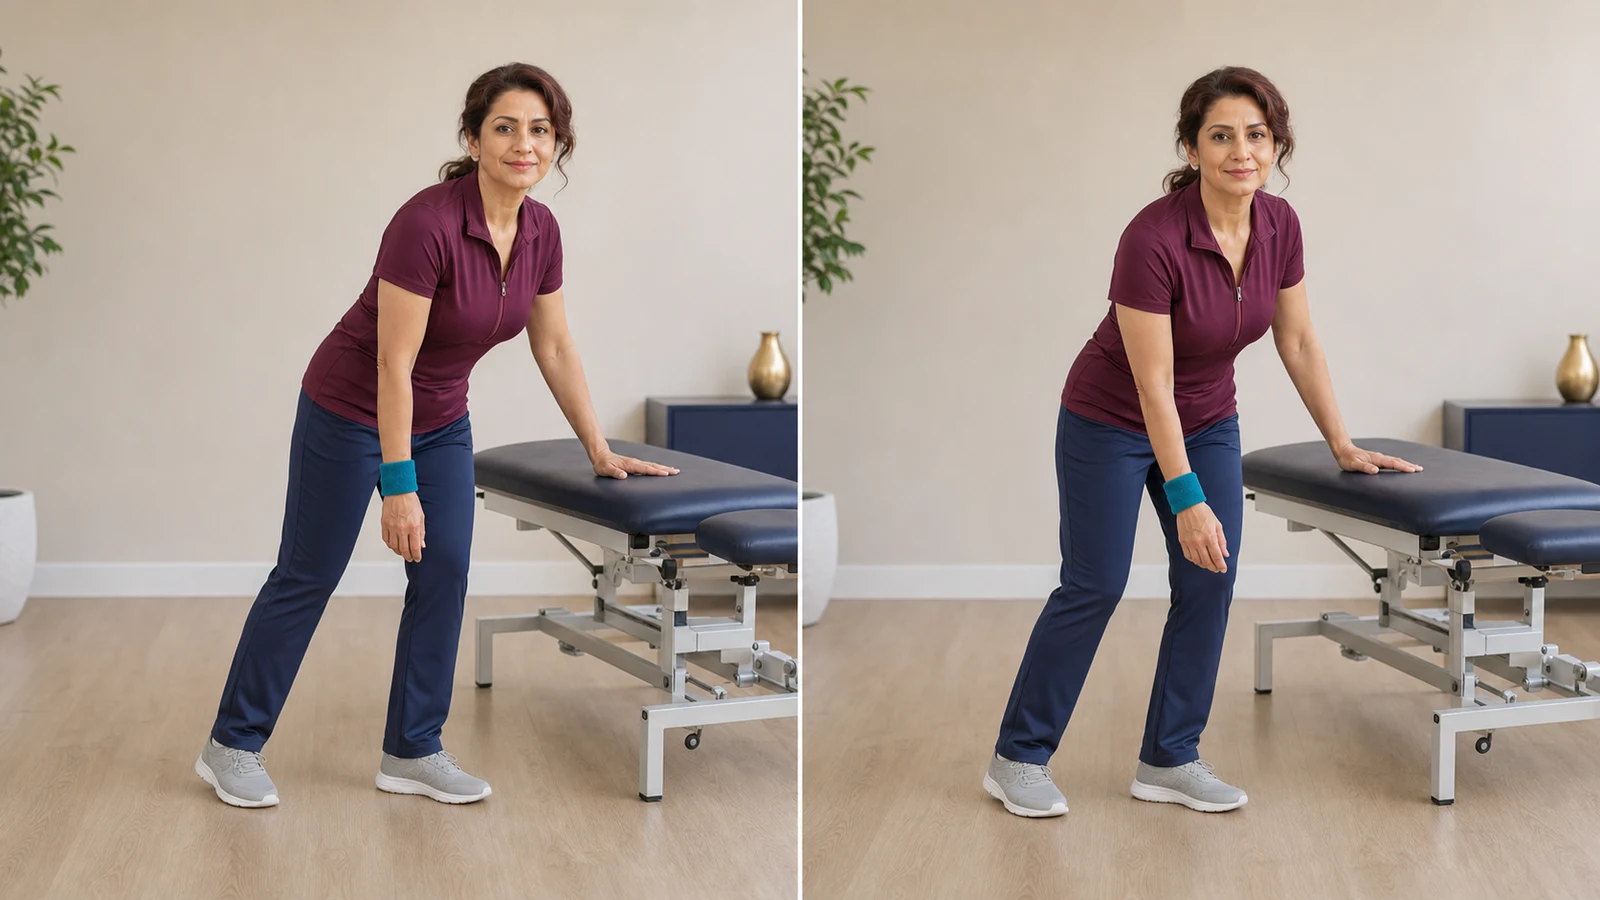
8) Pendulum created by trunk movement (Passive Pendulum)
A small shift of the trunk lets the completely relaxed arm move like a pendulum. The rotator cuff must not contract to create the movement. Some university instructions use 1 to 2 sets of 20 to 30 movements, four to five times a… sharp pain, active shoulder contraction, dizziness, or increased night pain occurs.
More detailLess detail
Goal and why it matters: A small shift of the trunk lets the completely relaxed arm move like a pendulum. The rotator cuff must not contract to create the movement.
Stage and starting criteria: Week 4 in the small-to-medium pathway, only after passive motion is documented as permitted. After a large or massive repair, this exercise is generally delayed until week 6.
Equipment and environmental safety: Use a heavy, stable table. Place the left hand on the table, keep the feet apart and knees soft, and let the unweighted right hand with its teal wristband hang freely.
Starting position: Bend slightly from the hips and support the trunk with the unaffected hand. Keep the neck relaxed and let the right arm hang vertically and loosely.
- Relax the right shoulder and elbow muscles.
- Shift your body weight a few centimeters forward and backward.
- Allow the arm to follow the trunk without any effort from you.
- Keep the range small and do not make large circles.
- To finish, slowly straighten the trunk and use the left hand to hold the right forearm.
Range, side, and restrictions: The range stays very small and comes only from the trunk's shift in weight; no wide circle is made, the right arm never travels behind the trunk, and no weight is held.
Breathing, speed, and rhythm: Keep breathing freely, shift your weight slowly through a small range, and between sets straighten the trunk and support the right forearm.
Documented dose: Some university instructions use 1 to 2 sets of 20 to 30 movements, four to five times a day. Follow that dose only if it matches your own plan, and do less if fatigue develops.
Rest: Between sets, straighten the trunk slowly and support the right forearm with the left hand so the shoulder is fully unloaded; the exact rest interval comes from your care team's programme.
Signs of correct technique and expected response: The movement comes from shifting body weight, and the shoulder muscles remain soft.
Stop immediately if: sharp pain, active shoulder contraction, dizziness, or increased night pain occurs.
Common mistakes: Making circles with the shoulder muscles, holding a weight, or bending without support are errors.
Easier version/regression: Reduce the range or wait until your next physiotherapy visit.
Progression criteria and next stage: The movement clearly comes from the trunk, without active shoulder contraction. Supported passive motion in month 2, only when the written plan releases it.
Expected and adverse responses: A mild stretch or sense of heaviness that settles when you stop.
The wound is settled, authorized exercises do not increase night pain, and the written plan permits the start of passive or assisted motion.
🌱 Days 31 to 60: restoring passive and assisted motion
Small-to-medium tear: Passive and then assisted movement generally continues within the prescribed limits, and gradual sling weaning may begin around week 7 or 8. Large or massive tear: In a protective protocol, passive motion may only begin at week 6, with approximate limits of 100 degrees of flexion and 30 degrees of external rotation; active shoulder motion is still not allowed.
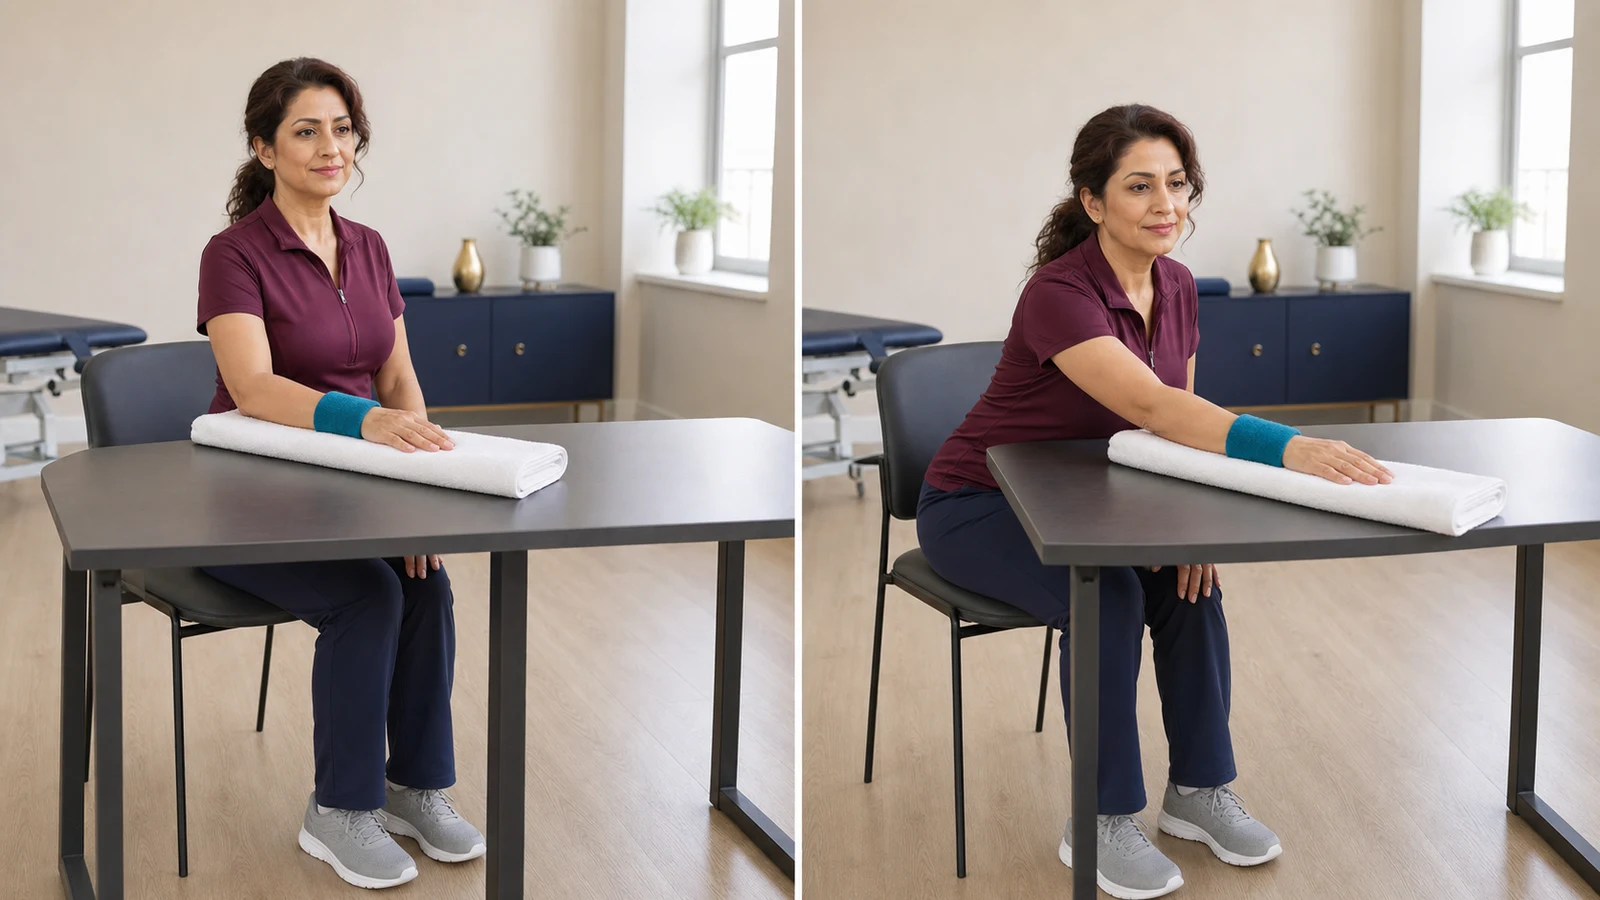
9) Supported forearm table slide (Supported Table Slide)
Trunk movement carries the supported forearm forward so range returns without actively lifting the arm. Follow your physiotherapy plan for repetitions and angle limits, because tear size… Stop and return to the previous range if you develop sharp pain, catching, shoulder…
More detailLess detail
Goal and why it matters: Trunk movement carries the supported forearm forward so range returns without actively lifting the arm.
Stage and starting criteria: Only after passive or assisted motion has been released. With a massive repair, you may need to wait until week 6 or later.
Equipment and environmental safety: A non-wheeled chair, stable table, and towel.
Starting position: Place the entire right forearm and hand on the towel; the left hand rests on the thigh.
- Relax the shoulder.
- Move the trunk forward slowly so the towel slides.
- Stop at the first comfortable stretch or the limit in your plan.
- Pause briefly without pressing through the palm.
- Move the trunk backward to return to the start.
Range, side, and restrictions: The right hand does not push on the table, and the shoulder does not hike.
Breathing, speed, and rhythm: Exhale as you move forward, keep both directions slow, and between repetitions straighten the trunk and relax the forearm.
Documented dose: Follow your physiotherapy plan for repetitions and angle limits, because tear size changes both.
Rest: Follow your care team's plan for the exact rest interval.
Signs of correct technique and expected response: The forearm stays in contact with the table and movement comes from the trunk.
Stop immediately if: Stop and return to the previous range if you develop sharp pain, catching, shoulder hiking, or a painful reaction lasting into the next morning.
Common mistakes: Actively pushing with the hand or forcing the reach are errors.
Easier version/regression: Move the chair closer to the table and shorten the range.
Progression criteria and next stage: More range without a shoulder shrug or next-day reaction. External rotation or assisted elevation only after that specific direction is released. Progress means a little more range with the same quality, not increasing range and repetitions at the same time.
Expected and adverse responses: A mild, brief stretch that settles after returning.
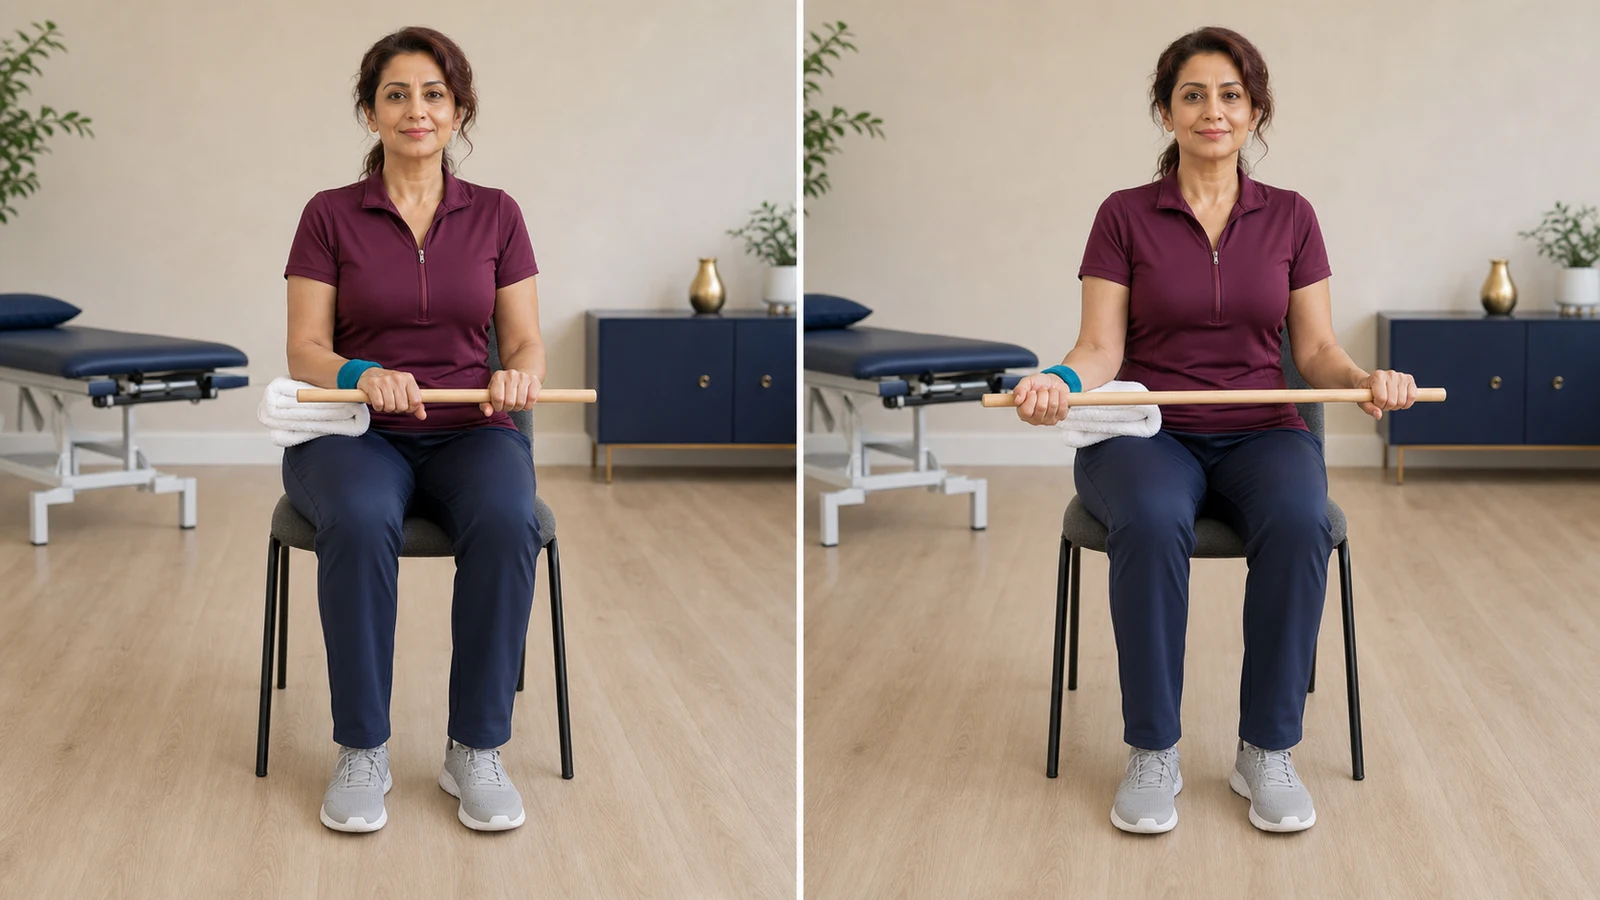
10) Passive external rotation with a dowel (Passive External Rotation with Dowel)
The left hand guides the right forearm through a small range to restore external rotation without early rotator-cuff activity. Use your physiotherapy prescription for repetitions, hold time, and angle. More range is… Stop for pain at the front of the shoulder, elbow drift, lower-back arching, or increased…
More detailLess detail
Goal and why it matters: The left hand guides the right forearm through a small range to restore external rotation without early rotator-cuff activity.
Stage and starting criteria: Begin only with permission. In the small-to-medium pathway, the early limit may be less than 20 degrees. In the massive-tear pathway, the limit during weeks 6 to 10 is about 30 degrees. A subscapularis repair can reduce the limit to zero or below the general protocol.
Equipment and environmental safety: Use one light dowel, a small towel, and a stable chair or bed; do not use a heavy bar or a slippery surface.
Starting position: Sit or lie on your back with the right elbow bent to 90 degrees on a towel beside the trunk, and both hands holding one dowel.
- Keep the right elbow fixed on the towel.
- Use the left hand to guide the dowel gently.
- Move the right forearm outward only to the written limit.
- Do not create an end-range stretch.
- Return to the starting position under the left hand's control.
Range, side, and restrictions: The right elbow stays on the towel beside the trunk and the forearm travels outward only to the angle cap written for you; no end-range stretch is created and the right hand stays passive throughout.
Breathing, speed, and rhythm: Exhale while guiding the forearm outward, make the return slower, and relax the forearm on the towel between repetitions.
Documented dose: Use your physiotherapy prescription for repetitions, hold time, and angle. More range is not always better; protecting the repair comes first.
Rest: Let the forearm rest on the towel between repetitions so the shoulder is unloaded; the exact rest interval comes from your physiotherapy prescription.
Signs of correct technique and expected response: The elbow stays beside the body and the right hand remains passive.
Stop immediately if: Stop for pain at the front of the shoulder, elbow drift, lower-back arching, or increased night pain.
Common mistakes: Letting the elbow move away, pushing with the right hand, or exceeding the angle limit.
Easier version/regression: Halve the range or omit the exercise until your physiotherapist reviews it, especially if the subscapularis was repaired.
Progression criteria and next stage: The prescribed range without a next-day reaction. Assisted elevation or a larger range only when recorded in the plan.
Expected and adverse responses: A mild stretch without pain at the front of the shoulder.
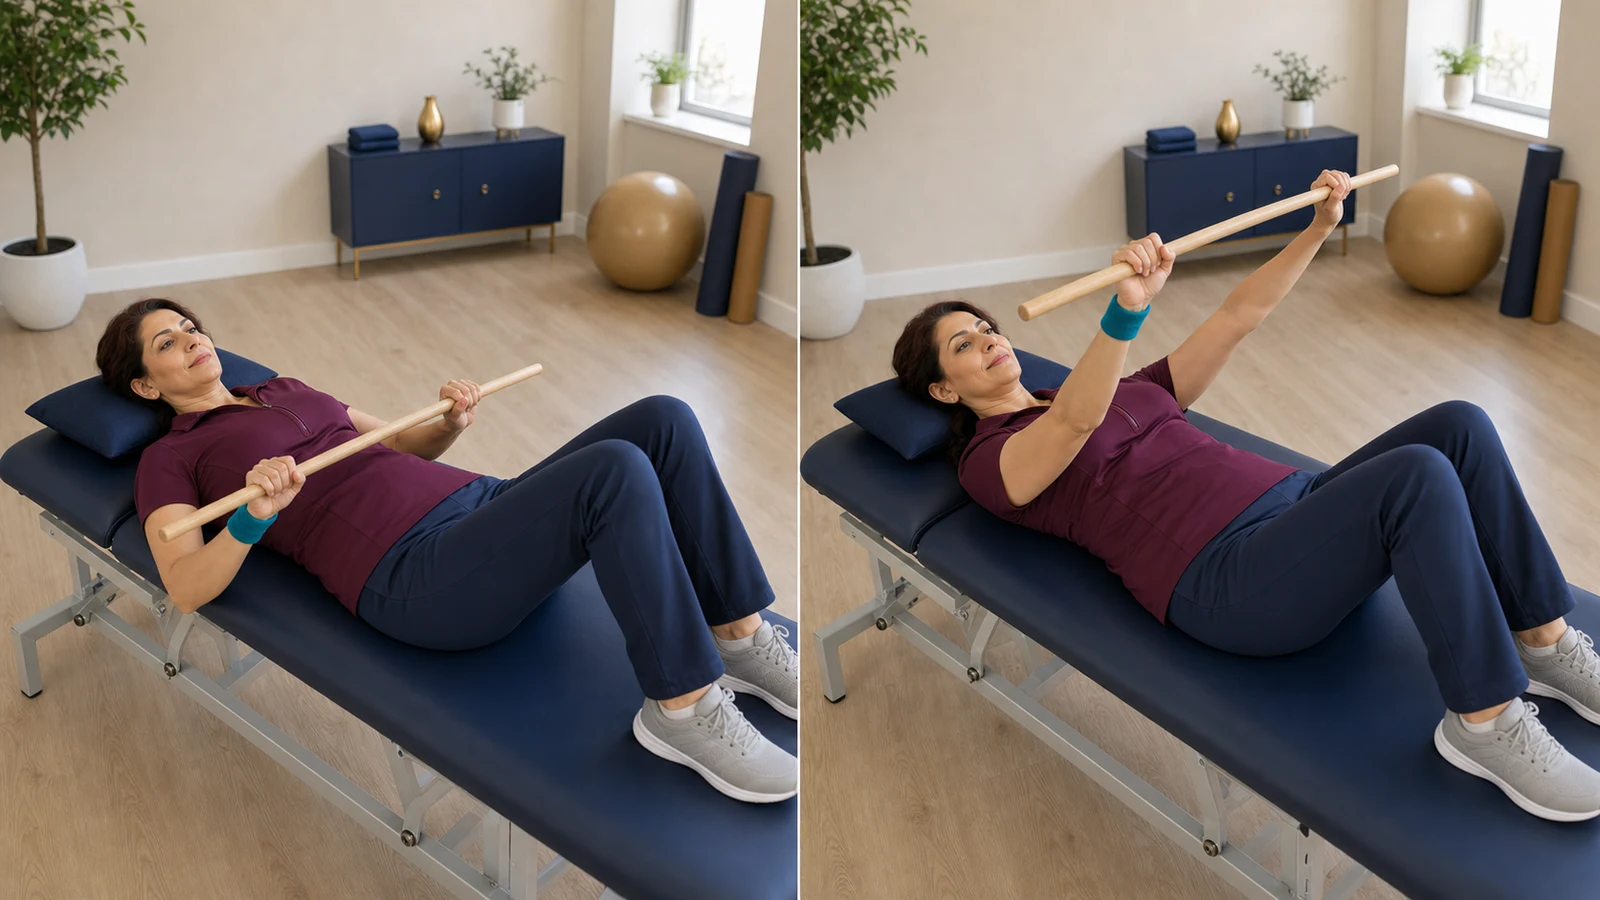
11) Supine assisted elevation with a dowel (Supine Assisted Elevation)
Lying on your back reduces the arm's weight, and the unaffected hand lets you practice the elevation path without early shoulder effort. The number of repetitions and daily sessions comes from your written programme; the… Stop for a sudden arm drop, sharp pain, or shoulder hiking.
More detailLess detail
Goal and why it matters: Lying on your back reduces the arm's weight, and the unaffected hand lets you practice the elevation path without early shoulder effort.
Stage and starting criteria: For a small-to-medium tear, this generally begins after week 4 to 6 and only with permission. For a large or massive tear, assisted motion is commonly delayed until about week 10.
Equipment and environmental safety: Use a flat bed and one light dowel; your position must allow both hands and the dowel's path to remain visible and controlled.
Starting position: Lie on your back with both hands on one light dowel, elbows comfortable, and the right shoulder relaxed.
- Let the left hand control the dowel.
- Gently move the dowel and right arm toward the ceiling.
- Stop before pain or the prescribed angle limit.
- Pause briefly without pressing.
- Use the left hand to lower the arm slowly.
Range, side, and restrictions: The right arm remains passive, the lower back does not arch, and repetitions follow the written plan.
Breathing, speed, and rhythm: Exhale as the arms rise, use the left hand to lower the movement slowly, and rest the arm beside the trunk between repetitions.
Documented dose: The number of repetitions and daily sessions comes from your written programme; the reference protocol gives no figure for this movement, and the angle cap outranks the count.
Rest: Let the arm rest beside the trunk between repetitions so it becomes fully passive again; the rest interval comes from your care team's programme.
Signs of correct technique and expected response: Both hands remain connected to the same dowel, and the left hand creates the movement.
Stop immediately if: Stop for a sudden arm drop, sharp pain, or shoulder hiking.
Common mistakes: Pushing with the right hand, arching the lower back, or forcing the reach.
Easier version/regression: Return to the table slide or shorten the range.
Progression criteria and next stage: A smooth path without loss of control or increased night pain. Active motion only after formal permission for the next phase. Active motion begins only after explicit permission and full control of this movement.
Expected and adverse responses: A brief, mild stretch that settles after lowering.
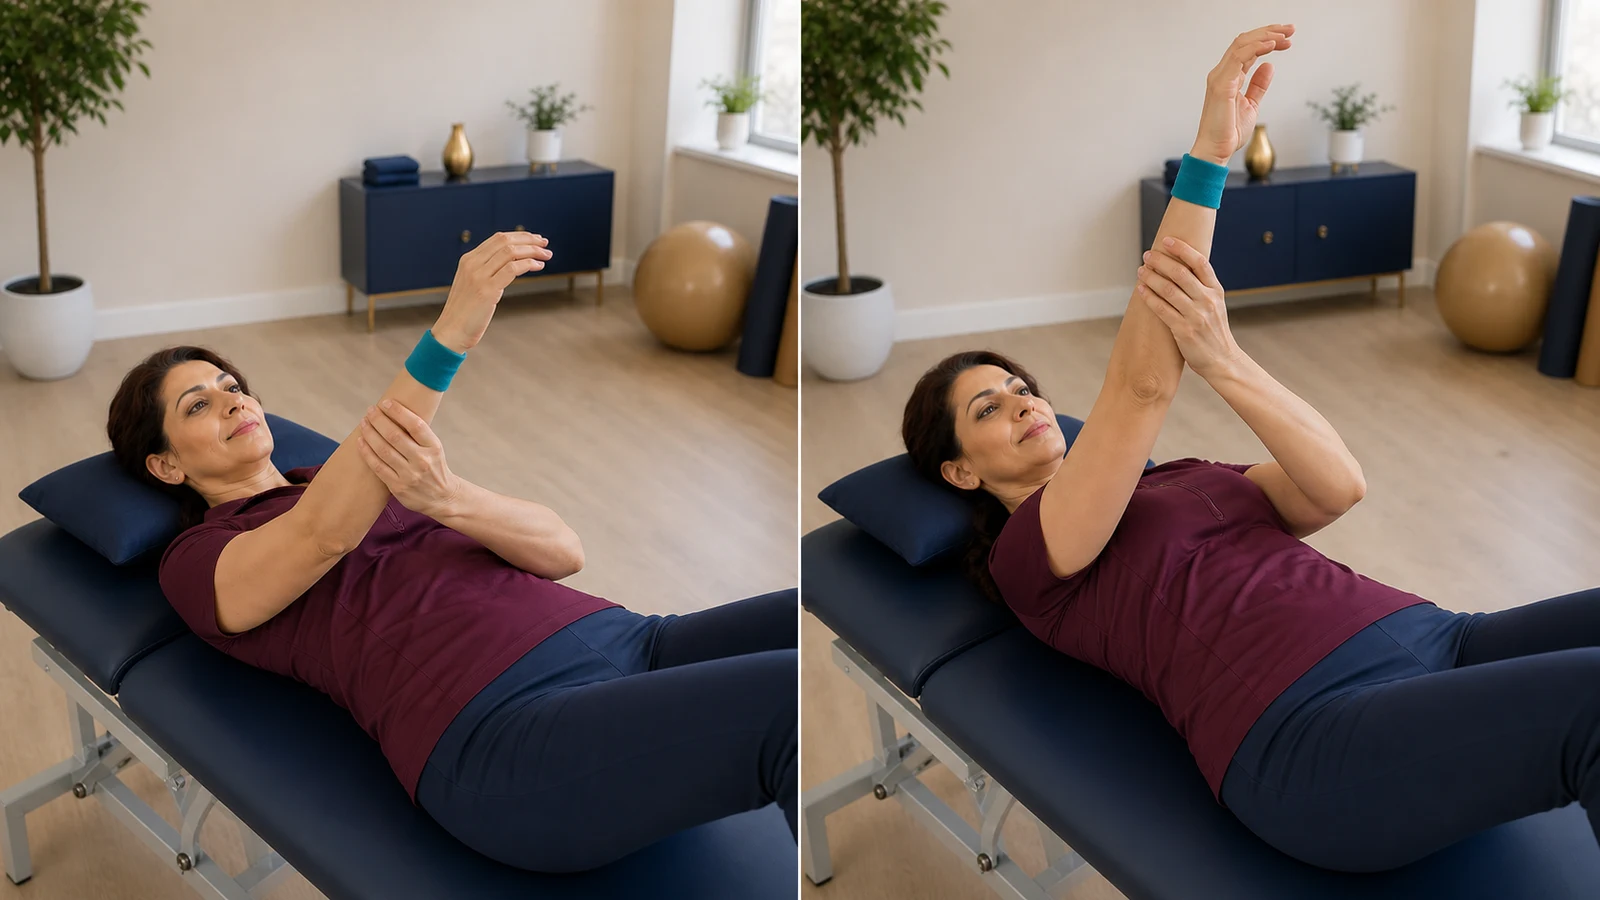
12) Self-Assisted Forward Elevation (Self-Assisted Forward Elevation)
This is the same assisted elevation, but without the dowel: the left hand takes the right arm directly from underneath and lifts it. Removing the… The reference protocol lists this among the assisted-motion exercises but gives no… Sharp pain, a painful noise, the shoulder shrugging, the low back arching, or pins and…
More detailLess detail
Goal and why it matters: This is the same assisted elevation, but without the dowel: the left hand takes the right arm directly from underneath and lifts it. Removing the dowel lets you feel exactly how much of the movement the sound arm made and how much the operated shoulder did — and that distinction is the line between assisted motion and active motion started too early.
Stage and starting criteria: Only once assisted motion is written into your programme. On the small-to-medium pathway usually from week four to six, and in that window the reference protocol caps elevation below 90 degrees; the cap rises to below 120 degrees at weeks seven to eight. After a large or massive repair, assisted motion is usually deferred to around week ten.
Equipment and environmental safety: A flat bed or floor, no high pillow under the head, and enough room for both arms. No dowel, weight or band is involved.
Starting position: On your back with the knees bent and the feet flat so the low back does not arch. The right arm is beside the trunk with the elbow nearly straight; the left hand takes the right wrist or forearm from underneath.
- Let the right shoulder go completely; the right arm should feel like a dead weight in the left hand.
- Using the left hand, take the right arm slowly towards the ceiling.
- Stop at the first sense of stretch, or at the angle cap written for you — whichever comes first.
- Pause for one to two seconds without pushing.
- Lower the arm with the left hand, more slowly than it went up, and release it beside the trunk.
Range, side, and restrictions: The left hand does all the work; the moment the right shoulder starts to push, the movement is no longer assisted. The angle cap comes from your own sheet, and the low back stays on the bed throughout.
Breathing, speed, and rhythm: Breathe out as the arm rises and lower it more slowly than you raised it.
Documented dose: The reference protocol lists this among the assisted-motion exercises but gives no repetitions; take the count and frequency from your physiotherapy programme.
Rest: Release the arm completely beside the trunk between repetitions so the shoulder becomes heavy and passive again.
Signs of correct technique and expected response: The low back stays down, the right shoulder does not ride towards the ear, and the arm feels heavy and passive the whole way; the brief stretch at the front of the shoulder settles as the arm comes down.
Stop immediately if: Sharp pain, a painful noise, the shoulder shrugging, the low back arching, or pins and needles in the hand.
Common mistakes: Quietly helping with the right shoulder, going past the written cap because it does not hurt, and dropping the arm quickly at the end.
Easier version/regression: Return to the same movement with the dowel, which gives more two-handed control, or shorten the range.
Progression criteria and next stage: Reaching the permitted cap smoothly with no compensation and no rise in night pain; the next stage is active elevation lying on your back, only with explicit clearance for that phase.
Expected and adverse responses: A brief, mild stretch at the front of the shoulder is expected; sharp pain, loss of control of the arm, or more pain by the next morning means the range or the count was too high.
🏋️ Days 61 to 90: gradually restoring active motion
Small-to-medium tear: Active motion commonly begins around week 7 or 8, initially in low-load positions. Large or massive tear: Assisted motion may begin around week 10, active external rotation around week 12, and active elevation near week 14. Some exercises in this section may therefore still be too early for you.
13) Seated Incline Table Slide (Seated Incline Table Slide)
This is the same forearm slide, but the surface is slightly inclined. The slope carries the arm higher along its path while the forearm's weight… The reference protocol lists this among the assisted-motion exercises but gives no count;… Sharp pain, a catching sensation, shrugging, the trunk leaning sideways, or a painful…
More detailLess detail
Goal and why it matters: This is the same forearm slide, but the surface is slightly inclined. The slope carries the arm higher along its path while the forearm's weight still rests on the surface, so the shoulder never has to hold it in the air. It is the bridge between the flat table slide and active motion.
Stage and starting criteria: Once the flat table slide is pain-free and shrug-free through its whole permitted range. The reference protocol places this movement at weeks seven to eight; after a large or massive repair it is later, and your written programme takes precedence.
Equipment and environmental safety: A stable table with an incline on it — a firm pillow, a lap board, or a tray propped on a few books — and a towel for the forearm to glide on. A chair without wheels on a non-slip floor. The slope should be shallow and must not shift mid-movement.
Starting position: Sit facing the table with the feet on the floor, the whole right forearm and hand on the towel at the bottom of the slope, and the left hand on the thigh.
- Let the right shoulder go and set the shoulder blade gently.
- Ease the trunk forward so the towel travels up the slope.
- Stop at the first comfortable stretch or at your programme's angle cap.
- Pause briefly without pressing down through the palm.
- Let the trunk come back and return the forearm slowly down the slope.
Range, side, and restrictions: The forearm stays on the surface throughout and the hand does not push the surface; the movement comes from the trunk, not the shoulder. Start with a shallow slope and do not pass the angle cap written for you.
Breathing, speed, and rhythm: Breathe out as you move forward and keep the travel out and back slow and even.
Documented dose: The reference protocol lists this among the assisted-motion exercises but gives no count; take the repetitions, the frequency and the angle cap from your physiotherapy programme.
Rest: Between repetitions, sit up and let the forearm rest on the surface so the shoulder is unloaded; the exact rest interval comes from your care team's programme.
Signs of correct technique and expected response: The forearm glides continuously on the surface, the shoulder stays away from the ear, and the work comes from the trunk moving; you feel a mild, brief stretch that settles as you return.
Stop immediately if: Sharp pain, a catching sensation, shrugging, the trunk leaning sideways, or a painful reaction that is still there the next morning.
Common mistakes: Too steep a slope from the start, pushing the surface with the palm, forcing your way further up the slope, and raising the slope and the count together.
Easier version/regression: Reduce the slope or remove it and go back to the flat table slide, or move the chair closer to the table so the range is shorter.
Progression criteria and next stage: The same slope covered more smoothly and without compensation, with no next-day reaction; then only one of slope or range rises a little, never both. The next stage is the wall climb.
Expected and adverse responses: A mild stretch at the front of the shoulder that settles as you return is expected; sharp pain, a smaller range or worse night pain means the slope or the count was too high.
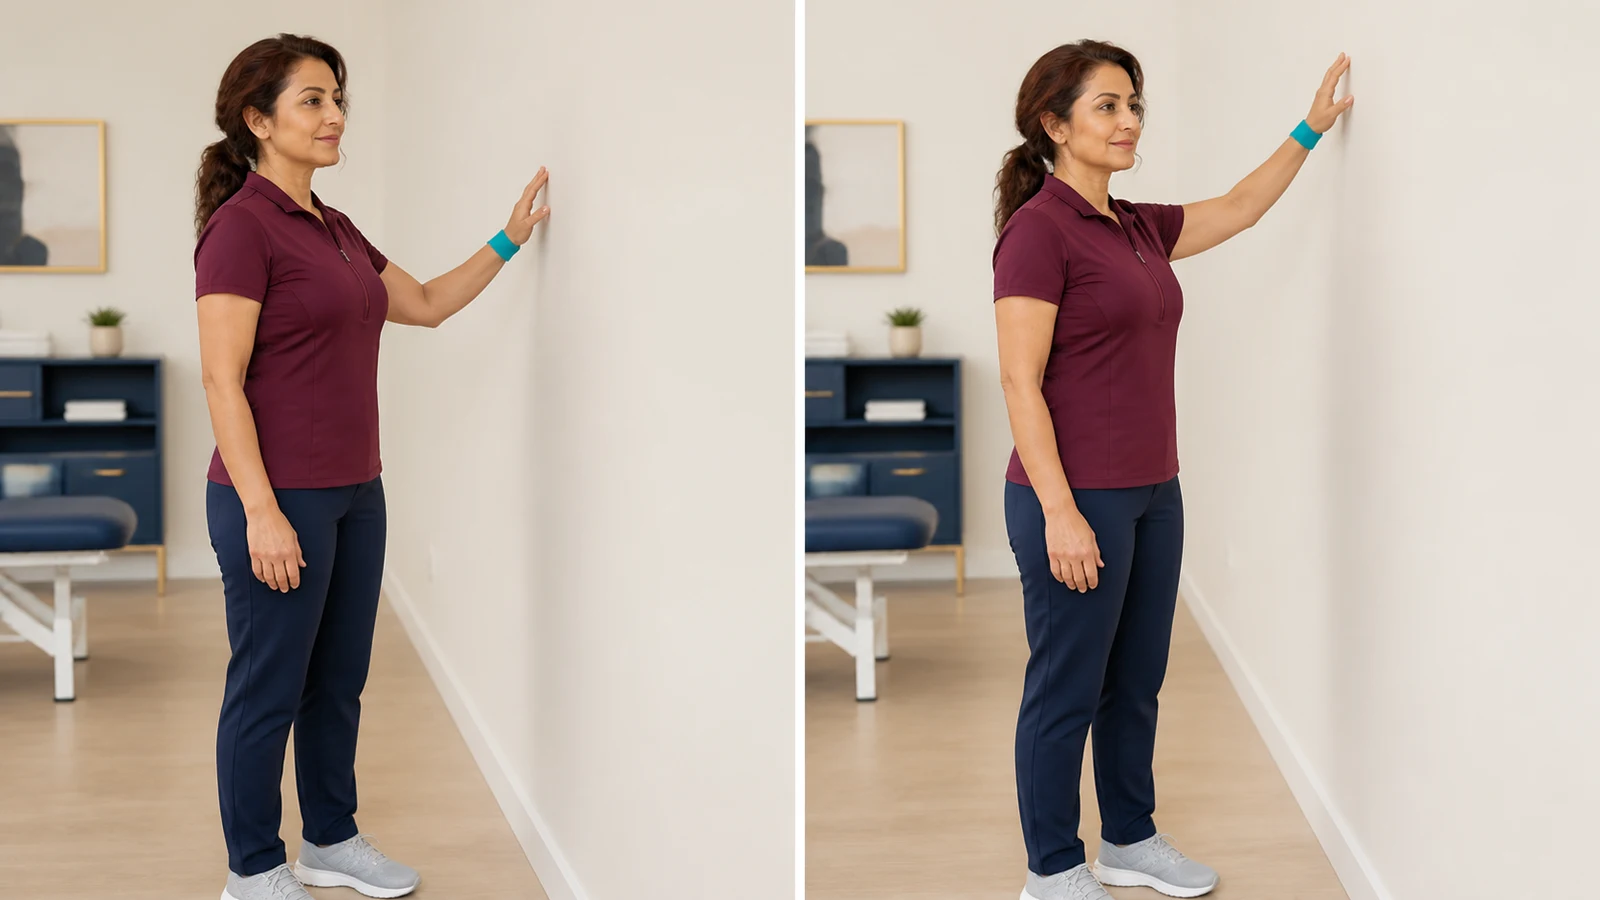
14) Wall Climb (Wall Climb)
The wall carries part of the arm's weight, so you can raise the height gradually without the shoulder having to hold the whole arm in the air. This… The reference protocol lists this among the active-motion exercises but gives no count;… Sharp pain, shrugging, the trunk leaning sideways, pins and needles, or an increase in…
More detailLess detail
Goal and why it matters: The wall carries part of the arm's weight, so you can raise the height gradually without the shoulder having to hold the whole arm in the air. This is the bridge between assisted motion and standing active motion.
Stage and starting criteria: Only once standing active or assisted motion is cleared. On the small-to-medium pathway usually from around week seven to eight, with the reference protocol capping elevation below 120 degrees. After a large or massive repair this exercise is usually still early.
Equipment and environmental safety: A flat wall clear of frames and switches, and a dry, non-slip floor. Do not take body weight through the hand; the hand only slides, and holds no weight.
Starting position: Stand facing the wall about an arm's length away, feet hip-width apart. The fingertips of the right hand rest on the wall at waist height and the left arm hangs free.
- Prepare the shoulder blade with the same gentle setting.
- Walk the fingers up the wall like a spider and let the arm follow them.
- Step closer to the wall if needed so the elbow does not end up fully straight.
- Stop at the first pain, the first shrug, or your own angle cap.
- Walk the fingers down just as slowly and release the arm beside the body.
Range, side, and restrictions: The height you reached today is today's ceiling, not a record to be broken. The trunk stays upright throughout and does not lean sideways.
Breathing, speed, and rhythm: Breathe out as you climb and take each finger-step slowly; this is not a fast movement.
Documented dose: The reference protocol lists this among the active-motion exercises but gives no count; take the repetitions and frequency from your physiotherapy programme.
Rest: Rest the arm beside the body between repetitions and let the shoulder go completely.
Signs of correct technique and expected response: The trunk is upright and still, the shoulder stays away from the ear, and the fingers carry the load rather than the shoulder; mild fatigue afterwards clears with rest.
Stop immediately if: Sharp pain, shrugging, the trunk leaning sideways, pins and needles, or an increase in night pain.
Common mistakes: Leaning the trunk towards the wall to get the hand higher, taking body weight through the hand, and climbing fast then dropping down suddenly.
Easier version/regression: Rest the palm on a soft ball and roll the ball up the wall instead, or go back to the lying exercises.
Progression criteria and next stage: More height with an upright trunk rather than with compensation; the next stage is elevation in the scapular plane without the wall.
Expected and adverse responses: Mild shoulder fatigue is expected; sharp pain, trunk compensation or worse night pain means the height or the count was too high.
15) Submaximal External Rotation Isometric (Submaximal External Rotation Isometric)
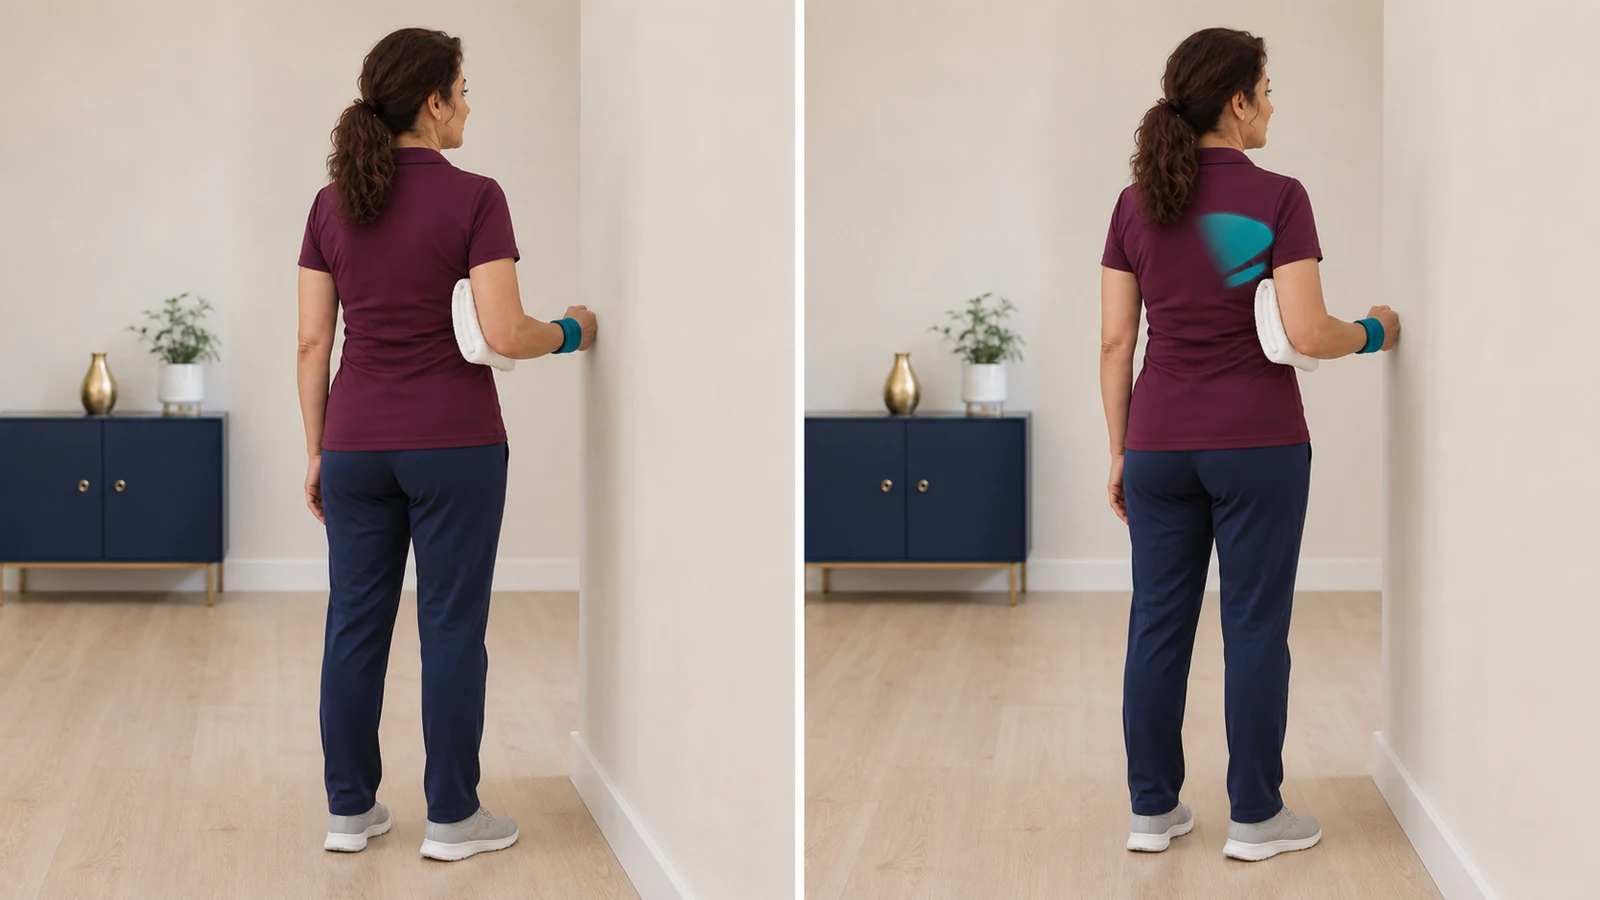
In an isometric the muscle works but the joint does not move. For a tendon only recently stitched back to bone this is the least risky way to wake… The reference protocol names this isometric but gives no intensity, count or hold time;… Pain at the front of the shoulder, trembling, the elbow sliding off the towel, trunk…
More detailLess detail
Goal and why it matters: In an isometric the muscle works but the joint does not move. For a tendon only recently stitched back to bone this is the least risky way to wake the muscle up: a load you can control, no sliding of the humeral head, and no travel to the end of range. Submaximal means far below your maximum — roughly a quarter of the force you could produce.
Stage and starting criteria: This exercise depends on written clearance more than any other. The MGH reference protocol starts rotator-cuff isometrics at weeks 13 to 16 and explicitly "with clearance from MD"; the UVA protocol starts earlier. If your own programme gives a different time, that one governs. After a large or massive repair it is usually later still.
Equipment and environmental safety: A small rolled towel and a doorframe or flat wall. No band or weight is involved, and the floor you stand on must be dry.
Starting position: Stand or sit beside the wall with your right side towards it. The rolled towel sits between the right elbow and your side, the right elbow is bent to 90 degrees, the forearm points forward, and the back of the right wrist rests lightly against the wall. The left hand is on the thigh.
- Set the shoulder blade gently and keep the towel under the elbow.
- Press the back of the right wrist slowly into the wall, as though taking the forearm outwards.
- Hold the pressure at about a quarter of your strength; the forearm must not move even a degree.
- Hold for a few seconds, breathing freely.
- Release the pressure slowly and completely.
Range, side, and restrictions: The range is zero; no movement should be visible. The elbow stays on the towel at your side throughout and the trunk does not rotate.
Breathing, speed, and rhythm: Breathe out as you build the pressure, build it over two seconds and release it over two seconds.
Documented dose: The reference protocol names this isometric but gives no intensity, count or hold time; take all three from your own strengthening-phase prescription. Submaximal is a condition, not a suggestion: maximum effort has no place at this stage.
Rest: Let the arm go slack beside the trunk between repetitions until the effort has left the muscle entirely.
Signs of correct technique and expected response: You feel gentle work behind the shoulder, the elbow stays on the towel and the trunk does not turn; mild fatigue afterwards clears with rest.
Stop immediately if: Pain at the front of the shoulder, trembling, the elbow sliding off the towel, trunk compensation, or an increase in night pain.
Common mistakes: Maximum effort, holding the breath, letting the elbow leave the side, and turning the trunk instead of pressing with the forearm.
Easier version/regression: Halve the pressure, or set the exercise aside until your physiotherapist reviews it.
Progression criteria and next stage: The same pressure held more calmly and with no next-day reaction; the next stage is external rotation with a very light band, only with separate clearance.
Expected and adverse responses: Mild fatigue behind the shoulder is expected; pain at the front of the shoulder, trembling or worse night pain means the effort was too high or the exercise is still early.
16) Submaximal Internal Rotation Isometric (Submaximal Internal Rotation Isometric)
The partner of the previous exercise, in the opposite direction. The internal rotators do the work of fastening a belt, dressing, and bringing the… The reference protocol names this isometric alongside the external-rotation one but gives… Pain at the front of the shoulder or at the subscapularis repair site, trembling, trunk…
More detailLess detail
Goal and why it matters: The partner of the previous exercise, in the opposite direction. The internal rotators do the work of fastening a belt, dressing, and bringing the hand towards the stomach, and waking them without joint movement is the least risky possible start.
Stage and starting criteria: As with the external-rotation isometric, only with written clearance for the strengthening phase. If your subscapularis was repaired, this exercise loads your repaired tendon directly; do not begin it without your surgeon's explicit permission, even if the external-rotation isometric has been cleared for you.
Equipment and environmental safety: The same rolled towel and the same wall or doorframe. No band or weight is involved.
Starting position: This time your left side is towards the wall so the right palm can reach it. The right elbow is at 90 degrees on the towel at your side, the forearm points forward, and the right palm rests lightly on the wall. The left hand is on the thigh.
- Set the shoulder blade gently.
- Press the right palm slowly into the wall, as though taking the forearm towards your stomach.
- Hold the pressure at about a quarter of your strength and do not let the forearm move.
- Hold for a few seconds, breathing freely.
- Release the pressure slowly.
Range, side, and restrictions: As before, the range is zero. Taking the hand behind the back to gain a bigger angle is forbidden at this stage, and the elbow does not leave your side.
Breathing, speed, and rhythm: Breathe out as you press, and both build and release the pressure slowly.
Documented dose: The reference protocol names this isometric alongside the external-rotation one but gives no numbers; intensity, count and hold time come from your strengthening-phase prescription.
Rest: Place the hand on the thigh between repetitions and let the shoulder go.
Signs of correct technique and expected response: You feel gentle work at the front of the shoulder and under the armpit while the elbow and trunk stay still; the fatigue clears with rest.
Stop immediately if: Pain at the front of the shoulder or at the subscapularis repair site, trembling, trunk compensation, or an increase in night pain.
Common mistakes: Pressing too hard, taking the hand behind the back, and letting the elbow leave your side.
Easier version/regression: Halve the pressure, or continue with the external-rotation isometric only.
Progression criteria and next stage: The same pressure without pain and with no next-day reaction; the next stage is internal rotation with a light band, in the strengthening phase and with separate clearance.
Expected and adverse responses: Mild fatigue at the front of the shoulder is expected; pain at the repair site, trembling or worse night pain means you should stop and speak to your treating team.
Avoid: dumbbells, resistance bands, overhead press, push-ups, bearing body weight through the hand, sudden movement, or strength testing before the strengthening phase is authorized.
Criteria for progressing beyond day 90: The permitted active range is pain-free and performed without shoulder hiking, shoulder-blade control is appropriate, and the exercise response settles by the next day.
🎯 After day 90: criteria-based strengthening, work, and sport
After a small-to-medium repair, rotator-cuff strengthening often begins during weeks 13 to 16 once motion is pain-free. After a large or massive repair, light isometrics may begin during weeks 14 to 18, progressive resistance during weeks 18 to 22, and advanced strengthening during weeks 22 to 26. This difference shows why “three months” is not automatic permission to use weights.
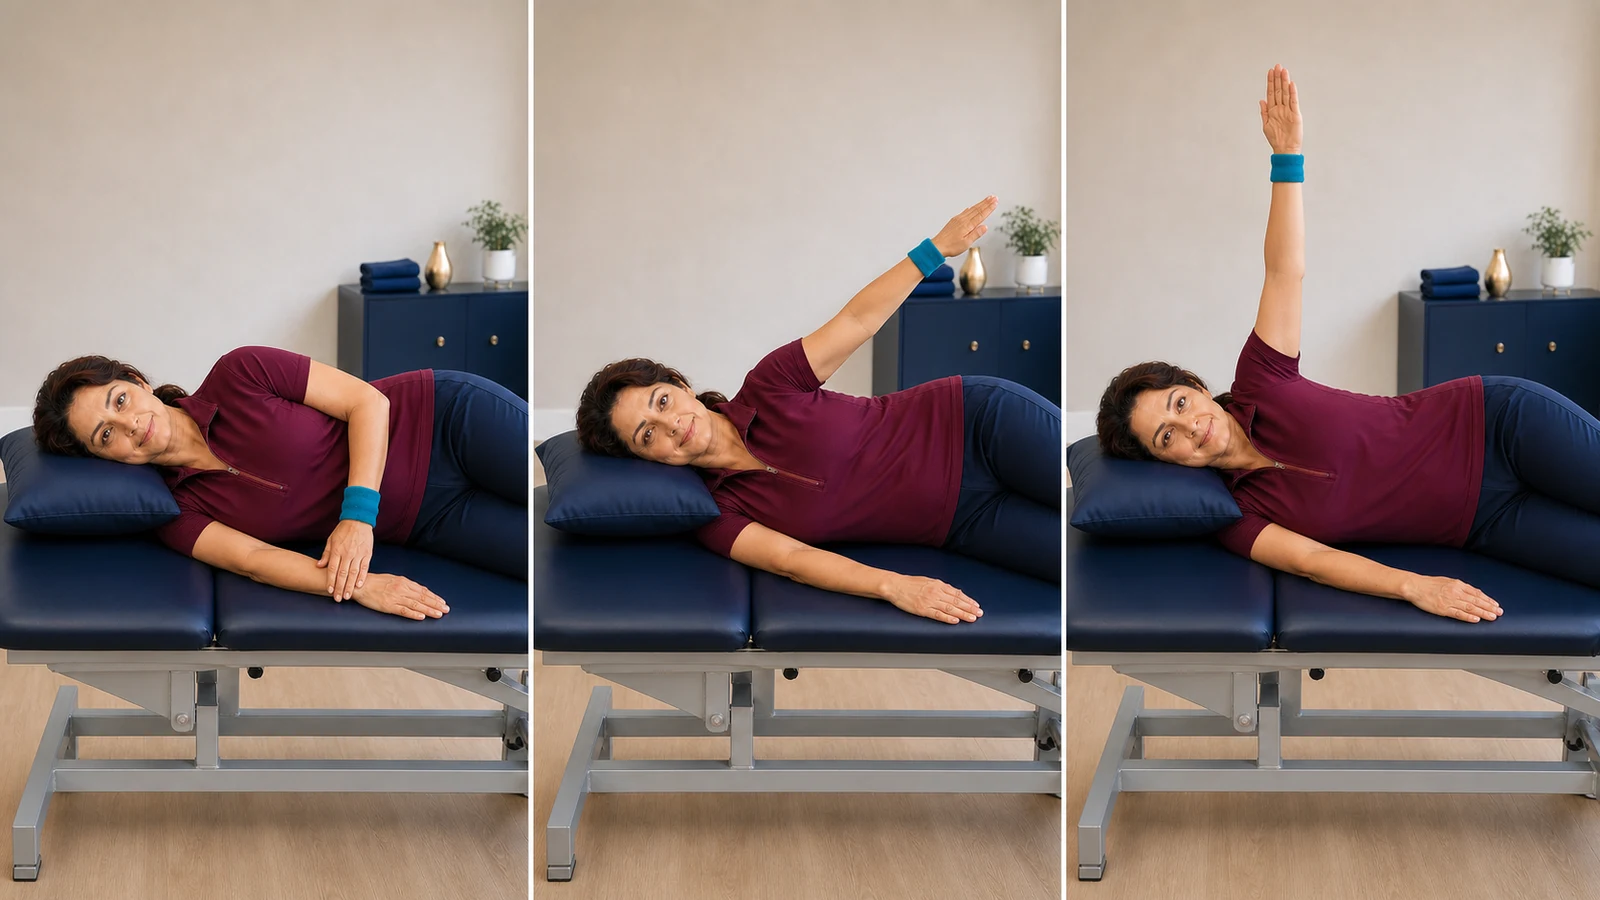
17) Sidelying Elevation to 90° (Sidelying Elevation to 90°)
Lying on the sound side puts the operated arm in the plane where gravity presses least on the repair. That is what makes it possible to gain range… The reference protocol names this movement with its 90-degree cap but gives no repetition… Sharp pain, the arm suddenly dropping, pins and needles, or an increase in night pain.
More detailLess detail
Goal and why it matters: Lying on the sound side puts the operated arm in the plane where gravity presses least on the repair. That is what makes it possible to gain range with very little effort and a great deal of control.
Stage and starting criteria: This guide places it after day 90. The reference protocol permits it from week four to six on the small-to-medium pathway, so if your written programme released it earlier, that programme takes precedence. The entry condition is the same either way: clearance for assisted motion and a pain-free supported table slide. The cap in the reference protocol is 90 degrees, no further.
Equipment and environmental safety: A flat bed and a pillow for the head, with enough room behind you that the arm meets nothing on its path. No weight in the hand.
Starting position: Lie on your left side — the sound side — with the knees slightly bent for stability. The right arm rests along your own side with the elbow nearly straight.
- Set the pillow so the neck stays in line.
- Lift the right arm off your side with the least possible effort and bring it towards the ceiling.
- Stop at 90 degrees, the point where the arm is perpendicular to the trunk.
- Pause briefly.
- Return the arm to your side slowly and under control; do not let it drop.
Range, side, and restrictions: 90 degrees is a ceiling, not a target to be forced. If pain or compensation appears before 90 degrees, that is your ceiling, and the trunk stays still throughout.
Breathing, speed, and rhythm: Breathe out as the arm rises and control the lowering over two to three seconds.
Documented dose: The reference protocol names this movement with its 90-degree cap but gives no repetition count; the number comes from your physiotherapy programme.
Rest: Let the arm rest along your side between repetitions so its weight settles fully onto the trunk.
Signs of correct technique and expected response: The trunk stays still, the arm travels up and down in a straight path, and the shoulder does not ride towards the ear; the effort felt is mild and settles with rest.
Stop immediately if: Sharp pain, the arm suddenly dropping, pins and needles, or an increase in night pain.
Common mistakes: Rolling the trunk backwards to gain more range, going past 90 degrees, and letting the arm fall on the way down.
Easier version/regression: Halve the range or go back to the supported table slide.
Progression criteria and next stage: Reaching 90 degrees smoothly with full control of the lowering; the next stage is active elevation lying on your back, after clearance for the active phase.
Expected and adverse responses: Mild work at the side of the shoulder is expected; sharp pain, a sudden drop of the arm, or worse night pain means the range or the count was too high.
If your repair is large or massive: Only passive motion may be allowed for most of month 2. Do not interpret the assisted-motion images as personal permission. Your operative report and physiotherapy plan determine the actual date.
Avoid: active elevation before permission, carrying loads, weight-bearing through the hand, reaching behind the back, end-range stretching, or discontinuing the sling solely because pain has improved.
Criteria for entering month 3: Passive or assisted range is smooth within the prescribed limit, the shoulder does not hike, and symptoms are not worse the next morning.
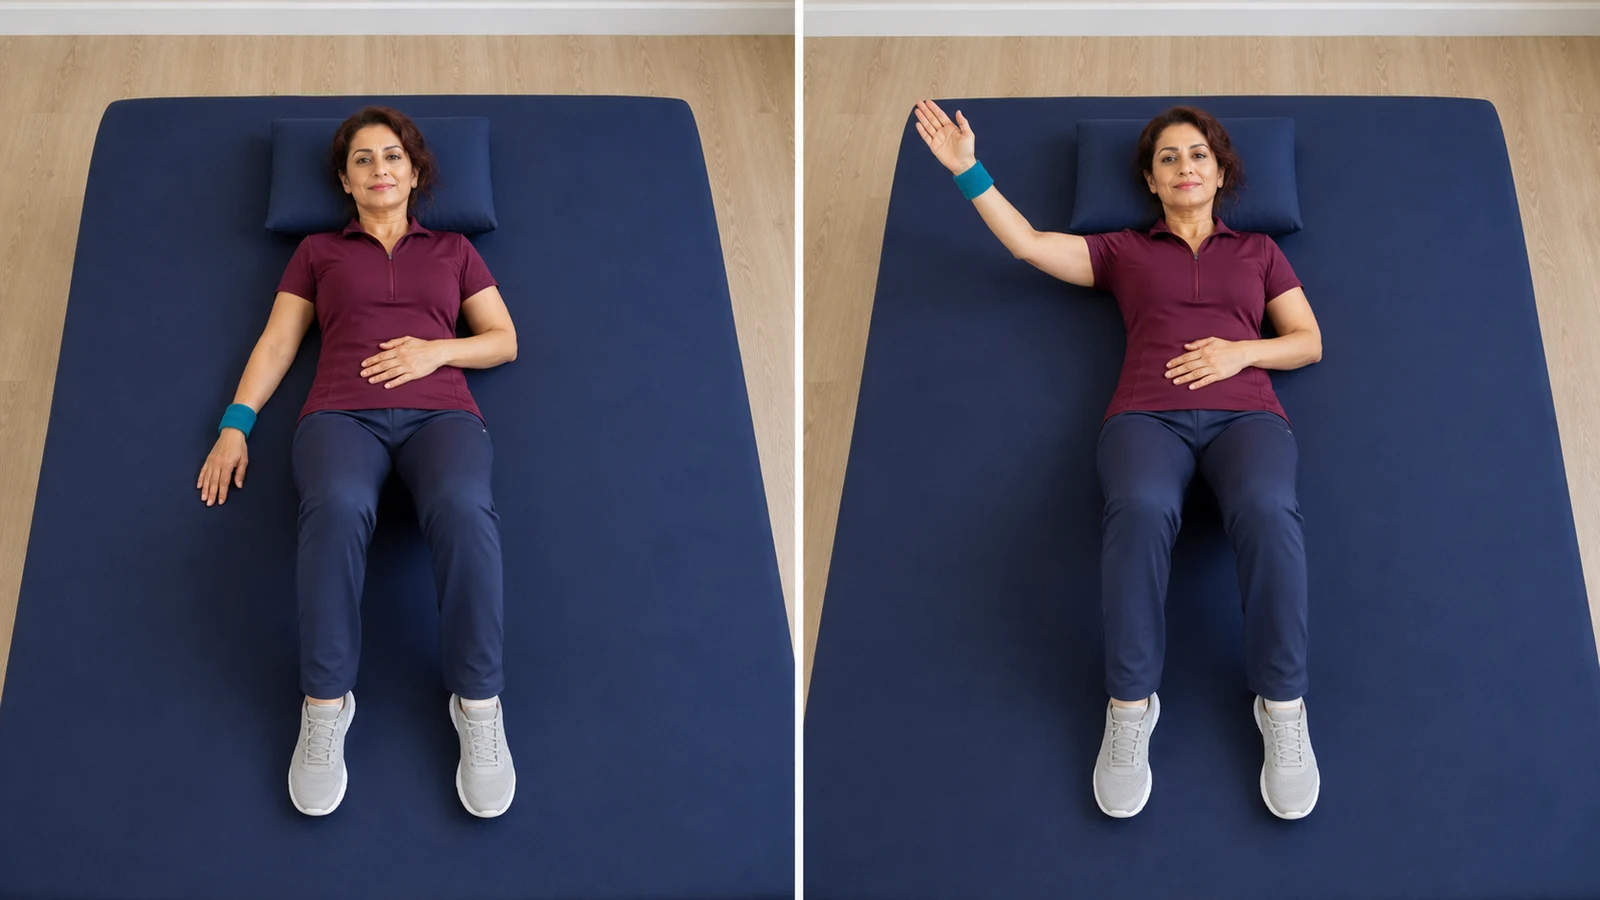
18) Supine active arm elevation (Supine Active Elevation)
Lying on your back reduces the effect of gravity so the rotator cuff and deltoid can relearn active motion with less compensation. Your physiotherapist sets the range and repetitions. At first, the quality of lowering… the arm suddenly drops, sharp pain develops, or a neurological symptom appears.
More detailLess detail
Goal and why it matters: Lying on your back reduces the effect of gravity so the rotator cuff and deltoid can relearn active motion with less compensation.
Stage and starting criteria: This guide places it after day 90. The entry condition is still explicit clearance for active motion, a smooth assisted range, and no significant pain at rest. On the small-to-medium pathway your programme may release active motion from week seven to eight, and later after a massive repair; either way your written programme outranks this guide.
Equipment and environmental safety: Use a flat bed with enough room for both arms; do not use a weight, dowel, or unstable surface.
Starting position: Lie on your back, with the left hand on the abdomen and the right arm beside the trunk, without a dowel or weight.
- Gently stabilize the right shoulder blade against the bed.
- Lift the right arm toward the ceiling under its own power.
- Stop before the shoulder hikes or pain begins.
- Pause briefly.
- Lower the arm slowly without letting it drop.
Range, side, and restrictions: The arm rises only to the point before pain or shrugging and the low back stays on the bed; your physiotherapist sets the range, and the quality of the lowering outranks a larger range.
Breathing, speed, and rhythm: Exhale as the arm rises, lower it more slowly, and let it relax beside the trunk between repetitions.
Documented dose: Your physiotherapist sets the range and repetitions. At first, the quality of lowering the arm matters more than a large range.
Rest: Let the arm rest beside the trunk between repetitions until the muscle fatigue clears; the exact interval comes from your physiotherapy programme.
Signs of correct technique and expected response: The left hand does not assist, and the lower back does not arch. Stop for increasing tremor, a sudden loss of control, or worsening night pain.
Stop immediately if: the arm suddenly drops, sharp pain develops, or a neurological symptom appears.
Common mistakes: Assistance from the left hand, lower-back arching, or using momentum.
Easier version/regression: Shorten the range or use the dowel for help again. Do not progress to an inclined or standing position until control is complete.
Progression criteria and next stage: Controlled lifting and lowering without compensation. Increasing trunk incline or standing exercise only after approval.
Expected and adverse responses: Mild fatigue without sharp pain that settles with rest.
19) Unweighted elevation in the scapular plane (Standing Scaption)
Lifting the arm slightly forward of the side practices a functional shoulder path and improves shoulder-blade control for everyday tasks. Your physiotherapist sets the repetitions, and no weight is added yet. sharp pain, arm drop, or tingling occurs.
More detailLess detail
Goal and why it matters: Lifting the arm slightly forward of the side practices a functional shoulder path and improves shoulder-blade control for everyday tasks.
Stage and starting criteria: This guide places it after day 90. The entry condition is still a smooth supine elevation, clearance for standing active motion, and the ability to hold the shoulder up without compensating. After a large or massive repair it usually begins around week fourteen or later, and the calendar alone is not permission to start.
Equipment and environmental safety: Use a mirror and a dry, uncluttered standing surface. Hold no weight, and stand beside a wall if your balance is limited.
Starting position: Stand in front of a mirror with the left arm by the side, the right thumb pointing upward, and no weight in either hand.
- Set the shoulder blade gently.
- Lift the right arm slightly forward of the side.
- Stop before the shoulder hikes or you reach the range limit.
- Pause briefly.
- Lower the arm slowly.
Range, side, and restrictions: Start below shoulder height and stay within your program's limit.
Breathing, speed, and rhythm: Exhale as the arm rises, lower it more slowly, and let it relax beside the body between repetitions.
Documented dose: Your physiotherapist sets the repetitions, and no weight is added yet.
Rest: Let the arm rest at your side between repetitions and keep the shoulder away from the ear; the rest interval comes from your rehabilitation programme.
Signs of correct technique and expected response: The trunk remains still and the shoulder stays away from the ear. Stop for lower-back arching, shoulder hiking, sharp pain, or arm drop.
Stop immediately if: sharp pain, arm drop, or tingling occurs.
Common mistakes: Shoulder shrugging, lower-back arching, or turning the thumb down.
Easier version/regression: Return to the supine position or shorten the range.
Progression criteria and next stage: A smooth path below the permitted height with no next-day reaction. A larger range or resistance only after entering the strengthening phase. Progress means a smoother path, not simply lifting the hand higher.
Expected and adverse responses: Mild fatigue at the side of the shoulder without increased night pain.
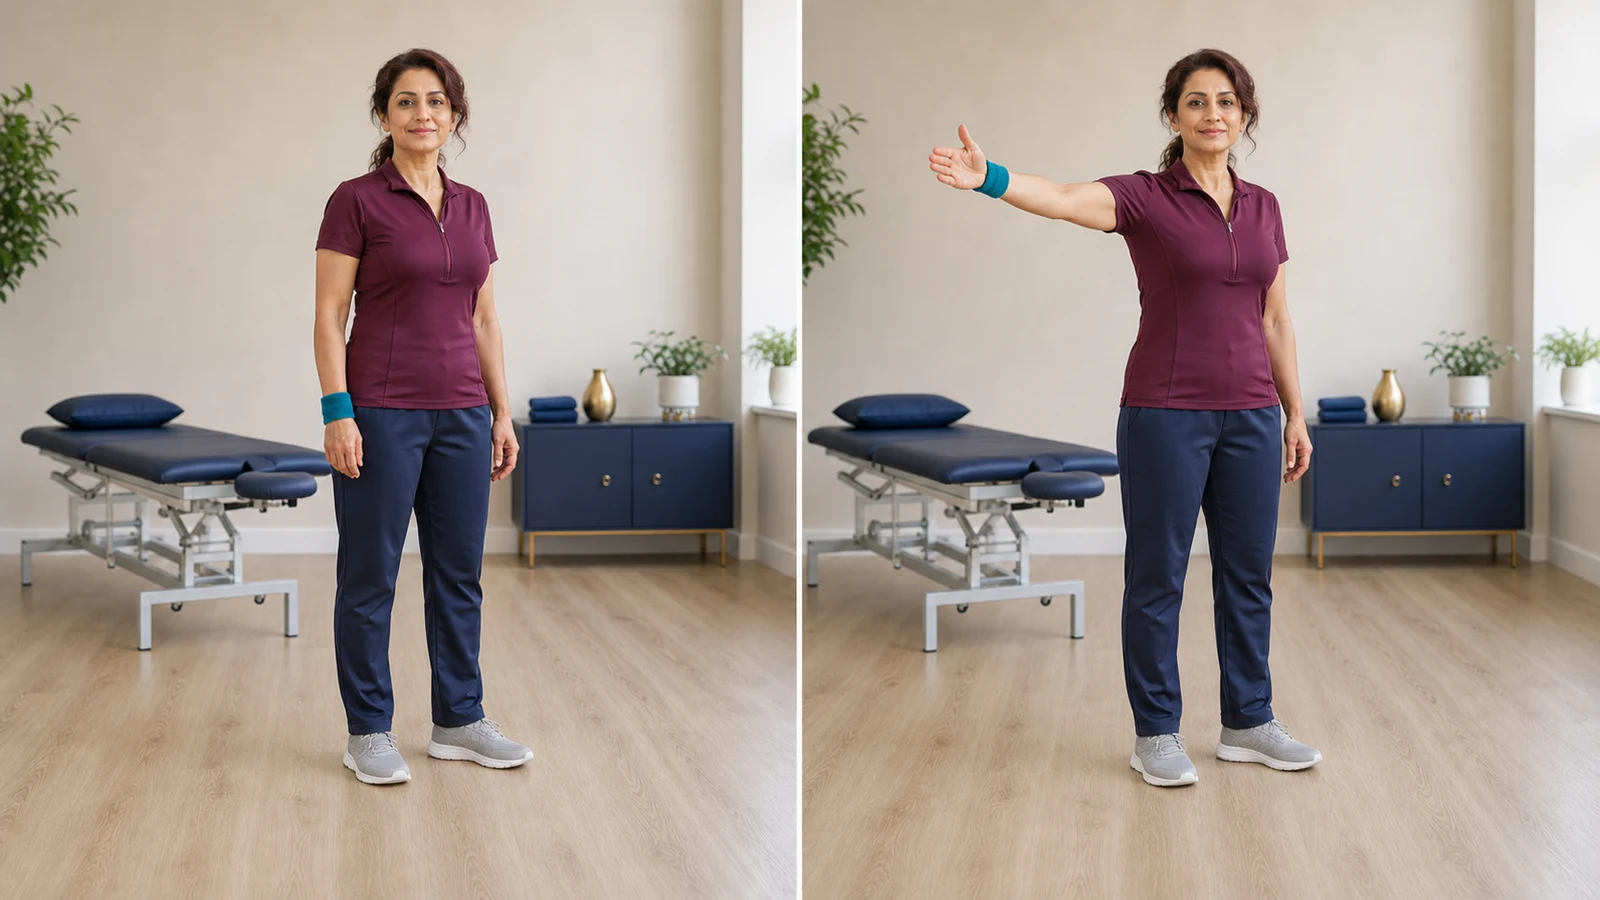
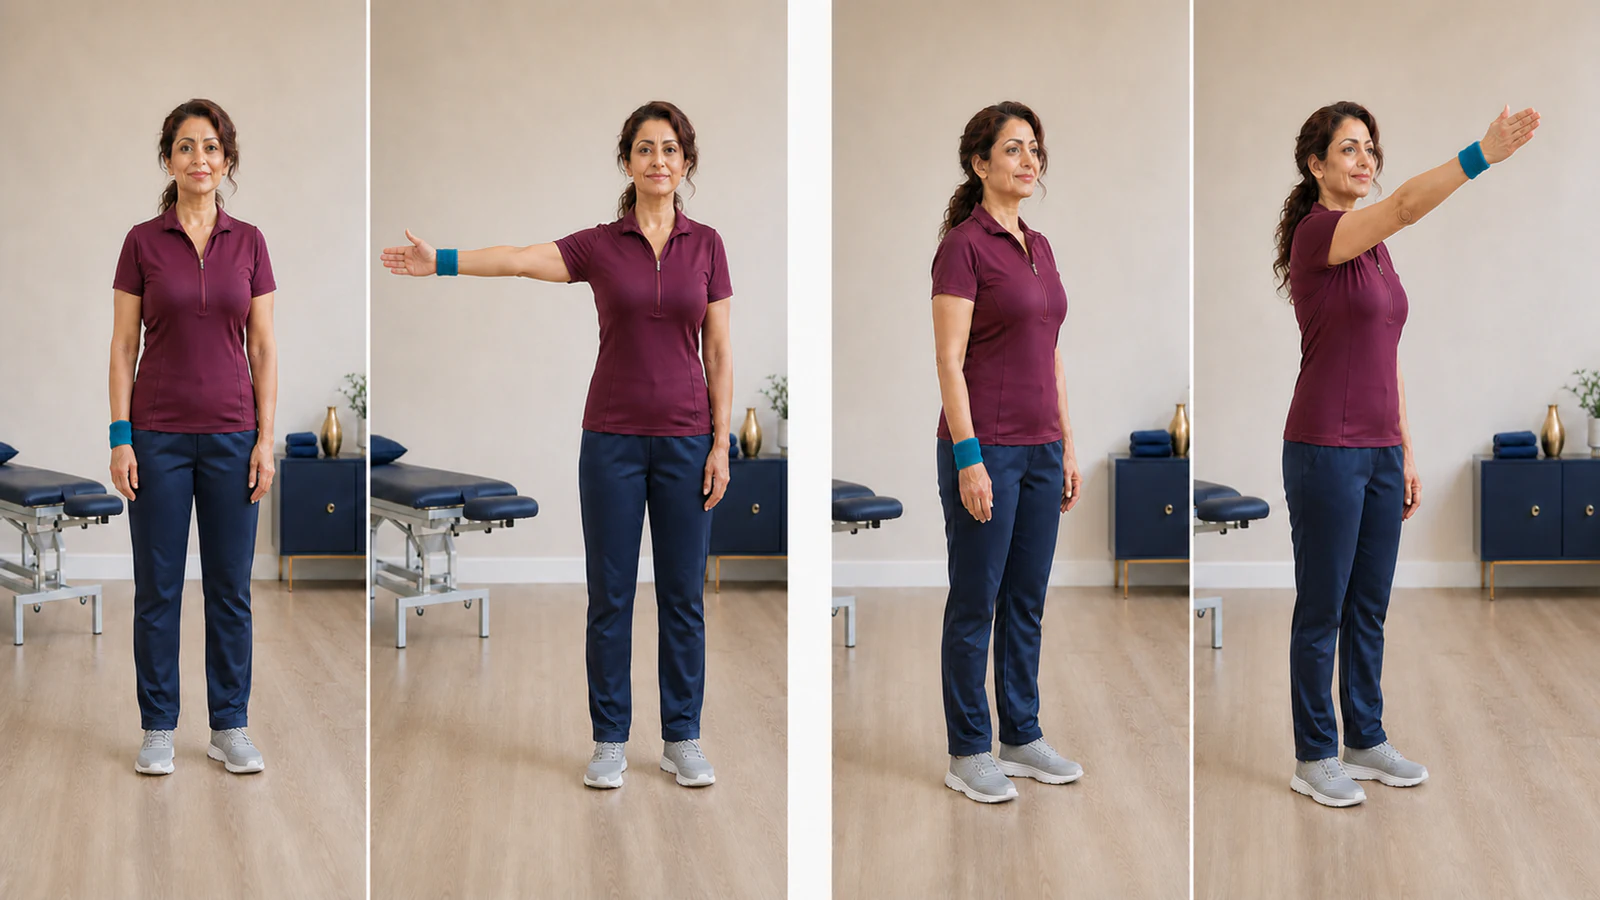
20) Standing lateral and forward arm elevation without weight (Standing Active Abduction & Forward Elevation)
This drill retrains coordinated active motion of the arm and shoulder blade and makes the path of the hand smoother. It is not a resisted “lateral… Take the repetition count and daily frequency from your rehabilitation plan; each… Stop for sharp pain, sudden arm drop, new weakness, tingling, shoulder hiking, trunk…
More detailLess detail
Goal and why it matters: This drill retrains coordinated active motion of the arm and shoulder blade and makes the path of the hand smoother. It is not a resisted “lateral raise” or a strength exercise. The hand remains empty throughout, and movement quality matters more than forcing a target angle.
Stage and starting criteria: Begin only after you have been cleared for standing active motion, with minimal pain, appropriate shoulder-blade control, and the ability to raise the arm without hiking the shoulder. After a large or massive repair, standing active elevation may begin around week 14 or later; multi-tendon or revision repairs may follow a slower plan, and the calendar alone is not permission to start.
Equipment and environmental safety: Stand in front of a mirror on a dry surface, feet hip-width apart and trunk upright.
Starting position: Let the left arm rest at the side; the wristband marks the operated right arm. Do not hold a dumbbell, band, or any other object.
- From neutral standing, set the shoulder blades gently without forcefully pinching them back.
- With the thumb up or slightly forward, raise the right arm out to the side.
- Stop at the first sign of pain or compensation and never beyond 90 degrees; the hand must not rise above shoulder height.
- Lower the arm slowly and pause briefly in neutral.
- Now keep the palm inward and thumb up while raising the right arm straight forward.
- Stop at the first sign of pain or compensation and never beyond 120 degrees, then lower the arm slowly to the side.
Range, side, and restrictions: Ninety degrees to the side and 120 degrees forward are ceilings, not targets to push through.
Breathing, speed, and rhythm: Exhale as the arm rises, do not force a hold at the top, lower it under slow control, and rest the arm at the side between the two directions.
Documented dose: Take the repetition count and daily frequency from your rehabilitation plan; each repetition should remain slow and compensation-free without worsening pain or range of motion that night or the next day.
Rest: Use the rest interval specified in your rehabilitation plan.
Signs of correct technique and expected response: The trunk and neck remain relaxed, the shoulder stays away from the ear, and the hand travels in a smooth path.
Stop immediately if: Stop for sharp pain, sudden arm drop, new weakness, tingling, shoulder hiking, trunk lean, or increased night/next-day pain.
Common mistakes: Back arching, swinging the arm, turning the thumb down, or exceeding the angle ceilings are errors.
Easier version/regression: First shorten the range or return to a wall-assisted/supine exercise.
Progression criteria and next stage: Progress means reaching the permitted range more smoothly without compensation; add a weight or band only after separate clearance for strengthening.
Expected and adverse responses: Mild fatigue at the side of the shoulder and the upper arm is expected and should clear with rest. Sharp pain, new weakness, pins and needles, or worse night pain and a smaller range the next day are not expected and mean the range or the count was too high.
21) Very light-band external rotation beside the body (Light-Band External Rotation)
Light resistance builds infraspinatus and teres minor endurance in a controlled position, helping the humeral head remain stable during activity. Resistance, repetitions, and training days must be specified in the strengthening… front-of-shoulder pain, loss of range, trunk compensation, or increased night pain occurs.
More detailLess detail
Goal and why it matters: Light resistance builds infraspinatus and teres minor endurance in a controlled position, helping the humeral head remain stable during activity.
Stage and starting criteria: Only after formal permission to enter the strengthening phase, with almost full pain-free active range, good shoulder-blade control, and the ability to perform unresisted external rotation without a next-day reaction.
Equipment and environmental safety: Use a very light band attached securely at elbow height.
Starting position: Place a towel between the right elbow and side, rest the left hand on the thigh, and hold the band only with the right hand.
- Stabilize the shoulder blade gently.
- Keep the elbow against the towel.
- Move the right forearm outward through a short range.
- Pause briefly without holding your breath.
- Control the band's return slowly.
Range, side, and restrictions: The right elbow stays on the towel against your side and the forearm travels outward only through the short written range; internal rotation behind the back has no place in this exercise.
Breathing, speed, and rhythm: Exhale as you pull, control the return over two to three seconds, and relax the arm beside the trunk between sets.
Documented dose: Resistance, repetitions, and training days must be specified in the strengthening prescription. Begin with light resistance and complete form, then increase only one variable at a time.
Rest: The exact interval comes from your strengthening prescription.
Signs of correct technique and expected response: You feel gentle work at the back of the shoulder while the elbow and trunk remain still.
Stop immediately if: front-of-shoulder pain, loss of range, trunk compensation, or increased night pain occurs.
Common mistakes: A heavy band, separating the elbow, or moving quickly are errors.
Easier version/regression: Return to an isometric exercise or movement without the band.
Progression criteria and next stage: Stable form, no loss of range the next day, and no increase in night pain. With care-team permission, increase only one of resistance, range, or repetitions by a small amount.
Expected and adverse responses: Mild fatigue at the back of the shoulder that resolves with rest.
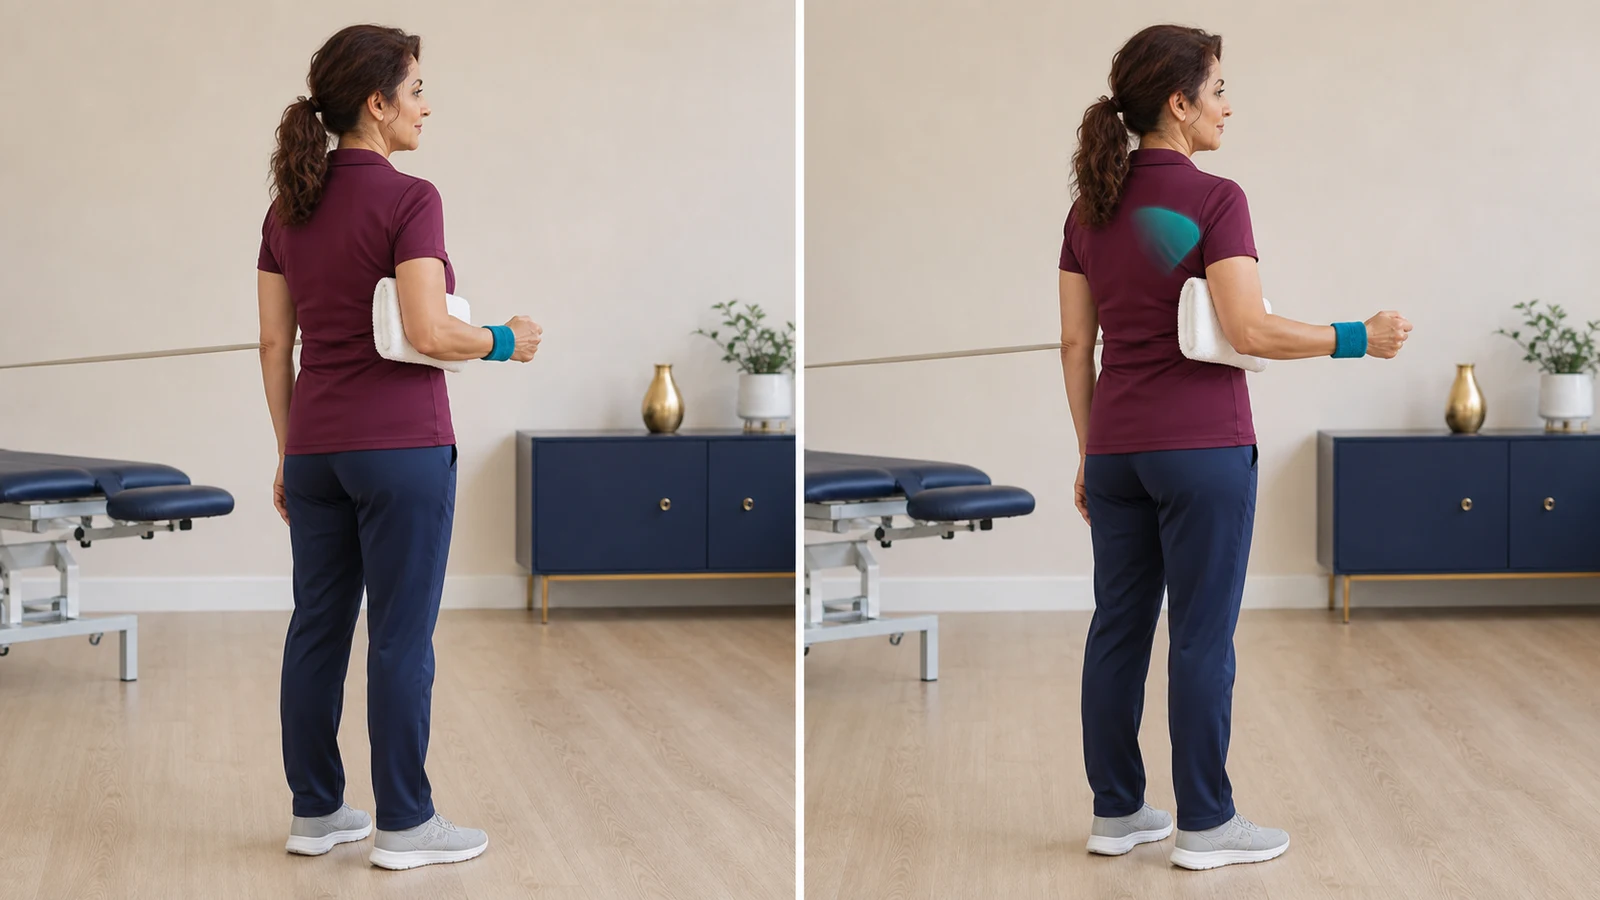
22) Resistance Band Seated Row (Resistance Band Seated Row)
A row strengthens the muscles between the shoulder blades. A strong blade gives the rotator cuff a base to work from; without it, raising the arm… The reference protocol lists the seated band row among the periscapular exercises but… Pain at the front of the shoulder, shrugging, the trunk rocking, a loss of range, or an…
More detailLess detail
Goal and why it matters: A row strengthens the muscles between the shoulder blades. A strong blade gives the rotator cuff a base to work from; without it, raising the arm slips back into compensation and shrugging. This exercise loads the shoulder blade, not the repair itself.
Stage and starting criteria: After formal entry into the strengthening phase, with active range nearly full and pain-free. If your subscapularis or teres minor was repaired, the reference protocol starts scapular retraction exercises from this phase onward and not before.
Equipment and environmental safety: A light band and a solid anchor at chest height — not a loose handle and not a half-closed door. A chair without wheels on a non-slip floor.
Starting position: Sit upright on the chair with the feet on the floor, both elbows bent at your sides, both hands holding the band with a little tension already in it.
- Sit tall and set the shoulder blades gently.
- Draw the elbows back along your sides so the shoulder blades come together.
- The elbows must not travel behind the line of the trunk.
- Pause for a second without holding the breath.
- Control the band's return slowly and do not let it throw the hands forward.
Range, side, and restrictions: The elbows stay in front of the line of the trunk, and the trunk stays upright and does not rock backwards. Start with the lightest band you have.
Breathing, speed, and rhythm: Breathe out as you pull and control the band's return over two to three seconds.
Documented dose: The reference protocol lists the seated band row among the periscapular exercises but gives no fixed number; the resistance, the count and the training days must be written into your strengthening-phase prescription. In any given block only one variable — resistance, count or range — rises a little, never all three together.
Rest: Rest the hands on the thighs between sets; the rest interval comes from your strengthening-phase prescription.
Signs of correct technique and expected response: You feel the work between the shoulder blades, not in the neck and not at the front of the shoulder; mild fatigue between the blades clears with rest.
Stop immediately if: Pain at the front of the shoulder, shrugging, the trunk rocking, a loss of range, or an increase in night pain.
Common mistakes: Too heavy a band, taking the elbows behind the line of the trunk, rocking the trunk to pull, and letting the band snap back.
Easier version/regression: Return to the seated low row without a band, or use a lighter band.
Progression criteria and next stage: A steady form with no loss of range the next day; the next stage is a gradual rise in resistance and then the T and Y exercises.
Expected and adverse responses: Mild fatigue between the shoulder blades is expected; pain at the front of the shoulder, loss of range or worse night pain means the resistance was too high.
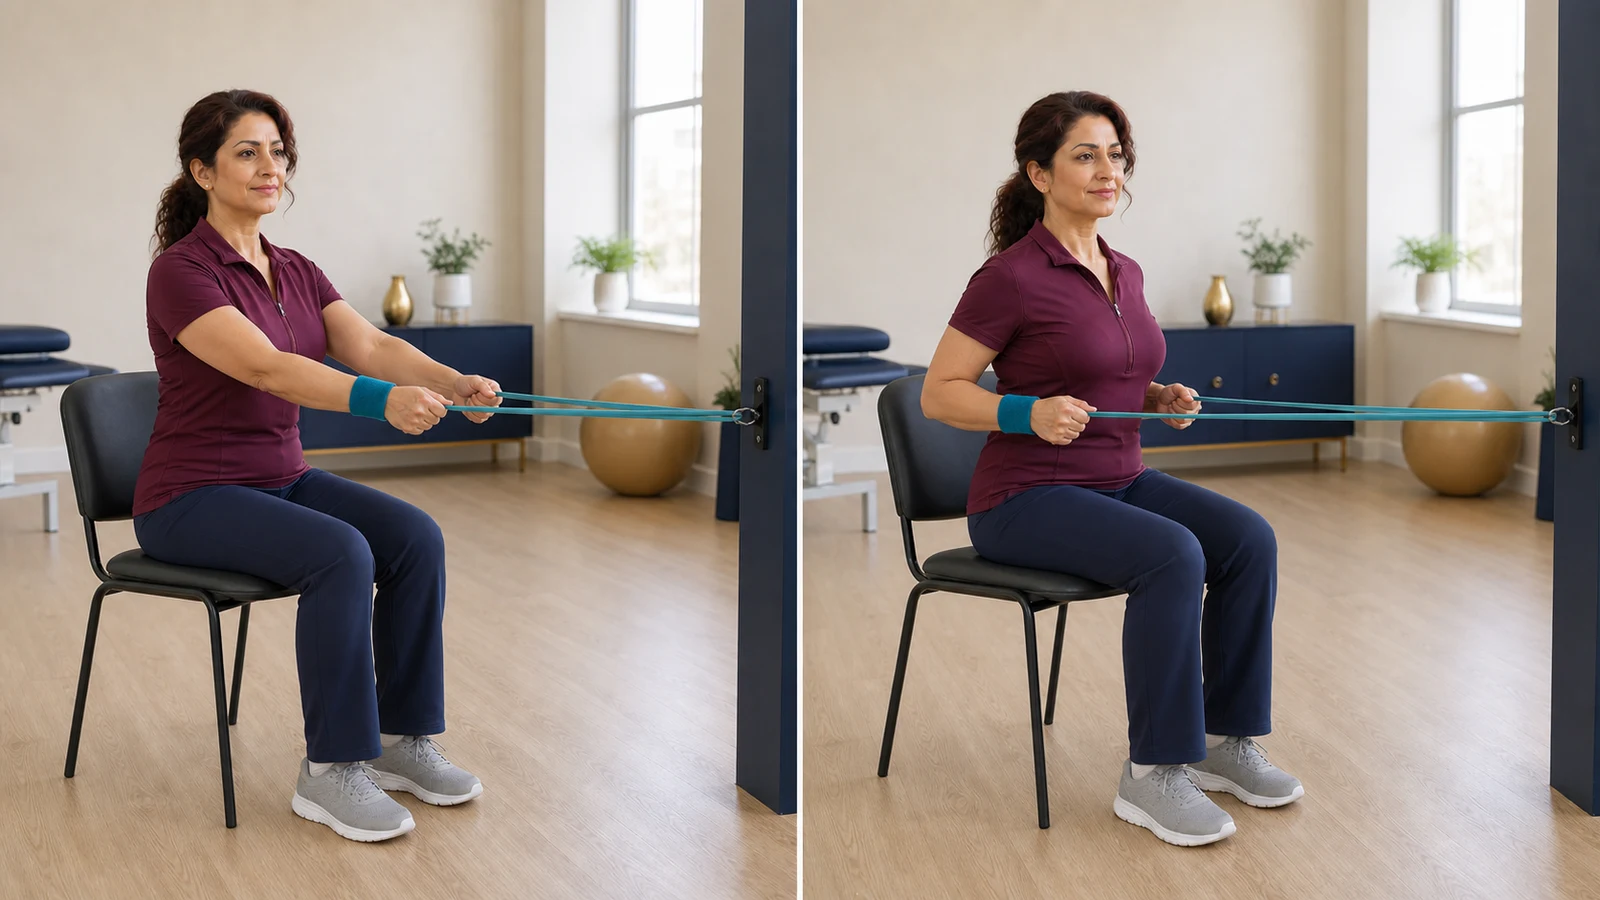
23) Scapular T and Y (Scapular T and Y)
In the T the arms open out to the sides, and in the Y they open diagonally upwards; those two angles build the middle and lower parts of the scapular… The start is without weight. The UVA protocol does give numbers for adding weight: begin… Pain at the front or top of the shoulder, shrugging, an arched low back, trembling, or an…
More detailLess detail
Goal and why it matters: In the T the arms open out to the sides, and in the Y they open diagonally upwards; those two angles build the middle and lower parts of the scapular muscles. These are the muscles that hold the shoulder blade in place during overhead work.
Stage and starting criteria: Only in the strengthening phase and after full, pain-free active range. The UVA protocol sets a clear condition: resistance is added only when the movement is pain-free and free of compensatory patterns.
Equipment and environmental safety: A firm bed and a folded towel for the forehead. Start with no weight at all; weight is added only at the next step and only as prescribed.
Starting position: Lie face down on the bed with the forehead on the folded towel so the neck stays in line, arms hanging off the edge. If lying face down is uncomfortable for you, do the same two movements standing and hinged forward from the hips.
- Set the shoulder blades gently.
- T: raise both arms out to the sides, level with the shoulders, up to the level of the bed, thumbs pointing up.
- Pause briefly and lower slowly.
- Y: open the arms diagonally upwards, at about the angle of the letter Y, again only up to the level of the bed.
- Lower slowly and take a few breaths' rest between the two letters.
Range, side, and restrictions: Do not go above the level of the bed; the aim is quality, not height. The neck stays relaxed and the low back does not arch.
Breathing, speed, and rhythm: Breathe out as the arms rise and lower them more slowly.
Documented dose: The start is without weight. The UVA protocol does give numbers for adding weight: begin at 0.5 kg and increase by 0.5 kg every 10 days, and only if the exercise is pain-free. Take the repetition count from your own strengthening-phase prescription.
Rest: Let the arms hang completely between the T and the Y and take a few calm breaths.
Signs of correct technique and expected response: The work is felt in the middle and lower shoulder blades, the neck is relaxed and the low back does not arch; mild scapular fatigue clears with rest.
Stop immediately if: Pain at the front or top of the shoulder, shrugging, an arched low back, trembling, or an increase in night pain.
Common mistakes: Raising the arms above the level of the bed, lifting the head and neck, arching the low back, and adding weight before the form is solid.
Easier version/regression: Take the weight off, reduce the range, or do the T only and add the Y later.
Progression criteria and next stage: Steady form at the current weight with no next-day reaction; the reference protocol's criterion for leaving the strengthening phase is external and internal rotation strength of at least 85% of the uninvolved arm. The next stage is a return-to-work or return-to-sport programme after functional testing.
Expected and adverse responses: Mild scapular fatigue is expected; pain at the top of the shoulder, trembling or worse night pain means weight or repetitions were added too soon.
- Strength progression: Exercise pain is minimal, range is not reduced the next day, and the shoulder blade moves without hiking.
- Overhead work: Return only after completing strengthening and functional testing, not by the calendar alone.
- Return to sport: Full pain-free range, normal shoulder-blade control, strength approaching the other side, and tolerance of a graded program are required. For massive repairs, one university protocol cites strength of 85% to 90% of the opposite side as a criterion.
Avoid: independently restarting weight training, pull-ups, dips, heavy pressing, throwing, swimming, or contact sport merely because three or six months have passed.
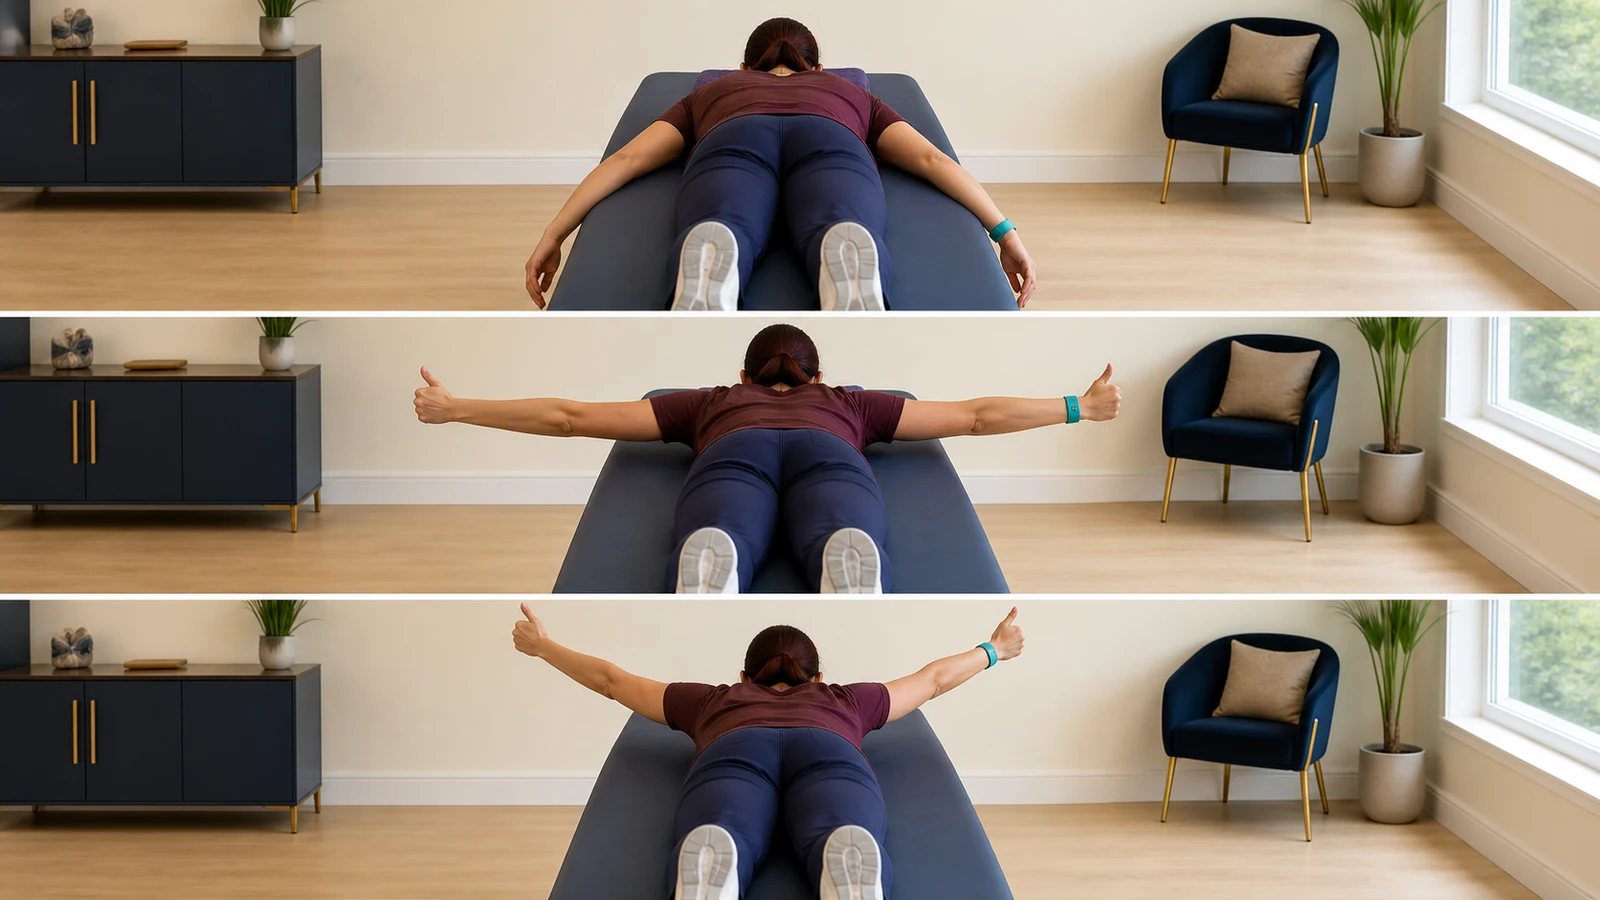
🚗 Driving, work, and return to activity
- Driving: Do not drive while wearing a sling, taking a sedating medicine, or unable to control the steering wheel and perform an emergency maneuver. Simulator data suggest impairment can persist for at least six weeks; obtain practical clearance from your care team.
- Desk work: Short, modified work may be possible earlier if the forearm is supported, you are not taking a sedating medicine, and sitting does not increase pain.
- Physical work: Carrying, overhead work, and sudden use of the hand wait until the strengthening and functional-testing stage. There is no single date that fits everyone.
- Sport: Return usually takes several months and is longer for throwing or overhead sports. Speed, strength, shoulder-blade control, and graded tolerance must be considered alongside time.
❓ Frequently asked questions
1) How many weeks should I wear the sling, and when?
The duration depends on the size and quality of the repair. Protective protocols commonly use it day and night for about six weeks, followed by gradual weaning during weeks 7 and 8. Your written plan takes priority.
2) When can I sleep on the operated shoulder?
Do not sleep on that side while sling use and repair protection continue. Later, try it only when the care team allows it, the wound is closed, and direct pressure does not cause pain.
3) When should I change the portal dressings?
The exact timing comes from your discharge sheet. Many centers replace the bulky dressing with small, separate dressings after about two days. Change a wet, soiled, loose, or saturated dressing sooner.
4) When may I shower or submerge the shoulder?
After a fully arthroscopic procedure, a brief shower may be allowed after about 48 hours, but an additional incision changes the timing. Avoid submersion until every portal is completely closed and the care team approves.
5) Is increased pain normal when the nerve block wears off?
A temporary increase as sensation returns is expected, which is why medicines should be taken on schedule. Uncontrolled or worsening pain, especially with increasing weakness or numbness, requires a call.
6) When should I move my hand, wrist, and elbow?
The fingers and wrist usually move from the first days. The elbow also commonly moves early after an isolated repair, but active elbow motion and palm-up rotation are more restricted after biceps tenodesis.
7) How can I be sure the pendulum is truly passive?
The unaffected hand supports you on a table, the operated arm hangs relaxed, and a small trunk shift creates the movement. If you contract the shoulder muscles to make a circle, the movement is no longer passive.
8) What is the difference between passive, assisted, and active motion?
During passive motion, the operated shoulder muscles do not create the movement. During assisted motion, the unaffected hand or a device carries most of the weight. During active motion, the shoulder muscles move the arm themselves. Their sequence matters for tendon protection.
9) When does physiotherapy start?
Education about the hand, sling, and safety can begin immediately, but shoulder-motion timing depends on tear size and the operative report. A massive tear may require six weeks without shoulder motion.
10) Why is the large-tear program slower?
The repair surface, tissue quality, and load at the tendon-to-bone attachment differ. A longer delay provides protection and does not mean the operation was unsuccessful.
11) How does biceps tenodesis restrict the elbow?
During the first phase, active elbow bending and turning the palm upward can load the tenodesis site. Active motion and biceps resistance are therefore added later according to the protocol.
12) Why is external rotation limited after subscapularis repair?
External rotation places stretch on the tendon at the front of the shoulder. The limit may therefore be 30 degrees, lower, or even zero in the first phase; use the value in your operative plan.
13) When is it safe to drive?
When the sling has been discontinued, you are not taking a sedating medicine, and you can control the steering wheel, gears, and an emergency maneuver without pain. Also follow your care team's clearance and local or insurance rules.
14) How does returning to desk work differ from heavy work?
Modified desk work with forearm support may be possible earlier. Heavy or overhead work requires range, strength, endurance, and functional testing and usually comes much later than a simple return to desk work.
15) What criteria are needed before swimming, tennis, or weight training?
Time alone is not enough. You need full pain-free range, appropriate shoulder-blade control, strength approaching the opposite side, and tolerance of a graded program. Overhead and throwing sports are among the last activities to resume.
✅ Practical summary
During the first weeks, your main responsibility is to protect the repaired tendon: keep the small portals clean and dry, fit the sling correctly, move the hand and wrist, and do not test the shoulder ahead of schedule. A small-to-medium tear does not follow the same pathway as a massive tear, revision repair, biceps tenodesis, or subscapularis repair. When an exercise is authorized, use smooth motion without compensation or a worse reaction the next day. If your own sheet starts later, that schedule takes priority over this guide.
To arrange a visit or ask about your individual plan, contact the office.
+98 913 782 5207Learn more about this area of care on the Shoulder & Elbow Surgery page.
This content is for general education only and does not replace an examination, advice from your treating clinician, your discharge sheet, or your surgeon-specific protocol. Timing, range of motion, weight-bearing, and exercise dose vary with the operation, any simultaneous procedures, and each person's circumstances. Do not change your medicines, dressings, or exercise plan without coordinating with your care team.
📚 Scientific sources
Scientific sources for this guide
- AAOS Clinical Practice Guideline: Management of Rotator Cuff Injuries, 2025
- ASSET Consensus Statement on rehabilitation after arthroscopic rotator cuff repair
- Massachusetts General Hospital: Small-to-Medium Rotator Cuff Repair Protocol
- Massachusetts General Hospital: Large-to-Massive Rotator Cuff Repair Protocol
- Massachusetts General Hospital: Biceps Tenodesis Protocol
- Massachusetts General Hospital: Subscapularis Repair Protocol
- Mazuquin et al.: Early versus delayed rehabilitation systematic review
- Massachusetts General Hospital: Shoulder Arthroscopy Postoperative Instructions
- Change in Driving Performance Following Arthroscopic Shoulder Surgery

Dr. Jalil Emad
Orthopedic specialist and surgeon, board-certified in bone and joint surgery; years of experience in knee and hip replacement, sports injuries and arthroscopy in Isfahan.
Related articles
Latarjet Shoulder Surgery: Postoperative Care and Rehabilitation
A complete, criteria-based guide to surgery day and care after Latarjet shoulder surgery—from wound care, sling use, medicines, and warning signs to the first 90 days of rehabilitation and a safer return to activity.
Total Hip Replacement Surgery: Postoperative Care and Rehabilitation
A complete, criteria-based guide to surgery day and care after total hip replacement—from wound care, medicines, and warning signs to the first 90 days of rehabilitation and a safer return to activity.
ACL Reconstruction Surgery: Postoperative Care and Rehabilitation
An evidence-informed, criteria-based guide to surgery day and care after ACL reconstruction—from wound care, medicines and warning signs to the first 90 days of rehabilitation and a safer return to driving, work and sport.