
On this page
- 🏥 What happens on the day of surgery and before discharge?
- ⚠️ Warning signs: when should you get help?
- 1Care during the first few days after HTO
- 🛡️ The first 2 weeks: movement without putting body weight through the leg
- ↔️ The second 2 weeks: better control with the same walking restrictions
- 🌱 Month 2: progressing after the bone has been assessed
- 🏋️ Month 3: strengthening after clearance for weight-bearing
- 🎯 After month 3: endurance and a gradual return to activity
- 🚗 Returning to work, driving and daily life
- ❓ Frequently asked questions after HTO
- ✅ How should you track your recovery?
- 📚 Scientific references
HTO for Bow Legs: Care and Rehabilitation After Surgery
This guide covers care after HTO, walking with 2 crutches, a brace, dressings, phased exercises, and returning to work and sport.
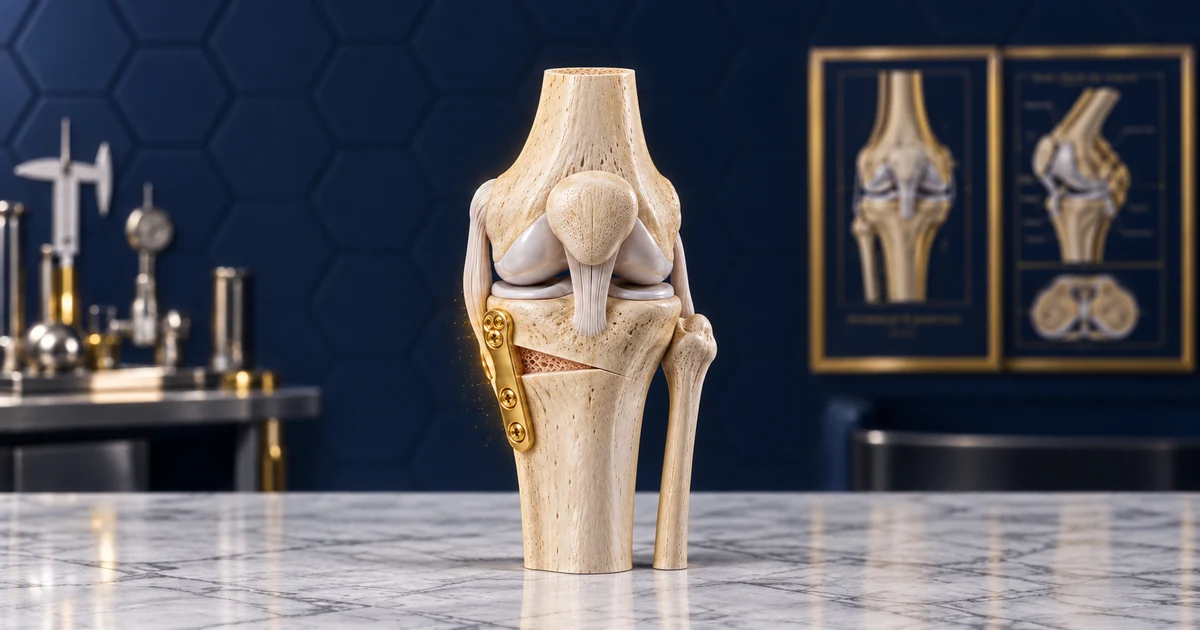
🏥 What happens on the day of surgery and before discharge?
After surgery to realign the upper shinbone (HTO), your pain, alertness and blood flow to the foot are checked in the recovery area. The effects of the anaesthetic or pain medicine may last for a while. Get out of bed for the first time with help from a nurse or physiotherapist.
Pain, swelling and bruising around the knee and lower leg may occur during the first few days. Before discharge, your pain should be manageable with oral medicine, and you should be able to move around using 2 crutches without putting your body weight through the operated leg. The length of your hospital stay depends on your condition and your care team's assessment.
Take your discharge instructions, prescriptions, instructions for using the crutches and brace, and follow-up appointment details home with you. Use the brace with the settings provided by your care team. Ask your physiotherapist for help if the settings need changing.
⚠️ Warning signs: when should you get help?
Contact your surgeon or treatment centre the same day: Increasing wound redness or warmth, pus-like discharge, or separation of wound edges; A fever above 38.5 °C, or chills and feeling generally unwell; A dressing that becomes wet or loose, or increasingly bloodstained; New pain after a fall or impact, or a change in the shape of the leg; New pain and swelling in 1 calf. Get a medical assessment for a blood clot the same day, and do not massage the calf; Fresh blood in your urine or stool, or black stools. Get assessed for bleeding the same day.
Seek emergency help: Sudden shortness of breath, chest pain, coughing up blood, or fainting; Severe, increasing calf pain, even if you do not yet have tightness or numbness; calf tightness and pain when moving the toes are also warning signs; A cold or pale foot, or new and worsening numbness and weakness; Bleeding that will not stop, vomiting blood, or bleeding with severe weakness and fainting. Slow breathing or unusual drowsiness after taking medicine. In Iran, call 115 for emergency medical help. Do not drive yourself.
If you have questions about pain, swelling or knee care after HTO, call Dr Jalil Emad’s clinic on 0913 782 5207, or book an appointment online. In an emergency, do not wait for the clinic to reply; follow the instructions in the emergency box above.
1Care during the first few days after HTO
During the first few days, wound care, swelling control and moving safely matter more than increasing your activity. Combine rest with short periods of permitted movement throughout the day.
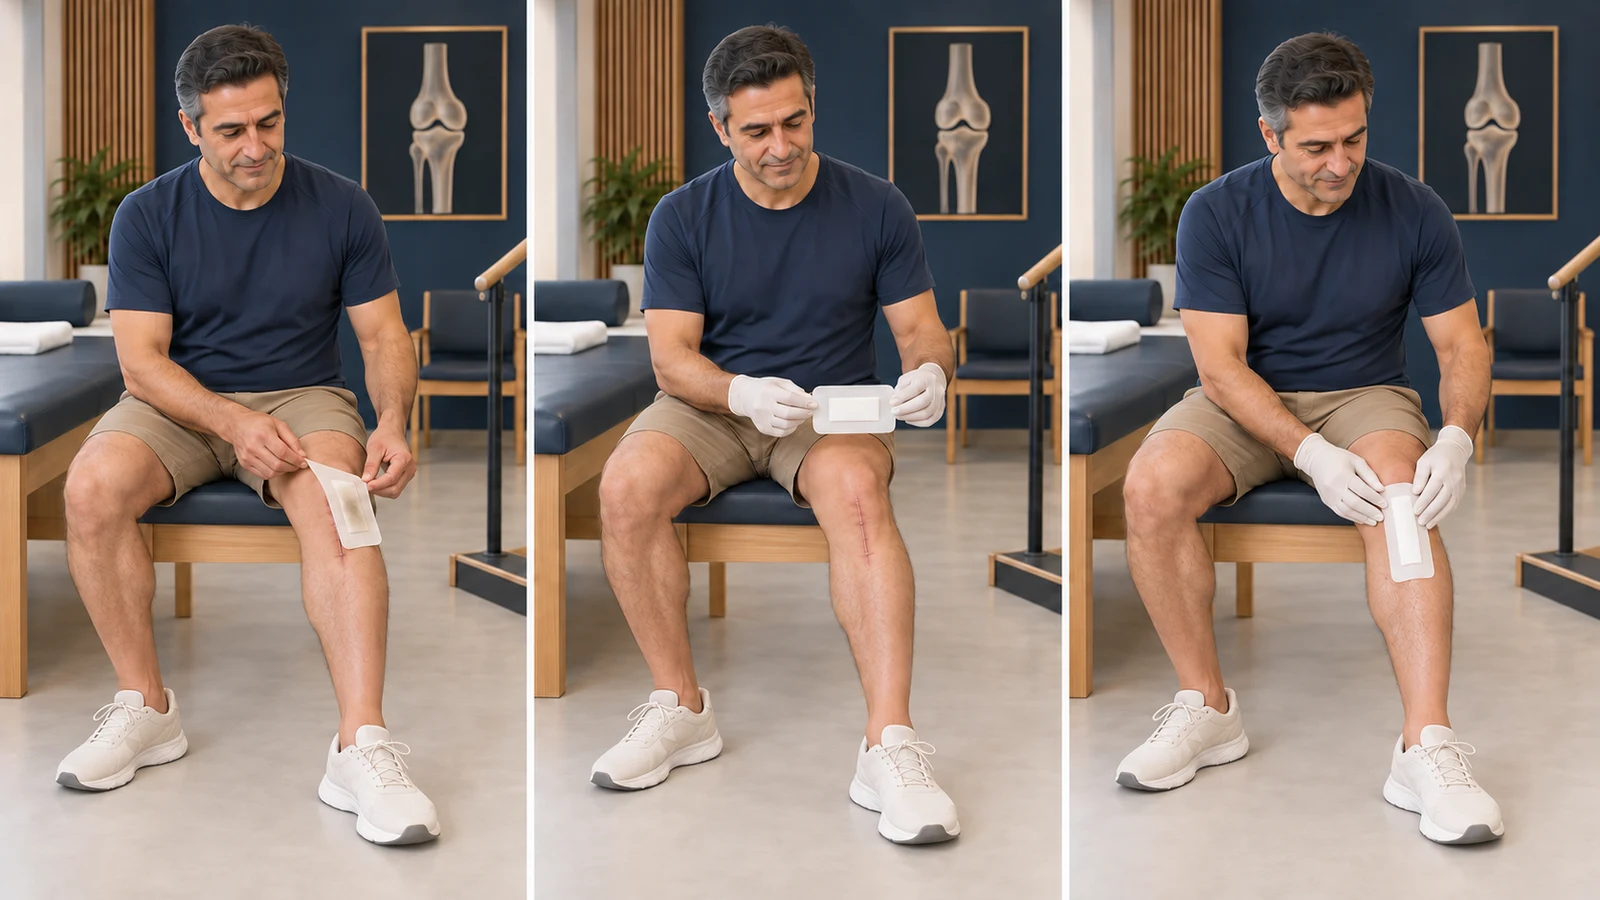
🩹 Wound care and dressing changes
Keep the original dressing clean and dry until your first appointment, usually 10 to 14 days after surgery. A small bloodstain that does not spread is different from ongoing bleeding. If the dressing becomes wet, dirty or loose, arrange an earlier change with your care team.
More detailLess detail
- If your care team has authorised a dressing change, prepare clean supplies and a suitable dressing on a clean surface, and wash your hands with soap and water.
- Gently remove the outer dressing. If it is stuck to the wound, do not pull it off. Ask your treatment centre how to remove it.
- Look at the incision without pressing or disturbing it. Do not pick at scabs, stitches or wound adhesive, and do not touch the wound surface.
- Wash your hands again and use sterile gloves to apply the new dressing. Do not touch the surface that will lie against the wound.
- Clean the wound only as your care team has taught you. Do not apply Betadine, alcohol, ointment or any other substance on your own.
- Apply a suitable dry dressing that covers the entire incision. Do not wrap tape or a bandage tightly around the lower leg.
- Stitches that need removal are usually taken out 2 to 3 weeks after surgery. Do not cut or remove them yourself.
🚿 Showering while protecting the wound
From 48 hours after surgery, if you feel well enough, you may take a short shower with an intact waterproof cover protecting the wound. If the dressing gets wet, it needs changing.
More detailLess detail
- Have someone help you get into and out of the shower, and keep the route dry and clear of obstacles.
- Use a stable shower chair so that you do not put your body weight through the operated leg. While seated, open the brace only as your care team has taught you.
- Before showering, check the waterproof cover for tears and leaks. Do not direct the water jet at the wound.
- After showering, gently remove the outer cover and check that the dressing has stayed dry. Do not scrub the wound.
💊 How should you take your medicines?
Take each medicine for this operation only if it has been prescribed for you. The names below do not mean that you should take all of them together. Check your discharge prescription for the dose, interval between doses and duration of treatment.
More detailLess detail
- Cefalexin and ciprofloxacin are antibiotics. If either is on your prescription, take it as prescribed. If you develop tendon pain or swelling while taking ciprofloxacin, especially at the back of the ankle, stop the medicine and contact your doctor immediately for a suitable alternative. Also stop exercising or placing stress on the painful tendon area until you have been assessed.
- Aspirin or apixaban may be prescribed to help prevent blood clots. Do not substitute one for the other, take them together, or change the duration of treatment without medical advice. Check with your doctor or pharmacist before adding ibuprofen, naproxen or a herbal medicine.
- Paracetamol with codeine, and oxycodone if prescribed, are used for pain. Combination medicines may contain paracetamol. Do not add another painkiller containing the same ingredient. Drowsiness and constipation may occur.
- Gabapentin may be prescribed for nerve pain, and alprazolam for a specific sleep or anxiety problem. Taking them with codeine or oxycodone can increase drowsiness and breathing problems. Take them only according to your doctor's clear instructions, and do not drink alcohol.
- Famotidine or pantoprazole, if prescribed, are used to reduce stomach acid and related stomach problems. Supplements such as collagen do not replace adequate nutrition, exercise or follow-up of bone healing. Take supplements according to your prescription too.
🧊 Pain, swelling and resting positions
Elevate your leg when resting and spread activity over several short sessions. If swelling and pain increase after activity and do not return to their previous level, reduce the amount of activity next time.
More detailLess detail
- When lying down, support your calf and heel to elevate the leg. Do not leave a pillow only under the bent knee for long periods.
- Wrap a cold pack in a cloth and apply it for 15 to 20 minutes at a time. Do not apply cold to numb or damaged skin, and do not sleep with the cold pack on.
- Do not leave your leg hanging over the edge of the bed. During long periods of sitting, change position and move your ankle.
- Do not wait for severe pain before moving. Exercise when your pain is manageable with your prescribed pain medicine plan.
🚶 Walking, 2 crutches and the brace
Until about 6 weeks, let the operated foot touch the ground for balance only. Support your weight mainly through the 2 crutches and your unoperated leg. Less pain does not mean that you may put more weight through the operated leg.
More detailLess detail
- Wear the brace when walking and open it for exercises performed sitting or lying down. Do not change the angle settings or straps unless you have been taught how.
- Move both crutches a little forwards, place the operated foot between them with only light contact on the ground, then support yourself through your hands and bring the unoperated leg forwards.
- Push up from the chair arms to stand. Do not lean on unsecured crutches. Find your balance before you start walking.
- Clear loose rugs, cables and other objects from your route. Do not use stairs without help until you have practised the technique with your physiotherapist.
- After an assessment and follow-up X-ray at about week 6, weight-bearing increases according to your care team's plan. Stopping the crutches and brace should match your knee control and ability to walk without a limp.
🦾 Follow-up of bone healing
Healing at the bone cut is monitored through examination and follow-up X-rays. Pain levels alone cannot tell you whether the bone has healed.
More detailLess detail
- Attend the first appointment 10 to 14 days after surgery to check the wound and exercise plan. Bring the requested X-ray to the assessment for increasing weight-bearing at about week 6.
- If you have not been given a follow-up appointment or X-ray request, contact the clinic. Do not increase activity based only on how much time has passed.
- Smoking and nicotine-containing products can interfere with bone healing. Ask your care team for help with stopping and with nutritional support.
🛡️ The first 2 weeks: movement without putting body weight through the leg
The aims during this period are to control swelling, move the knee gently and activate the thigh muscle. Use the brace and 2 crutches when walking, with the foot touching the ground for balance only. Start the exercises after being taught how, and do not force yourself to do them all in one session.
Moving the ankle up and down (Ankle pumps)
Move your ankle gently, with your knee and calf supported on the bed. Stop the movement if you develop sharp pain or new calf pain.
More detailLess detail
Before you start: Lie down or sit with your calf supported and your foot free to move. This movement helps circulation and ankle mobility and does not require weight-bearing.
How to do it:
- Gently pull your toes towards you.
- Gently point your toes away from you.
- Repeat within a comfortable range without twisting your lower leg.
Movement tips: Your ankle moves while your knee and hip stay still. Breathe normally and rest between sessions. You may feel a gentle stretch at the back of the calf.
Amount, repetitions and progression: Repeat 10 to 20 times, 3 to 4 times a day. The movement should be smooth. More pain or swelling is not a reason to increase the exercise.
Stop immediately if: Stop the exercise if you develop sharp pain or new calf pain.
Common mistakes: Do not move just your toes, and do not rotate the whole leg from the hip.
Easier version: Use a smaller ankle movement and provide better support for the calf.
Tightening the muscle at the front of the thigh (Quadriceps set)
Keep your knee straight without lifting the leg, and gently tighten the muscle at the front of your thigh. Stop the movement if you feel sharp pain.
More detailLess detail
Before you start: Lie on a reasonably firm bed with your leg straight. This exercise helps knee control and maintains strength in the muscle at the front of the thigh without weight-bearing.
How to do it:
- Gently pull your toes towards you.
- Tighten the muscle at the front of your thigh so that the back of your knee moves closer to the bed.
- Hold the contraction, then relax the muscle completely.
Movement tips: Keep your knee aligned with your foot and your heel on the bed. Do not hold your breath, and relax the muscle between contractions. You should be able to see the thigh muscle tighten and the kneecap move slightly upwards.
Amount, repetitions and progression: Repeat 10 times, holding each contraction for 5 to 10 seconds, 3 to 4 times a day. If pain or swelling increases after exercise, reduce the amount of exercise in the next session.
Stop immediately if: Release the contraction if you develop sharp pain in the knee or at the operation site.
Common mistakes: Do not lift your pelvis off the bed or force the knee down against the bed.
Easier version: Use a gentler contraction and initially focus just on tightening the muscle.
Sliding the heel on the bed (Heel slide)
Slide your heel towards you on the bed, bending the knee without forcing it. Stop the movement if you develop sharp pain or painful catching.
More detailLess detail
Before you start: Lie down with the operated leg on a flat surface. Open the brace for this exercise. The aim is to maintain knee movement without putting body weight through the leg.
How to do it:
- Keep your heel on the bed and gently slide it towards your buttock.
- Move only as far as a gentle stretch, without causing sharp pain.
- Gently slide your heel forwards again until the knee is straight.
Movement tips: Keep your knee and toes pointing upwards and your heel on the surface. Move slowly, breathe normally and rest between repetitions. There is no fixed numerical limit on bending, but painful force is not allowed.
Amount, repetitions and progression: Repeat 10 times, 3 to 4 times a day. Increase the range slightly only when the movement is smooth and does not cause more pain or swelling afterwards.
Stop immediately if: Stop the movement if you develop sharp pain or a painful catching sensation.
Common mistakes: Do not let a helper force your knee to bend, and do not twist the leg on the bed.
Easier version: Start with a smaller range. If needed, ask your physiotherapist to teach you how to use a towel for assistance.
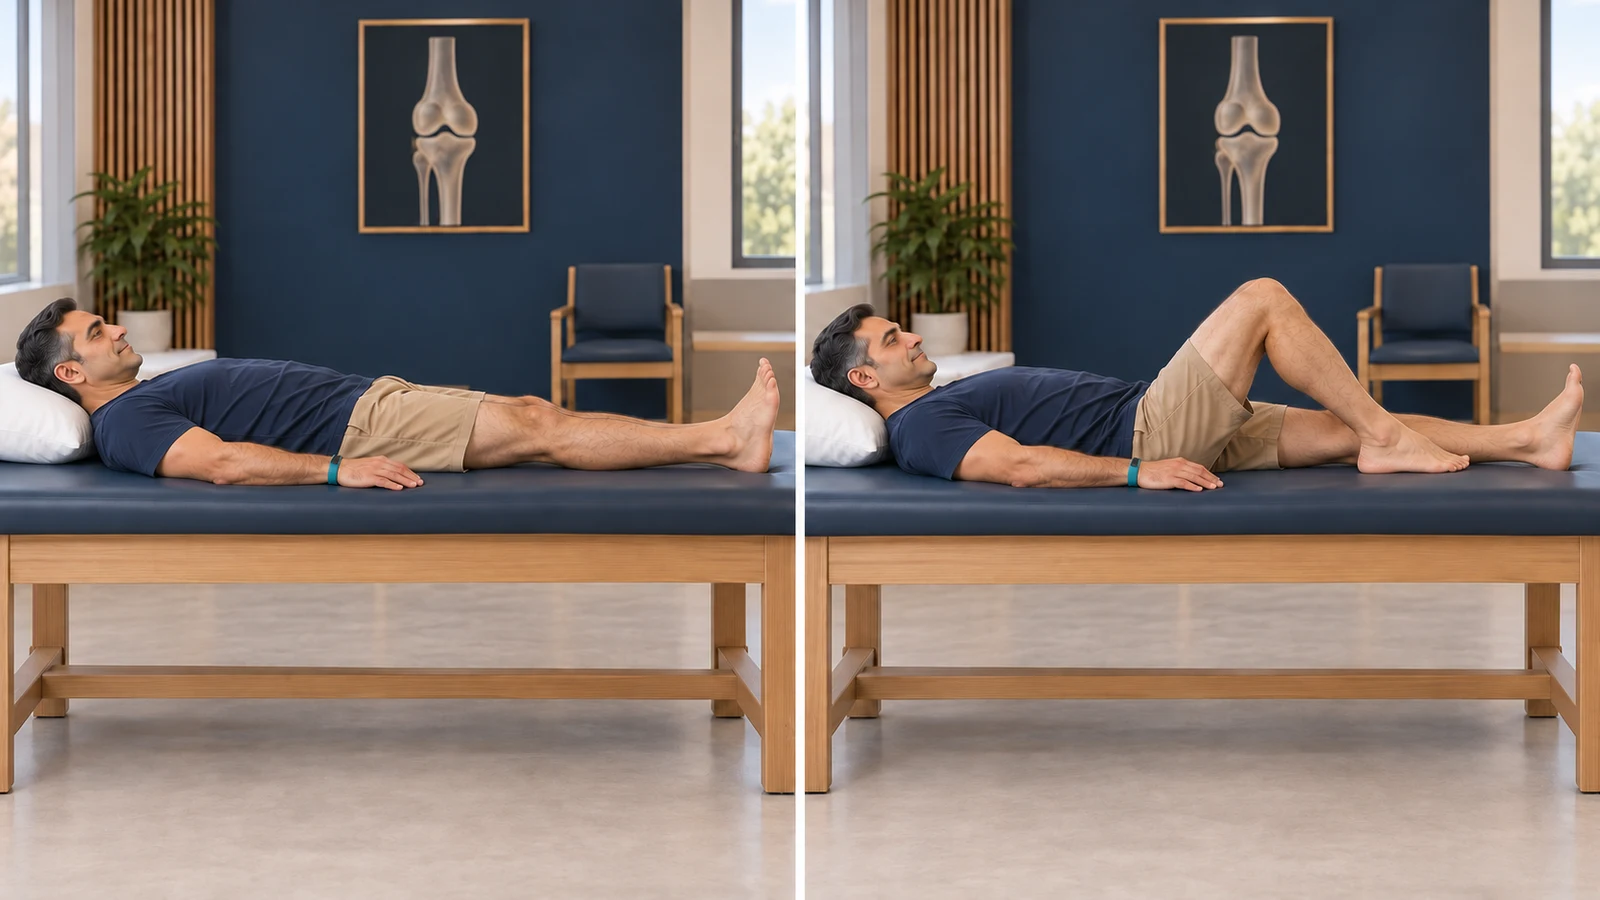
Lifting the straight leg while keeping the knee controlled (Straight leg raise)
Lift the operated leg slightly off the bed only if the knee stays straight as you lift it. Stop the movement if you feel sharp pain.
More detailLess detail
Before you start: Start this movement after checking your thigh muscle control with your physiotherapist. Lie on your back with the unoperated leg bent and the operated leg straight. Open the brace for exercise, and do not attach an ankle weight.
How to do it:
- Tighten the muscle at the front of your thigh and keep your knee fully straight.
- Lift the operated heel only slightly off the bed. The knee must not bend or sag.
- After a pause, gently lower the leg back onto the bed and relax the muscle.
Movement tips: Keep the operated knee straight as the leg rises and lowers. You do not need to lift the leg high. Do not hold your breath, and rest between repetitions. If the knee bends, return to thigh muscle tightening exercises for now.
Amount, repetitions and progression: If your knee stays straight and you have full control of the movement, repeat 10 times, holding for 5 to 10 seconds, 3 to 4 times a day. If this amount causes loss of control or more pain, stop and adjust the plan with your physiotherapist.
Stop immediately if: Lower the leg if the knee bends and sags, or if you develop sharp pain at the operation site.
Common mistakes: Do not swing the leg up or hold it raised with the knee bent.
Easier version: For now, just tighten the muscle at the front of your thigh with your heel resting on the bed.
↔️ The second 2 weeks: better control with the same walking restrictions
Do not put your body weight through the operated leg yet. After the wound has been checked, continue the exercises that do not load the leg. The aim is gentler movement and better control, rather than forcing the knee to reach a particular angle.
Continuing to activate the muscle at the front of the thigh (Quadriceps set)
Keep your knee straight without lifting the leg, and gently tighten the muscle at the front of your thigh. Stop the movement if you feel sharp pain.
More detailLess detail
Before you start: Lie on a reasonably firm bed with your leg straight. This exercise helps knee control and maintains strength in the muscle at the front of the thigh without weight-bearing.
How to do it:
- Gently pull your toes towards you.
- Tighten the muscle at the front of your thigh so that the back of your knee moves closer to the bed.
- Hold the contraction, then relax the muscle completely.
Movement tips: Keep your knee aligned with your foot and your heel on the bed. Do not hold your breath, and relax the muscle between contractions. You should be able to see the thigh muscle tighten and the kneecap move slightly upwards.
Amount, repetitions and progression: Repeat 10 times, holding each contraction for 5 to 10 seconds, 3 to 4 times a day. If pain or swelling increases after exercise, reduce the amount of exercise in the next session.
Stop immediately if: Release the contraction if you develop sharp pain in the knee or at the operation site.
Common mistakes: Do not lift your pelvis off the bed or force the knee down against the bed.
Easier version: Use a gentler contraction and initially focus just on tightening the muscle.
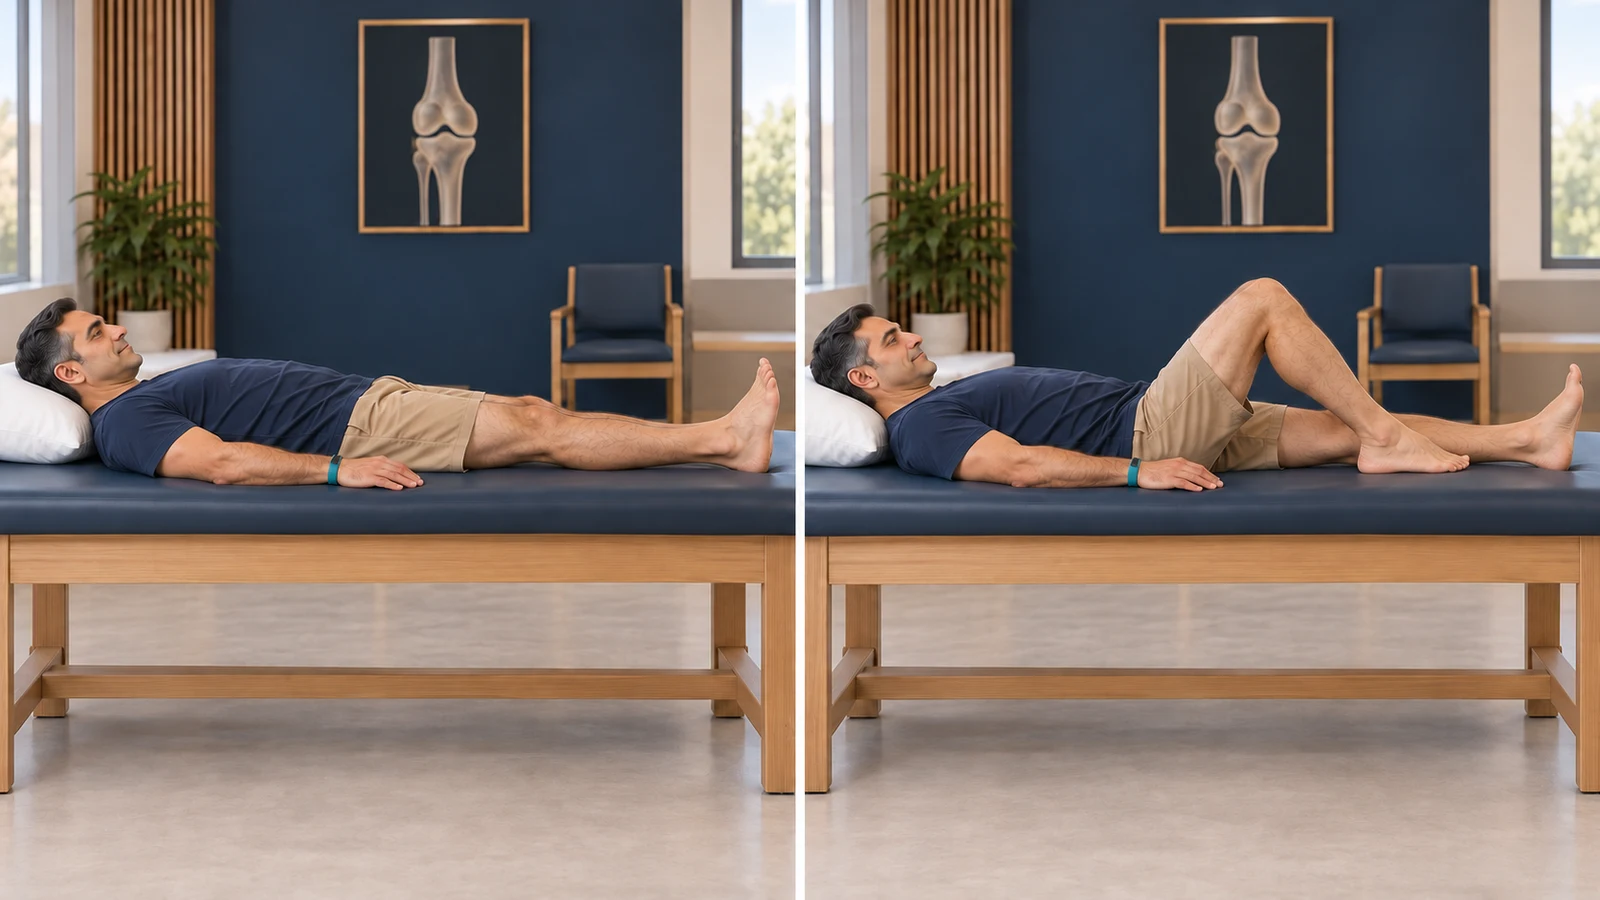
Continuing knee bending with heel slides
Slide your heel towards you on the bed, bending the knee without forcing it. Stop the movement if you develop sharp pain or painful catching.
More detailLess detail
Before you start: Lie down with the operated leg on a flat surface. Open the brace for this exercise. The aim is to maintain knee movement without putting body weight through the leg.
How to do it:
- Keep your heel on the bed and gently slide it towards your buttock.
- Move only as far as a gentle stretch, without causing sharp pain.
- Gently slide your heel forwards again until the knee is straight.
Movement tips: Keep your knee and toes pointing upwards and your heel on the surface. Move slowly, breathe normally and rest between repetitions. There is no fixed numerical limit on bending, but painful force is not allowed.
Amount, repetitions and progression: Repeat 10 times, 3 to 4 times a day. Increase the range slightly only when the movement is smooth and does not cause more pain or swelling afterwards.
Stop immediately if: Stop the movement if you develop sharp pain or a painful catching sensation.
Common mistakes: Do not let a helper force your knee to bend, and do not twist the leg on the bed.
Easier version: Start with a smaller range. If needed, ask your physiotherapist to teach you how to use a towel for assistance.
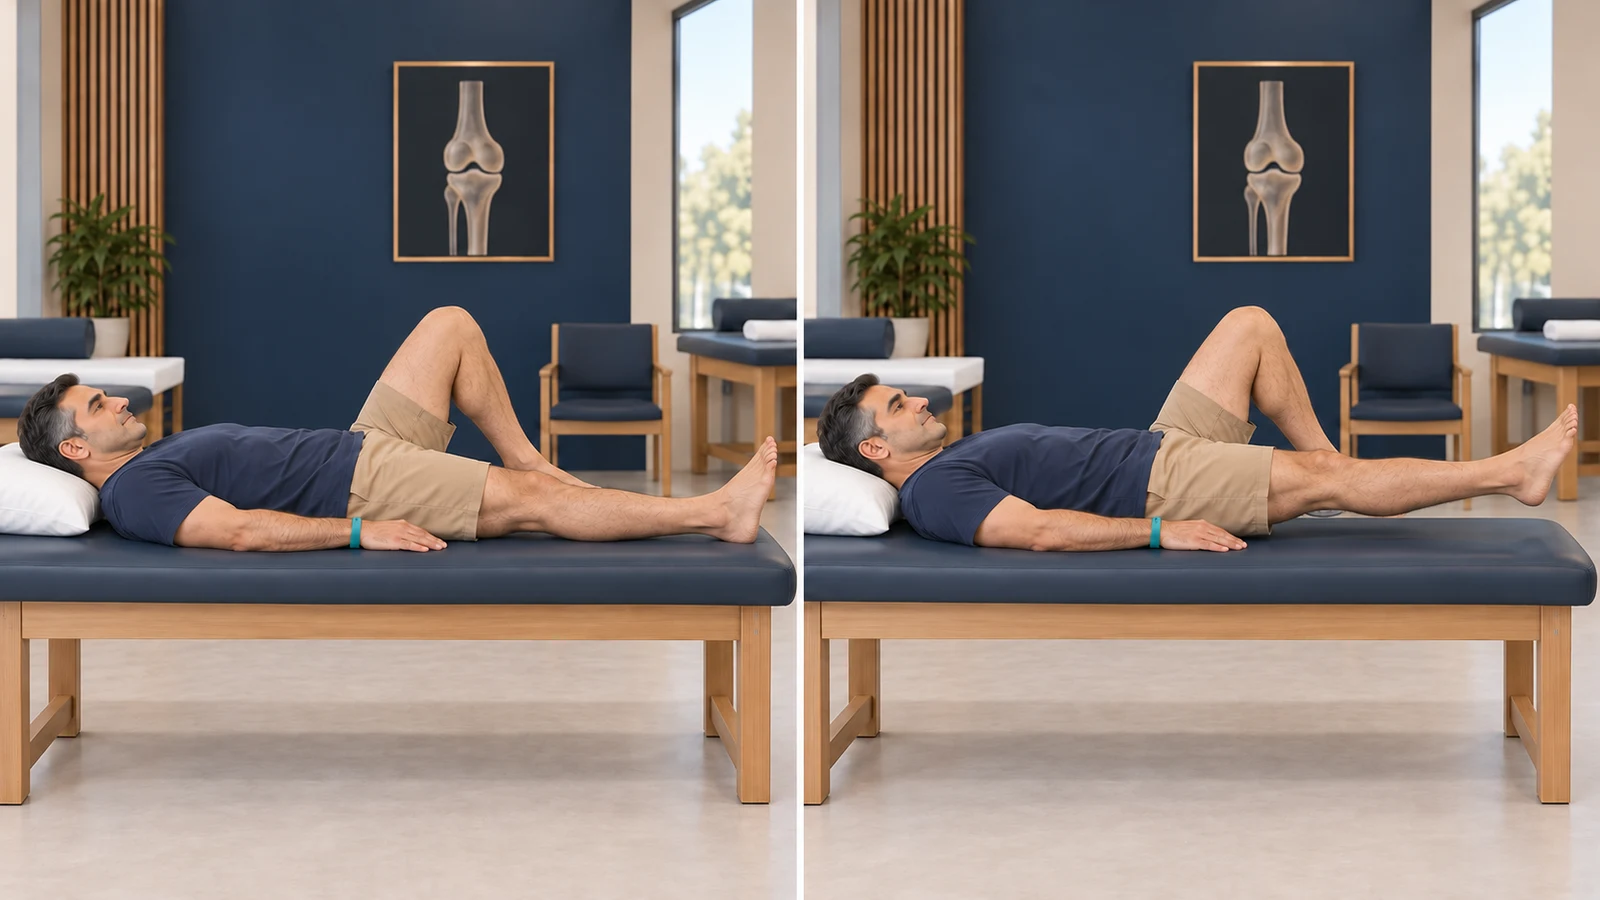
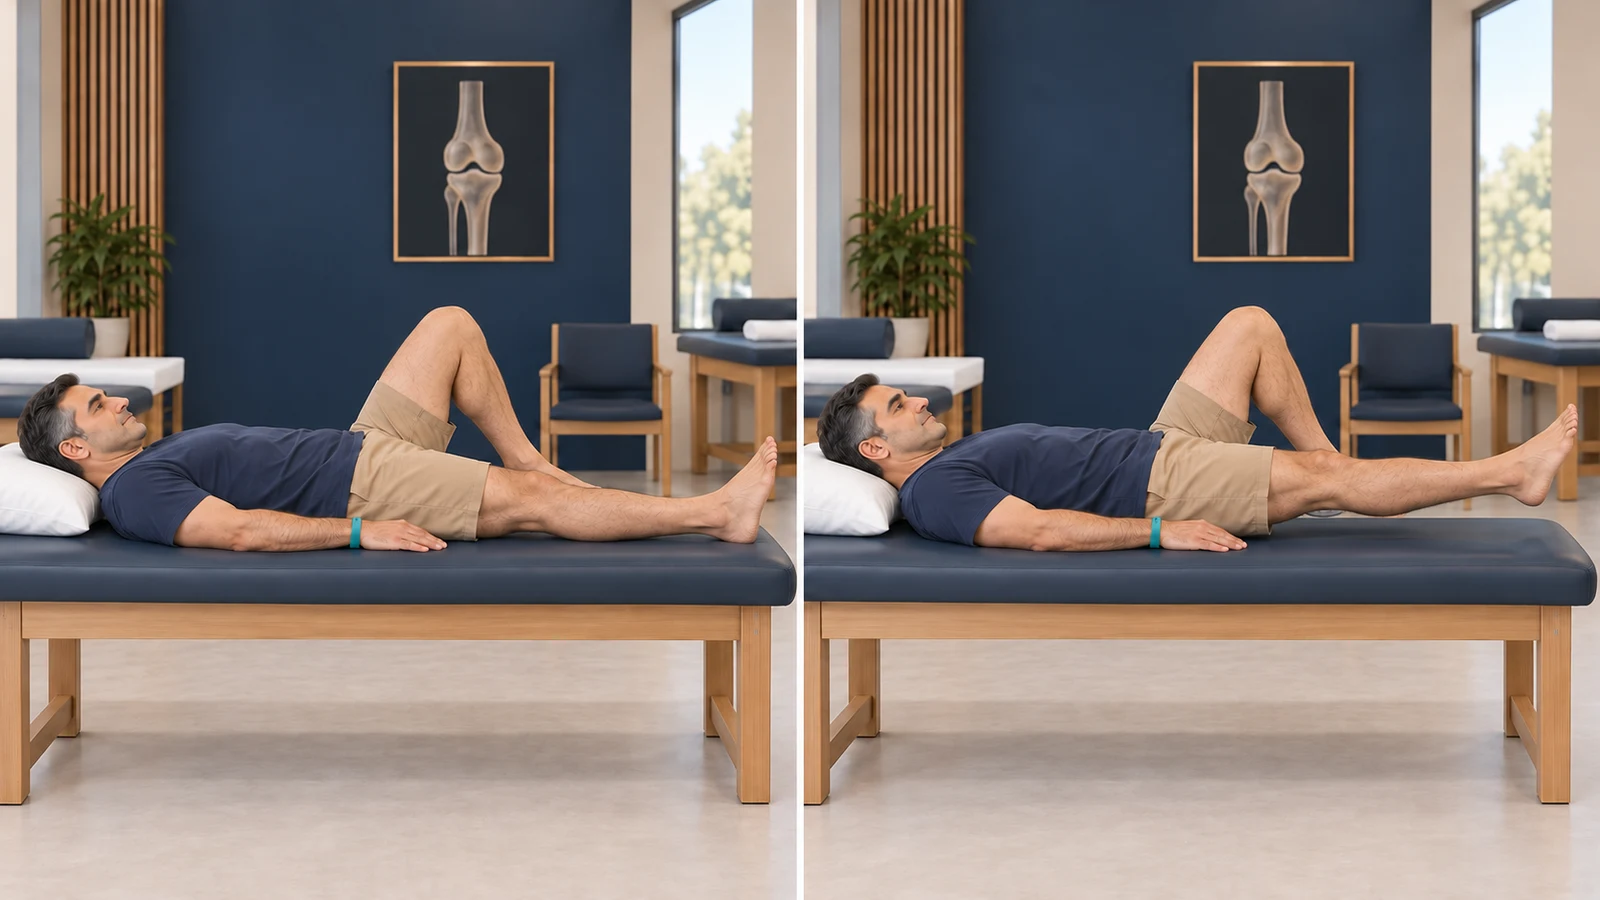
Lifting the straight leg while keeping the knee controlled (Straight leg raise)
Lift the operated leg slightly off the bed only if the knee stays straight as you lift it. Stop the movement if you feel sharp pain.
More detailLess detail
Before you start: Start this movement after checking your thigh muscle control with your physiotherapist. Lie on your back with the unoperated leg bent and the operated leg straight. Open the brace for exercise, and do not attach an ankle weight.
How to do it:
- Tighten the muscle at the front of your thigh and keep your knee fully straight.
- Lift the operated heel only slightly off the bed. The knee must not bend or sag.
- After a pause, gently lower the leg back onto the bed and relax the muscle.
Movement tips: Keep the operated knee straight as the leg rises and lowers. You do not need to lift the leg high. Do not hold your breath, and rest between repetitions. If the knee bends, return to thigh muscle tightening exercises for now.
Amount, repetitions and progression: If your knee stays straight and you have full control of the movement, repeat 10 times, holding for 5 to 10 seconds, 3 to 4 times a day. If this amount causes loss of control or more pain, stop and adjust the plan with your physiotherapist.
Stop immediately if: Lower the leg if the knee bends and sags, or if you develop sharp pain at the operation site.
Common mistakes: Do not swing the leg up or hold it raised with the knee bent.
Easier version: For now, just tighten the muscle at the front of your thigh with your heel resting on the bed.
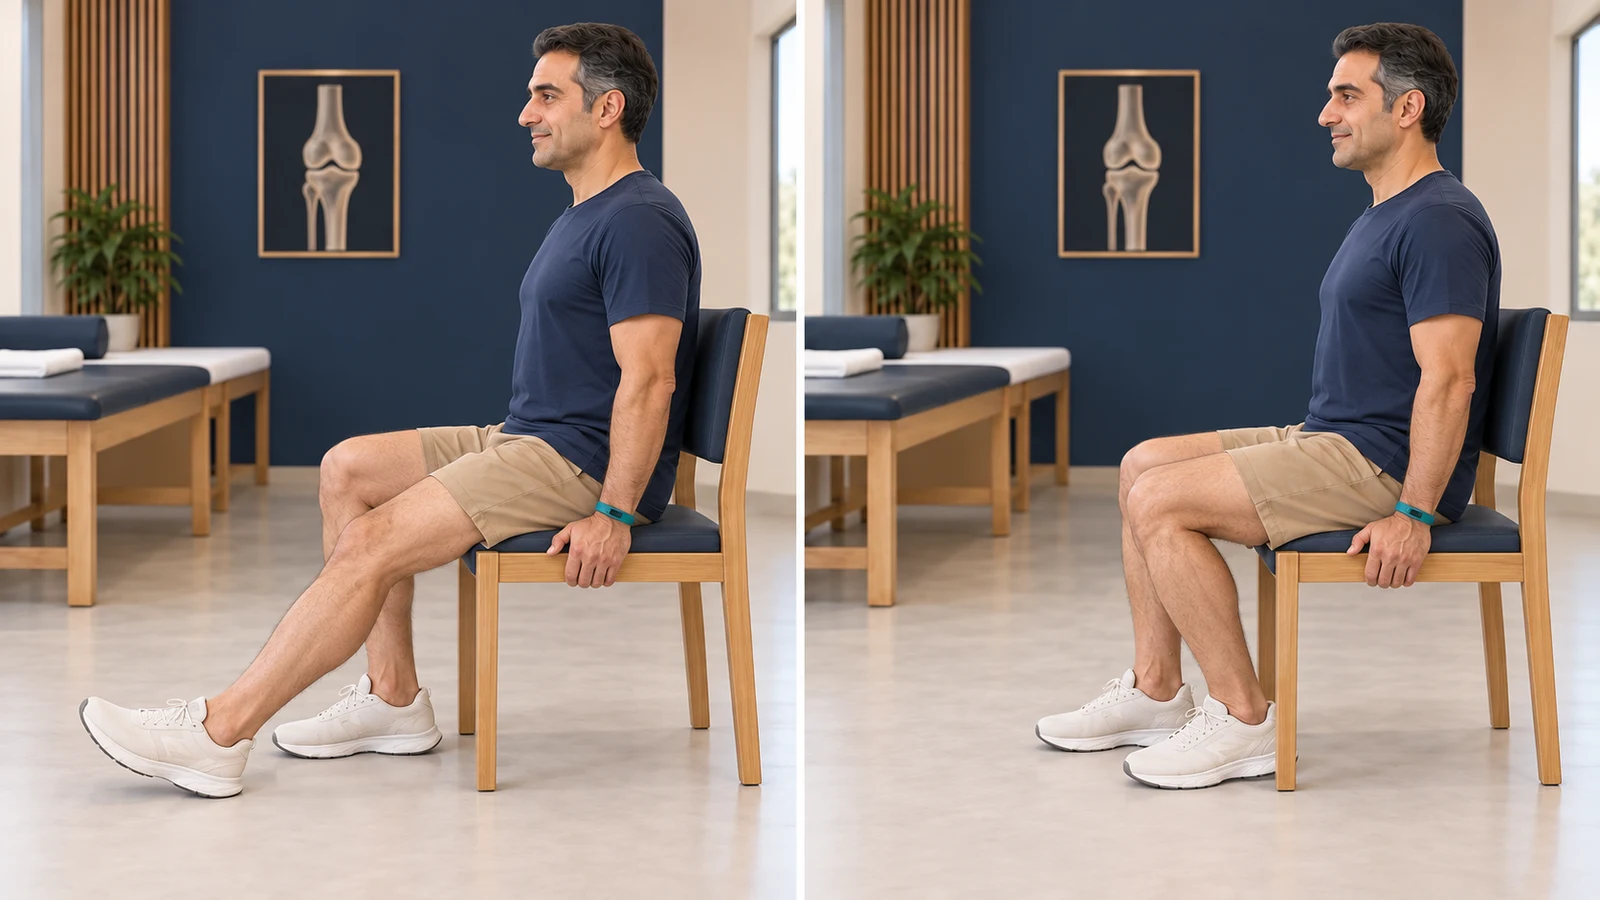
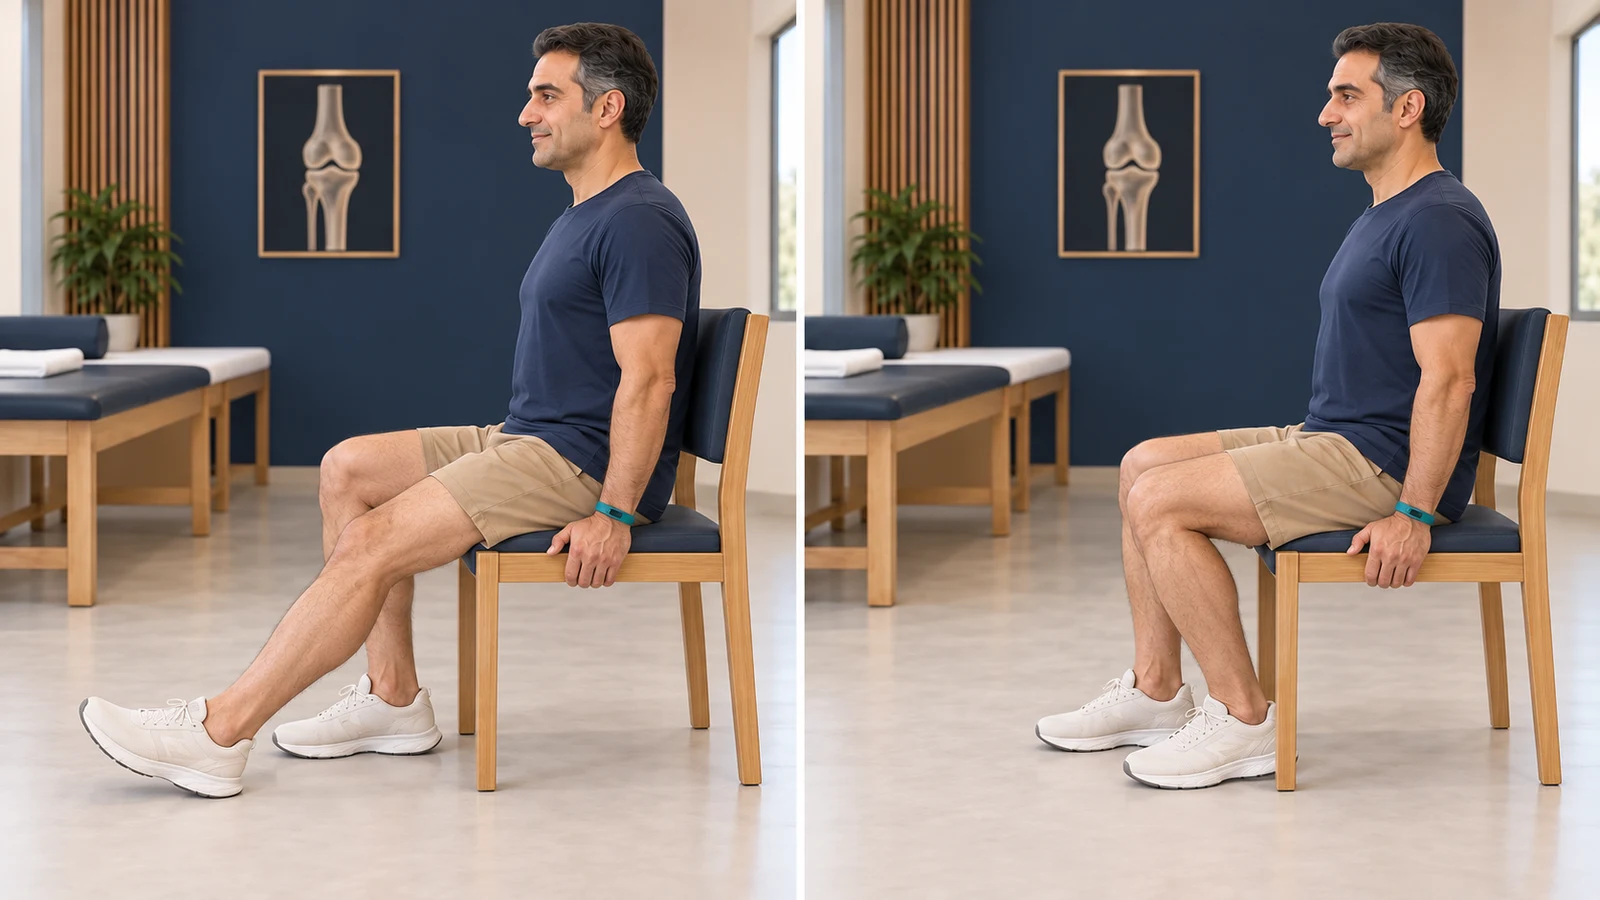
Gently bending the knee while seated (Seated assisted knee flexion)
While seated, gently slide the operated foot backwards without putting your body weight through it. Stop the movement if you develop sharp pain or painful catching.
More detailLess detail
Before you start: Sit on a stable chair with your thigh supported on the seat. Use crutches and any help you need to reach the chair. This exercise does not mean that you may stand up by putting weight through the operated leg.
How to do it:
- Place the operated heel on a smooth surface.
- Gently slide your heel backwards, bending the knee as far as you can tolerate. The unoperated leg can help control the movement.
- Pause within a comfortable range, then slide the foot forwards again.
Movement tips: Stay seated on the chair and do not shift your body weight onto the operated leg. Keep the knee aligned with the toes. Breathe normally as you move, and rest between repetitions.
Amount, repetitions and progression: Repeat 5 times, holding for 15 to 20 seconds within a comfortable range each time, 3 to 4 times a day. Increase the range without worsening pain or swelling.
Stop immediately if: If you develop sharp pain or painful catching, gently move the foot forwards and stop the exercise.
Common mistakes: Do not lean over the leg to bend the knee with your body weight, and do not jerk the heel backwards.
Easier version: Use a smaller range or return to heel slides while lying down.
🌱 Month 2: progressing after the bone has been assessed
Continue using 2 crutches with the foot touching the ground for balance only until your assessment and follow-up X-ray at about week 6. After clearance from your care team, weight-bearing increases gradually. Do not stop using both crutches all at once. The exercises below do not load the leg and can also be continued while you wait for clearance.
Continuing to activate the muscle at the front of the thigh (Quadriceps set)
Keep your knee straight without lifting the leg, and gently tighten the muscle at the front of your thigh. Stop the movement if you feel sharp pain.
More detailLess detail
Before you start: Lie on a reasonably firm bed with your leg straight. This exercise helps knee control and maintains strength in the muscle at the front of the thigh without weight-bearing.
How to do it:
- Gently pull your toes towards you.
- Tighten the muscle at the front of your thigh so that the back of your knee moves closer to the bed.
- Hold the contraction, then relax the muscle completely.
Movement tips: Keep your knee aligned with your foot and your heel on the bed. Do not hold your breath, and relax the muscle between contractions. You should be able to see the thigh muscle tighten and the kneecap move slightly upwards.
Amount, repetitions and progression: Repeat 10 times, holding each contraction for 5 to 10 seconds, 3 to 4 times a day. If pain or swelling increases after exercise, reduce the amount of exercise in the next session.
Stop immediately if: Release the contraction if you develop sharp pain in the knee or at the operation site.
Common mistakes: Do not lift your pelvis off the bed or force the knee down against the bed.
Easier version: Use a gentler contraction and initially focus just on tightening the muscle.
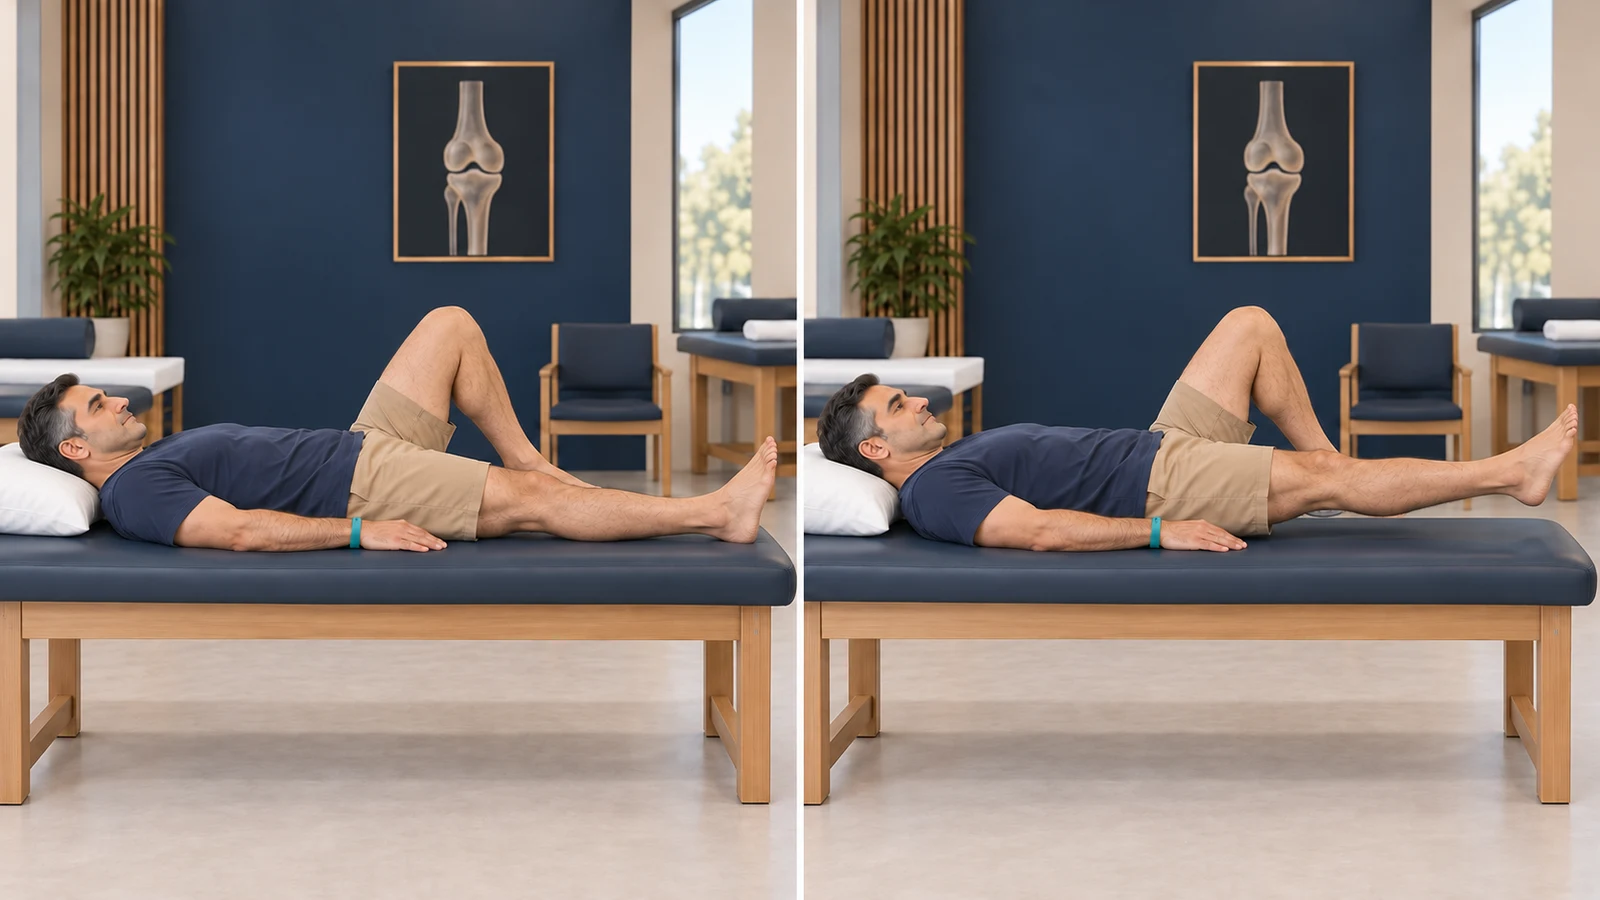
Lifting the straight leg while keeping the knee controlled (Straight leg raise)
Lift the operated leg slightly off the bed only if the knee stays straight as you lift it. Stop the movement if you feel sharp pain.
More detailLess detail
Before you start: Start this movement after checking your thigh muscle control with your physiotherapist. Lie on your back with the unoperated leg bent and the operated leg straight. Open the brace for exercise, and do not attach an ankle weight.
How to do it:
- Tighten the muscle at the front of your thigh and keep your knee fully straight.
- Lift the operated heel only slightly off the bed. The knee must not bend or sag.
- After a pause, gently lower the leg back onto the bed and relax the muscle.
Movement tips: Keep the operated knee straight as the leg rises and lowers. You do not need to lift the leg high. Do not hold your breath, and rest between repetitions. If the knee bends, return to thigh muscle tightening exercises for now.
Amount, repetitions and progression: If your knee stays straight and you have full control of the movement, repeat 10 times, holding for 5 to 10 seconds, 3 to 4 times a day. If this amount causes loss of control or more pain, stop and adjust the plan with your physiotherapist.
Stop immediately if: Lower the leg if the knee bends and sags, or if you develop sharp pain at the operation site.
Common mistakes: Do not swing the leg up or hold it raised with the knee bent.
Easier version: For now, just tighten the muscle at the front of your thigh with your heel resting on the bed.
Gently bending the knee while seated (Seated assisted knee flexion)
While seated, gently slide the operated foot backwards without putting your body weight through it. Stop the movement if you develop sharp pain or painful catching.
More detailLess detail
Before you start: Sit on a stable chair with your thigh supported on the seat. Use crutches and any help you need to reach the chair. This exercise does not mean that you may stand up by putting weight through the operated leg.
How to do it:
- Place the operated heel on a smooth surface.
- Gently slide your heel backwards, bending the knee as far as you can tolerate. The unoperated leg can help control the movement.
- Pause within a comfortable range, then slide the foot forwards again.
Movement tips: Stay seated on the chair and do not shift your body weight onto the operated leg. Keep the knee aligned with the toes. Breathe normally as you move, and rest between repetitions.
Amount, repetitions and progression: Repeat 5 times, holding for 15 to 20 seconds within a comfortable range each time, 3 to 4 times a day. Increase the range without worsening pain or swelling.
Stop immediately if: If you develop sharp pain or painful catching, gently move the foot forwards and stop the exercise.
Common mistakes: Do not lean over the leg to bend the knee with your body weight, and do not jerk the heel backwards.
Easier version: Use a smaller range or return to heel slides while lying down.
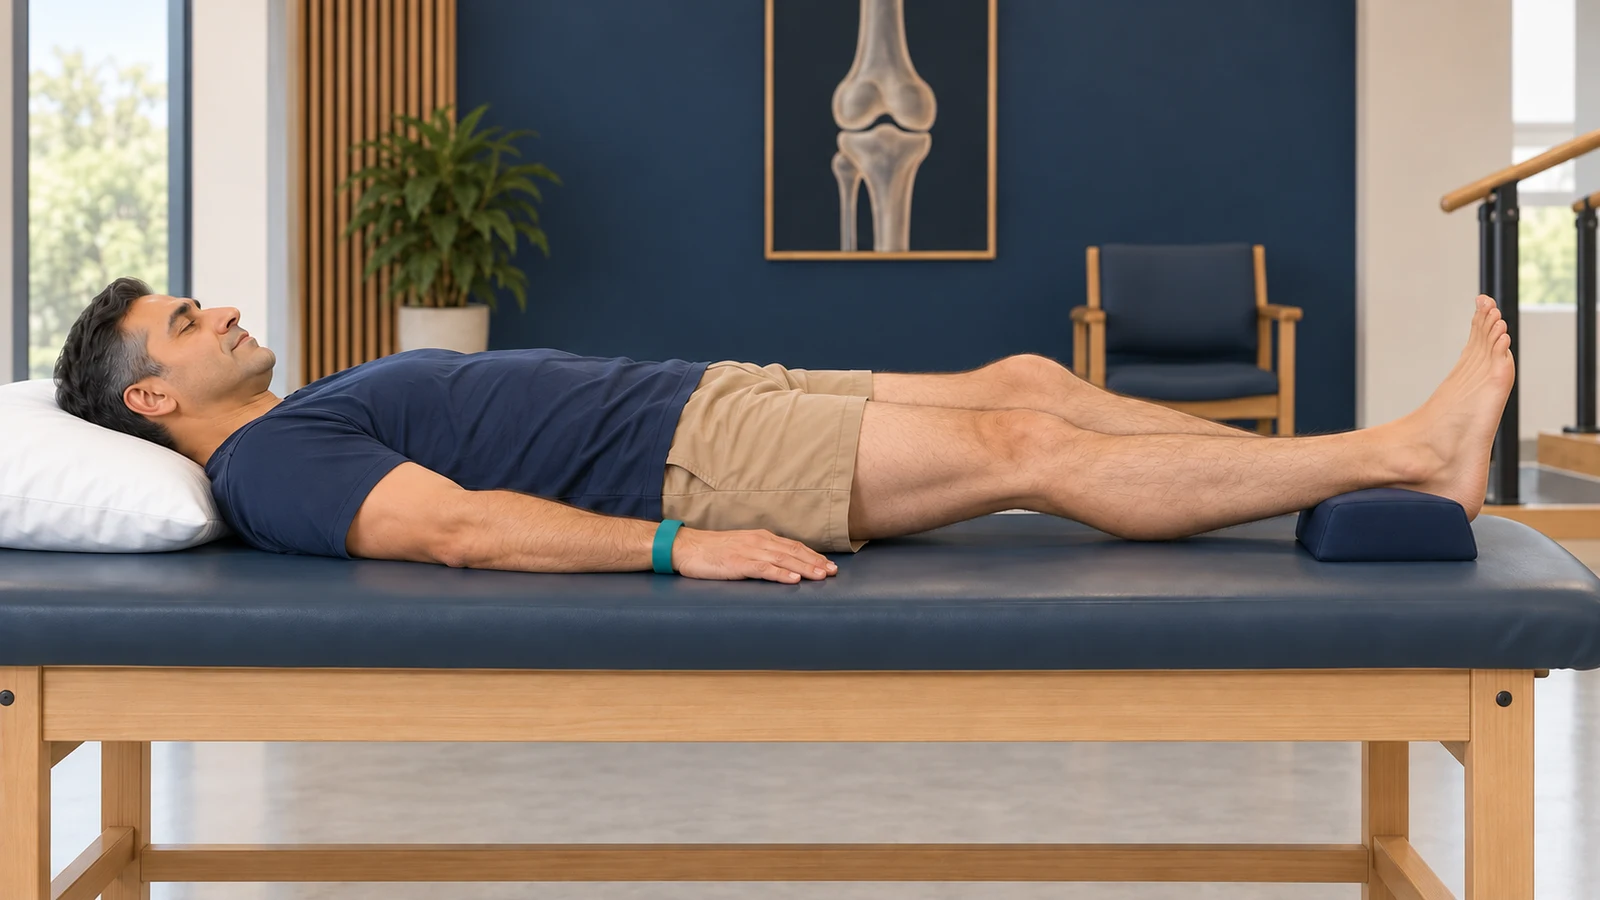
Gently straightening the knee with the heel supported (Heel-prop extension)
Support your heel and let the knee straighten gently without external force. Stop the movement if you develop sharp knee pain or unusual pain at the back of the calf.
More detailLess detail
Before you start: Lie on the bed with your heel on a low, soft support. Leave the back of the knee unsupported. This movement helps the knee straighten without putting body weight through the leg.
How to do it:
- Place your heel on the support and keep your foot pointing upwards.
- Relax your muscles so that the leg's own weight helps the knee move towards straightening.
- If you feel discomfort, remove the support and return to a comfortable position.
Movement tips: The stretch should be gentle. Do not force the knee backwards. Rest while breathing normally, and do not add any weights or hand pressure over the knee.
Amount, repetitions and progression: Stay within your tolerance and follow your physiotherapist's instructions. There is no mandatory holding time for this exercise. Progress means easier straightening without more pain or swelling.
Stop immediately if: Stop the exercise if you develop sharp knee pain or unusual pain at the back of the calf.
Common mistakes: Do not put the pillow directly under the knee or let a helper press on the knee.
Easier version: Use a lower support or return to gentle thigh muscle tightening.
🏋️ Month 3: strengthening after clearance for weight-bearing
Starting the exercises that load the leg in this stage requires clearance for full weight-bearing, knee control and appropriate follow-up of bone healing. Clearance to increase weight-bearing gradually after week 6 does not mean clearance to start these exercises. If these conditions are not yet met, continue the exercises from the previous stage that do not load the leg.
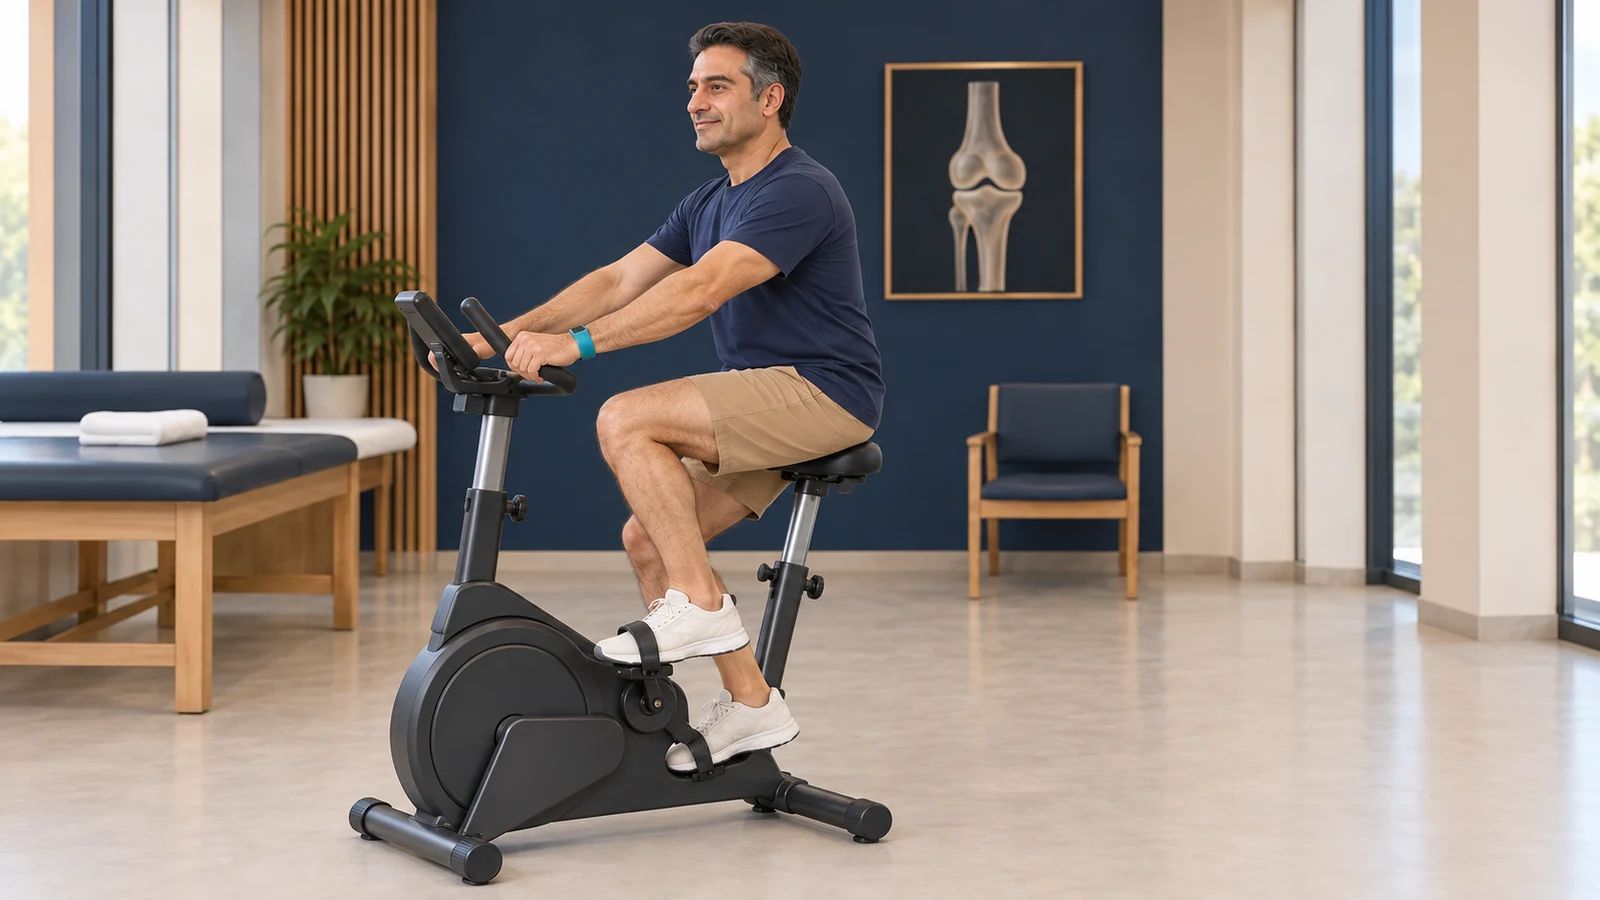
Gentle pedalling on a stationary bike (Stationary cycling)
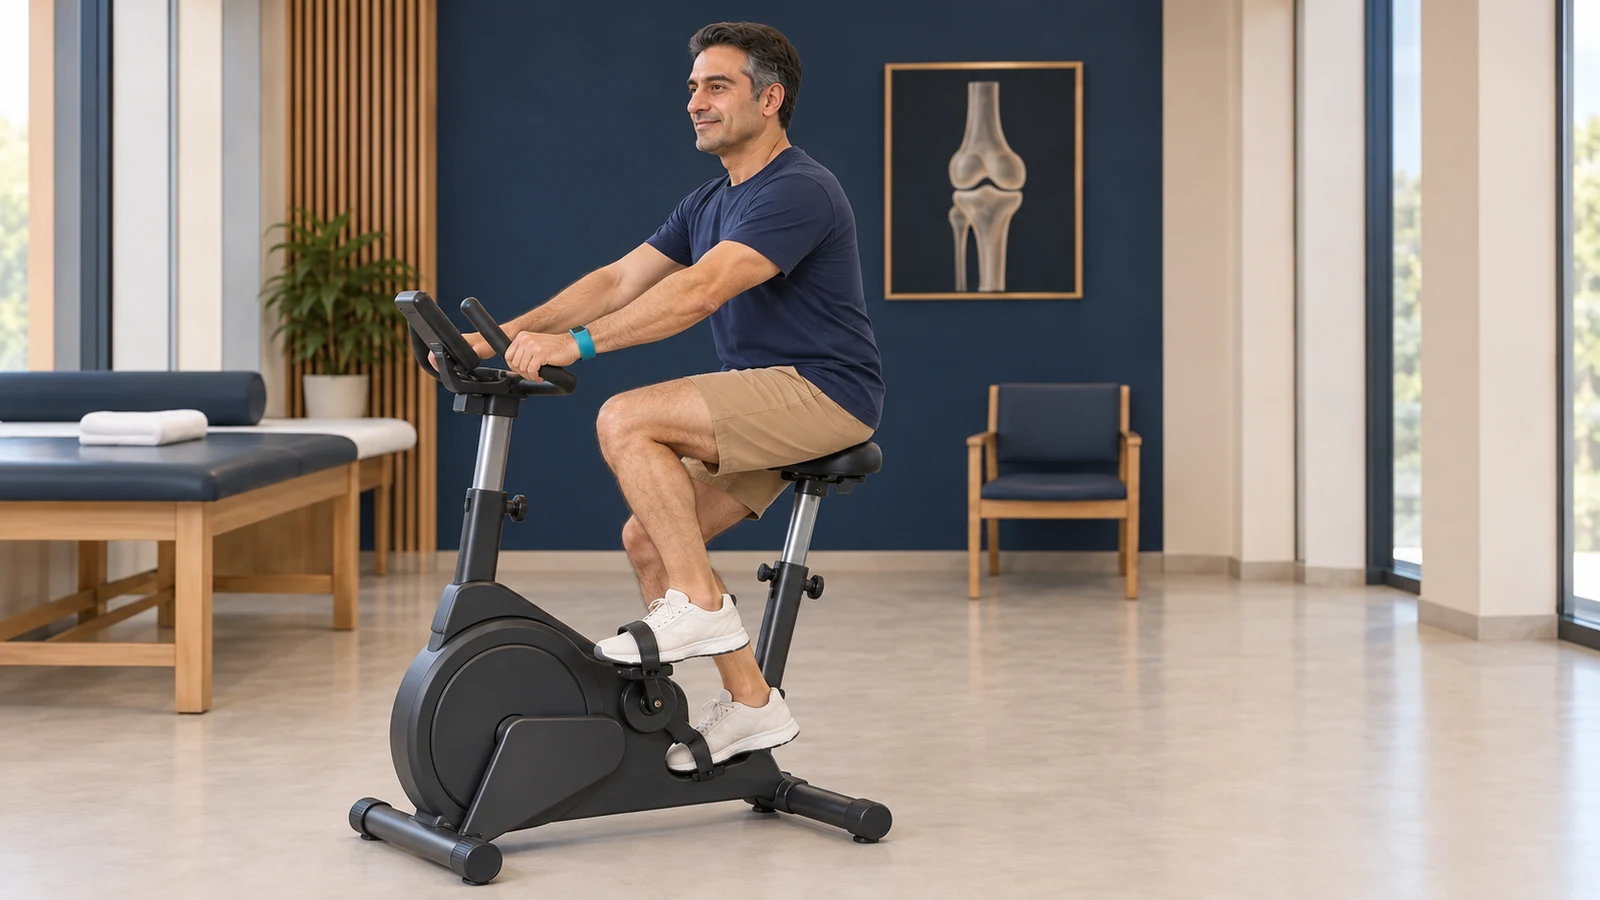
After clearance for activity and instruction, pedal while seated with low or no resistance. Stop pedalling if you develop pain at the bone cut or sharp knee pain.
More detailLess detail
Before you start: Starting this exercise requires clearance from your care team, enough knee bend, and the ability to get on and off safely. Have your physiotherapist adjust the seat height so that you do not have to bend the knee beyond what you can tolerate.
How to do it:
- Sit on the stable bike with any help you need, and place your feet on the pedals.
- Pedal gently. If you cannot make a full revolution without forcing the knee, use the smaller movement you have been taught.
- Bring the pedals to a complete stop before getting off, and use a support to help you.
Movement tips: Stay seated on the saddle throughout the exercise and keep the knee aligned with the foot. Pedal at a gentle pace and breathe normally. Mild fatigue is acceptable, but pain at the operation site or a limp after exercise is not.
Amount, repetitions and progression: Start with a short, tolerable session. Increase the duration first, then the resistance. Adjust the amount with your physiotherapist so that it does not cause more pain or swelling afterwards. If pain or swelling increases after exercise, reduce the amount of exercise in the next session.
Stop immediately if: Stop pedalling if you develop pain at the bone cut or sharp knee pain.
Common mistakes: Do not pedal while standing or force the knee to bend to complete a pedal revolution.
Easier version: For now, continue gentle knee movements on the bed until you can pedal without forcing the movement.
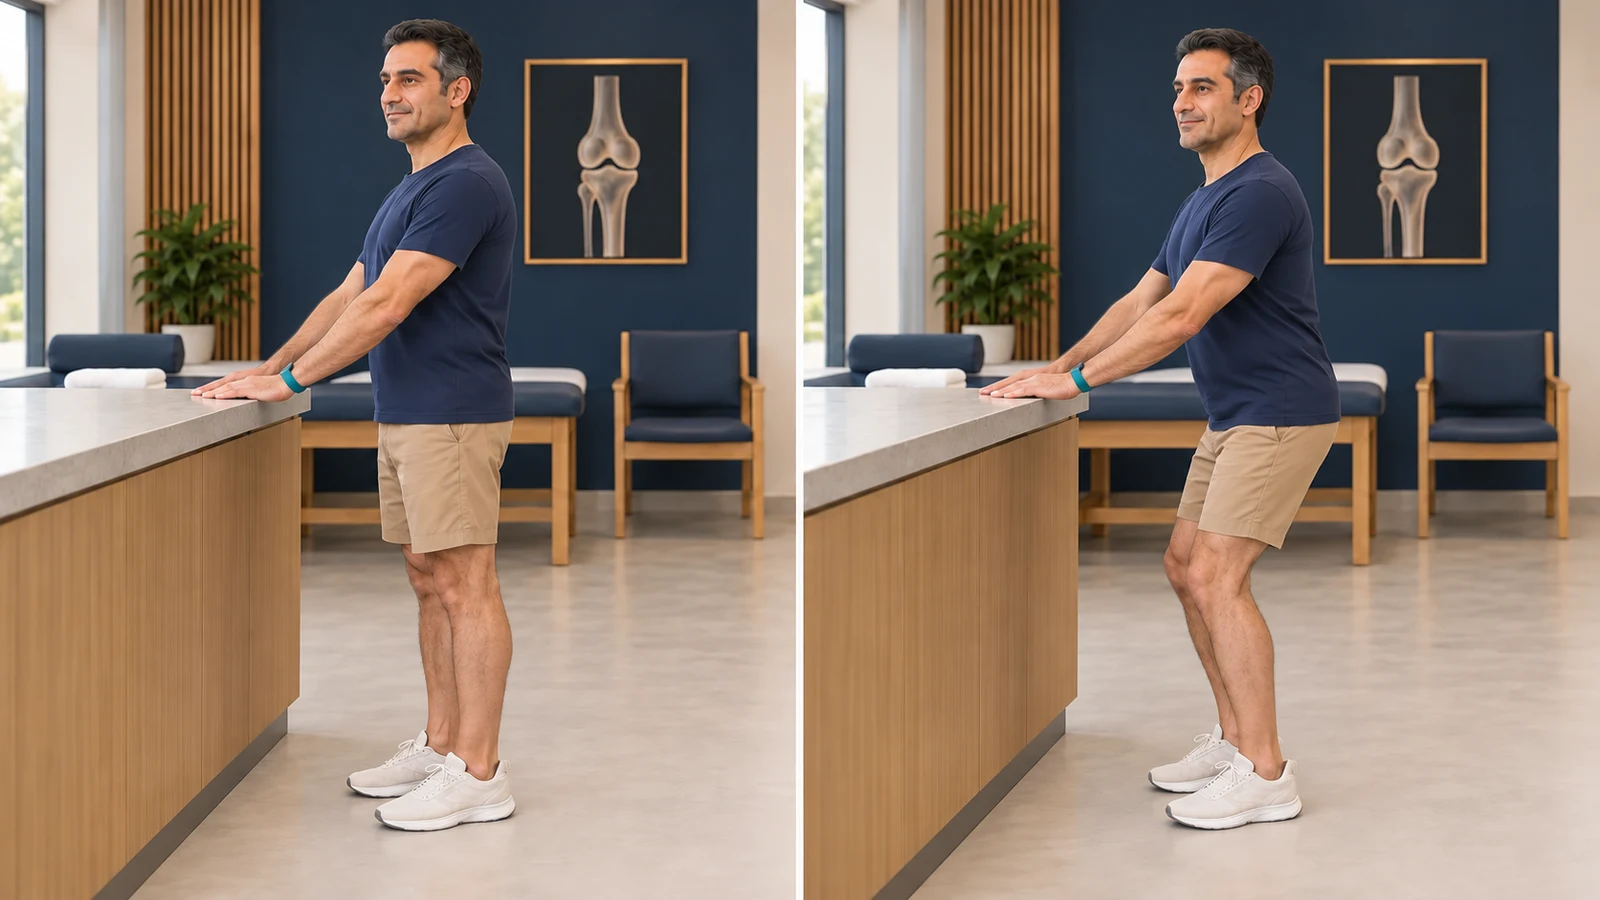
Small knee bends with support (Supported mini-squat)
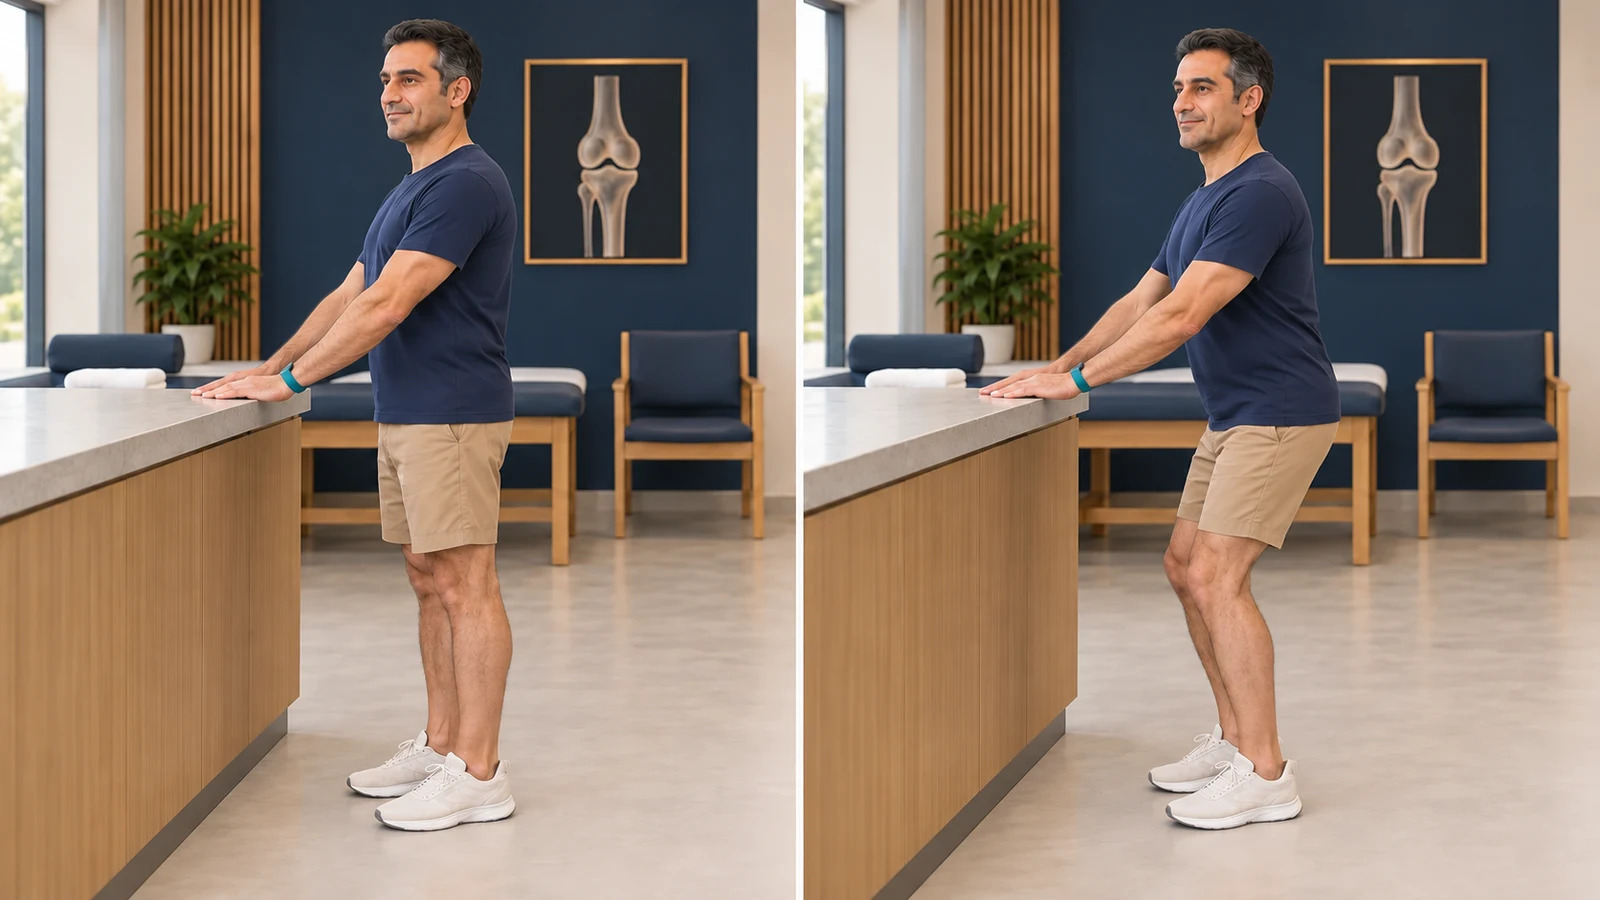
Only after clearance for full weight-bearing, bend and straighten both knees through a small range while supporting yourself with your hands. Stop the movement if your knee gives way or you develop sharp pain at the operation site.
More detailLess detail
Before you start: Stand beside a firm counter or rail with both hands on the support. This exercise is not for the period when your foot may only touch the ground lightly. Clearance for full weight-bearing and adequate knee control must first be confirmed.
How to do it:
- Point your feet forwards and place them a comfortable distance apart.
- Move your hips slightly backwards and bend both knees a little.
- Gently return to standing, pushing evenly through both feet and using your hands for help.
Movement tips: In weeks 8 to 10, keep the knee bend between 0 and 45 degrees. Practise this small range with your physiotherapist before starting, and stay within the range you were taught. Keep your knees from falling inward and your heels on the floor; rest between sets.
Amount, repetitions and progression: Do a few controlled repetitions following the guidance above, without increasing pain or swelling. Do not increase the number of repetitions and depth at the same time. Agree the amount of progression with your physiotherapist.
Stop immediately if: If your knee gives way or you develop sharp pain at the operation site, use the support to help you stop the exercise.
Common mistakes: Do not squat deeply or turn the operated knee inwards.
Easier version: Bend the knees less and use your hands for more support.
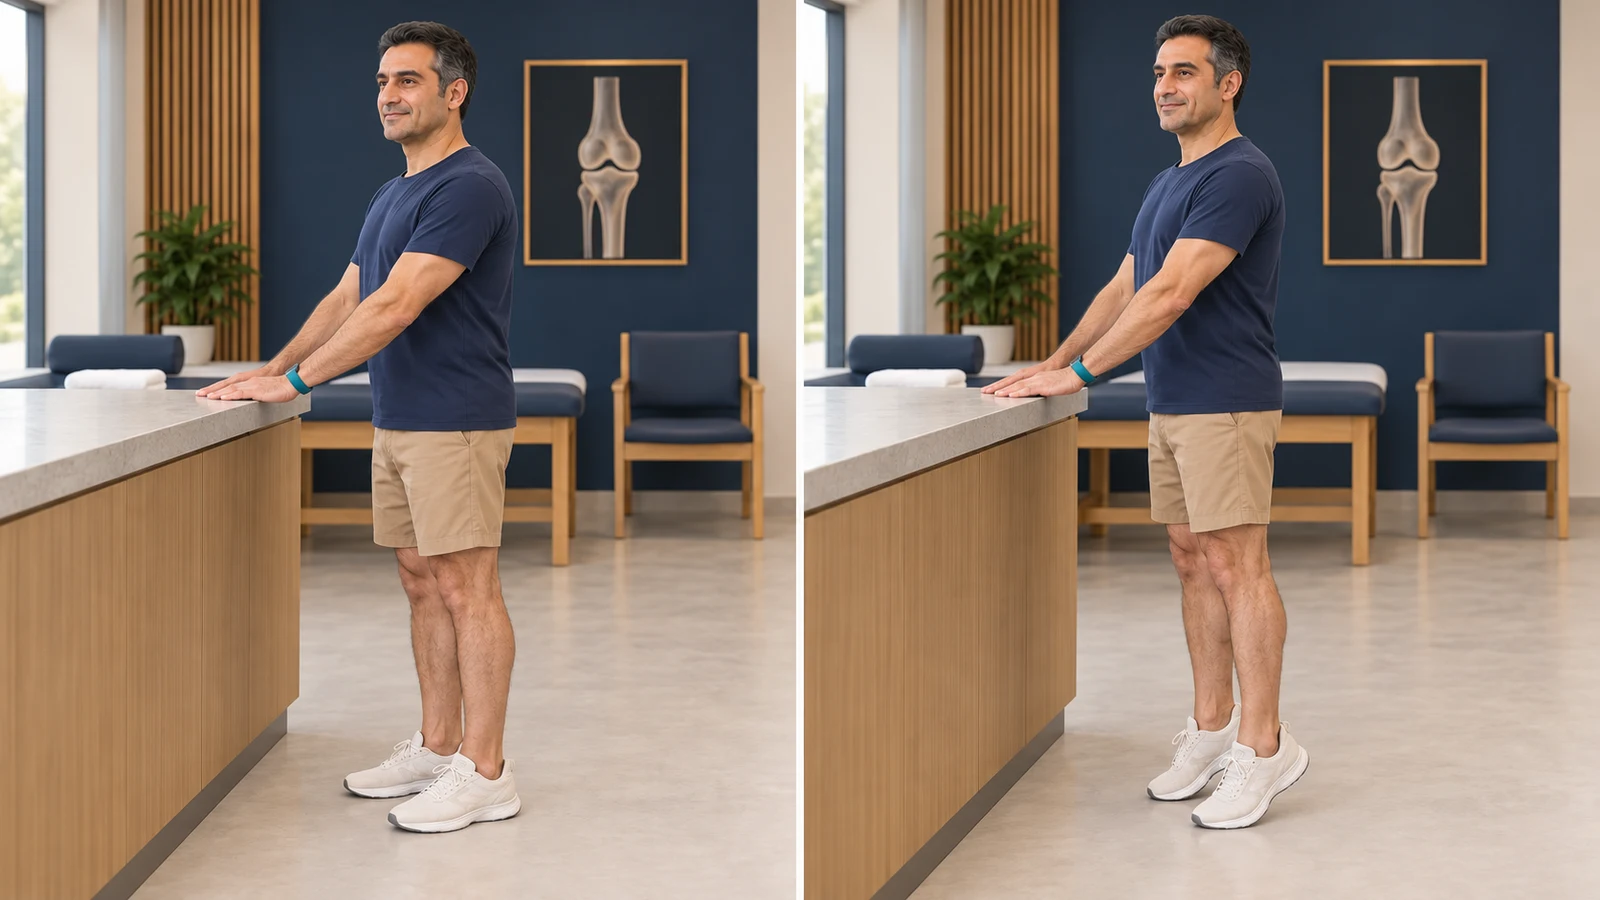
Gently rising onto the toes of both feet (Supported bilateral heel raise)
After clearance for full weight-bearing, rise onto the toes of both feet while supporting yourself with your hands. Stop the movement if you develop sharp pain, your knee gives way, or you develop new pain in the tendon at the back of the ankle.
More detailLess detail
Before you start: Stand beside a firm counter with both hands on it. This exercise requires clearance for full weight-bearing through both legs. Do not do it during the period when the foot touches the ground for balance only.
How to do it:
- Align your feet and place both soles on the ground.
- Gently lift both heels, keeping the fronts of your feet on the ground.
- Lower your heels gently without dropping them onto the ground.
Movement tips: Keep your knees facing forwards and do not shift your body to one side. Move gently and breathe normally. Mild calf fatigue may occur, but pain at the operation site is not acceptable. Rest between sessions.
Amount, repetitions and progression: Choose a number of repetitions that lets you keep the movement smooth and even on both sides. Increase the amount only if there is no additional pain or swelling afterwards, following your physiotherapist's plan. If pain or swelling increases after exercise, reduce the amount of exercise in the next session.
Stop immediately if: Stop the exercise if you develop sharp pain, your knee gives way, or you develop new pain in the tendon at the back of the ankle.
Common mistakes: Do not do this movement on 1 leg or swing your body to rise up.
Easier version: Lift your heels less and use your hands for more support.
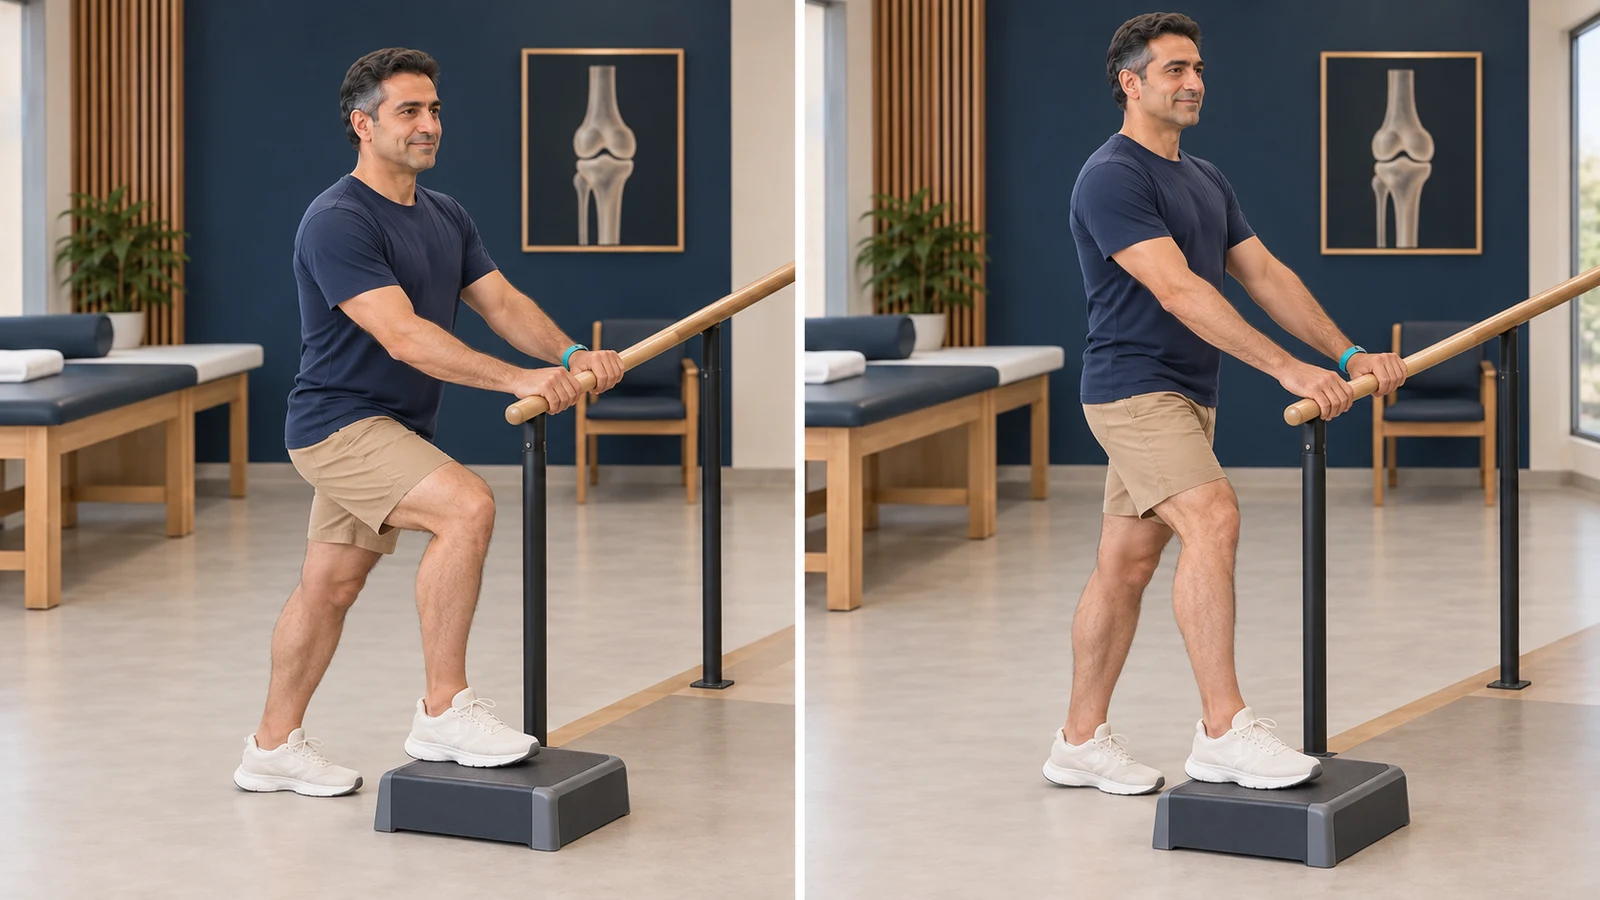
Controlled step-ups onto a low exercise step (Low step-up)
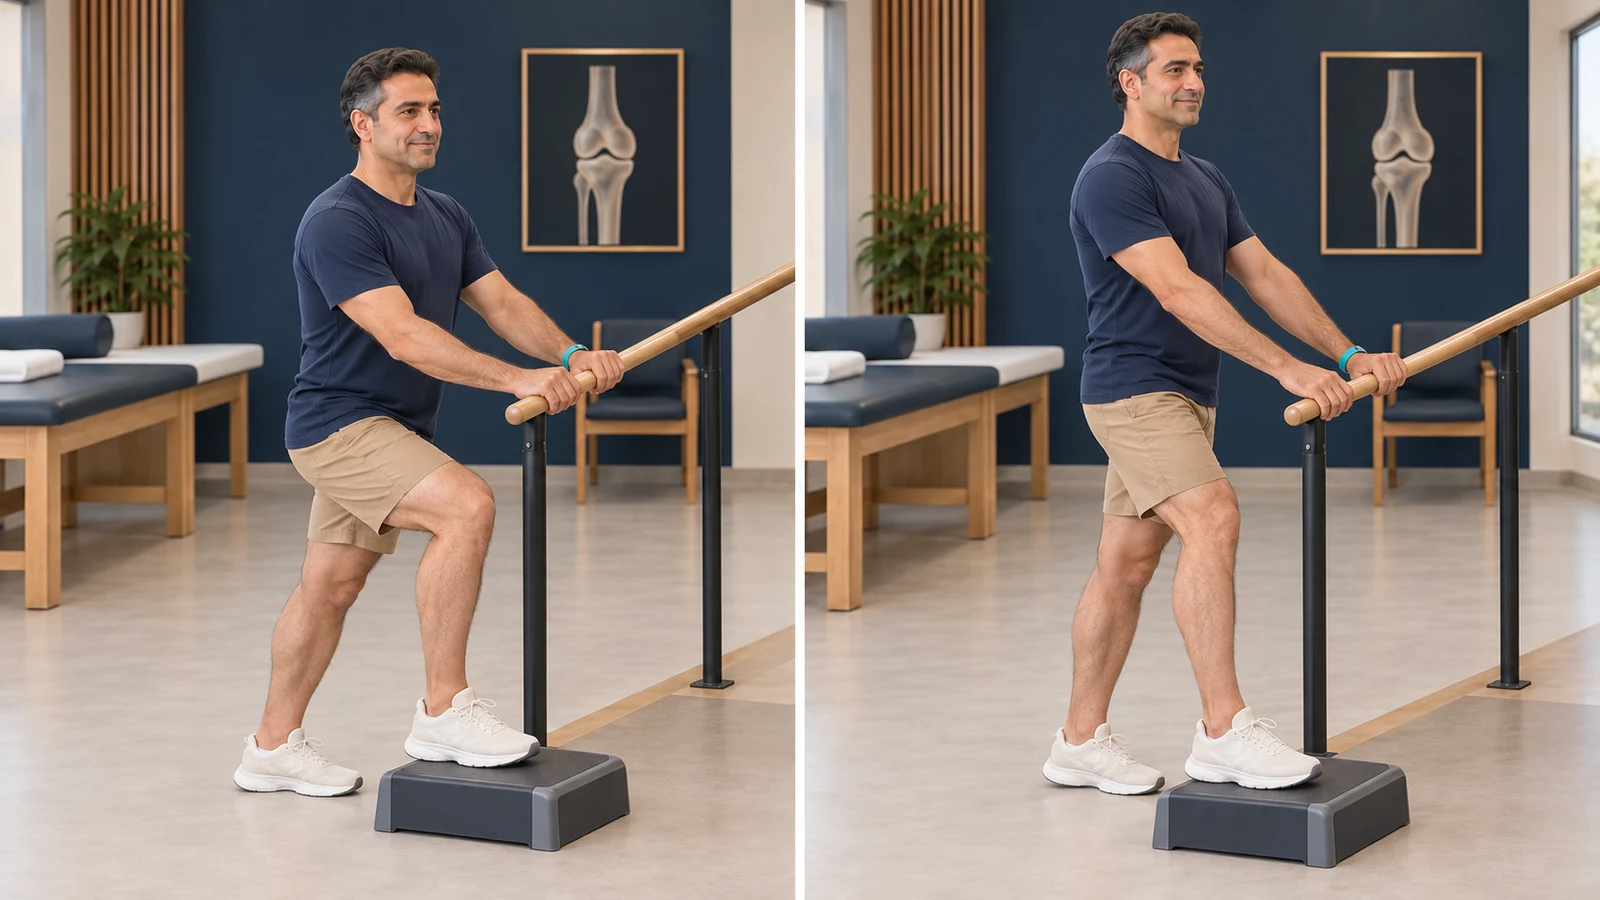
After clearance for full weight-bearing and with adequate knee control, practise stepping onto a low step with hand support. Stop the movement if your knee gives way or you develop sharp pain.
More detailLess detail
Before you start: Start this movement only after clearance for full weight-bearing and assessment of knee control. Starting this exercise is considered from about week 10 onwards, and only after assessment by a physiotherapist. You need a low, stable exercise step beside a rail. The height and starting technique should first be set during a treatment session.
How to do it:
- Place the whole sole of the operated foot on the low step and hold the rail.
- Raise your body while controlling the knee and using your hand for as much help as needed.
- Lower yourself gently using the technique you have been taught. Do not jump or let your body drop.
Movement tips: Keep the knee over the toes and do not let the pelvis drop to one side. Move up and down gently. Rest between sessions, and do not continue if the knee gives way.
Amount, repetitions and progression: Choose a number of repetitions and step height that let you maintain control. Do not increase the height or resistance until you can use the low step without more pain or swelling.
Stop immediately if: If your knee gives way or you develop sharp pain, use the rail to steady yourself and stop the exercise.
Common mistakes: Do not use a wobbly or high step, and do not let the knee fall inwards as you step up.
Easier version: Practise with a lower step and more hand support with your physiotherapist.
🎯 After month 3: endurance and a gradual return to activity
The aim is to gradually improve your activity tolerance while keeping the knee settled and well controlled. Reaching this stage does not automatically clear you to run, jump or take part in sports involving pivoting. These activities are planned after healing has been assessed and strength and control have been tested.
Gentle pedalling on a stationary bike (Stationary cycling)
After clearance for activity and instruction, pedal while seated with low or no resistance. Stop pedalling if you develop pain at the bone cut or sharp knee pain.
More detailLess detail
Before you start: Starting this exercise requires clearance from your care team, enough knee bend, and the ability to get on and off safely. Have your physiotherapist adjust the seat height so that you do not have to bend the knee beyond what you can tolerate.
How to do it:
- Sit on the stable bike with any help you need, and place your feet on the pedals.
- Pedal gently. If you cannot make a full revolution without forcing the knee, use the smaller movement you have been taught.
- Bring the pedals to a complete stop before getting off, and use a support to help you.
Movement tips: Stay seated on the saddle throughout the exercise and keep the knee aligned with the foot. Pedal at a gentle pace and breathe normally. Mild fatigue is acceptable, but pain at the operation site or a limp after exercise is not.
Amount, repetitions and progression: Start with a short, tolerable session. Increase the duration first, then the resistance. Adjust the amount with your physiotherapist so that it does not cause more pain or swelling afterwards. If pain or swelling increases after exercise, reduce the amount of exercise in the next session.
Stop immediately if: Stop pedalling if you develop pain at the bone cut or sharp knee pain.
Common mistakes: Do not pedal while standing or force the knee to bend to complete a pedal revolution.
Easier version: For now, continue gentle knee movements on the bed until you can pedal without forcing the movement.
Small knee bends with support (Supported mini-squat)
Only after clearance for full weight-bearing, bend and straighten both knees through a small range while supporting yourself with your hands. Stop the movement if your knee gives way or you develop sharp pain at the operation site.
More detailLess detail
Before you start: Stand beside a firm counter or rail with both hands on the support. This exercise is not for the period when your foot may only touch the ground lightly. Clearance for full weight-bearing and adequate knee control must first be confirmed.
How to do it:
- Point your feet forwards and place them a comfortable distance apart.
- Move your hips slightly backwards and bend both knees a little.
- Gently return to standing, pushing evenly through both feet and using your hands for help.
Movement tips: At the start of this stage, continue the same shallow squat with only a small knee bend. Agree the range with your physiotherapist, and do not squat more deeply on your own. Do not let your knees fall inwards, and keep your heels on the ground. Breathe normally as you move, and rest between sessions.
Amount, repetitions and progression: Do a few controlled repetitions following the guidance above, without increasing pain or swelling. Do not increase the number of repetitions and depth at the same time. Agree the amount of progression with your physiotherapist.
Stop immediately if: If your knee gives way or you develop sharp pain at the operation site, use the support to help you stop the exercise.
Common mistakes: Do not squat deeply or turn the operated knee inwards.
Easier version: Bend the knees less and use your hands for more support.
Controlled step-ups onto a low exercise step (Low step-up)
After clearance for full weight-bearing and with adequate knee control, practise stepping onto a low step with hand support. Stop the movement if your knee gives way or you develop sharp pain.
More detailLess detail
Before you start: Start this movement only after clearance for full weight-bearing and assessment of knee control. Starting this exercise is considered from about week 10 onwards, and only after assessment by a physiotherapist. You need a low, stable exercise step beside a rail. The height and starting technique should first be set during a treatment session.
How to do it:
- Place the whole sole of the operated foot on the low step and hold the rail.
- Raise your body while controlling the knee and using your hand for as much help as needed.
- Lower yourself gently using the technique you have been taught. Do not jump or let your body drop.
Movement tips: Keep the knee over the toes and do not let the pelvis drop to one side. Move up and down gently. Rest between sessions, and do not continue if the knee gives way.
Amount, repetitions and progression: Choose a number of repetitions and step height that let you maintain control. Do not increase the height or resistance until you can use the low step without more pain or swelling.
Stop immediately if: If your knee gives way or you develop sharp pain, use the rail to steady yourself and stop the exercise.
Common mistakes: Do not use a wobbly or high step, and do not let the knee fall inwards as you step up.
Easier version: Practise with a lower step and more hand support with your physiotherapist.
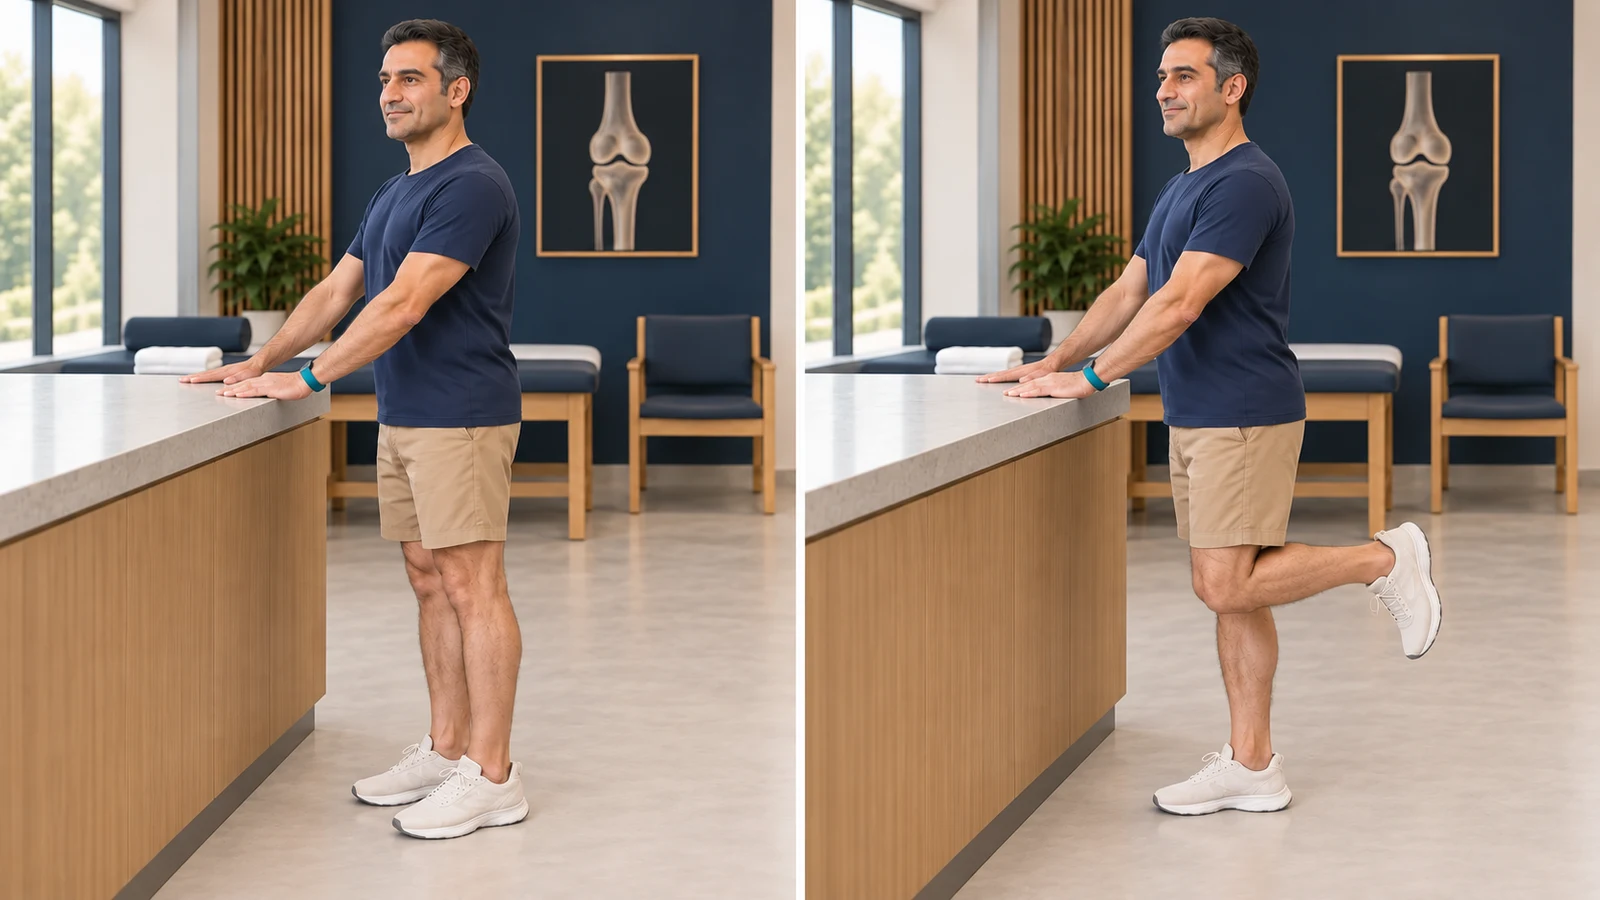
Gently bending the knee to strengthen the back of the thigh (Supported hamstring curl)
After clearance for weight-bearing, exercise the muscle at the back of your thigh by bending the knee in a controlled way. Stop the movement if you feel sharp pain.
More detailLess detail
Before you start: Stand beside a firm support with both hands on it. Have your physiotherapist check your standing position and the amount of resistance. Do not attach an ankle weight at the start.
How to do it:
- Use your hands to help keep your weight on the unoperated leg, and keep the thigh of the operated leg still.
- Gently bring the operated heel backwards, bending the knee within a comfortable range.
- Lower the foot gently and rest briefly before the next repetition.
Movement tips: Do not let the thigh move forwards, arch your lower back or rotate your pelvis. Do not force the knee to the end of its range. Breathe normally as you move, and rest between sessions.
Amount, repetitions and progression: Adjust the number of repetitions and resistance so that you can follow the guidance above without worsening pain or swelling. Increase only 1 of them at each stage, with your physiotherapist's advice.
Stop immediately if: If you develop sharp pain in the knee or at the operation site, gently lower the foot and stop the exercise.
Common mistakes: Do not swing the heel upwards or lean your trunk forwards to bend the knee.
Easier version: Remove the resistance, or ask your physiotherapist to replace this with a seated version of the exercise.
🚗 Returning to work, driving and daily life
Judge progress by what you can do, the swelling afterwards and your follow-up results. The timeline below shows when activities can be assessed. It does not clear you to start them on its own.
- Desk work: this may be possible before 3 months if you can elevate your leg, take breaks and travel safely. Starting part-time is easier than a full day. Standing work, carrying loads and heavy work usually take longer than 3 months.
- Driving: do not drive while you rely on 2 crutches and let the foot touch the ground only lightly. Readiness can be assessed at about week 6. You must have full control of the pedals and emergency braking, be comfortable sitting, and be free from the effects of sedating medicine. Surgery on the right leg, a manual car and continued brace use may delay your return.
- Stairs: use a rail and have someone with you. Lead with the unoperated leg when going up. When coming down, move the crutch and operated leg first. Throughout, keep only light contact through the operated foot, with your hands and unoperated leg supporting your body weight.
- Sleeping and sitting: use a stable bed or chair, and use your hands to help you get up. Do not twist the leg suddenly or kneel on the operated knee to pick something up from the floor.
- Prayer: use a stable chair while weight-bearing is restricted. To return to sitting and prostrating on the floor, you need to be able to transfer weight and bend the knee deeply without pain, with clearance from your care team. There is no single date for everyone.
- Sex: resume when you can change position comfortably and your pain is manageable. Choose a position that supports the lower leg without putting weight, direct pressure or twisting forces through the operated knee. Your weight-bearing restrictions still apply.
- Sport: start walking and stationary cycling at low intensity after meeting the requirements for the relevant stage. Many people may return to low-impact activity within about 6 months. Running, jumping and pivoting sports require bone healing on X-rays, adequate strength and control, and an individual assessment.
❓ Frequently asked questions after HTO
1) Can I stop using crutches sooner if the pain improves?
No. In your plan, the foot touches the ground for balance only until about 6 weeks. Weight-bearing increases after an assessment and follow-up X-ray. Feeling better alone does not show that the bone has healed.
2) Should I wear the brace during exercise too?
In this plan, wear the brace when walking and open it for exercises performed sitting or lying down. Do not change the brace settings yourself.
3) How many degrees may I bend my knee?
Your plan for this operation does not set a fixed numerical limit. Bend the knee gently as tolerated. A mild stretch is different from painful force. A helper must not force your knee to bend, and deep bending under your body weight is not allowed yet.
4) When are the dressing and stitches checked?
Keep the original dressing until the appointment at 10 to 14 days, unless it becomes wet or dirty or another problem develops sooner. Stitches that need removal are usually taken out 2 to 3 weeks after surgery.
5) When may I shower?
From 48 hours after surgery, if you feel well enough, you may take a short shower with an intact waterproof cover protecting the wound. Shower while seated to avoid putting weight through the leg, and have help getting into and out of the shower.
6) How long does swelling last?
Swelling may be greater during the first few weeks and may increase again with activity. In some people, it takes months to settle completely. The overall downward trend and response to rest matter. Do not put new swelling in 1 calf, or swelling with warning signs, down to normal activity.
7) Is it better to spend most of the day in bed?
No. Combine relative rest with ankle movements and short, safe trips using 2 crutches. Prolonged immobility contributes to stiffness and weakness. Moving around does not mean that you may put your body weight through the operated leg.
8) When will the bone be fully healed?
There is no fixed date for everyone. The amount of correction, bone quality, nicotine use and the progress of healing all matter. The X-ray at about week 6 helps with the initial decision to increase weight-bearing. It does not necessarily mean that the bone has fully healed.
9) If my blood clot prevention medicine runs out, should I continue it myself?
No. Stopping or continuing the medicine must follow your prescription. If the prescription or duration is unclear, contact your doctor or pharmacist before changing the plan. Do not substitute aspirin and apixaban for each other or take them together on your own.
10) When can I drive?
Do not drive while you rely on 2 crutches and light foot contact. At about week 6, an assessment checks your pedal and emergency braking control, whether you are free from the effects of sedating medicine, and your brace use. This does not mean everyone can start driving then.
11) When can I return to work?
Light work with opportunities to rest may be possible before 3 months. Heavy work, prolonged standing, carrying loads or working on uneven ground usually become possible later than 3 months, depending on bone healing and your actual ability.
12) When can I start using a stationary bike?
First, your knee must be able to move the pedal without being forced, and you must be able to get on and off safely. Your physiotherapist may introduce movement without resistance earlier in the plan. At home, start after instruction, and do not pedal with resistance or while standing.
13) Can I run after 3 months?
The passage of 3 months alone is not enough. Running and jumping are considered after X-rays show bone healing and knee strength and control have returned. Low-impact activity usually resumes earlier than sports involving running or pivoting.
14) Can I sit on the floor for prayer?
Use a stable chair while weight-bearing is restricted. Before returning to the floor, you need to be able to sit down and get up and tolerate deep knee bending, and you need clearance to load the leg. Do not force the knee to reach this position.
15) When is sex possible?
When pain and ease of movement allow, you can consider sex with the lower leg supported and without pressure, weight-bearing or twisting through the operated knee. If you have to push through the leg to change position, that position is not suitable yet.
16) Do the plate and screws have to be removed?
Not everyone needs the plate removed. If it causes persistent discomfort after bone healing, or there is another specific reason, your surgeon will decide about removal. Do not plan it before the bone has healed sufficiently.
✅ How should you track your recovery?
Care for the wound, do the exercises that do not load the leg regularly, and keep only light foot contact with the ground until about 6 weeks. After an assessment and follow-up X-ray, weight-bearing and strengthening gradually increase. The aim is controlled walking and a lasting return to activity. More pain and swelling are not signs of progress.
For follow-up of bone healing, changes to weight-bearing or same-day concerns described in the warning signs section, call Dr Jalil Emad’s clinic on 0913 782 5207, or book an appointment online. In an emergency, do not wait for the clinic to reply; follow the instructions in the warning signs section.
To learn about treatments in this area, see the related service page: Correction of Bone Deformity and Treatment with the Ilizarov Frame.
This content is for general education only and does not replace an examination, advice from your treating doctor, discharge instructions or your surgeon's individual protocol. Timelines, range of movement, weight-bearing and exercise amounts vary with the operation, any additional procedures and individual circumstances. Do not change your medicines, dressings or exercise plan without consulting your care team.
📚 Scientific references
View scientific sources
- Ollivier M, et al. Surgical strategy and complication management of osteotomy around the painful degenerative varus knee: ESSKA Formal Consensus Part II. Knee Surg Sports Traumatol Arthrosc. 2024;32:2194–2205. doi:10.1002/ksa.12273. https://doi.org/10.1002/ksa.12273
- Schröter S, et al. Early full weight-bearing versus 6-week partial weight-bearing after open wedge high tibial osteotomy. Knee Surg Sports Traumatol Arthrosc. 2017;25:325–332. doi:10.1007/s00167-015-3592-x. https://pubmed.ncbi.nlm.nih.gov/25854499/
- Lansdaal JR, et al. Early weight bearing versus delayed weight bearing in medial opening wedge high tibial osteotomy: a randomized controlled trial. Knee Surg Sports Traumatol Arthrosc. 2017;25:3670–3678. doi:10.1007/s00167-016-4225-8. https://pubmed.ncbi.nlm.nih.gov/27371292/
- Gateshead Health NHS Foundation Trust. Post Operative — Knee Osteotomy Surgery. Updated 11 February 2026. https://www.gatesheadhealth.nhs.uk/resources/post-operative-knee-osteotomy-surgery/
- University of Virginia. Post-operative Rehabilitation Protocol: High Tibial Osteotomy / Distal Femoral Osteotomy. https://med.virginia.edu/orthopaedic-surgery/wp-content/uploads/sites/242/2023/01/HTO-DFO-Protocol-1.pdf
- Royal Orthopaedic Hospital. High Tibial Osteotomy and Distal Femoral Osteotomy. https://roh.nhs.uk/services-information/knees/hto-and-dfo
- ICM-VTE. Question 188: Is routine VTE prophylaxis needed for patients undergoing osteotomy around the knee? https://icmphilly.blog/vte-188-is-routine-vte-prophylaxis-needed-for-patients-undergoing-osteotomy-around-the-knee/
- FDA. Benzodiazepine boxed warning update (2020). https://www.fda.gov/drugs/drug-safety-and-availability/fda-requiring-boxed-warning-updated-improve-safe-use-benzodiazepine-drug-class
- FDA. Gabapentinoid serious breathing problems safety communication (2019). https://www.fda.gov/safety/medical-product-safety-information/neurontin-gralise-horizant-gabapentin-and-lyrica-lyrica-cr-pregabalin-drug-safety-communication
- NHS medicines. Apixaban. https://www.nhs.uk/medicines/apixaban/
- NHS medicines. About cefalexin. https://www.nhs.uk/medicines/cefalexin/about-cefalexin/
- NHS medicines. Side effects of ciprofloxacin. https://www.nhs.uk/medicines/ciprofloxacin/side-effects-of-ciprofloxacin/
- NHS medicines. How and when to take pantoprazole. https://www.nhs.uk/medicines/pantoprazole/how-and-when-to-take-pantoprazole/
- UCSF Orthopaedic Institute. Pre and Post-Operative Instructions: High Tibial Osteotomy / Distal Femoral Osteotomy. Fever and contact guidance only; this article follows the surgeon’s separately confirmed movement protocol. https://www.womenssportsmedicine.com/pdf/post-op-instructions-high-tibial-osteotomydistal-femoral-osteotomy.pdf
- American Academy of Orthopaedic Surgeons. Compartment Syndrome: acute symptoms and emergency assessment. https://www.orthoinfo.org/diseases--conditions/compartment-syndrome/
- DailyMed. Ciprofloxacin Medication Guide: tendon symptoms and activity precautions. https://dailymed.nlm.nih.gov/dailymed/fda/fdaDrugXsl.cfm?setid=4fa9482a-ee88-1afd-e054-00144ff8d46c&type=display
- ESSKA. Osteotomy consensus full report (2022), Section4 rehabilitation; related final journal publication cited separately. https://cdn.ymaws.com/www.esska.org/resource/resmgr/docs/consensus_projects/osteotomyconsensuscomp2022.pdf
- NHS. Anticoagulant medicines: side effects and bleeding signs. https://www.nhs.uk/medicines/anticoagulants/side-effects/
- Robert Jones and Agnes Hunt Orthopaedic Hospital. Achilles Tendinopathy (2024), general cold-pack skin and sleep precautions only. https://www.rjah.nhs.uk/media/savdwb1q/achilles-tendinopathy-msst-v1.pdf
- Gloucestershire Hospitals NHS Foundation Trust. Ice and heat treatment, skin integrity precautions only. https://www.gloshospitals.nhs.uk/your-visit/patient-information-leaflets/ice-and-heat-treatment/
- Dr. Mark Slabaugh, Orthopedics and Joint Replacement, Mercy Medical Center. High Tibial Osteotomy Rehabilitation Protocol. Undated document. https://www.markslabaughmd.com/pdf/high-tibial-osteotomy-rehabilitation-protocol.pdf

Dr. Jalil Emad
Orthopedic specialist and surgeon, board-certified in bone and joint surgery; years of experience in knee and hip replacement, sports injuries and arthroscopy in Isfahan.