
On this page
🧭 Pick your situation
This guide comes in separate versions for different situations; read the one that matches yours.
Kneecap Pain Over 40 and Patellofemoral Arthritis: Daily Routines and Exercises
A practical guide to kneecap pain and patellofemoral arthritis over 40: stairs and rising from a chair, thigh and hip strengthening, balance, weight control, gym principles and red flags.
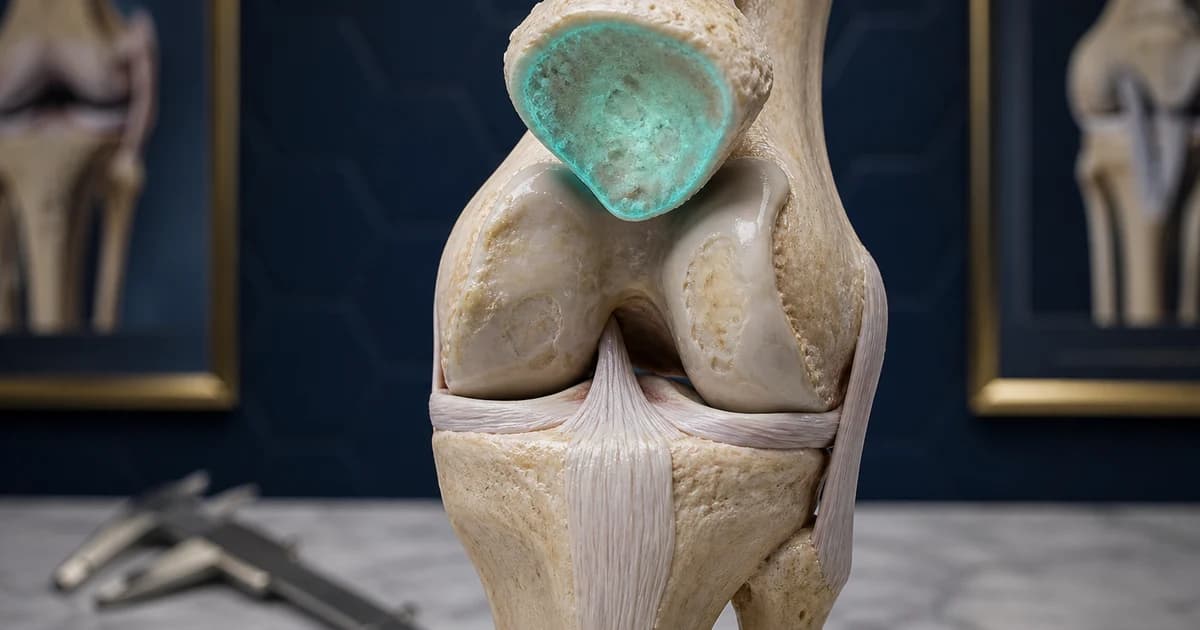
This version is for you if you are over 40 and the pain at the front of your knee gets worse with stairs, getting up from a chair, and sitting for a long time; you may also have heard the words wear or patellofemoral osteoarthritis in an imaging report. This diagnosis is not the end of being active: the right exercise is the most effective known treatment for this very condition. This article is general education and is not a substitute for an examination; with severe symptoms or warning signs, get seen first.
1🦴 What is this condition, and what does your version mean?
The kneecap glides up and down in a groove on the thighbone, and the surface of both is covered with cartilage. As the years pass this cartilage becomes thinner and rougher; the result is pain at the front of the knee that gets worse with stairs, with getting up from a chair, and with sitting for a long time, and is sometimes accompanied by a grating sound. When this wear progresses, its name becomes patellofemoral osteoarthritis — which is the other end of the same spectrum that in younger people is called patellofemoral pain.
Chondromalacia is likewise a word for the softening of this same cartilage; it is a structural finding, not a separate disease. The important point is that the severity of what is seen on imaging does not necessarily match the severity of your pain, and many people with no pain at all have these very same changes; that is why a routine MRI is not needed and usually does not change the treatment plan. What has been shown to help is the same thing that is the basis of non-surgical treatment in knee osteoarthritis as well: regular exercise, strengthening the hip and thigh muscles, weight control, and adjusting daily activities. Patience is part of the treatment too — improvement takes weeks to months.
2🏠 Daily routines you should adjust
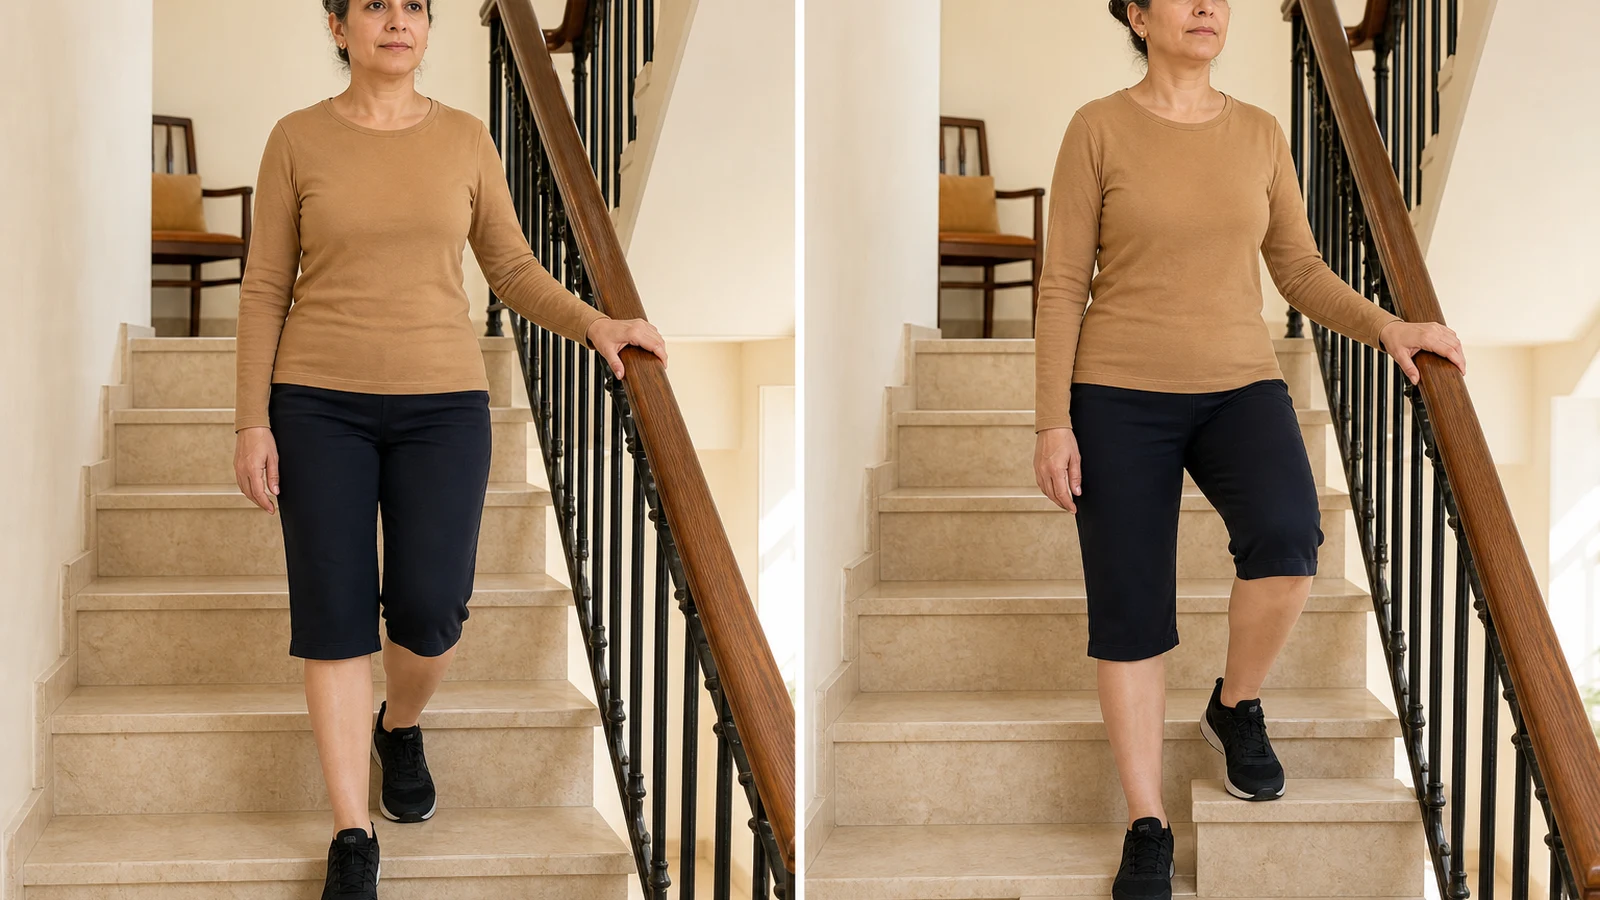
🪜 Go up and down stairs with the right pattern
Going down stairs puts the greatest load on the patellofemoral joint, because the thigh muscle has to brake the entire body weight. Go down more slowly and with the help of the handrail, put the painful leg down first, and do not let the knee fall inward. The sign of the right pattern is that as you come down, the kneecap travels in line with your second toe and you feel no jolt in the knee.
More detailLess detail
- On the way up, put the healthier leg forward and go up by pushing through the heel.
- On high-symptom days, replace some of your daily stairs with the lift; this avoidance is temporary, not permanent.
- Do not cut stairs out altogether — as your strength improves those same stairs become tolerable again, and cutting them out completely makes the muscle weaker.
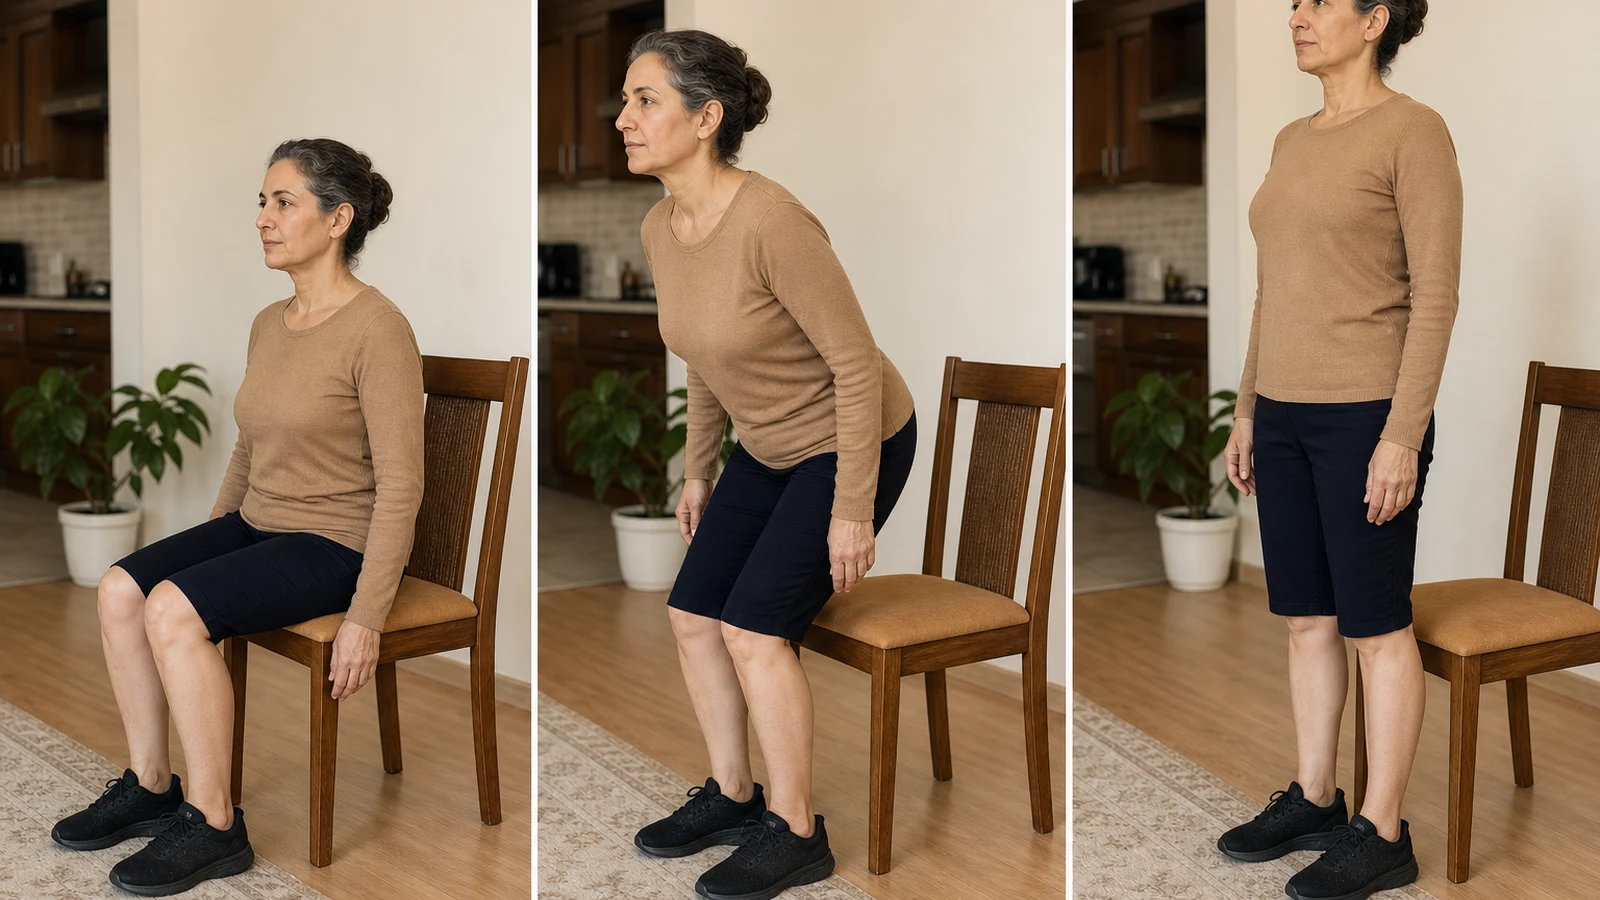
🛋 Get up from a chair or a sofa correctly
Getting up from a low, soft sofa uses the knee in its most bent and highest-pressure position and is usually the most painful moment of your day. By bringing your hips to the edge of the seat and leaning your trunk slightly forward, you hand the work over to the thigh and the buttock. The sign of doing it right is that you can get up without leaning on the armrest and without struggling.
More detailLess detail
- Place your feet a little behind your knees and bring your nose over your toes, then stand up by pushing through your heels.
- Raise very deep, low sofas with a firm cushion so the knee bends less.
- Sitting down matters too: sit down under control and do not drop yourself onto the sofa.
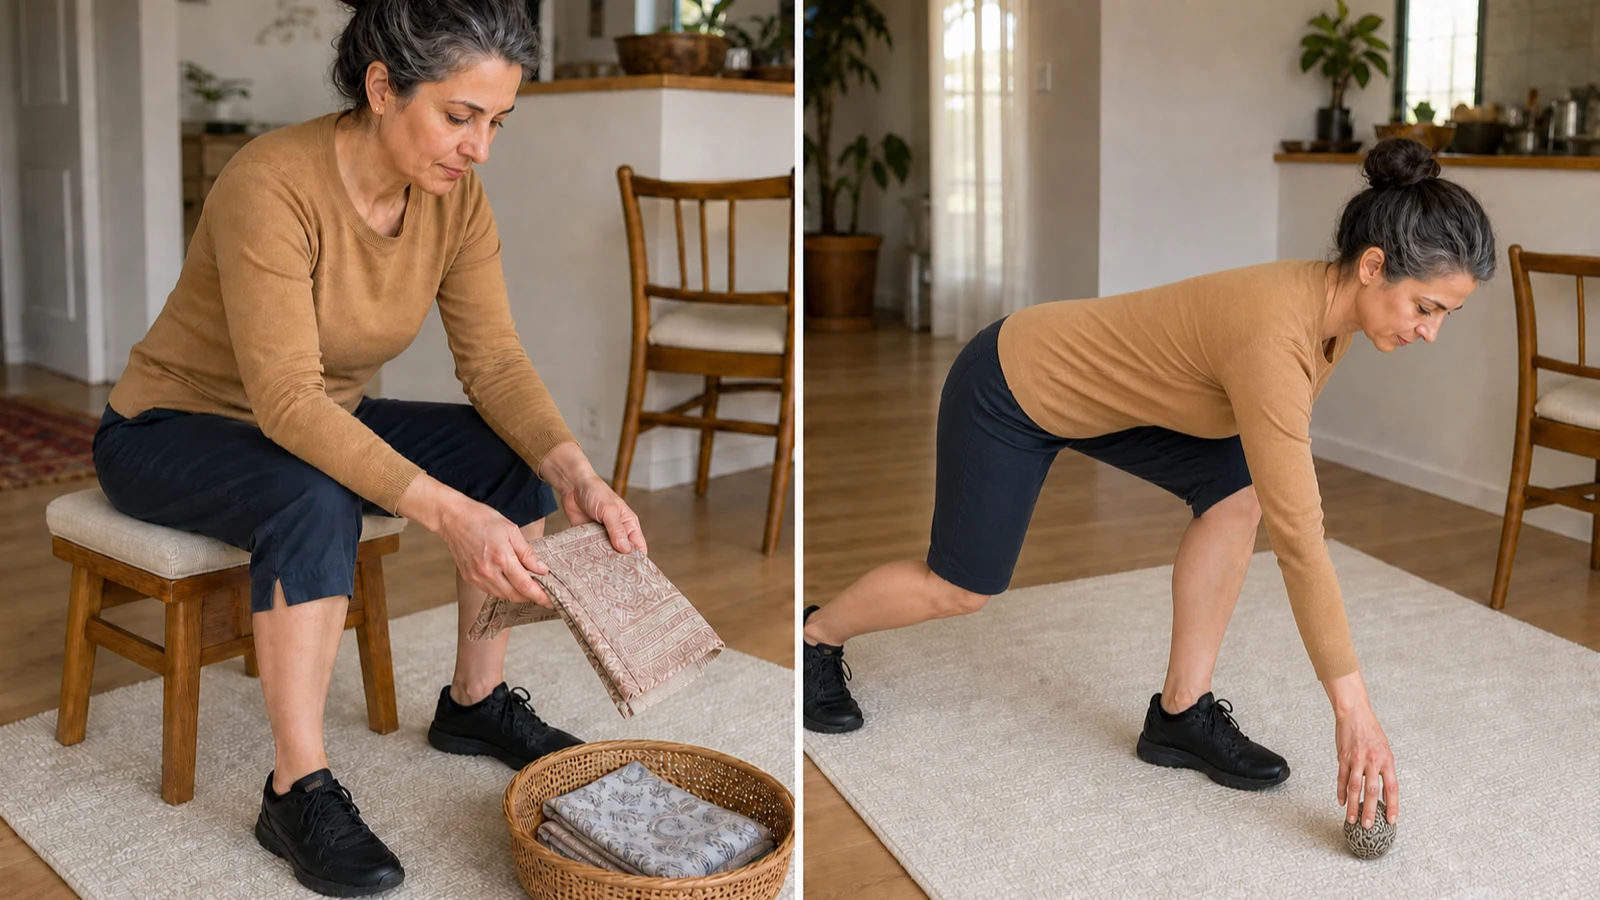
🧎 Give up kneeling and deep squatting
With worn cartilage, deep bending of the knee brings the greatest pressure onto that very damaged area; that is why prayer, work on the floor, and squatting can keep the pain awake for hours. Get some height: a stool, a low chair, or a soft kneeling pad. The sign of doing it right is that after work on the floor your knee pain is no worse than before.
More detailLess detail
- To pick something up from the floor, take one leg back and go down with the knee bent less.
- For prayer, a chair or a soft kneeling pad are acceptable options; discuss this with your care team.
- Turn long work on the floor (cleaning, gardening) into work at a table or with long-handled tools.
🚶 Keep up your daily walking
With cartilage wear, staying still makes the joint stiffer and the muscle weaker and the pain greater; regular gentle movement is the best lubrication for the joint. Fifteen to 30 minutes of walking on the flat each day, in one or several bouts, is a good target. The sign that the amount is right is that the day after your walk your knee is no worse than before.
More detailLess detail
- Prefer a flat route and a softer surface to a downhill and to stairs; downhill is harder on the kneecap than uphill.
- Several short walks through the day are tolerated better than one long walk.
- If walking is still painful, a stationary bike with the saddle slightly high and light resistance is a very good substitute.
⚖️ Keep your weight in a healthy range
When you go up and down stairs, the force on the patellofemoral joint is several times your body weight; with worn cartilage you feel those few kilograms of difference in your daily pain. The goal is gradual loss together with strength training, not a harsh diet. The sign that you are on the right path is that as the weight comes down, your pain-free distance goes up.
More detailLess detail
- Small, sustainable changes (dropping sweet drinks, a smaller plate, a daily walk) are more effective than harsh diets.
- Losing weight without strength training also takes muscle away and leaves the knee less protected.
- For a personalized eating plan, get help from a dietitian; this article does not take the place of that advice.
🌅 Start the day gently
Morning stiffness of the knee is normal with cartilage wear and does not mean the disease is getting worse; the joint has spent the night without moving and needs a few minutes. Before any heavy tasks, gently bend and straighten the knee a few times in bed and take a warm shower. The sign of a good start to the day is that the stiffness eases within about half an hour.
More detailLess detail
- In bed, bend and straighten the knee a few times through a comfortable range, then get up.
- Leave the tasks that involve bending (tying shoelaces, socks) until after your body has warmed up.
- If the stiffness lasts more than an hour every day or comes with swelling, say so at your visit; that is a different pattern.
🏡 Make your home fall-proof
When the knee is not reliable on stairs and downhills and the thigh muscle has grown weak, the risk of falling rises, and at this age a simple fall can end in a fracture. Walk through your home once with exactly this in mind. The sign of a job well done is that at night you can go from the bedroom to the bathroom with enough light and with no obstacles.
More detailLess detail
- Fix down the edges of rugs, clear cables out of the walkway, and keep the stairway lit.
- Wear closed-toe slippers with a treaded sole and put a non-slip mat in the bathroom.
- A handrail beside the stairs and a grab bar in the bathroom are a small investment that can prevent a fracture.
🪑 Break up long sitting with a bent knee
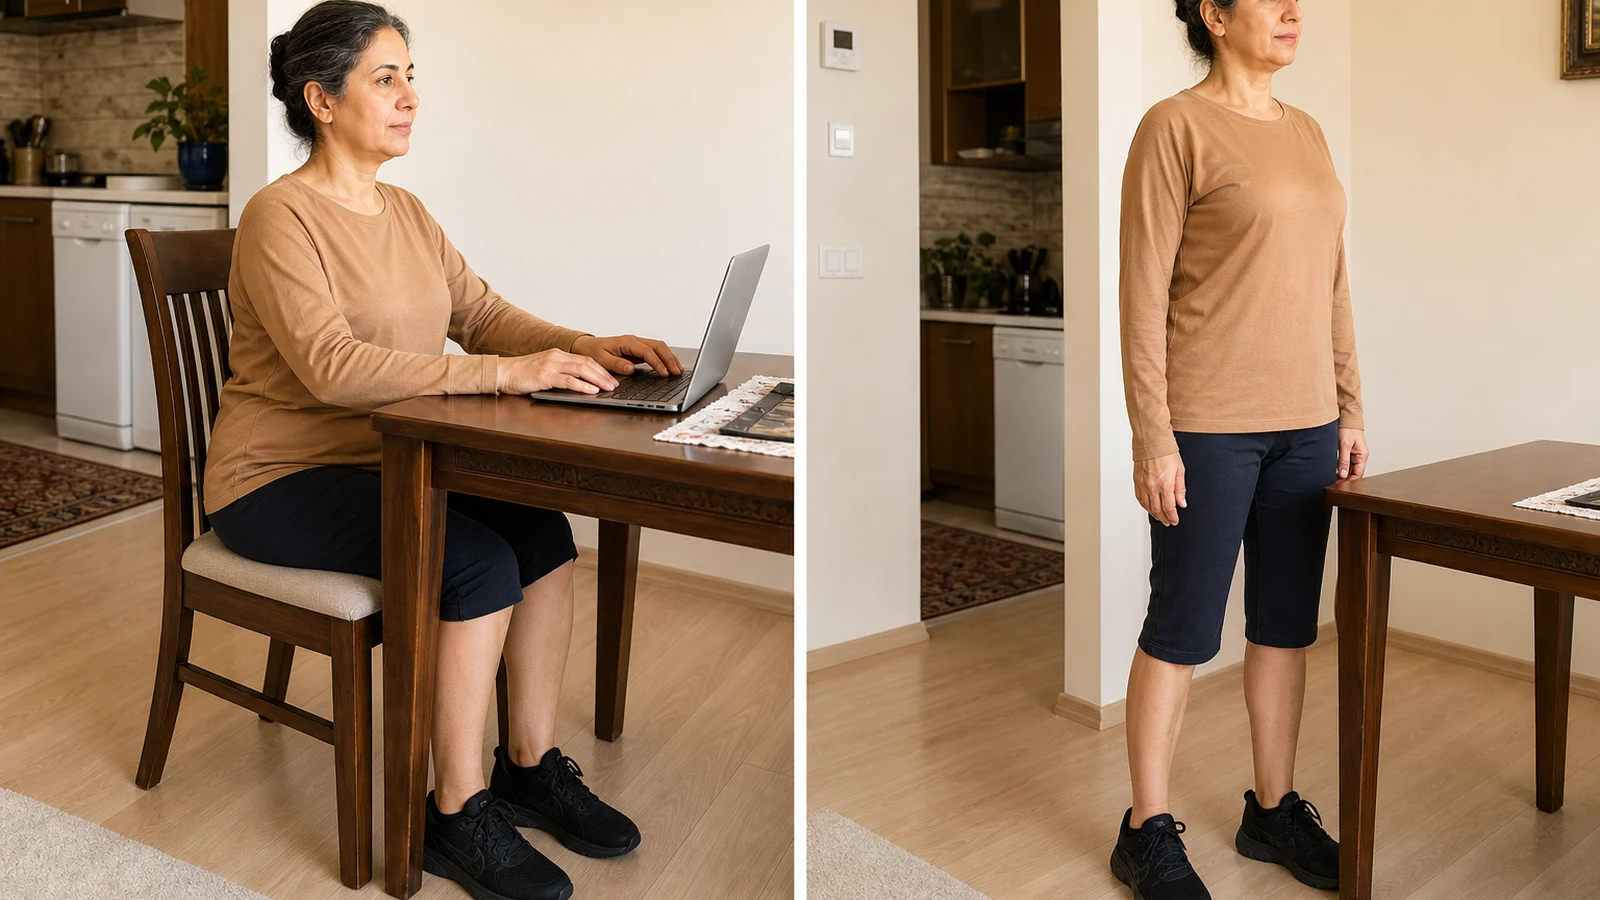
With patellofemoral wear, sitting for a long time with the knee bent keeps the pressure constant and makes the next stand-up painful. Get up every 30 to 45 minutes, take a few steps, and straighten the knee fully a few times. The sign of doing it right is that after a long session your knee is not locked and painful when you get up.
More detailLess detail
- Set the chair height so that the knee is at about 90 degrees or a little more open.
- At gatherings and on trips, prefer an ordinary chair to a deep, low sofa.
- On long journeys, make a short stop every hour and take a few steps.
👟 Wear suitable, cushioned shoes
A flat, worn-out shoe reduces shock absorption and transfers the load to the worn knee. Choose a comfortable shoe with a cushioned sole and a low heel, and keep high heels for short occasions. The sign of a good choice is that you walk your usual route with less pain.
More detailLess detail
- Look at the sole of the shoe: uneven wear or spreading out means its life is over.
- A high-heeled shoe holds the knee in a bent position and increases the pressure on the kneecap.
- The international consensus considers a medical insole useful in some patients, but the choice should follow an examination, not a purchase made on your own.
🧊 Manage the days when the pain flares up
With cartilage wear, the days when the pain increases are part of the path and do not mean the treatment has failed. On these days reduce activity but do not bring it to zero, and use cold or heat, whichever gives you relief. The sign of good management is that you return to your previous level within a few days, rather than staying in bed for weeks.
More detailLess detail
- On a high-symptom day, keep the lying-down, low-pressure exercises in this article and cut down on stairs and long walks.
- Cold is usually more comfortable for swelling and heat for stiffness; whichever is better for you, use that one.
- Do not decide on a painkiller or any other medicine on your own, and raise it at your visit.
3🏋️ Home exercises
With patellofemoral wear, exercise is not only safe — it is considered the basis of non-surgical treatment. The international consensus regards combining hip-focused and knee-focused exercise as the most effective approach, and meta-analyses have shown that adding hip strengthening to quadriceps exercise makes the result better. Do the exercises within a pain-free range and without deep bending. The doses are the common ranges of exercise therapy and your care team can change them.
Quad Set (Quad Set)
The safest way to activate the thigh muscle without moving the joint; suitable for high-symptom days. 10 repetitions of 5 seconds, 2 to 3 times a day. Stop with sharp pain at the front of the knee.
More detailLess detail
Goal and why: on painful days the thigh muscle is inhibited; this contraction keeps it active without putting pressure on the cartilage.
Starting position: sitting or lying with the leg extended; a rolled towel under the knee.
Step-by-step execution:
- Tighten the muscle at the front of the thigh so that the kneecap is drawn slightly upward.
- Hold for 5 seconds and do not hold your breath.
- Relax completely and repeat.
Documented dose: 10 repetitions of 5 seconds, 2 to 3 times a day (the common range in exercise therapy).
Stop immediately if: sharp pain at the front of the knee or a feeling that the joint is locking.
Common mistakes: holding the breath; lifting the whole leg instead of a simple contraction.
Easier version: shorten the hold to 3 seconds.
Straight Leg Raise (Straight Leg Raise)
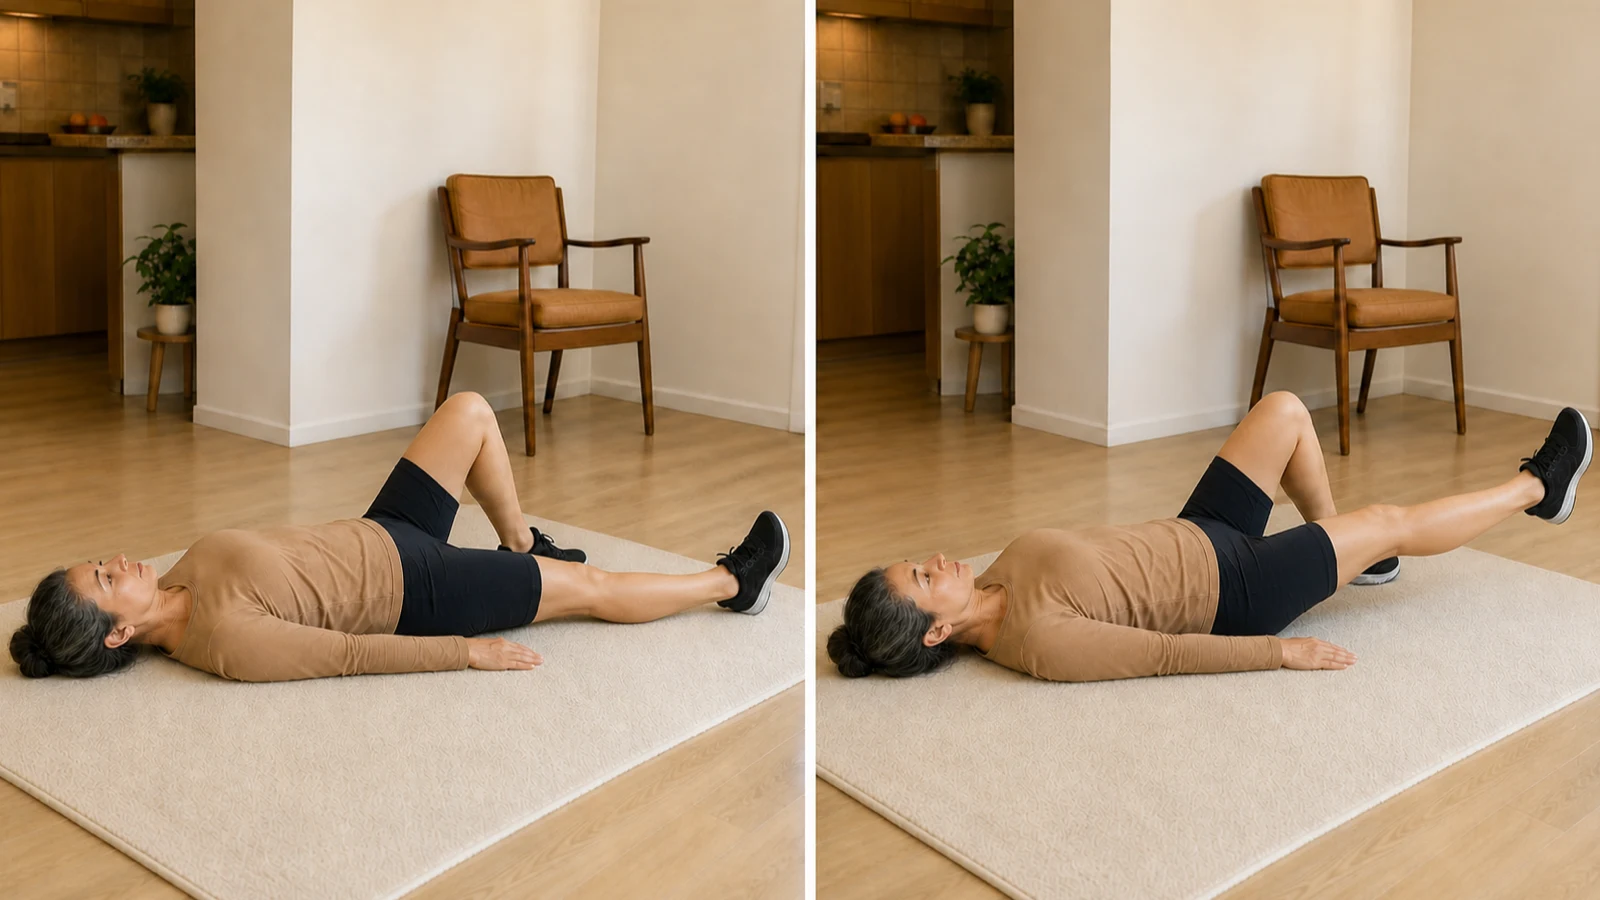
Strengthening the front of the thigh without bending the knee, which means without rubbing the surface of the cartilage. 10 to 15 repetitions, 2 to 3 sets. If your back hurts or the knee shoots with pain, stop.
More detailLess detail
Goal and why: a strong thigh muscle is the shock absorber of the joint; this exercise strengthens it with the least pressure on the cartilage.
Starting position: on your back, the healthy leg bent with the sole on the floor, the painful leg straight.
Step-by-step execution:
- First tighten the muscle at the front of the thigh so that the knee stays completely straight.
- Raise the leg, with the knee straight, to about 30 centimetres.
- Pause for a moment and lower it slowly and under control.
Documented dose: 10 to 15 repetitions, 2 to 3 sets, most days of the week.
Stop immediately if: back pain, sharp knee pain, or heavy trembling of the leg.
Common mistakes: bending the knee while raising; arching the lower back.
Easier version: halve the height and take fewer repetitions.
Clamshell (Clamshell)
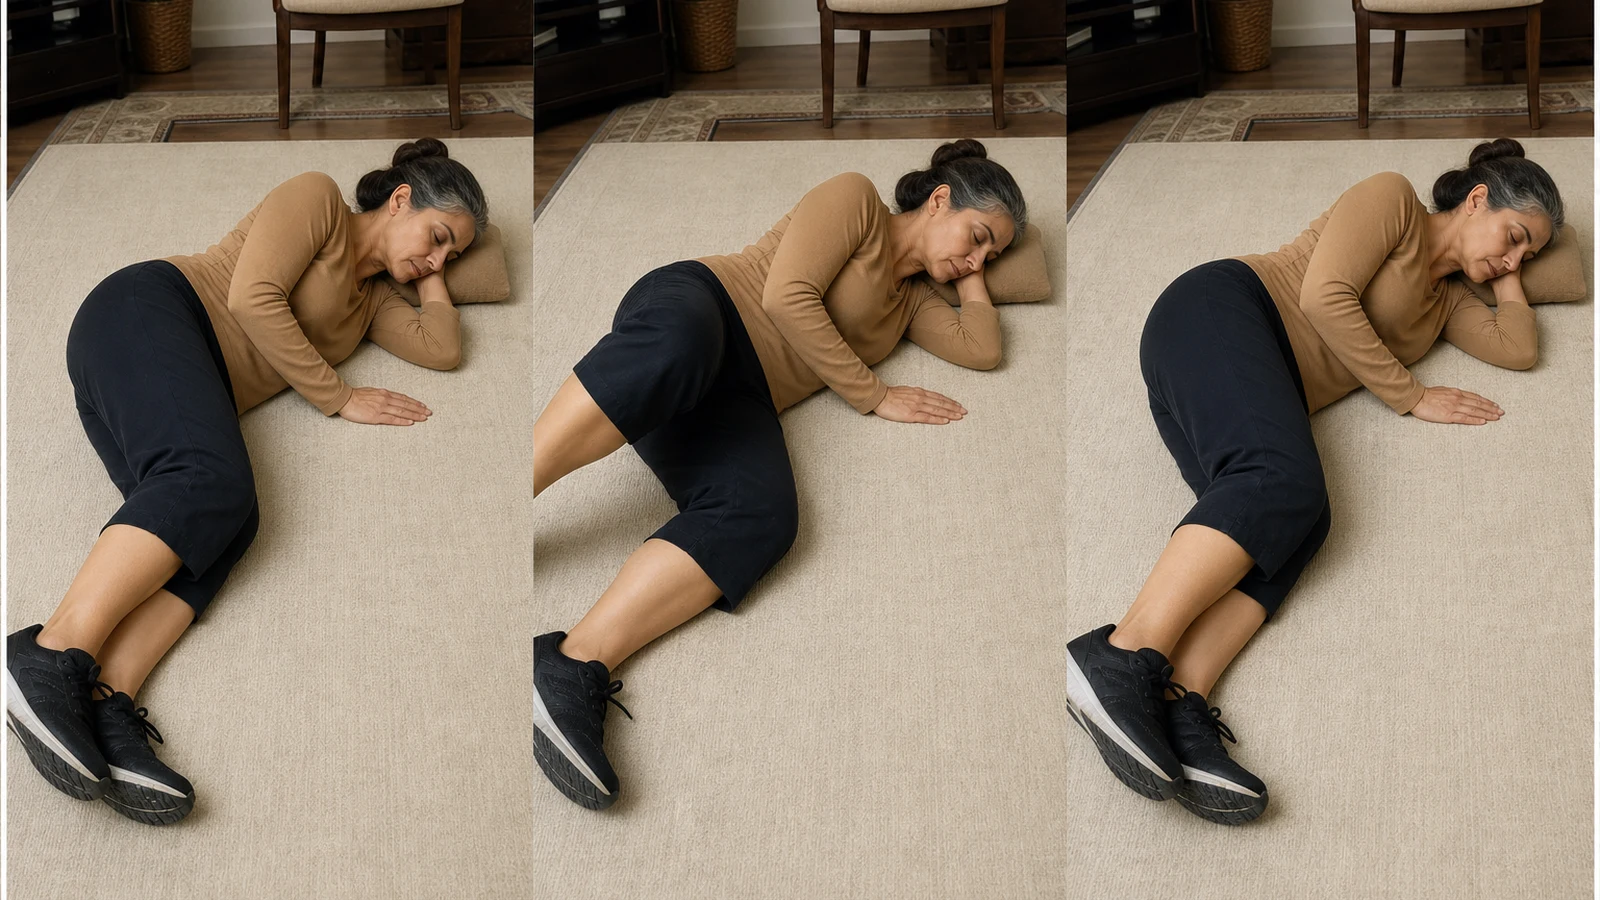
Strengthening the external rotator muscles of the hip, which in meta-analyses have had a key role in reducing patellofemoral pain. 10 to 15 repetitions, 2 to 3 sets on each side. Stop with groin pain.
More detailLess detail
Goal and why: a weak hip lets the thigh rotate inward on stairs and when standing up, and the pressure on that same worn area of cartilage increases.
Starting position: on your side, knees bent to about 45 degrees, hips stacked and steady.
Step-by-step execution:
- Keep your heels touching each other.
- Raise the upper knee like a clam opening, without rolling the pelvis backward.
- Pause for a moment and return slowly.
Documented dose: 10 to 15 repetitions, 2 to 3 sets for each side.
Stop immediately if: sharp pain in the groin or the side of the hip.
Common mistakes: rolling the pelvis backward; a fast, bouncy execution.
Easier version: take a shorter range and do it without a band.
Side-Lying Hip Abduction (Side-Lying Hip Abduction)
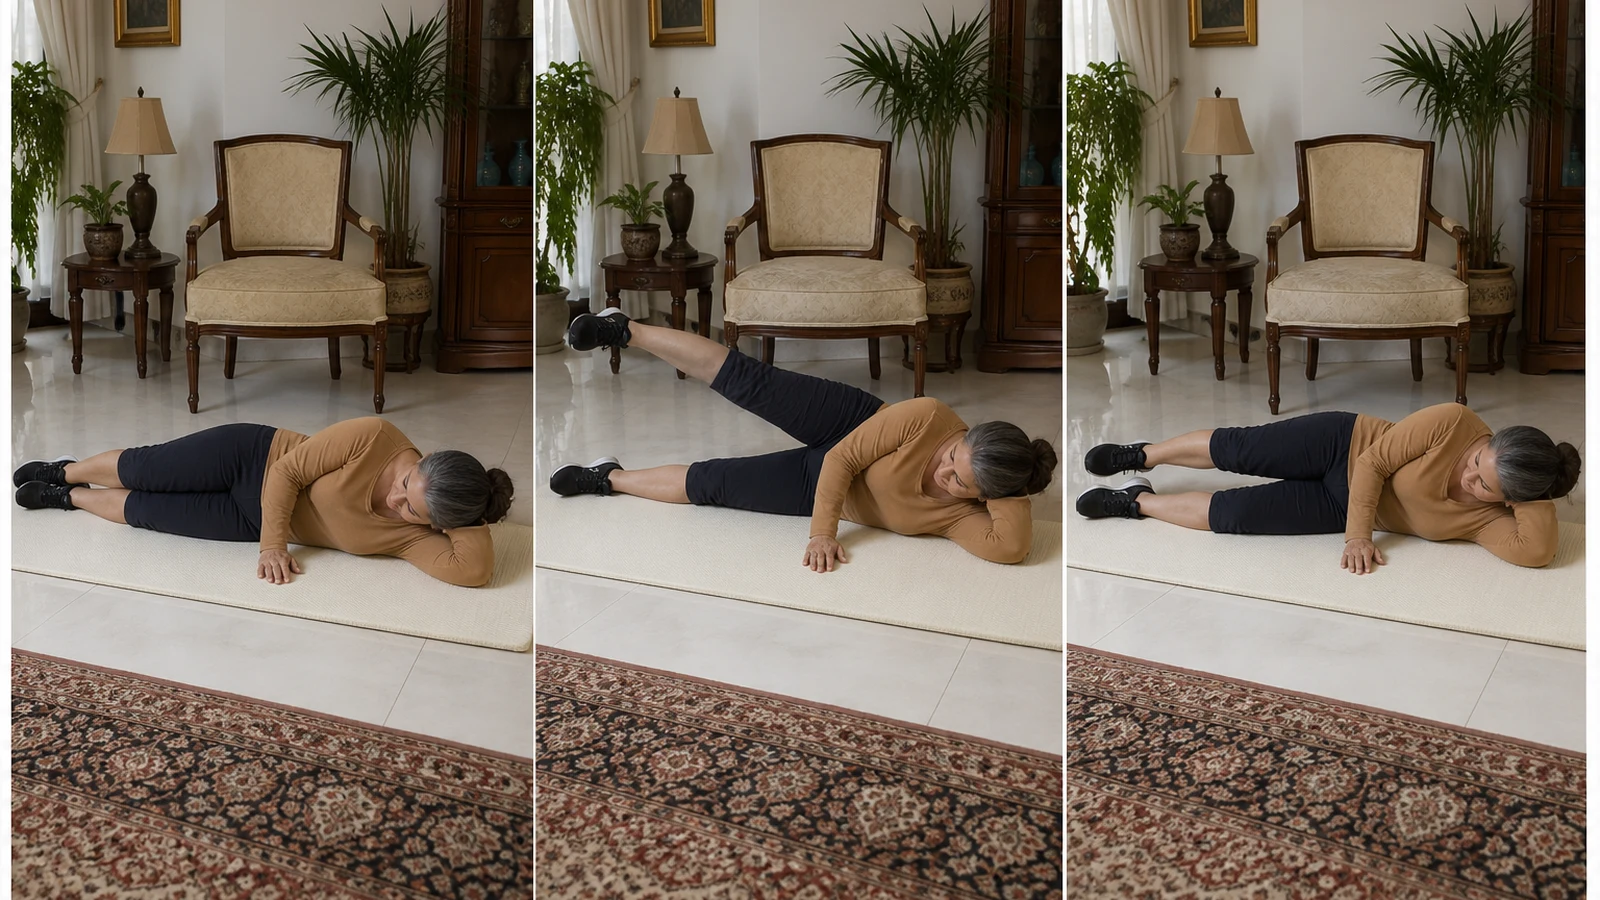
Strengthening the muscles at the side of the hip that, with every step, keep the pelvis level and the knee on track. 10 to 15 repetitions, 2 to 3 sets on each side. Stop with pain at the side of the hip.
More detailLess detail
Goal and why: these muscles keep the pelvis level with every step; their weakness means an uneven load on the patellofemoral joint.
Starting position: on your side with the body in one straight line, the lower leg slightly bent for balance.
Step-by-step execution:
- Keep the upper leg straight and turn the toes to face forward.
- Raise the leg to about 30 to 45 degrees, no further.
- Pause for a moment and lower it slowly.
Documented dose: 10 to 15 repetitions, 2 to 3 sets for each side.
Stop immediately if: sharp pain at the side of the hip or in the lower back.
Common mistakes: turning the toes upward; taking the leg forward instead of up.
Easier version: reduce the range or keep the knee slightly bent.
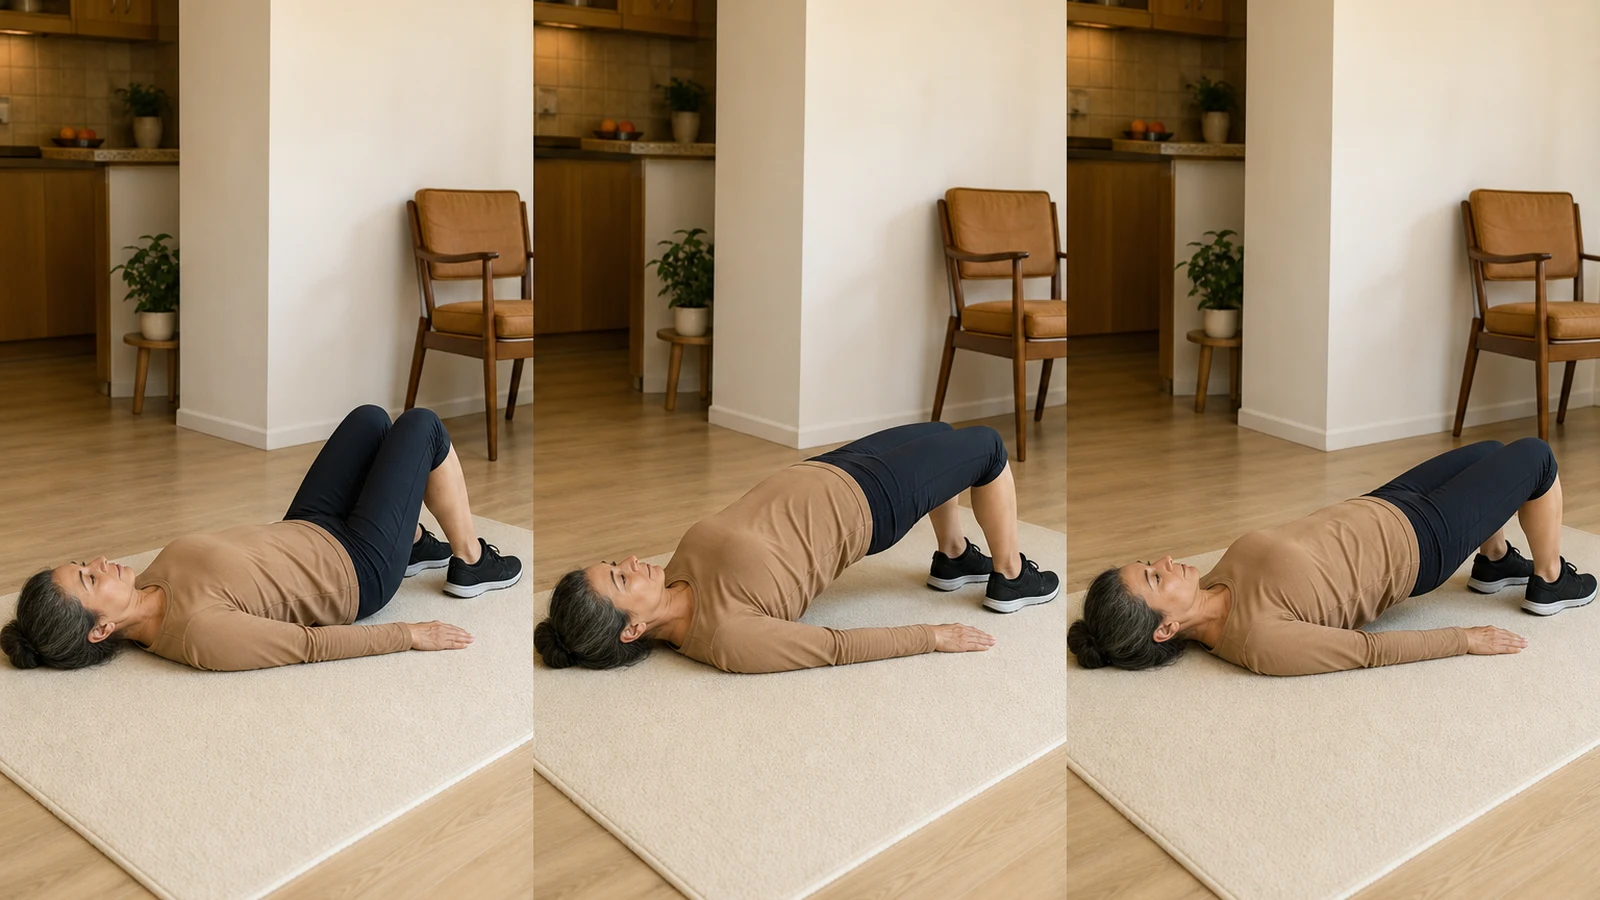
Glute Bridge (Glute Bridge)
Strengthening the buttock so that the work of standing up and of stairs moves from the worn knee to the hip. 10 to 15 repetitions, 2 to 3 sets. If the pain concentrates at the front of the knee or in the lower back, stop.
More detailLess detail
Goal and why: a strong buttock takes the load off the knee and makes getting up from a chair easier.
Starting position: on your back, knees bent, soles on the floor at hip width.
Step-by-step execution:
- Tighten the abdomen a little so that the lower back does not take on extra arch.
- Push through the heels and raise the pelvis to a comfortable line.
- Pause for 2 seconds and come down slowly.
Documented dose: 10 to 15 repetitions, 2 to 3 sets.
Stop immediately if: lower back pain or heavy cramping at the back of the thigh.
Common mistakes: raising the pelvis too high; pushing through the toes instead of the heels.
Easier version: a shorter range without the pause.
Supported Mini Squat (Supported Mini Squat)
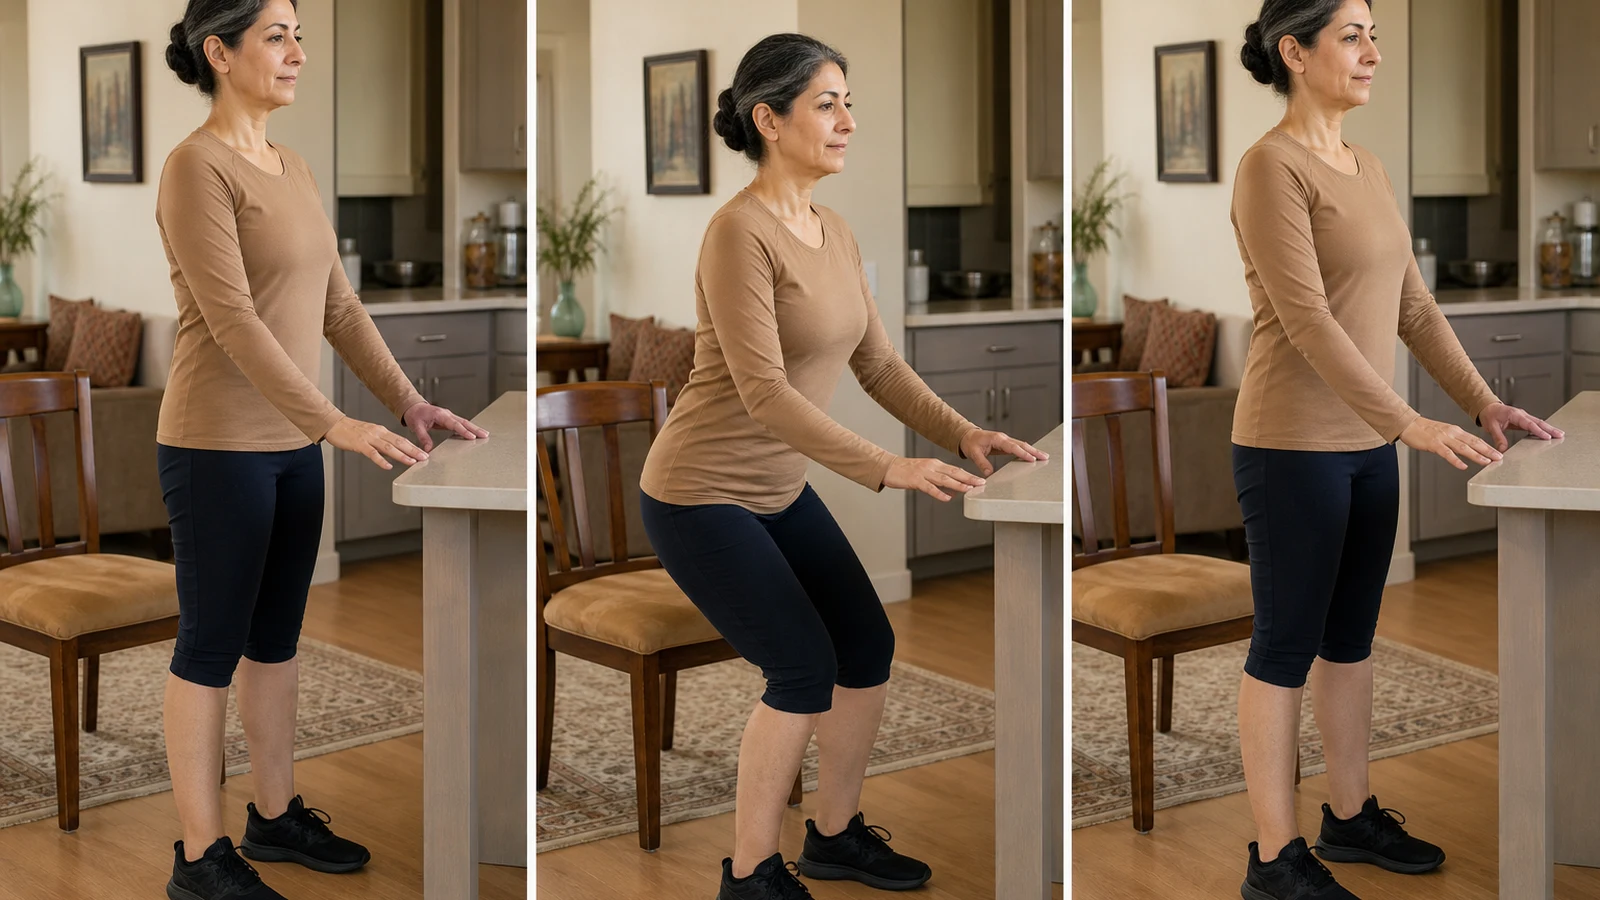
Strengthening the thigh in a low-pressure range; take the depth only to about 30 to 40 degrees. 8 to 12 repetitions, 2 sets, next to a support. Stop with pain at the front of the knee.
More detailLess detail
Goal and why: with patellofemoral wear, a shallow range gives the greatest benefit with the least pressure; a deep squat is not needed.
Starting position: standing facing the back of a chair or a cabinet, hands resting lightly on the support, feet at hip width.
Step-by-step execution:
- Take the hips slightly back and go down only about a third of the way.
- The knees stay in line with the second toe and do not travel past the tips of the toes.
- Push through the heels and come up slowly.
Documented dose: 8 to 12 repetitions, 2 sets, 3 days a week.
Stop immediately if: pain at the front of the knee or a painful sound during the movement.
Common mistakes: going too deep; letting the knees fall inward.
Easier version: halve the depth and lean more on the support.
Sit-to-Stand (Sit-to-Stand)
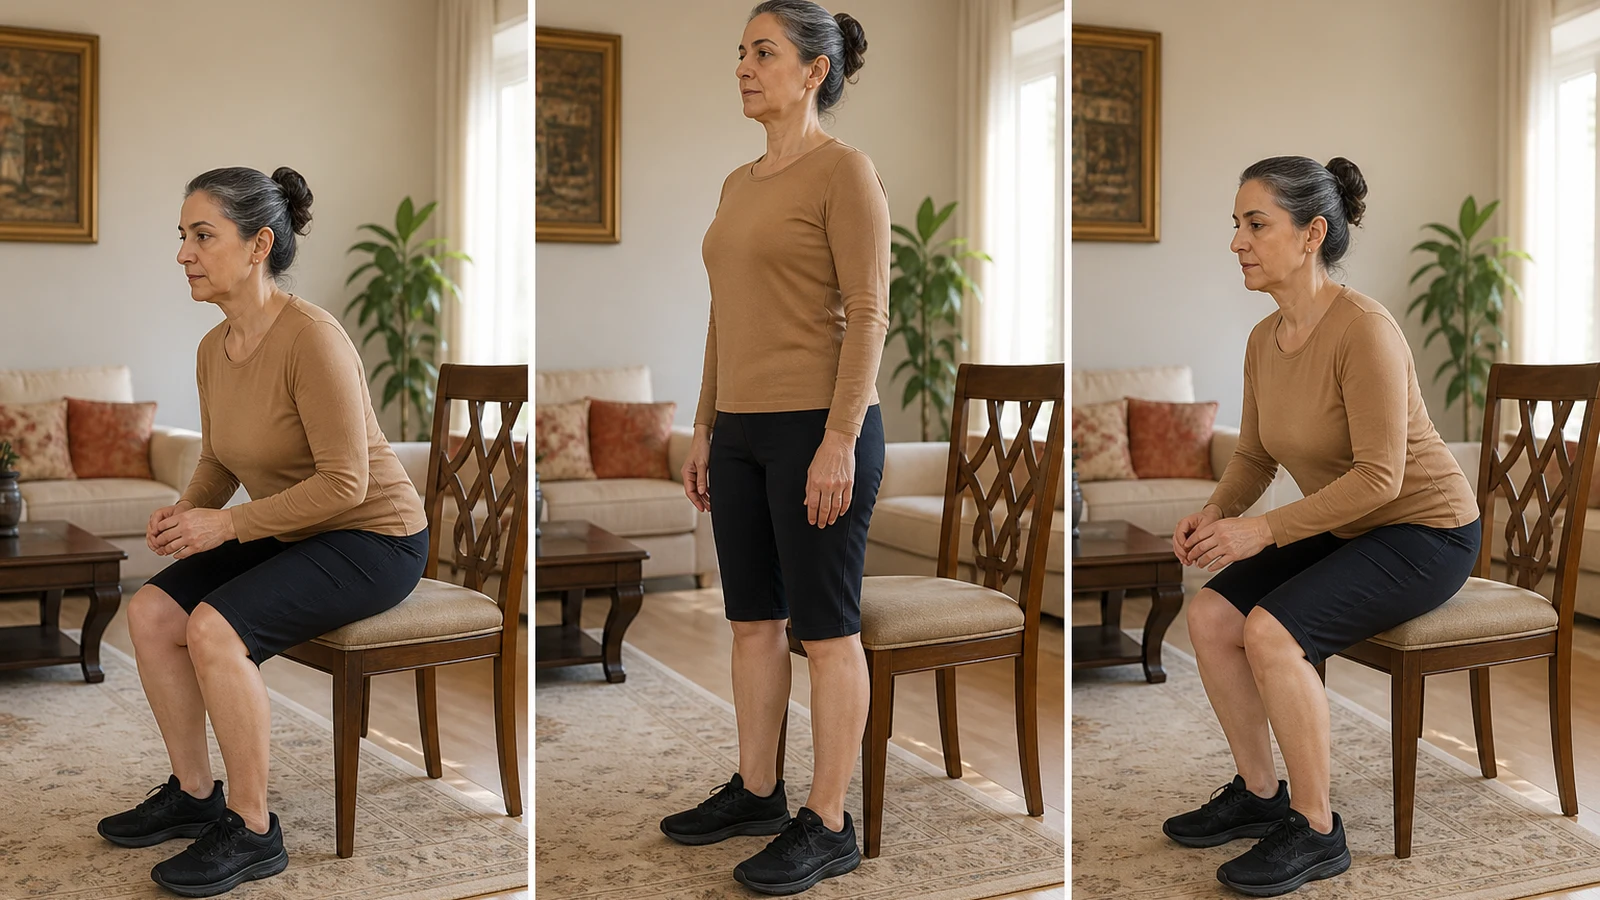
Practising the very movement you make dozens of times a day; your strongest functional exercise. 8 to 12 repetitions, 2 sets, 3 days a week. Stop with sharp pain at the front of the knee.
More detailLess detail
Goal and why: it builds functional thigh and buttock strength in the very pattern your daily independence depends on.
Starting position: on a firm chair of ordinary height; feet at hip width, a little behind the knees.
Step-by-step execution:
- Lean forward a little (nose over toes) and stand up by pushing through your feet.
- At the top stand completely straight and pause for a moment.
- Sit down slowly and under control; do not drop yourself.
Documented dose: 8 to 12 repetitions, 2 sets, 3 days a week.
Stop immediately if: sharp pain at the front of the knee or dizziness as you stand up.
Common mistakes: always taking help from the hands; a chair that is too low.
Easier version: a higher chair, or putting a firm cushion under the buttocks.
Supported Single-Leg Balance (Supported Single-Leg Balance)
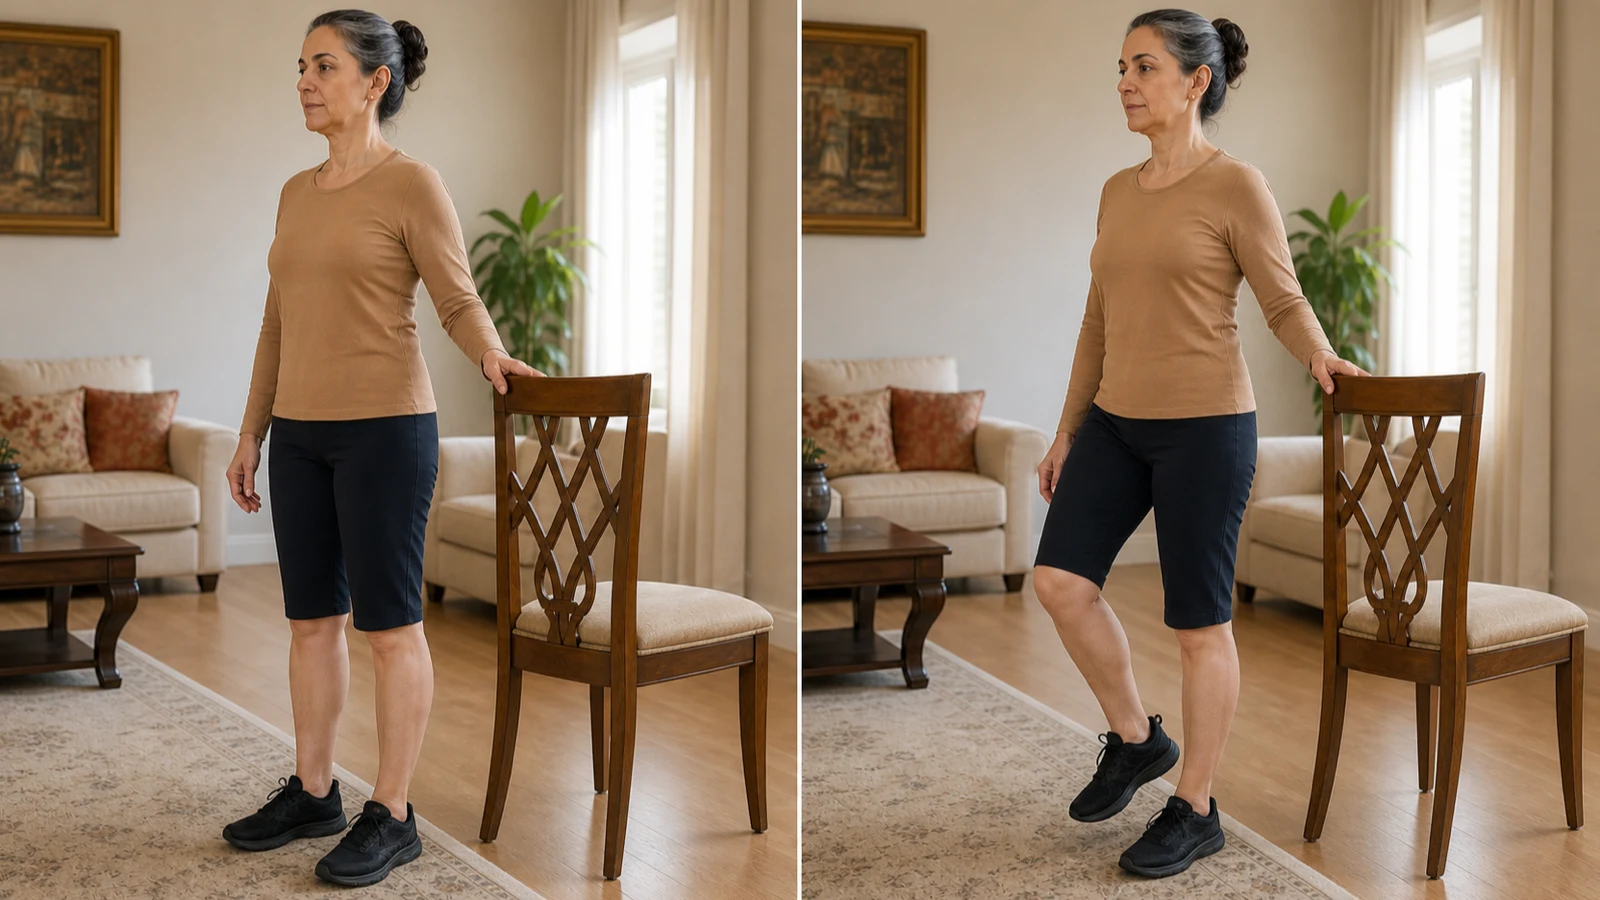
Better balance means fewer falls and more confident walking. 3 holds of 10 to 20 seconds on each leg, preferably daily. Stop with dizziness.
More detailLess detail
Goal and why: when the knee is painful, balance and trust in the leg go down; balance training brings both back.
Starting position: beside a table or the back of a chair, one hand near the support.
Step-by-step execution:
- Shift your weight onto one leg and lift the other slightly off the floor.
- Hold for 10 to 20 seconds, standing tall.
- Change legs; as you progress, lean on your hand more lightly.
Documented dose: 3 holds of 10 to 20 seconds for each leg, preferably daily.
Stop immediately if: dizziness, blacking out, or severe unsteadiness.
Common mistakes: training away from a support at the start; looking down.
Easier version: just narrowing the distance between the feet (heel in front of toes) with both hands on the support.
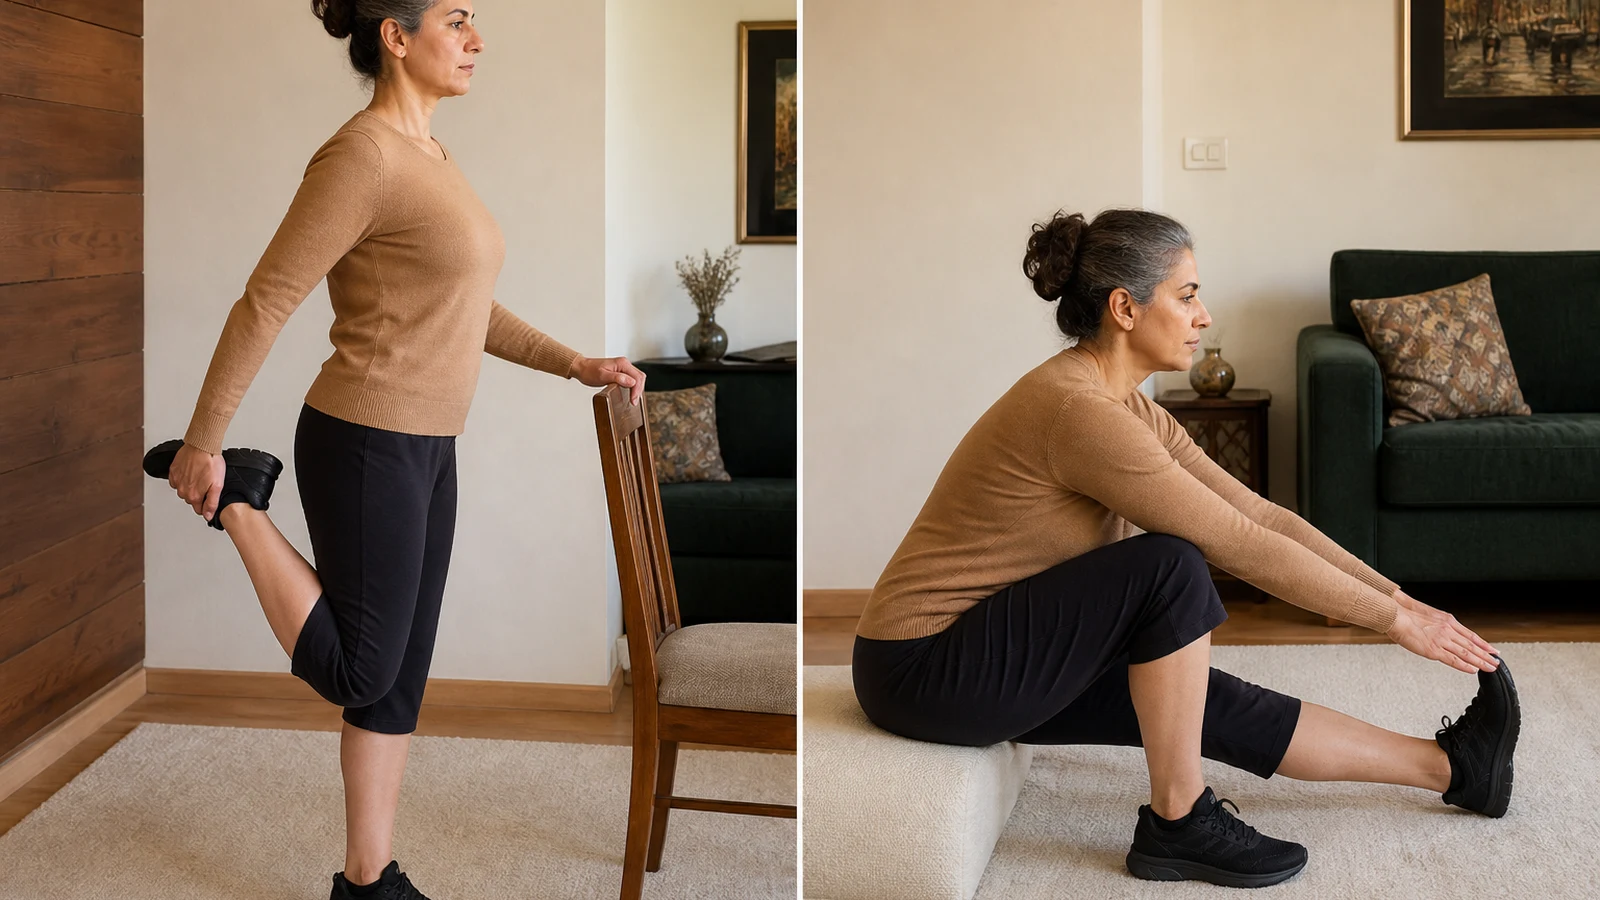
Quadriceps and Hamstring Stretch (Quadriceps and Hamstring Stretch)
Tight muscles at the front and the back of the thigh raise the pressure on the kneecap; these stretches are the closing part of every session. 2 to 3 repetitions of 20 to 30 seconds on each side. Stop with sharp pain.
More detailLess detail
Goal and why: better flexibility at the front and the back of the thigh widens the pain-free range of the knee and makes walking smoother.
Starting position: for the front of the thigh, standing beside a wall with a hand for support; for the back of the thigh, sitting on a chair with the leg extended.
Step-by-step execution:
- Quadriceps stretch: bring your ankle toward your buttock and rotate the pelvis slightly forward.
- Hamstring stretch: sitting with the leg extended and the back straight, bend slightly forward from the hip.
- Hold each stretch for 20 to 30 seconds without bouncing.
Documented dose: 2 to 3 repetitions of 20 to 30 seconds for each side (the common range for static stretching).
Stop immediately if: sharp pain in the knee, the groin, or the lower back.
Common mistakes: bouncing stretches; rounding the lower back in the hamstring stretch.
Easier version: for the front of the thigh, use a towel to catch the ankle and take a smaller range.
4🏟️ Principles of training at the gym
Wear of the kneecap is not a reason not to go to the gym; it is a reason to go correctly. Regular resistance training in knee osteoarthritis is considered the basis of non-surgical treatment. What follows is not a set-by-set program — a coach writes that for your body — but the principles that every good program should have.
Warming up and cooling down
Warming up matters more in this condition: 8 to 10 minutes on a stationary bike with light resistance and the saddle slightly high, then a few dynamic movements for the hip. Finish the session too with a few minutes of easy cycling and the stretches in this article. A warm joint makes less noise in the first minutes and hurts less.
Choosing the weight and the rule of progression
Start with seated machines and a light weight; a weight that gives you 10 to 15 pain-free repetitions with good form is the right starting point. With worn cartilage, more repetitions with a lighter load are tolerated better than a heavy weight. Increase the load more slowly than younger people do and at intervals of several weeks; the criterion for increasing is the pain the day after training, not the feeling in the moment.
Form and breathing
In all leg movements the kneecap must travel in line with the second toe and the knee must not fall inward. Set the depth of the movement by your pain, not by copying the person next to you — in your situation a shallow range is entirely enough. Breathe out during the effort phase and do not hold your breath under load, especially if you have high blood pressure.
Order and structure of the session
Suggested order: warm-up, hip exercises (the least load on the kneecap), then leg movements on machines through a short range, then balance exercises, and stretching at the end. Do not drop balance: at this age, better balance means fewer falls and it matters just as much as the weights.
High-risk patterns and safe alternatives
Every do-not has an alternative; removing the legs from the program altogether is not necessary:
- Deep barbell squat ← supported mini squat or leg press through a short range.
- Leg extension with a heavy load at the end range ← straight leg raise or leg extension with a light weight in the middle range.
- Deep lunge and kneeling on machines ← stepping up onto a low step or standing up from a chair.
- Treadmill on a steep incline or running ← walking on a flat surface, a stationary bike, or the elliptical.
- Jumping, skipping rope, and impact movements ← controlled resistance training and balance training.
Manage the bad day, do not cancel it
With cartilage wear, high-symptom days are part of the path. On these days halve the session rather than closing it down: keep the hip, upper-body, and balance work and leave out the heavy leg movements. A complete break of several days makes the joint stiffer and the return harder.
Weekly template
2 to 3 resistance sessions a week for the hip and thigh, plus walking or cycling on most days and balance training preferably daily. Leave at least one day between two resistance sessions; rest is part of training. Tell your coach plainly that you have patellofemoral wear so that the program is written by these very rules.
Signs to stop at the gym
Stop the set at that very moment if: sharp pain at the front of the knee, locking or catching of the joint, the knee suddenly giving way, new swelling, chest pain, or dizziness. A grating sound without pain is usually harmless; what matters is pain and swelling, not the noise.
5⚠️ Warning signs — see a doctor immediately
These signs mean you should close the article and get seen:
- Considerable, sudden swelling of the knee, especially after a blow or a fall
- True locking of the knee, or an inability to straighten it fully
- The knee giving way repeatedly, or repeated falls
- Inability to bear weight on the leg, or severe limping
- Redness, warmth, and fever together with knee pain
- Persistent night pain that does not settle with rest, or unexplained weight loss
- Pain that, with a correct program, has not improved after about three months or is heading toward getting worse
6✅ Summary and next step
Wear of the kneecap cartilage means a joint that has worked for years, not a joint that is finished. Do the stairs and getting up from a chair correctly, give up kneeling and deep squatting, walk every day, and two or three times a week do the hip, thigh, and balance exercises in this article. Give your body time: improvement takes weeks to months, and staying with the program matters more than the result of the first week. If the pain heads toward getting worse or you see a warning sign, an examination is needed so that we can review the next options together.
If knee pain has limited your daily life, or you want to know what stage you are at, book an appointment for a personalized assessment.
To get to know this area of treatment better, see the knee arthroscopy page.
Related guides: Service page: Knee Arthroscopy · Also related: Total Knee Replacement Surgery: Postoperative Care and Rehabilitation
This content is provided for general education only and is not a substitute for an examination and your own doctor's advice. If you have warning signs, or the pain has not improved with these adjustments over a few weeks, get examined before continuing the exercises. Adjust the intensity and type of exercise to your own condition and your care team's advice.
View scientific sources
- Crossley KM, et al. 2016 Patellofemoral pain consensus statement from the 4th International Patellofemoral Pain Research Retreat. Part 1: Terminology, definitions, clinical examination, natural history, patellofemoral osteoarthritis. Br J Sports Med. 2016. doi.org/10.1136/bjsports-2016-096384
- Collins NJ, et al. 2018 Consensus statement on exercise therapy and physical interventions to treat patellofemoral pain: 5th International Patellofemoral Pain Research Retreat. Br J Sports Med. 2018. doi.org/10.1136/bjsports-2018-099397
- Kan HS, et al. Non-surgical treatment of knee osteoarthritis. Hong Kong Med J. 2019. doi.org/10.12809/hkmj187600
- Wallis JA, et al. A Systematic Review of Clinical Practice Guidelines for Physical Therapist Management of Patellofemoral Pain. Phys Ther. 2021. doi.org/10.1093/ptj/pzab021
- Alammari A, et al. Effect of hip abductors and lateral rotators' muscle strengthening on pain and functional outcome in adult patients with patellofemoral pain: a systematic review and meta-analysis. J Back Musculoskelet Rehabil. 2023. doi.org/10.3233/BMR-220017
- Rathleff MS, et al. Association of Self-Reported Improvement After 4 Weeks and Outcomes After 52 Weeks Among Adolescents With Patellofemoral Pain. Orthop J Sports Med. 2024. doi.org/10.1177/23259671241280581

Dr. Jalil Emad
Orthopedic specialist and surgeon, board-certified in bone and joint surgery; years of experience in knee and hip replacement, sports injuries and arthroscopy in Isfahan.
Related articles
Total Knee Replacement Surgery: Postoperative Care and Rehabilitation
Read knee replacement recovery step by step, from wound care and medicines to exercise. Progress depends on pain, swelling and movement.
ACL reconstruction
Care and rehabilitation after ACL reconstruction; if your meniscus was repaired in the same operation, pick your version at the top of the article — the type of repair sets the weight-bearing and knee-bend limits of the first weeks.
Hip replacement: care and rehabilitation after surgery
Learn about care after total hip replacement: surgery day, wounds, medicines, warning signs, first-three-month exercises and a safe return to activity.