
Choose a guide version
To read the guide, first choose the version that matches your situation.
🧭 Choose the programme for your shoulder repair
Your treating team decides which programme is right for you. Do not guess from pain or the tear size written on an MRI report. Individual restrictions and any additional procedure take priority over this guide.
I am not sure which version fits
Read the version titles. If you are unsure about your diagnosis or circumstances, check with your clinician or the clinic before choosing an exercise programme.
Contact the clinicOn this page
- 🏥 Surgery day and discharge
- ⚠️ Warning signs and when to call
- 1Care during the first days after surgery
- 🛡️ The first two weeks
- ↔️ Weeks three and four
- 🌱 Month two: starting protected passive movement
- 🏋️ Month three: continuing passive movement and gradually introducing active-assisted movement
- 🎯 After the third month: active movement, strengthening, and return to activity
- 🚗 Driving, work, and return to activity
- ❓ Frequently asked questions
- ✅ Summary
- 📚 Scientific references
Rotator Cuff Repair: Care and Programme for Large Tears and High-Risk Repairs
Read about care and exercise after a large or high-risk rotator cuff repair. Each movement starts and progresses within the protective programme.

🏥 Surgery day and discharge
This operation is usually performed under general anesthesia. A shoulder nerve block may also be given to reduce pain. After surgery, you stay in recovery until your breathing and blood pressure are stable, you are fully alert, and pain and nausea are controlled. The operated arm is placed in a sling, and a small pillow may hold it away from your body.
Many patients go home on the day of surgery. Before discharge, your pain must be manageable with the home medication plan, you must be sufficiently alert, and you must be able to walk safely with any help you need. An adult companion takes you home and stays with you for the first night.
While the arm is still numb, protect it from heat, knocks, pressure, and hanging unsupported. Pain may become more noticeable as the numbness wears off; take your medicines as prescribed. Having little pain does not mean you can lift objects or test your shoulder strength.
Before leaving, obtain your dressing instructions, movement restrictions, medication prescription, follow-up appointment, and physical therapy plan. Make sure you know whether your repair was straightforward or included another procedure, because this can change your movement plan.
⚠️ Warning signs and when to call
Contact your surgeon or treatment center the same day: Fever or chills, spreading redness and warmth, thick or foul-smelling drainage, or an opening wound; Uncontrolled or increasing pain, severe hand swelling, or persistent pressure from the sling; Numbness or tingling that has not resolved after the expected duration of the anesthetic explained to you, or new numbness or weakness as its effect wears off; A wet, loose, or drainage-soaked dressing; A fall, an impact, a sudden pull on the arm, or a sudden sound accompanied by loss of function.
Seek emergency care: Shortness of breath, chest pain, coughing up blood, or fainting; Swelling of the face or tongue, wheezing, or shortness of breath after taking a medicine; Increasing coldness or bluish discoloration of the hand. In Iran, call emergency medical services on 115.
If you have questions about shoulder pain, your wound, or movement restrictions, call Dr Jalil Emad’s clinic on 0913 782 5207, or book an appointment online. In an emergency, do not wait for the clinic to reply; follow the instructions in the emergency box above.
1Care during the first days after surgery
Night pain, bruising, and swelling around the shoulder may occur during the first few days and should gradually improve. Keep the wound clean and dry, support the weight of your arm in the sling, and perform only the movements you have been allowed to do.
🩹 Wound care and dressing changes
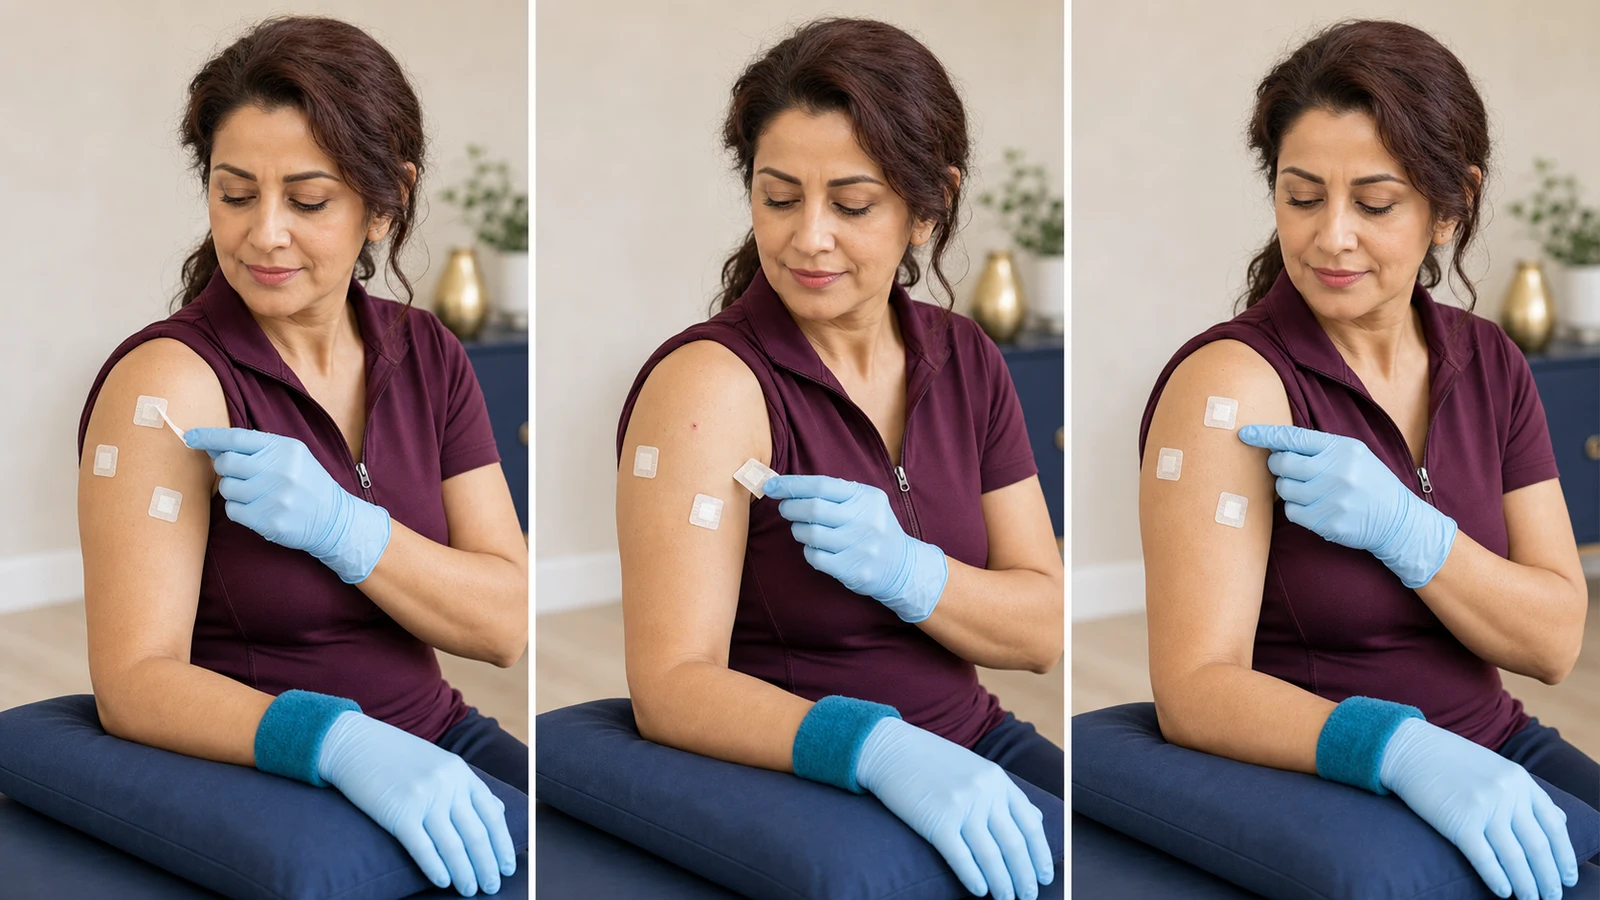
You will usually have several small wounds around the shoulder. Take your time when changing the dressing, support your forearm on a pillow, and ask a trained companion for help if you cannot reach the wound. You are changing the covering using a clean technique; leave the wound itself alone.
More detailLess detail
- If your waterproof dressing is intact, leave it in place until the wound check on days 10–14. Replace a wet, dirty, or loose dressing sooner. For a standard dressing or an additional incision, follow the timing on your discharge instructions.
- Clean your work surface and lay out the new dressings. Wash and dry your hands with soap and water. Wear sterile gloves on both hands when touching the clean surface of the dressing.
- Gently peel back the outer adhesive along the skin. Do not lift or pull the operated arm backward to reach a wound behind the shoulder.
- Briefly inspect the wound without pressing on it. A small blood spot that is not growing is different from increasing drainage or bleeding.
- Do not remove skin strips, tissue glue, scabs, or sutures. Use antiseptics, ointments, or creams only as your surgical team has taught you.
- Do not touch the inner surface of the dressing. Place a suitable dry covering over each wound. The adhesive should not pucker the skin or tighten around the arm.
- Change a wet, dirty, or loose dressing as you were taught. If the wound is stuck to the dressing or changing it is difficult, ask your treatment center for help.
🚿 Showering and keeping the wound dry
A short shower may be possible from day two if the waterproof dressing is intact and you use an extra protective covering. Support your forearm when removing the sling and ask a companion for help. If you have an additional incision, a different dressing, or a specific restriction, follow the timing for that situation.
More detailLess detail
- Before showering, read your surgical center's instructions for covering the wound. A waterproof label alone does not mean showering is allowed.
- Do not aim a strong jet of water at the wound or scrub the area.
- After showering, gently pat the surrounding skin dry with a clean towel.
- If water has entered beneath the covering, replace the wet dressing using the technique you were taught.
💊 Medicines: preventing complications and introducing PRP
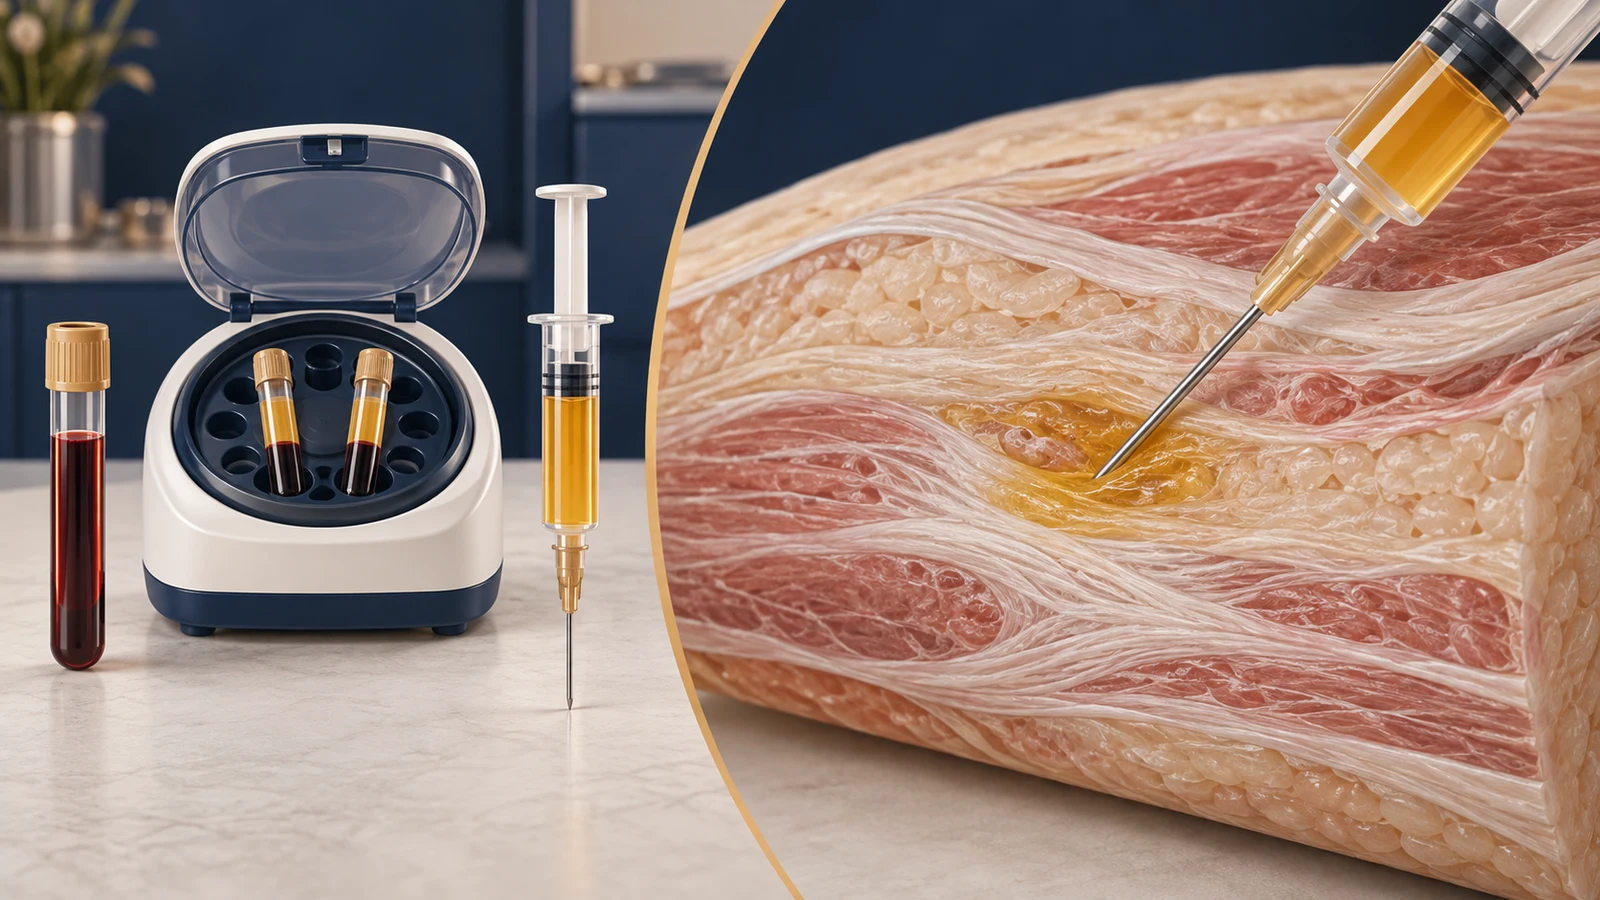
Take your medicines according to your discharge prescription and at the stated intervals. Medication plans differ between patients. Do not add someone else's medicine or an over-the-counter product without checking for interactions. Platelet-rich plasma (PRP) is prepared from a small sample of your own blood. Platelets contain growth factors; the aim is to support natural tissue healing.
More detailLess detail
- Write down each medicine's name and schedule. Do not double the next dose to make up for a missed one.
- Some combination pain medicines contain acetaminophen. Before taking extra acetaminophen, ask a pharmacist to check the ingredients.
- Strong pain medicines may cause drowsiness, nausea, or constipation. Do not take them with alcohol or an added sedative, and do not drive while drowsy. If you already take alprazolam or another benzodiazepine sedative regularly, coordinate your medicines with the prescriber before starting a strong pain medicine; do not abruptly stop these sedatives on your own.
- Take only the medicines listed on your prescription. Antibiotics, medicines to prevent blood clots, and supplements are not necessary for every patient.
- In selected rotator-cuff repairs, PRP can be considered as an adjunct aimed at supporting tendon healing. In some studies, PRP used during repair was associated with fewer retears; however, better overall patient-reported outcomes have not been established, and this evidence does not conclusively show the effect of injections after surgery. Dr Emad decides suitability and details according to the tear and your condition; repair protection and the permitted start of strengthening remain as planned.
🧊 Pain, swelling, and safe use of cold therapy
Cold therapy can reduce pain and swelling, but it can injure numb skin. Wrap the cold pack in a cloth and do not place it directly on your skin or wound.
More detailLess detail
- Apply a cloth-wrapped cold pack for about 20 minutes, four to six times a day. Also follow your device instructions or discharge plan.
- Let the skin warm up between applications and check its color and sensation.
- Do not sleep with a cold pack in place or apply it to an area that is still completely numb.
- Stop cold therapy if you develop persistent paleness, a blister, or increased numbness.
🦾 The sling, abduction pillow, and hand movement
The sling and abduction pillow support the weight of your arm during the protection phase. Protective plans may require them day and night for up to six weeks. When you can stop using them depends on your repair and personal plan.
More detailLess detail
- Support your elbow and entire forearm inside the sling. Do not remove the abduction pillow on your own.
- Remove the sling only for hygiene or permitted exercises. Even then, support the weight of your forearm with a pillow or your other hand.
- Gently move your fingers and wrist. If the tendon at the front of the upper arm has been fixed to bone (biceps tenodesis), active elbow movement has separate restrictions.
- Do not carry, push, or pull with the operated hand, or push through that palm to stand up.
🛏️ Sleep, clothing, and daily tasks
Choose a sleeping position that supports the weight of your arm without pressure on the operated shoulder. Loose clothing that opens at the front is easier to put on and take off.
More detailLess detail
- Sleep on your back or partly upright, with a pillow beneath your elbow and forearm. Do not sleep on the operated shoulder.
- Keep the sling on at night as directed in your protection plan. Having less pain is not a reason to stop using it.
- When dressing, put the operated arm into the sleeve first. When undressing, take the healthy arm out first.
- Use your legs and healthy arm to change position in bed. Do not put your body weight through the operated hand.
🚶 Walking and getting around at home
Short walks around the house help you remain active. Clear your walking route and keep the sling on to support the weight of your arm as you walk.
More detailLess detail
- Walk slowly on a level surface. Ask a companion for help if you feel dizzy.
- Remove slippery objects, cords, and loose rugs from your route.
- On stairs, hold the handrail with your healthy hand. Do not reach out with the operated hand to regain your balance.
🛡️ The first two weeks
The instructions and illustrations assume surgery on the right shoulder. If your left shoulder was operated on, swap right and left wherever the instructions specify a side. The healthy hand is on the side that was not operated on.
In the large and high-risk programme, the arm stays supported during protection. Hand and elbow exercises follow their stated conditions. Passive shoulder movement and elevation using the healthy hand usually start around week six after instruction. Earlier starting requires individual permission for that patient. Do not actively lift the arm, put the hand behind your back or take a load.
Gentle soft-ball squeeze (Gentle Hand-Grip Squeeze)
Gently close your fingers around a soft ball, then release. Exercise in short bouts within your plan. Stop if tingling, a change in hand color, wound pain, or unintended shoulder movement increases.
More detailLess detail
Before you start: This movement keeps your hand mobile and is intended for when adequate sensation has returned to the fingers. Sit in a sturdy chair, support the operated forearm in the sling or on a pillow, and hold a soft foam ball.
How to do it:
- Place your fingers around the ball.
- Gently squeeze the ball without tightening your shoulder.
- Hold briefly while breathing freely.
- Release the pressure completely.
- Open and relax your fingers between repetitions.
Movement tips: Squeeze lightly and release slowly; breathe out as you squeeze. Relax your fingers between repetitions. Only the hand should work, and the arm should stay in place.
Amount, repetitions and progression: The reference plan uses hand and wrist movements four to six times a day. Follow your own plan for the number of repetitions each time. If swelling or pain is worse by the next session, reduce the number and check the sling's position.
Stop immediately if: Tingling, a change in hand color, wound pain, or unintended shoulder movement increases.
Common mistakes: Avoid a hard ball, maximal squeezing, and shrugging the shoulder.
Easier version: Return to a softer ball and fewer repetitions.
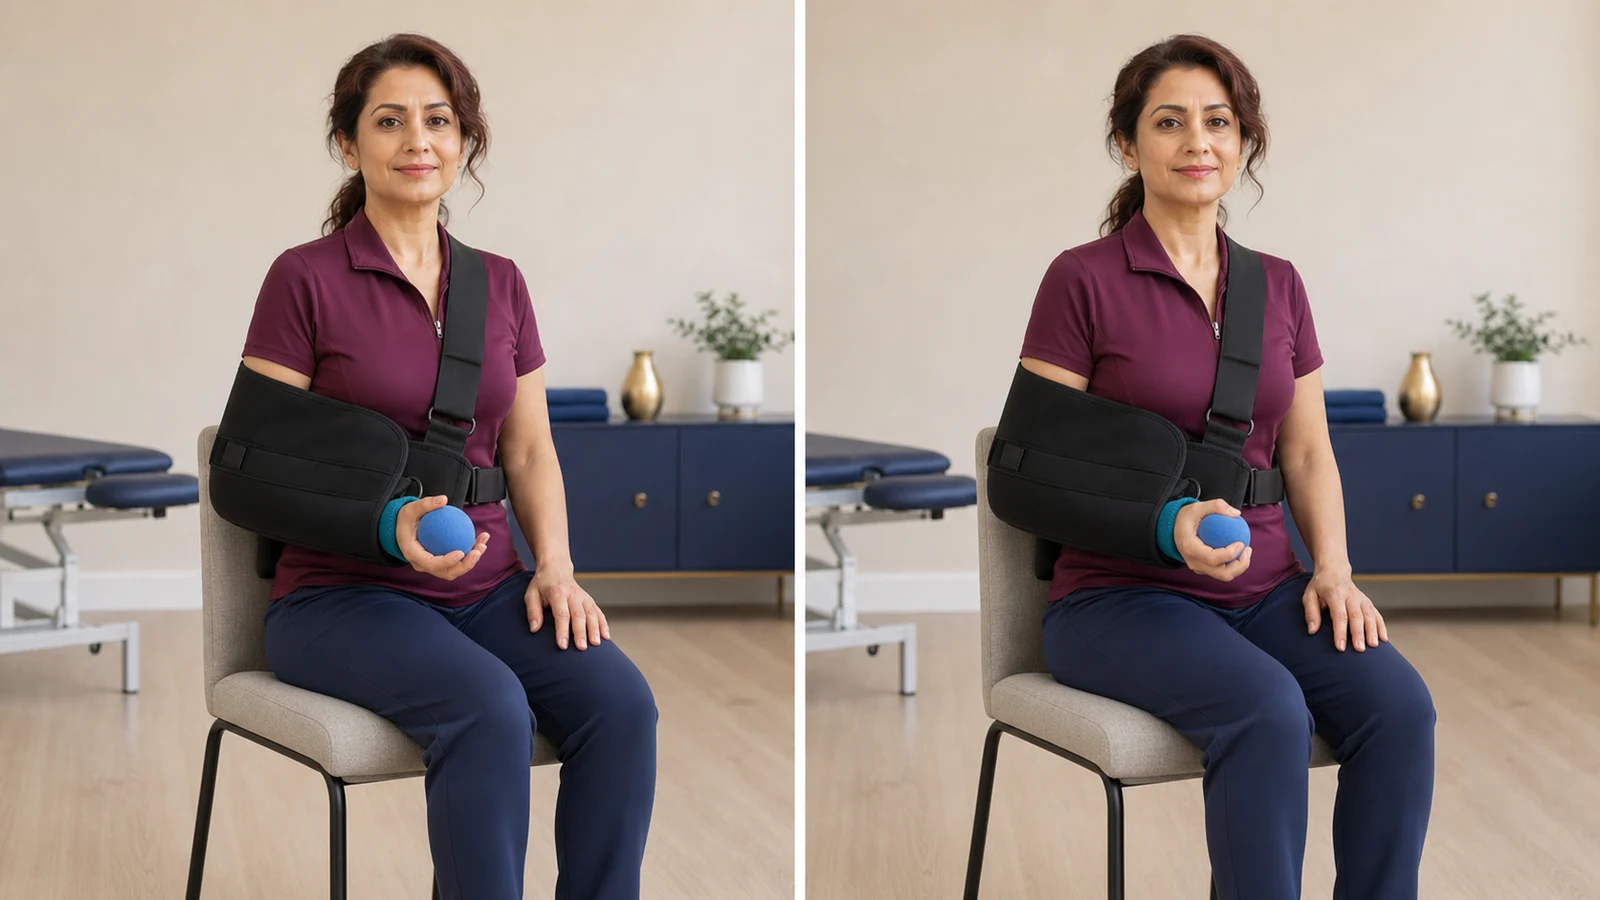
Opening and closing the fingers and moving the wrist (Finger and Wrist Motion)
Move your fingers and wrist with the forearm supported. Exercise in short bouts within your plan. Stop if pain, tingling, or a change in hand color increases.
More detailLess detail
Before you start: Move your fingers and wrist after adequate sensation returns to prevent hand stiffness. Sit in a sturdy chair and support the operated elbow and forearm. You need no equipment, and should not wear a tight ring or bracelet on that hand.
How to do it:
- Gently spread your fingers.
- Make a loose fist without squeezing.
- Release the fist.
- Move the wrist up and down through a small range.
- Keep the forearm and elbow still throughout.
Movement tips: Move your fingers and wrist through a comfortable range without forcing the end of the movement. Move slowly, do not hold your breath, and relax the hand between repetitions. Keep your shoulder and elbow still.
Amount, repetitions and progression: The reference plan uses hand and wrist movements four to six times a day. Follow your own plan for the number of repetitions each time. If swelling or pain is worse by the next session, reduce the number and check the sling's position.
Stop immediately if: Pain, tingling, or a change in hand color increases.
Common mistakes: Avoid forcefully rotating the forearm, holding a heavy object, or taking the elbow out of the sling.
Easier version: Move only the fingers and reduce the wrist range.
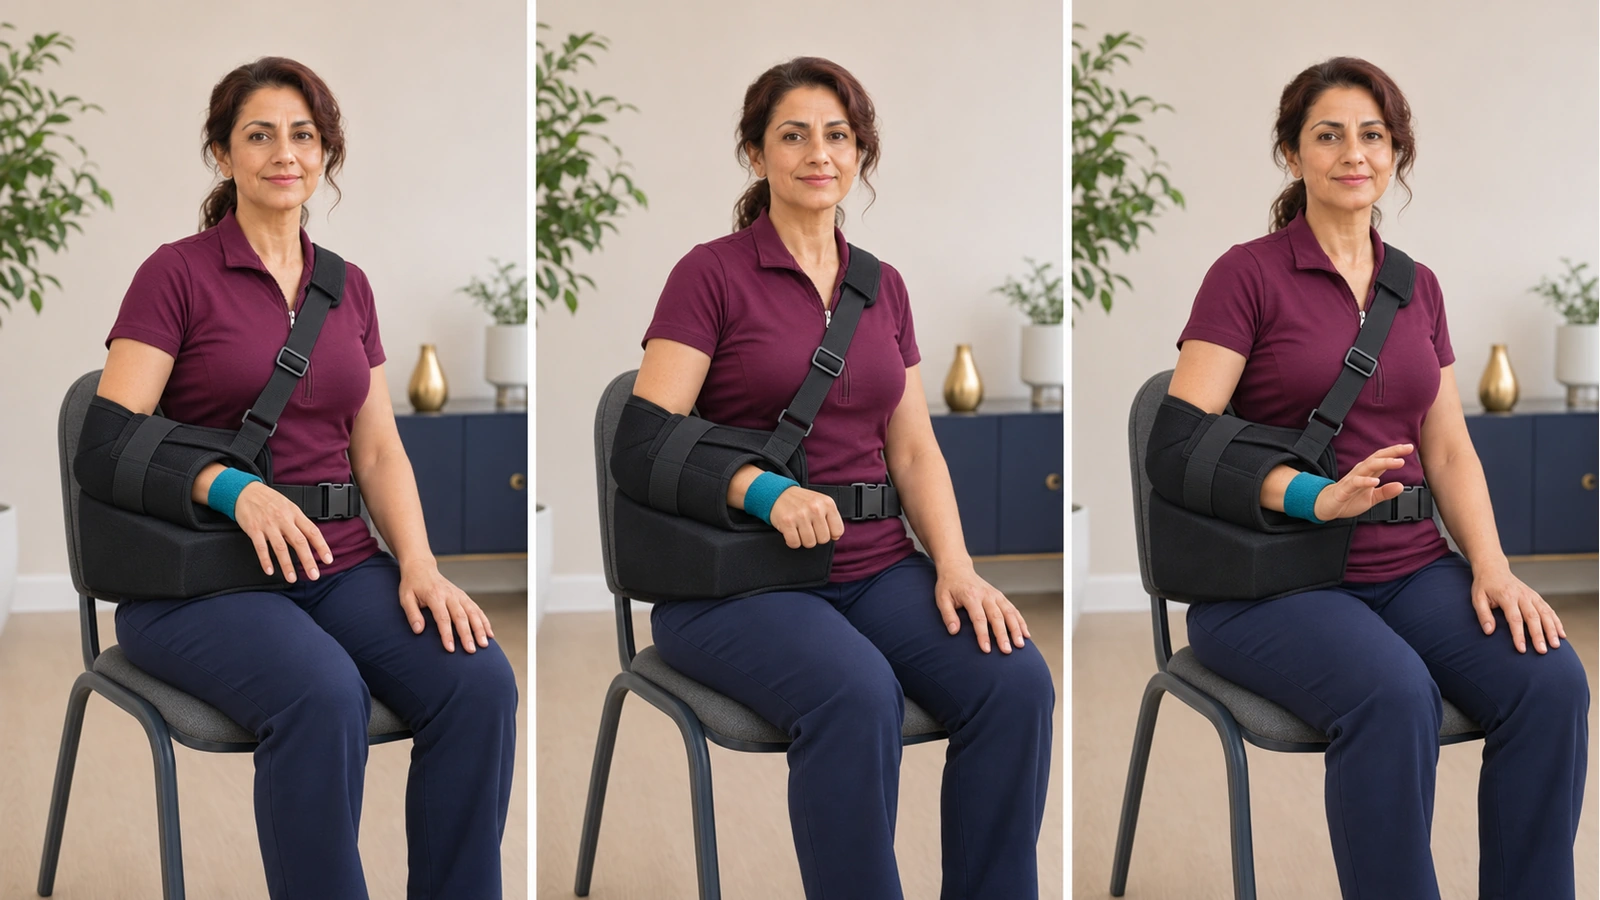
Supported elbow bending and straightening (Supported Elbow Range of Motion)
Bend and straighten the elbow with help from your healthy hand, without moving the shoulder. Exercise in short bouts within your plan. Stop if you develop pain at the front of the shoulder or upper arm, pulling on the wound, or tingling.
More detailLess detail
Before you start: This exercise maintains elbow movement and is performed only once brief removal of the sling is allowed. Sit and support the operated forearm's weight with your healthy hand. If the tendon at the front of the upper arm was fixed to bone (biceps tenodesis), do not actively bend the elbow or turn the palm until the time specified in your plan.
How to do it:
- Relax the shoulder and keep the upper arm still.
- Use your left hand to help gently straighten the right elbow a little.
- Stop before you feel a stretch in the shoulder or biceps.
- Return to the starting angle with the same support.
- Place the whole forearm back inside the sling.
Movement tips: Keep the upper arm beside your body and move the elbow without weights through a comfortable range. Breathe freely and move slowly. Support the forearm between repetitions so its weight does not pull on the shoulder.
Amount, repetitions and progression: For rotator cuff repair without an additional procedure, the reference plan uses elbow movement four to six times a day. Follow your plan for the number of repetitions each time. After biceps tenodesis, follow the timing and type of movement specified for that repair.
Stop immediately if: You develop pain at the front of the shoulder or upper arm, pulling on the wound, or tingling.
Common mistakes: Avoid letting the forearm hang, turning the palm against resistance, or forcing the elbow fully straight.
Easier version: Use a smaller range and more support from the left hand.
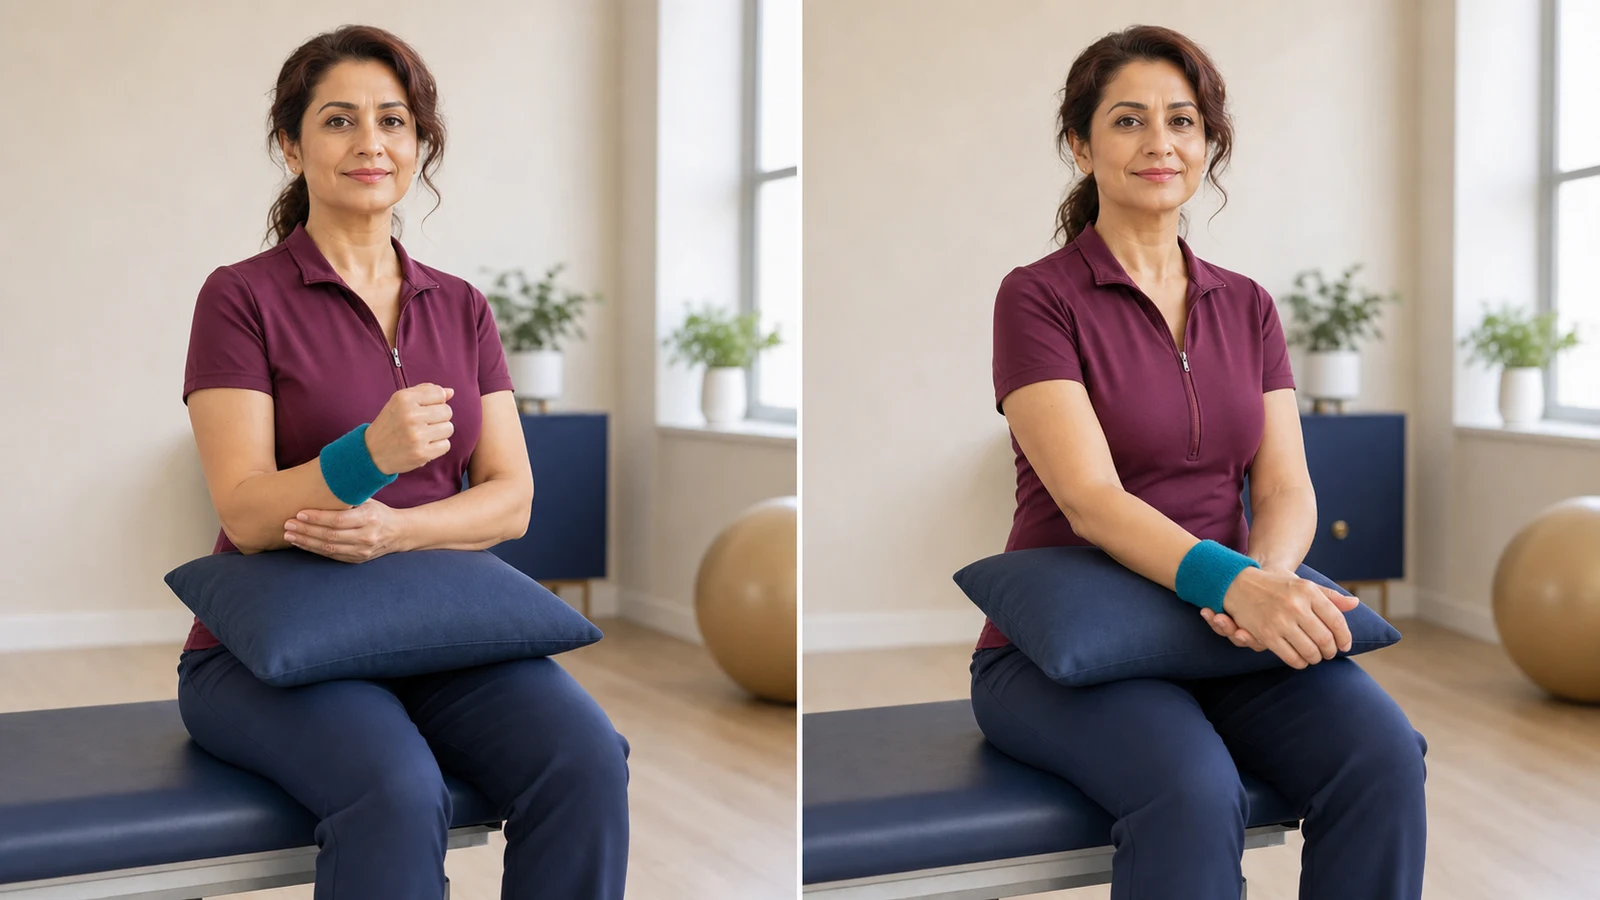
Gentle chin tuck
Draw your chin back slightly, then relax your neck. Exercise in short bouts within your plan. Stop if you develop dizziness, neck pain, or tingling in the hand.
More detailLess detail
Before you start: This small movement helps make your neck position more comfortable while wearing the sling. From the second week, if you have no dizziness or shooting neck pain, sit in a chair with a backrest. The operated arm stays in the sling and no equipment is needed.
How to do it:
- Without lowering your head, draw your chin back a few millimeters.
- Imagine the back of your neck becoming slightly longer.
- Take two slow breaths.
- Return to your normal position.
- Relax your jaw and shoulders between repetitions.
Movement tips: Draw your chin back slightly. Do not bend your head toward your chest or press it against a wall. Move gently while breathing freely and relax the neck between repetitions. The shoulder and sling should not shift.
Amount, repetitions and progression: The right amount varies from person to person. Exercise in short bouts without pain or a change in movement technique, then rest until your muscles relax. Follow your plan for repetitions and resistance. Reduce the amount if night pain increases or swelling is worse the next day.
Stop immediately if: You develop dizziness, neck pain, or tingling in the hand.
Common mistakes: Avoid bending the chin to the chest, holding your breath, and shrugging the shoulder.
Easier version: Halve the range and use the chair's backrest for support.
↔️ Weeks three and four
Protection of the repair continues. Do not start passive shoulder movement yourself before the specified time. The scapular exercises below require arm support and permission for that movement; after repair of the tendon at the front of the shoulder (subscapularis) or one of the tendons at the back of the shoulder (teres minor), individual permission is required.
Gentle shoulder-blade setting in the sling (Gentle Scapular Setting)
Gently adjust your shoulder blade while keeping the arm still. Exercise in short bouts within your plan. Stop if you develop pain around the shoulder, neck pain, or arm movement.
More detailLess detail
Before you start: This movement trains shoulder-blade control without lifting the arm. From week three, once your treatment plan permits it, sit in a chair with the arm supported in the sling. If the tendon at the front of the shoulder (subscapularis) or one at the back (teres minor) was repaired, drawing the shoulder blade back requires separate permission.
How to do it:
- Take a gentle breath in.
- As you breathe out, move the right shoulder blade a very small amount toward the spine and slightly downward.
- Do not pull the arm, elbow, or sling backward.
- Pause briefly without straining.
- Relax the shoulder blade completely.
Movement tips: Adjust the shoulder blade with a small, painless movement. Do not pull the elbow back or arch your lower back. Breathe out as you move and relax the shoulder between repetitions. Mild effort behind the shoulder blade is expected, but the arm must stay still.
Amount, repetitions and progression: The right amount varies from person to person. Exercise in short bouts without pain or a change in movement technique, then rest until your muscles relax. Follow your plan for repetitions and resistance. Reduce the amount if night pain increases or swelling is worse the next day.
Stop immediately if: You develop pain around the shoulder, neck pain, or arm movement.
Common mistakes: Avoid forcefully squeezing the shoulder blades together, arching the back, or pulling the elbow backward.
Easier version: Perform the same permitted shoulder-blade movement through a smaller range, keeping your arm still.
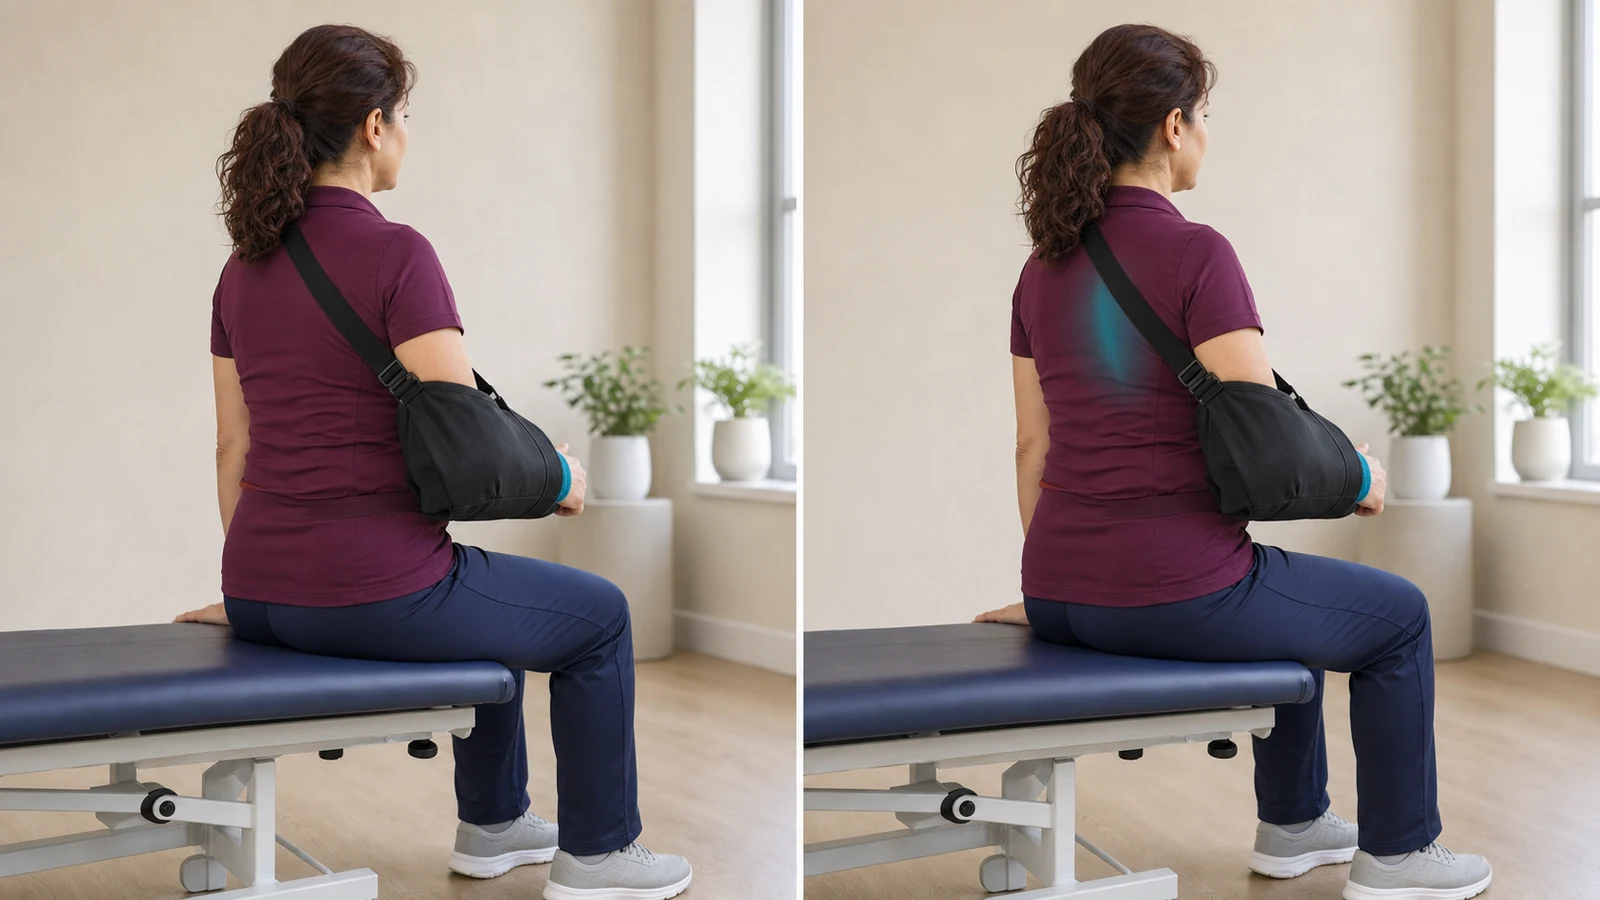
Seated downward shoulder-blade setting (Seated Low Row)
Gently move the shoulder blade down and slightly back. Exercise in short bouts within your plan. Stop if you develop pain around the shoulder or in the neck, or the shoulder rises toward your ear.
More detailLess detail
Before you start: This exercise teaches you to move the shoulder blade down and slightly back without a band or weights. From week three, after shoulder-blade setting is comfortable, sit in a sturdy chair with the operated arm in the sling. After subscapularis or teres minor repair, do not perform it until separately permitted.
How to do it:
- Breathe freely and fully relax your shoulders once.
- Without moving the arm, gently move the right shoulder blade down and slightly back.
- Hold there for a few seconds while breathing freely.
- Fully relax the shoulder blade and let it return to neutral.
- Take one full breath before the next repetition.
Movement tips: Only the shoulder blade moves; keep your torso and arm still. Gently lower the shoulder blade as you breathe out, then fully relax. Take a comfortable breath before the next repetition and keep your neck relaxed.
Amount, repetitions and progression: The right amount varies from person to person. Exercise in short bouts without pain or a change in movement technique, then rest until your muscles relax. Follow your plan for repetitions and resistance. Reduce the amount if night pain increases or swelling is worse the next day.
Stop immediately if: You develop pain around the shoulder or in the neck, or the shoulder rises toward your ear.
Common mistakes: Avoid pressing harder to feel more effort, holding your breath, moving your head forward, or taking the elbow out of the sling.
Easier version: Return to gentle shoulder-blade setting in the sling until your next physical therapist check.
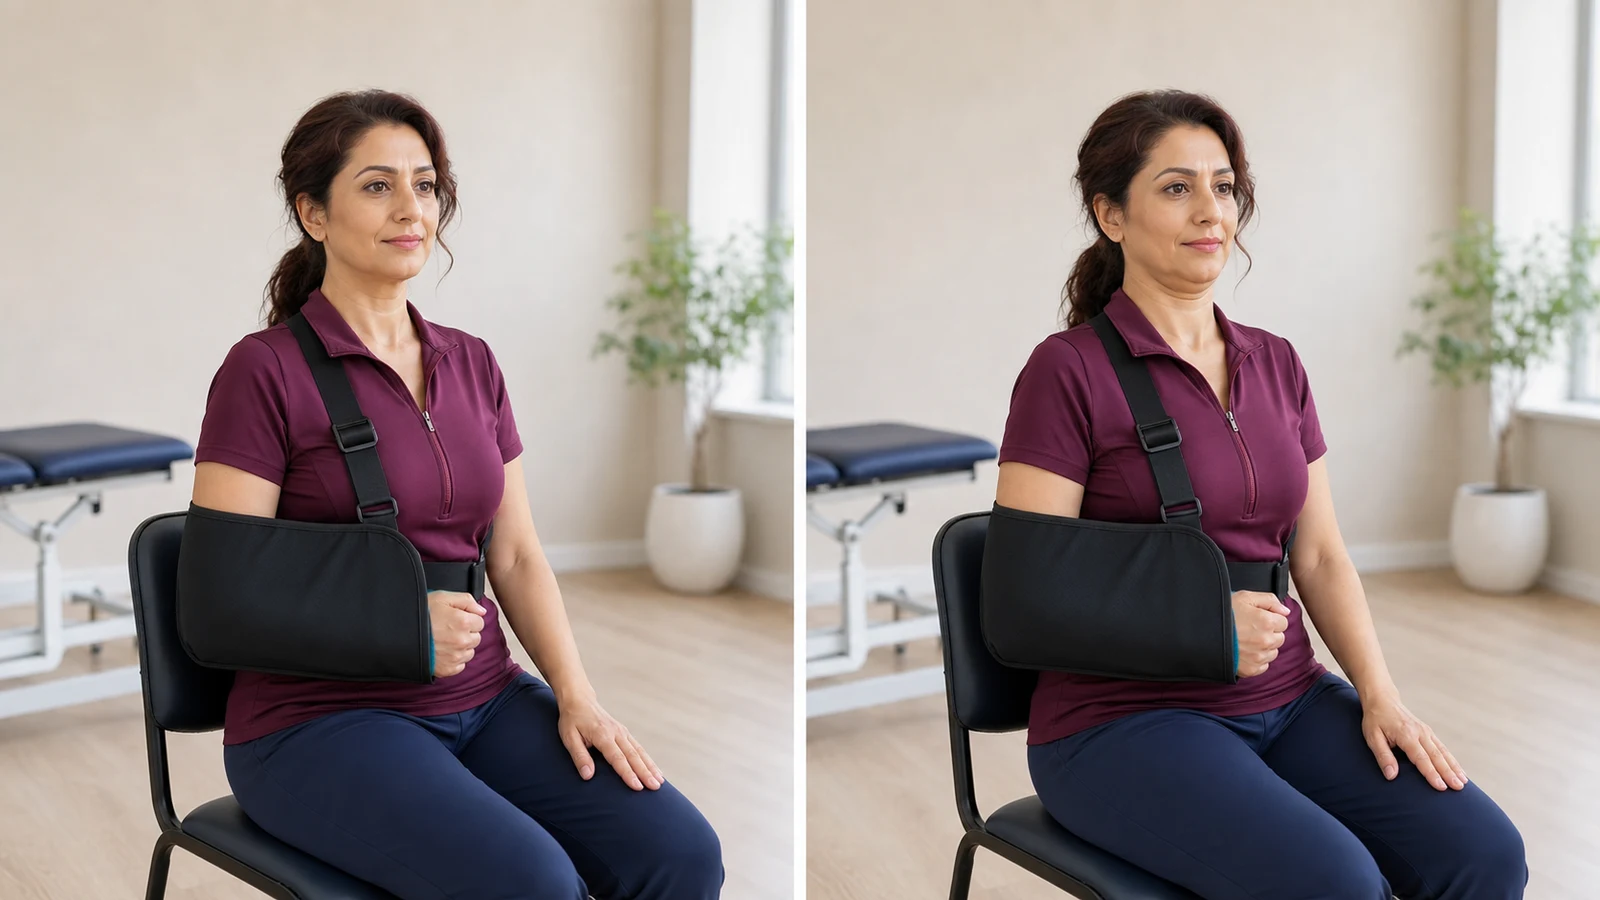
Adjusting sitting and standing posture with the sling (Postural Setting with the Sling On)
Position your head and torso comfortably and adjust the sling. Exercise in short bouts within your plan. Stop if pain or dizziness develops, or the sling shifts out of place.
More detailLess detail
Before you start: This exercise makes sitting and standing with the sling more comfortable without moving the shoulder joint. From week three, sit in a chair with a backrest facing a mirror, or stand beside a wall. Keep the operated arm in the sling and do not lean on either hand.
How to do it:
- Look at your head and torso position in the mirror.
- Gently position your head over your torso without lifting the chin.
- Slightly reduce the curve of your back without forcefully pulling your shoulders backward.
- Relax your shoulders and take a few comfortable breaths.
- Check that the sling still supports your whole forearm and elbow.
Movement tips: Position your head over your torso, keep the chin level, and relax your shoulders. Take a few comfortable breaths, then rest. The aim is not a rigid military posture or forcefully pulling the shoulder blades back.
Amount, repetitions and progression: The right amount varies from person to person. Exercise in short bouts without pain or a change in movement technique, then rest until your muscles relax. Follow your plan for repetitions and resistance. Reduce the amount if night pain increases or swelling is worse the next day.
Stop immediately if: Pain or dizziness develops, or the sling shifts out of place.
Common mistakes: Avoid lifting the chin instead of lengthening the neck, tightening the shoulders, or holding a rigid military posture.
Easier version: Sit with full back support and shorten the time.
Continuing supported elbow movement during protection (Supported Elbow Mobility During Prolonged Protection)
As protection continues, use the healthy hand to bend and straighten the elbow without moving the shoulder. Keep bouts within your programme. Stop the exercise if pain at the front of the shoulder or upper arm, pulling on the wound or tingling develops.
More detailLess detail
Before you start: In this programme, longer sling use should not mean keeping an elbow still when its movement is permitted. If you have already been taught and allowed supported elbow movement, continue in the second two weeks while sitting and supporting the forearm’s weight with your healthy hand. After biceps tenodesis, the type and timing of movement allowed for that repair take priority; do not bend the elbow using its own strength.
How to do it:
- Relax the shoulder and keep the upper arm still.
- Use your left hand to gently straighten the right elbow a little.
- Stop before stretching the shoulder or biceps.
- Return to the starting angle with the same support.
- Fully support the forearm inside the sling again.
Movement tips: Keep the operated upper arm supported beside your trunk; only the elbow moves within a comfortable range. Do not lift the shoulder to take the hand out of the sling. Breathe calmly, guide both directions with the healthy hand and fully support the forearm before fastening the sling again.
Amount, repetitions and progression: For rotator cuff repair without an additional operation, the reference programme includes elbow movement four to six times a day. Follow your own programme for repetitions per bout. After biceps tenodesis, movement timing and type must follow the instructions for that repair.
Stop immediately if: Pain at the front of the shoulder or upper arm, pulling on the wound or tingling develops.
Common mistakes: Avoid letting the forearm’s weight hang, turning the palm against resistance or forcing the elbow fully straight.
Easier version: Use a smaller range and more support from the left hand.
🌱 Month two: starting protected passive movement
In this programme, passive shoulder movement usually starts around week six after instruction and permission to begin. An earlier start requires individual permission for that patient. Keep elevation below 90 degrees and external rotation below 30 degrees. Reaching these numbers is not the goal, and end-range force is not allowed. A lower individual limit or a limit for an additional procedure takes priority. Range progresses after assessment by your treating team.
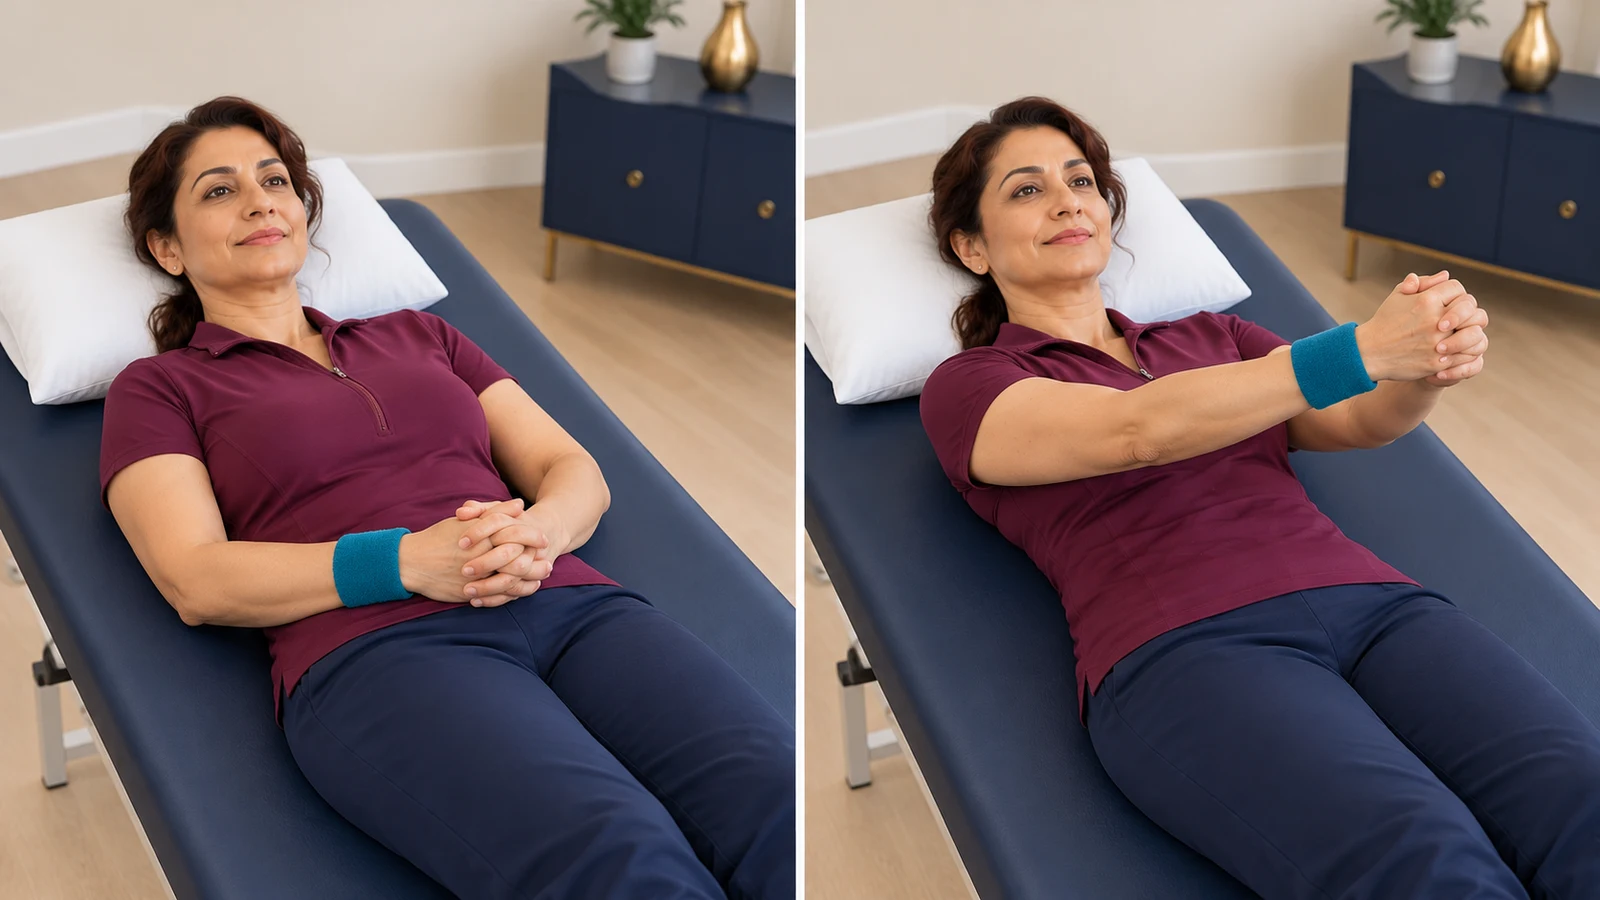
Passive elevation on your back with clasped hands (Protected Self-Assisted Supine Elevation)
Use your healthy hand to lift the relaxed arm to less than 90 degrees while lying on your back. Practise in short bouts within your programme. Stop the exercise if pain or pulling at the front of the shoulder develops, or if you cannot support the arm.
More detailLess detail
Before you start: This exercise teaches protected shoulder movement guided by the healthy hand. In this programme, around week six unless individually permitted earlier, and after instruction and confirmation of correct technique, lie on your back on a stable bed. Gently clasp your fingers in front of your abdomen and keep the elbow slightly bent.
How to do it:
- Relax the operated shoulder muscles and support the arm’s weight with your healthy hand.
- Use the strength of your healthy hand to slowly lift both hands from in front of your abdomen.
- Stop before pain, pulling or the lower limit in your programme; elevation must remain below 90 degrees.
- Without a stretching hold, slowly lower the arm with your healthy hand.
- Support the operated arm on a pillow beside your body.
Movement tips: Your healthy hand guides both lifting and lowering. If the operated shoulder strains to move, stop and practise the method again with your therapist. In the initial phase, keep elevation below 90 degrees and do not force the arm to reach that number. A lower individual limit takes priority; increase the range only after your treating team assesses it. Breathe freely. Do not shrug the shoulder or lift your back from the bed, and support the arm between repetitions.
Amount, repetitions and progression: From the permitted starting time for this movement, do 5 slow repetitions, 3 sessions a day, without a stretching hold. Support the arm and rest between sessions. Your individual programme takes priority. Reduce the amount if pain that night, swelling the next day or other symptoms increase. Increase the amount only after assessment by your treating team.
Stop immediately if: Pain or pulling at the front of the shoulder develops, or your healthy hand cannot support the arm’s weight.
Common mistakes: Avoid actively lifting with the operated shoulder, forcing the arm to reach the angle limit or letting go of it while lowering.
Easier version: Use a smaller range. If full support is not possible, do not perform the exercise until you have been taught the method again.
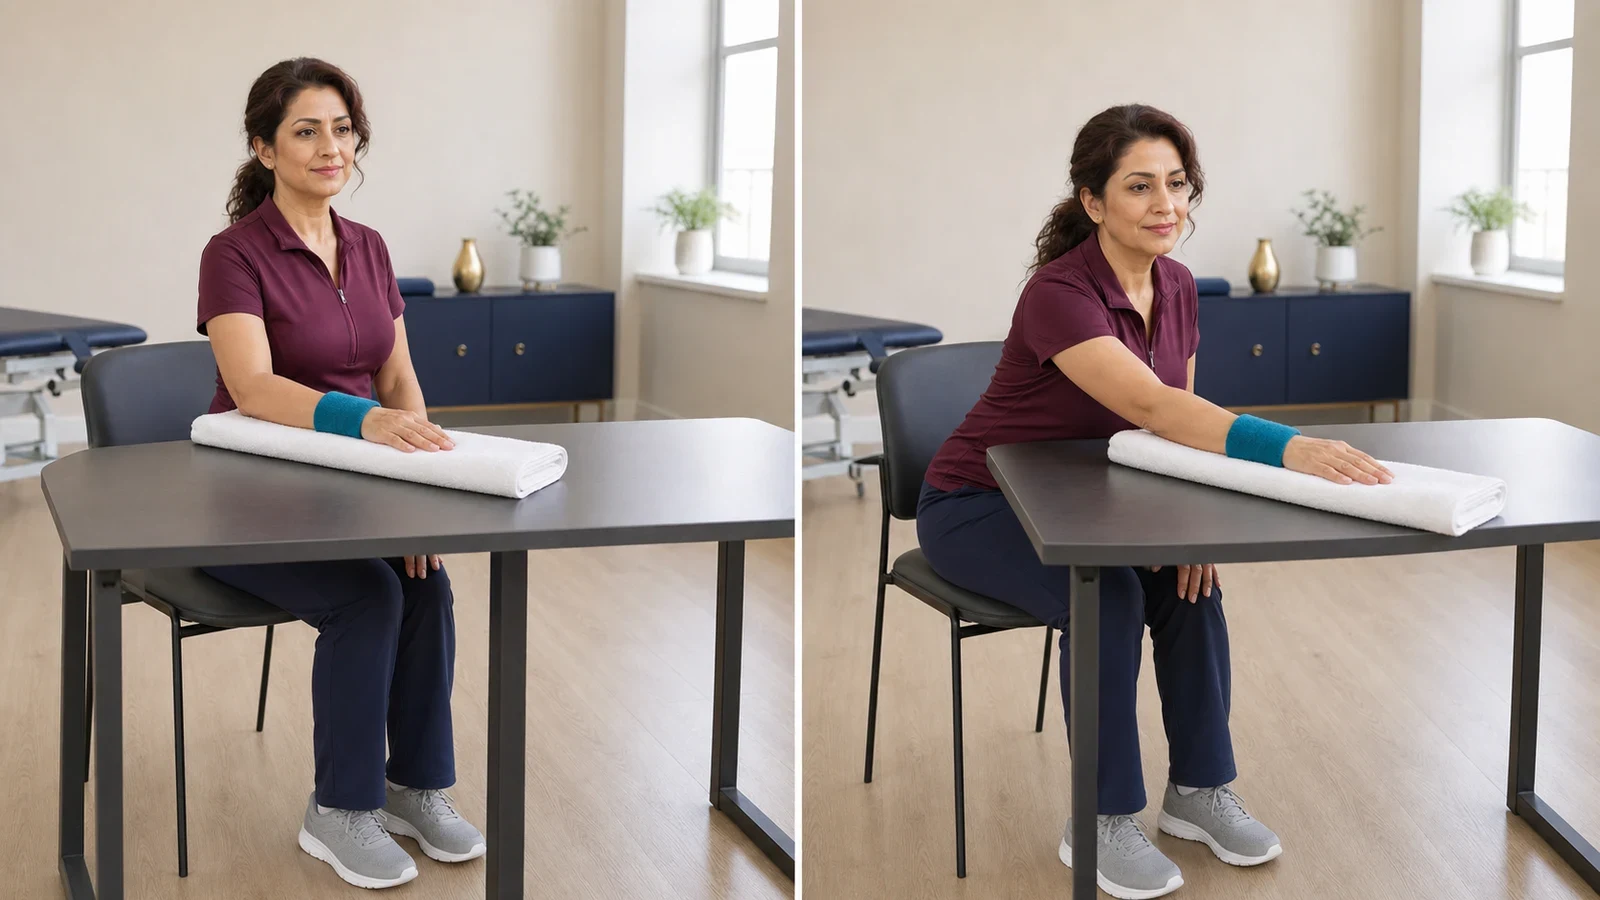
Learning a protected forearm slide on a table (Initial Protected Table Slide)
Gently move your trunk to slide the supported forearm a short distance on the table. Practise in short bouts within your programme. Stop the exercise if pain, catching or pulling on the wound develops.
More detailLess detail
Before you start: This method teaches passive movement supported by a table. Around week six unless individually permitted earlier, after instruction and permission for this movement, sit facing a stable table and rest the operated forearm on a towel. The table must support the forearm’s weight.
How to do it:
- Relax the operated shoulder and keep the forearm on the towel.
- Move your trunk slightly forwards so the forearm slides without pushing with the hand.
- Stop before pain or the lower limit in your programme; shoulder elevation stays below 90 degrees.
- Slowly move your trunk back to return the forearm to the start, then rest.
Movement tips: The movement comes from your trunk. The operated hand does not push on the table or take your body weight. In the initial phase, keep elevation below 90 degrees and do not force the arm to reach that number. A lower individual limit takes priority; increase the range only after your treating team assesses it. Breathe freely, avoid shrugging and keep the forearm supported on the table in both directions.
Amount, repetitions and progression: From the permitted starting time for this movement, do 5 slow repetitions, 3 sessions a day, without a stretching hold. Support the arm and rest between sessions. Your individual programme takes priority. Reduce the amount if pain that night, swelling the next day or other symptoms increase. Increase the amount only after assessment by your treating team.
Stop immediately if: Pain, catching in the shoulder or pulling on the wound develops.
Common mistakes: Avoid actively pushing with the hand, putting body weight through the palm or forcing a larger range.
Easier version: Move the chair closer and reduce trunk movement. If the shoulder will not stay relaxed, get further instruction.
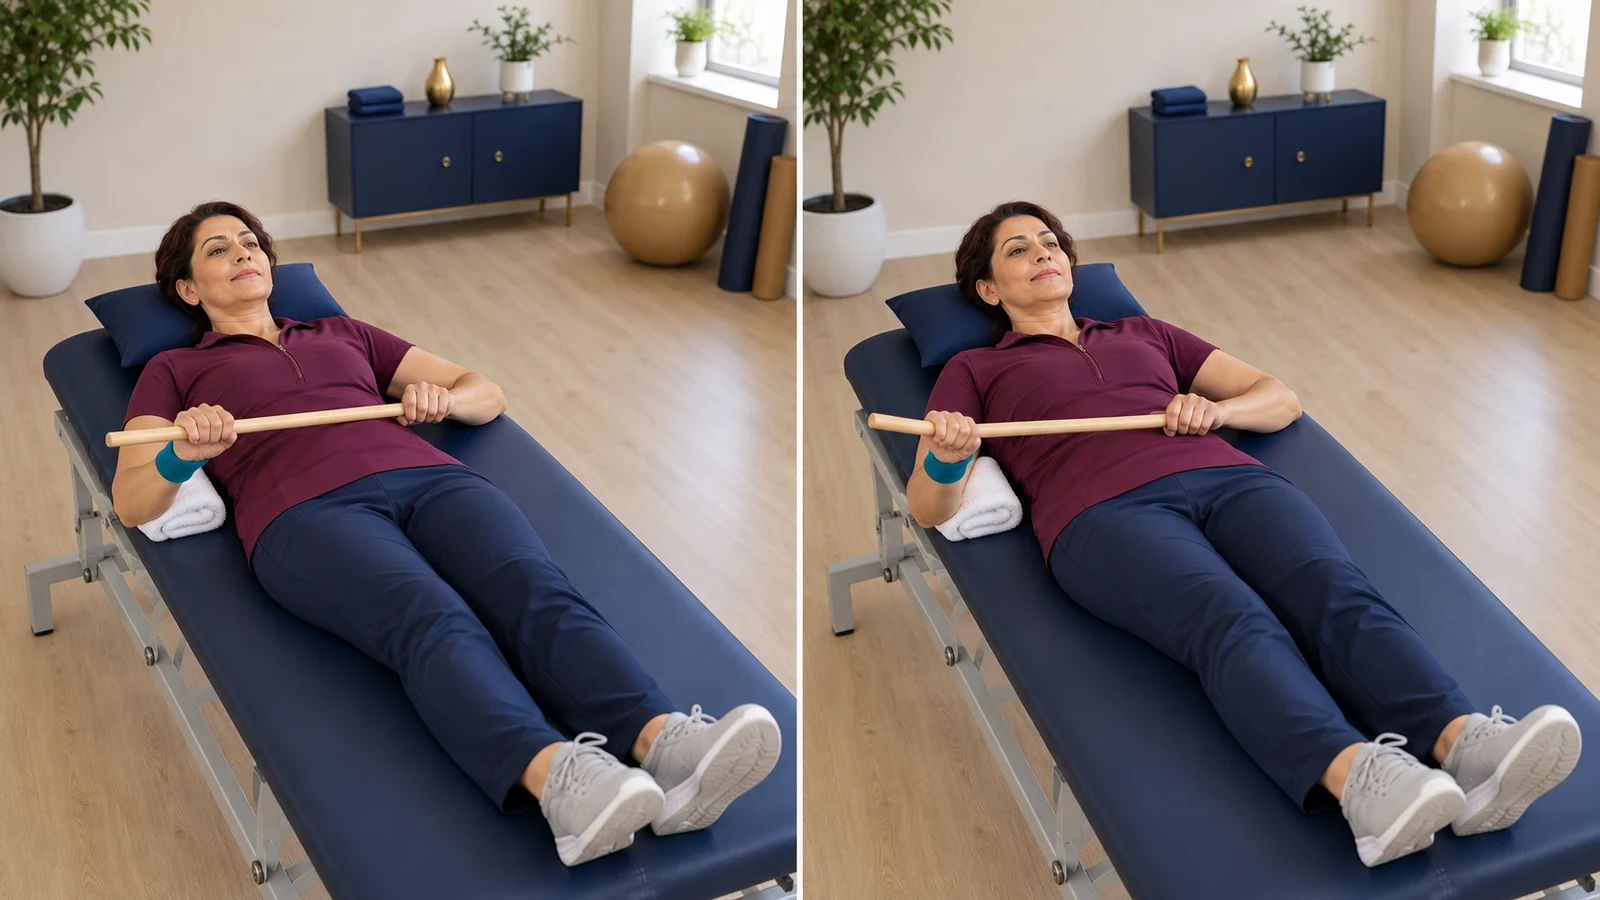
Learning limited passive external rotation with a stick (Initial Protected Passive External Rotation)
Your healthy hand uses a stick to guide the operated forearm outwards, keeping rotation below 30 degrees. Practise in short bouts within your programme. Stop the exercise if pain or pulling at the front of the shoulder develops, or if the elbow moves away from your side.
More detailLess detail
Before you start: This exercise teaches limited shoulder rotation without help from that shoulder’s muscles. Around week six unless individually permitted earlier, and only after instruction and permission for this direction, lie on your back. Support the operated elbow on a towel beside your body and hold a light stick with both hands. After subscapularis repair, do not do this movement without individual permission.
How to do it:
- Keep the operated elbow bent and still on the towel beside your body.
- Use your healthy hand to gently guide the stick so the operated forearm moves a little outwards.
- Stop before pain or the lower limit in your programme; rotation must remain below 30 degrees.
- Without an end-range stretch, use your healthy hand to return the forearm to the start and relax the shoulder.
Movement tips: Your healthy hand produces the movement while the operated forearm stays relaxed; keep the elbow beside your body. In the initial phase, external rotation is below 30 degrees. That number is not an exercise target. A lower individual limit takes priority, especially after subscapularis repair, and range progression needs assessment by your treating team. Move slowly, breathe freely and support the forearm between repetitions.
Amount, repetitions and progression: From the permitted starting time for this movement, do 5 slow repetitions, 3 sessions a day, without a stretching hold. Support the arm and rest between sessions. Your individual programme takes priority. Reduce the amount if pain that night, swelling the next day or other symptoms increase. Increase the amount only after assessment by your treating team.
Stop immediately if: Pain or pulling at the front of the shoulder develops, or the elbow moves away from your side.
Common mistakes: Avoid pushing with the operated hand, lifting the elbow away from your side or rotating the forearm to the end of the range.
Easier version: Reduce the range. If permission for this direction or your limit is unclear, do not perform it until your treating team checks.
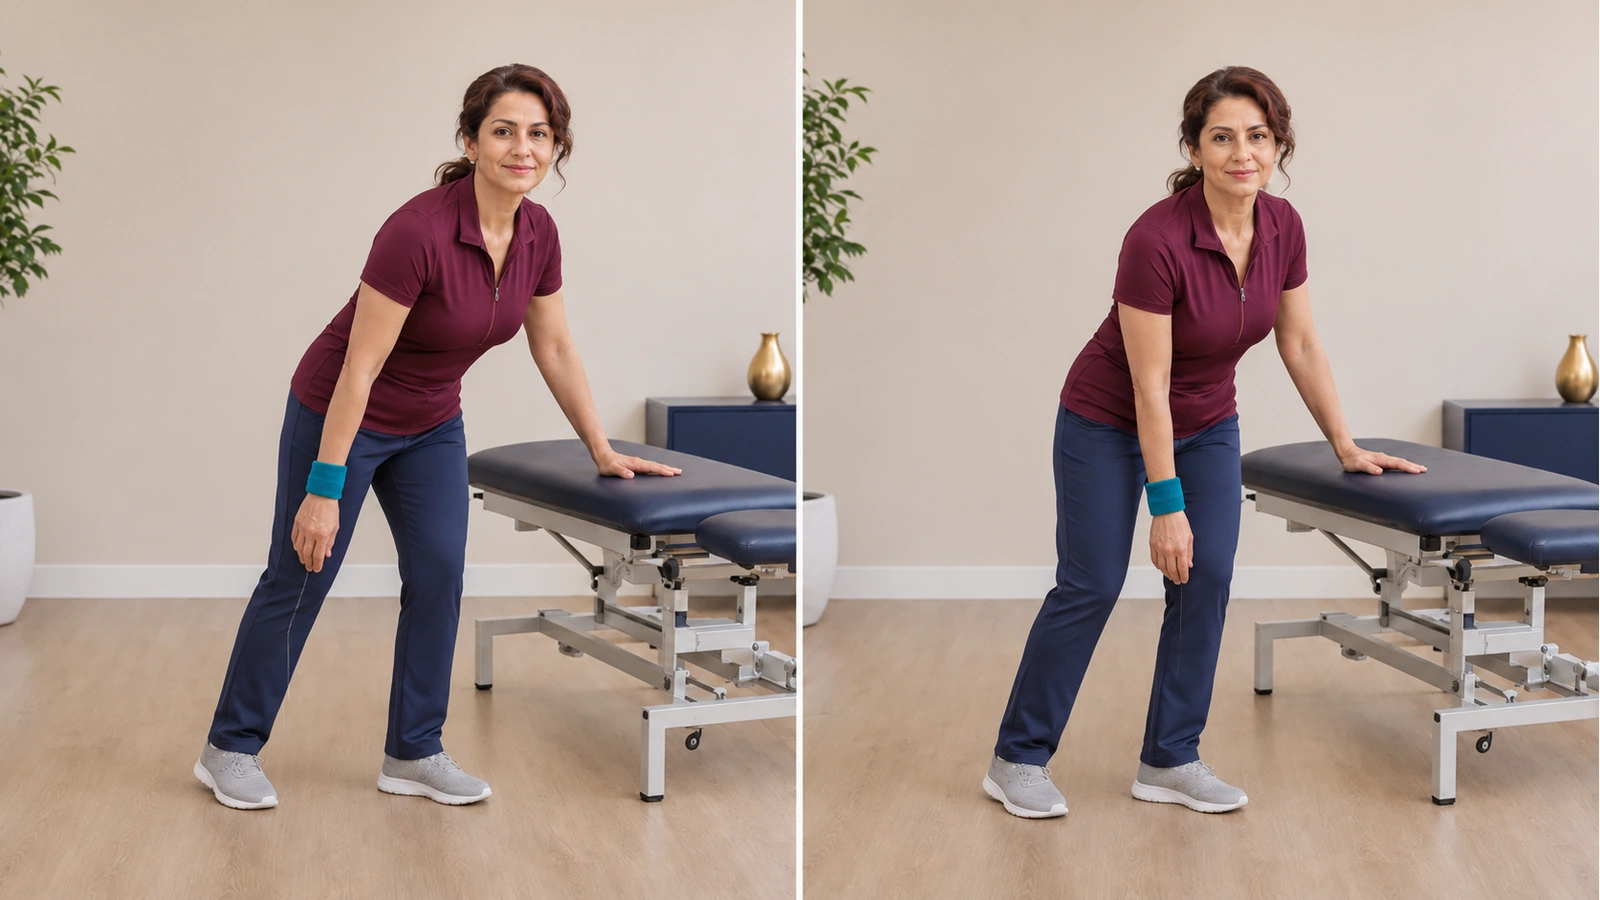
Learning a small pendulum with a relaxed arm (Initial Relaxed Pendulum)
Gently move your trunk a small amount to move the relaxed arm. Practise in short bouts within your programme. Stop the exercise if pain, pulling on the wound or active shoulder contraction develops.
More detailLess detail
Before you start: This exercise teaches passive movement produced by the trunk. Around week six unless individually permitted earlier, after instruction and permission for this movement, support yourself on a firm surface with your healthy hand and relax the operated arm. Do not hold a weight.
How to do it:
- Support yourself with the healthy hand, lean forwards slightly from the hips and keep your balance.
- Relax the operated arm so it hangs from the shoulder.
- Make a very small trunk movement to produce a short movement of the relaxed arm; do not swing it with the shoulder itself.
- Stop the trunk, then support the forearm’s weight with your healthy hand before resting.
Movement tips: Use a small range produced by trunk movement. The operated shoulder does not make circles and the arm does not move behind the trunk. Breathe freely and move without momentum. If the shoulder will not stay relaxed, stop and have the method taught again.
Amount, repetitions and progression: From the permitted starting time for this movement, do 5 slow repetitions, 3 sessions a day, without a stretching hold. Support the arm and rest between sessions. Your individual programme takes priority. Reduce the amount if pain that night, swelling the next day or other symptoms increase. Increase the amount only after assessment by your treating team. For the pendulum, one small back-and-forth movement of the trunk counts as one repetition.
Stop immediately if: Pain, pulling on the wound or active shoulder contraction develops.
Common mistakes: Avoid actively swinging the arm, making large circles or holding a weight.
Easier version: Reduce trunk movement. If the arm will not stay relaxed, do not exercise until you have been taught the method again.
🏋️ Month three: continuing passive movement and gradually introducing active-assisted movement
Continue passive movement within the set limit. Increase the range only after assessment by your treating team. Active-assisted movement with shoulder muscle participation usually starts around week ten after permission. Active movement without help may be delayed until around week fourteen or later.
Forearm slide on an inclined surface (Seated Incline Table Slide)
Slide the forearm upward with support from a stable inclined surface. Exercise in short bouts within your plan. Stop if you develop pain, the surface slips, or the arm moves suddenly.
More detailLess detail
Before you start: The inclined forearm slide builds on the table exercise. Perform it only once that exercise is comfortable and assisted movement is allowed. Sit in a sturdy chair and rest the operated forearm on a towel on a stable inclined surface. Your physical therapist determines the slope and height.
How to do it:
- Relax the right shoulder and gently set the shoulder blade.
- Slowly move your torso forward so the towel slides up the incline.
- Stop at the first comfortable stretch or your plan's angle limit.
- Pause briefly without pressing through your palm.
- Move your torso backward to slowly return the forearm down the incline.
Movement tips: Move your torso slowly as the surface supports the forearm moving upward. Do not shrug or arch your back. Breathe out as you move up, return slowly, and relax the forearm between repetitions. Do not forcefully push the surface with your hand.
Amount, repetitions and progression: The right amount varies from person to person. Exercise in short bouts without pain or a change in movement technique, then rest until your muscles relax. Follow your plan for repetitions and resistance. Reduce the amount if night pain increases or swelling is worse the next day.
Stop immediately if: You develop pain, the surface slips, or the arm moves suddenly.
Common mistakes: Avoid a steep slope at the start, pushing with the palm, forcing a higher incline, or increasing the incline and repetitions together.
Easier version: Reduce or remove the incline and return to a flat table slide, or move the chair closer to shorten the range.
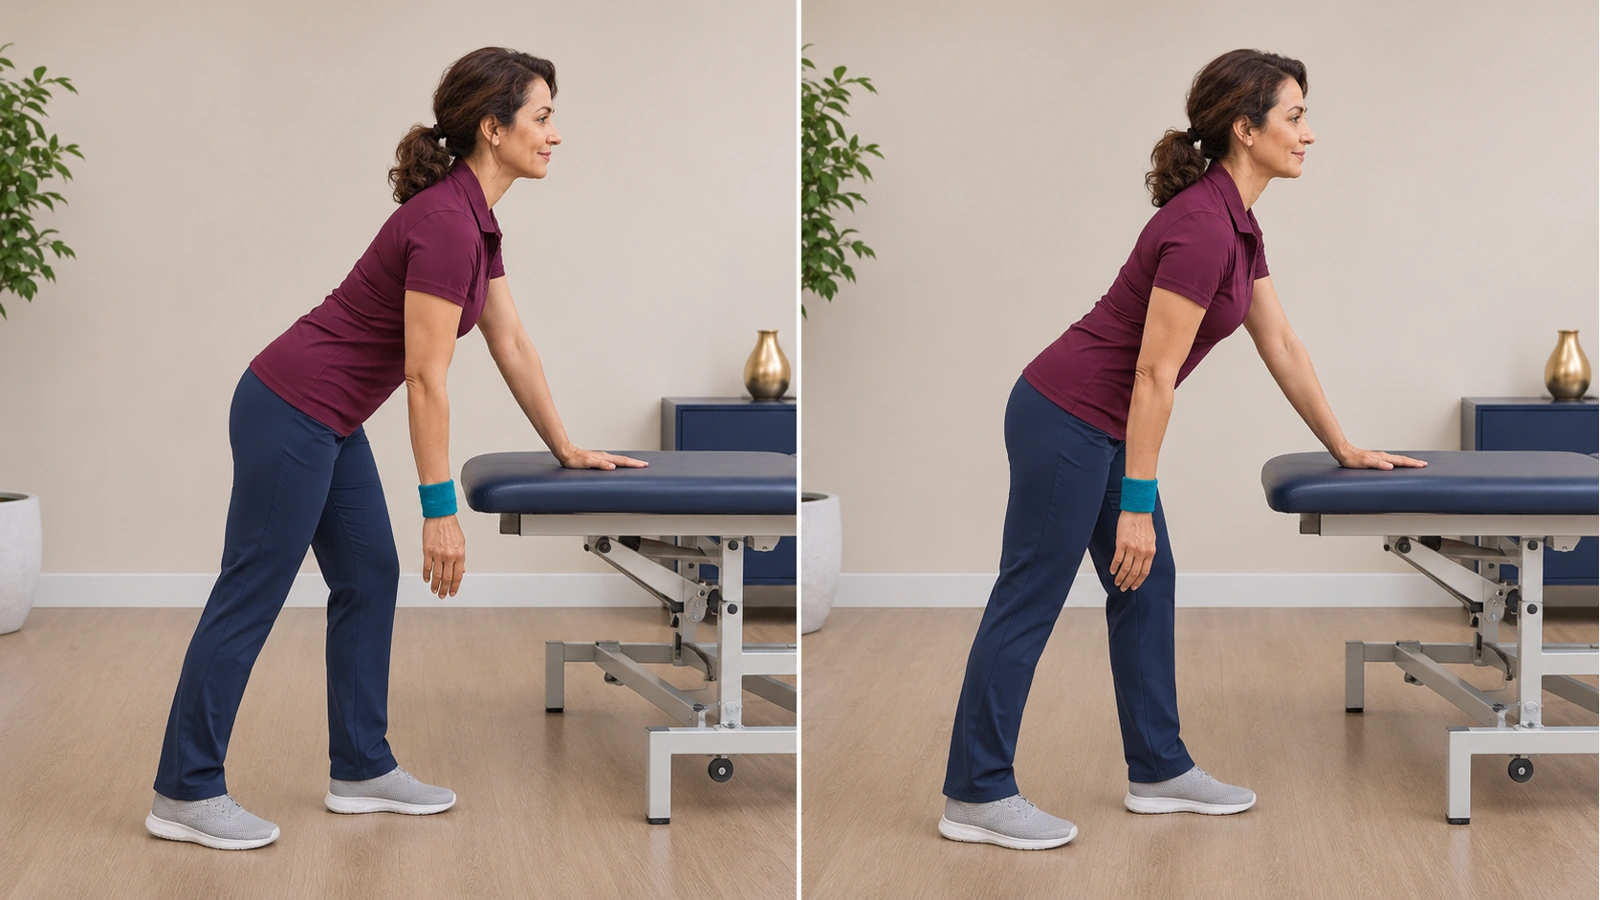
Continuing the pendulum through trunk movement (Passive Pendulum)
Move the relaxed arm using small shifts of your torso. Exercise in short bouts within your plan. Stop if pain, pulling on the wound, or active shoulder contraction develops.
More detailLess detail
Before you start: This card continues the pendulum taught after passive movement began around week six or at your individual starting time. A new stage does not permit a larger range. Support yourself on a firm surface with your healthy hand and relax the operated arm. Do not hold a weight.
How to do it:
- Relax the muscles of the right shoulder and elbow.
- Shift your torso a few centimeters forward and backward.
- Let the arm follow your torso without making an effort.
- Keep the movement small; do not make large circles.
- To finish, slowly straighten your torso and support the right forearm with your left hand.
Movement tips: Keep the range small and comfortable. The arm does not move behind the trunk and the shoulder itself does not swing it. Gently shift your trunk while breathing freely and support the forearm between bouts. Stop if you lose the ability to keep the arm relaxed.
Amount, repetitions and progression: Practise in short bouts, moving gently without pain or a change in technique. Then rest until the muscles relax and support the arm. Follow your individual programme for repetitions per bout. Do not add weights, bands or resistance to this movement. If night pain or next-day swelling increases, reduce the amount and leave any further increase to assessment by your treating team.
Stop immediately if: Pain, pulling on the wound, or active shoulder contraction develops.
Common mistakes: Avoid using the muscles to draw circles, holding a weight, or bending over without support.
Easier version: Reduce the range or wait until your next physical therapy session.
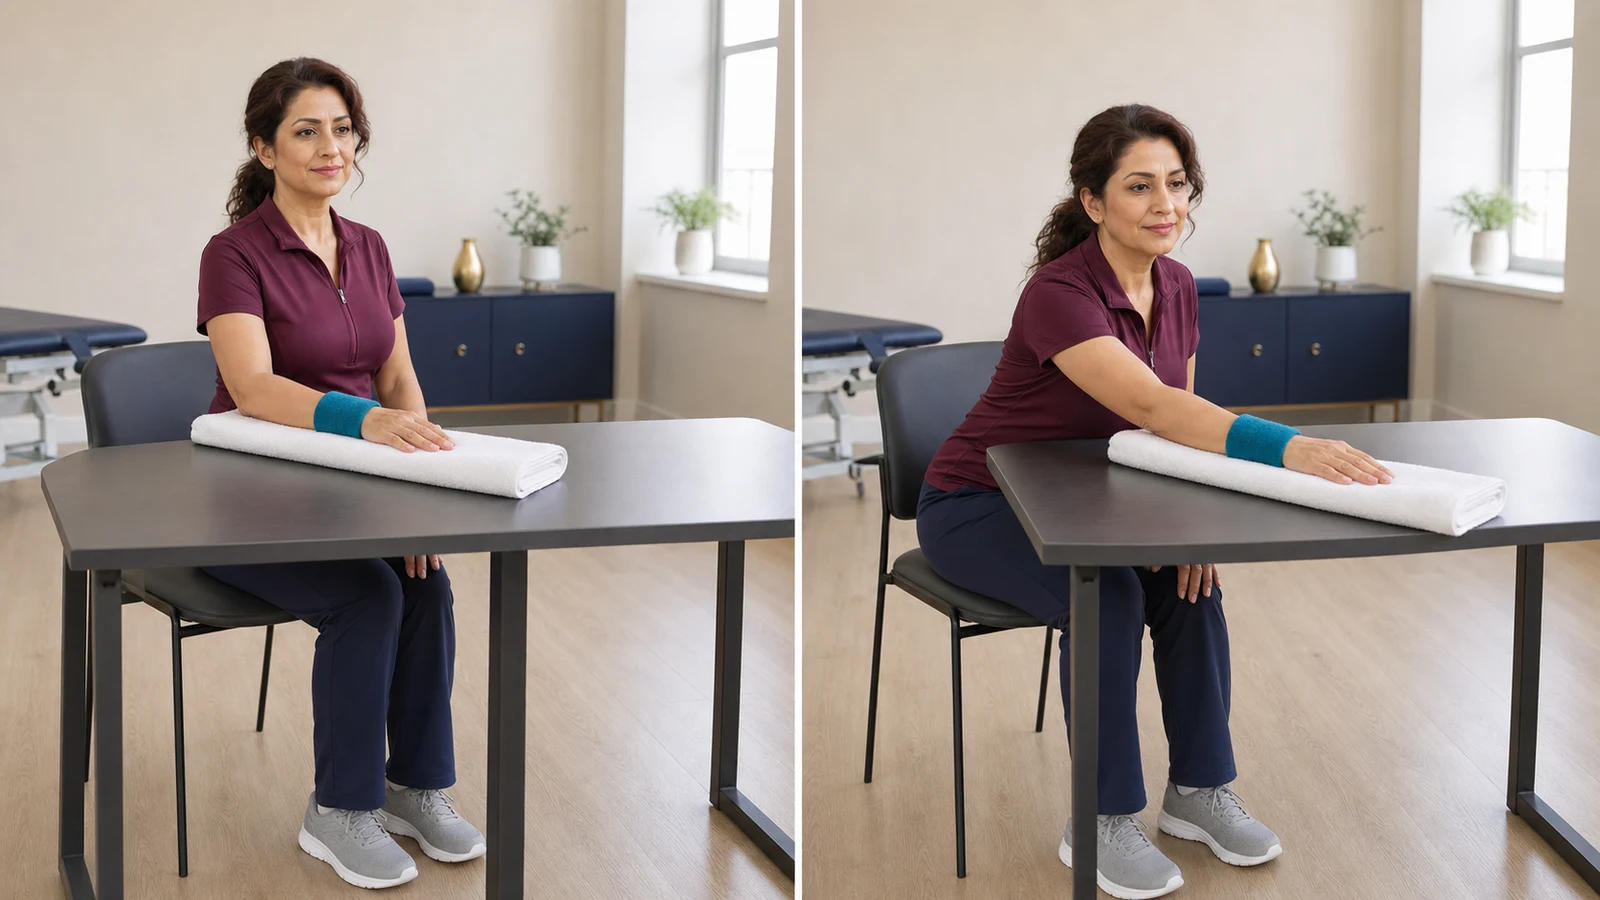
Forearm slide on a table (Supported Table Slide)
Slide your forearm along the table using torso movement. Exercise in short bouts within your plan. Stop if you develop pain, catching in the shoulder, or pulling on the wound.
More detailLess detail
Before you start: This card continues passive sliding after starting and learning the protective programme. Sit facing a stable table and support the forearm on a towel. Increase the range only after assessment by your treating team.
How to do it:
- Relax the shoulder.
- Slowly move your torso forward so the towel slides.
- Stop at the first comfortable stretch or the limit in your plan.
- Pause briefly without pressing through your palm.
- Move your torso back to return to the start.
Movement tips: The forearm slides as you move your trunk. The operated hand does not push on the table, and the shoulder does not shrug towards the ear. Until a new limit is set, keep elevation below 90 degrees or a lower individual limit. Return slowly while breathing freely and support the forearm between repetitions.
Amount, repetitions and progression: Practise in short bouts, moving gently without pain or a change in technique. Then rest until the muscles relax and support the arm. Follow your individual programme for repetitions per bout. Do not add weights, bands or resistance to this movement. If night pain or next-day swelling increases, reduce the amount and leave any further increase to assessment by your treating team.
Stop immediately if: You develop pain, catching in the shoulder, or pulling on the wound.
Common mistakes: Avoid actively pressing with the hand or forcing the end of the range.
Easier version: Move the chair closer to the table and shorten the range.
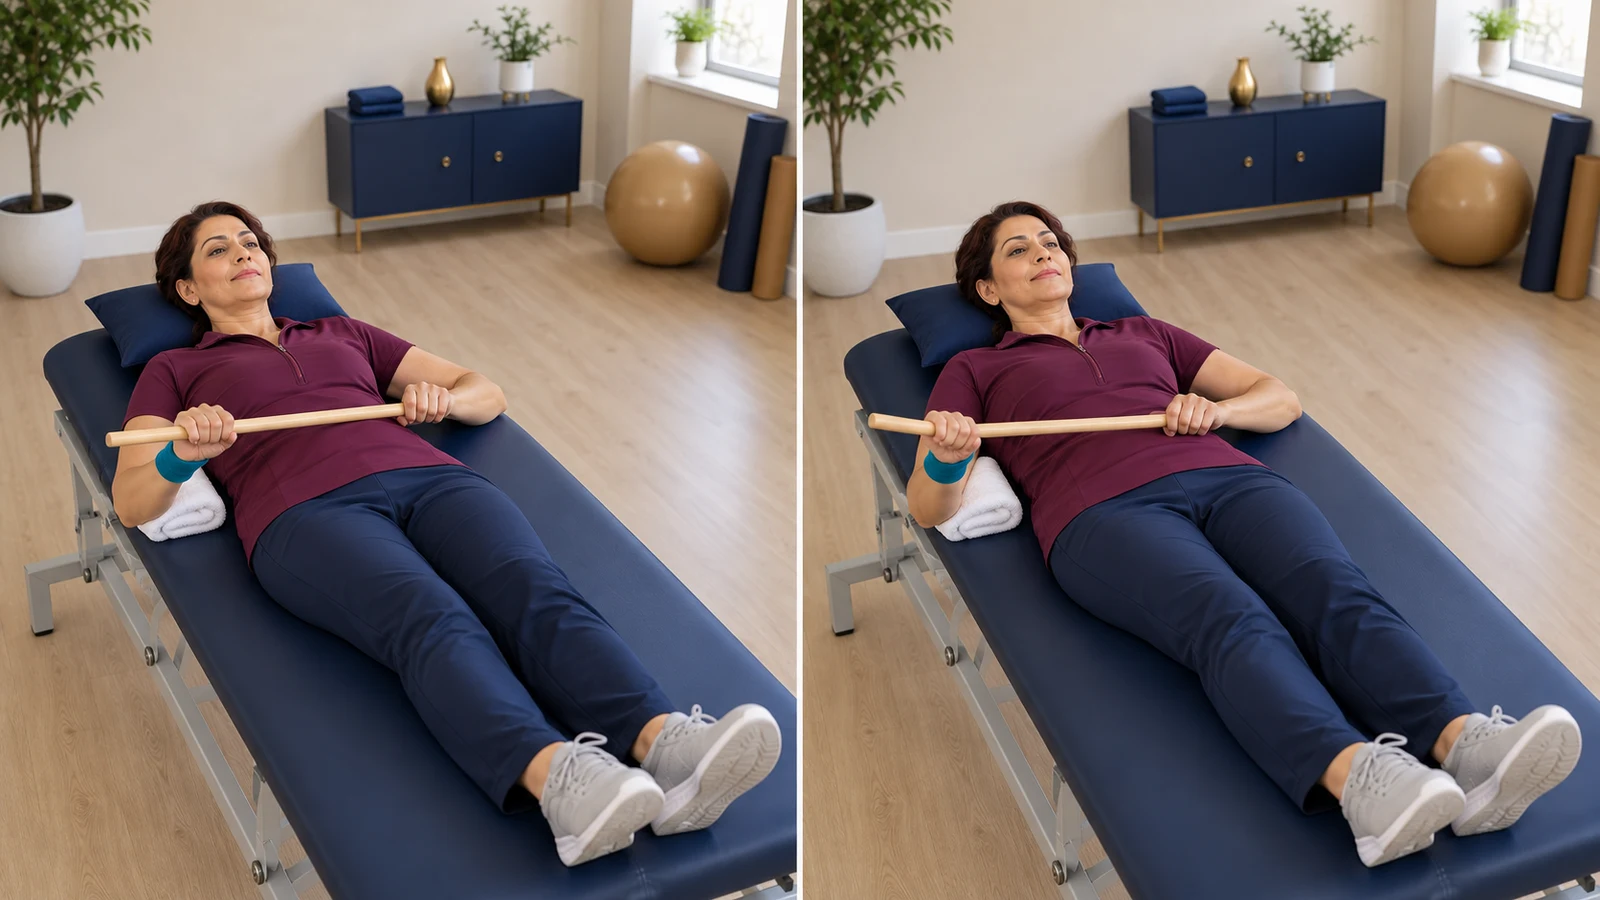
Passive external rotation with a stick (Passive External Rotation with Dowel)
Use the healthy hand to gently guide the operated forearm outward. Exercise in short bouts within your plan. Stop if you develop pain or a pull at the front of the shoulder, or the elbow moves away from your side.
More detailLess detail
Before you start: This card continues the passive rotation already taught. With permission to continue this direction, lie on your back, support the elbow on a towel beside your body and hold a light stick. After subscapularis repair, individual permission and limits take priority.
How to do it:
- Keep the right elbow still on the towel.
- Gently guide the stick with your left hand.
- Move the right forearm outward only to the written limit.
- Do not force an end-range stretch.
- Return to the start under the control of your left hand.
Movement tips: Your healthy hand moves the stick while the operated shoulder stays relaxed and the elbow remains beside your body. Until your treating team assesses and sets a new limit, rotation stays below 30 degrees or a lower individual limit. Return slowly without end-range force, breathe freely and relax the forearm.
Amount, repetitions and progression: Practise in short bouts, moving gently without pain or a change in technique. Then rest until the muscles relax and support the arm. Follow your individual programme for repetitions per bout. Do not add weights, bands or resistance to this movement. If night pain or next-day swelling increases, reduce the amount and leave any further increase to assessment by your treating team.
Stop immediately if: You develop pain or a pull at the front of the shoulder, or the elbow moves away from your side.
Common mistakes: Avoid letting the elbow move away, pushing with the right hand, or exceeding the angle limit.
Easier version: Halve the range or leave out the exercise until your physical therapist checks it, especially after subscapularis repair.
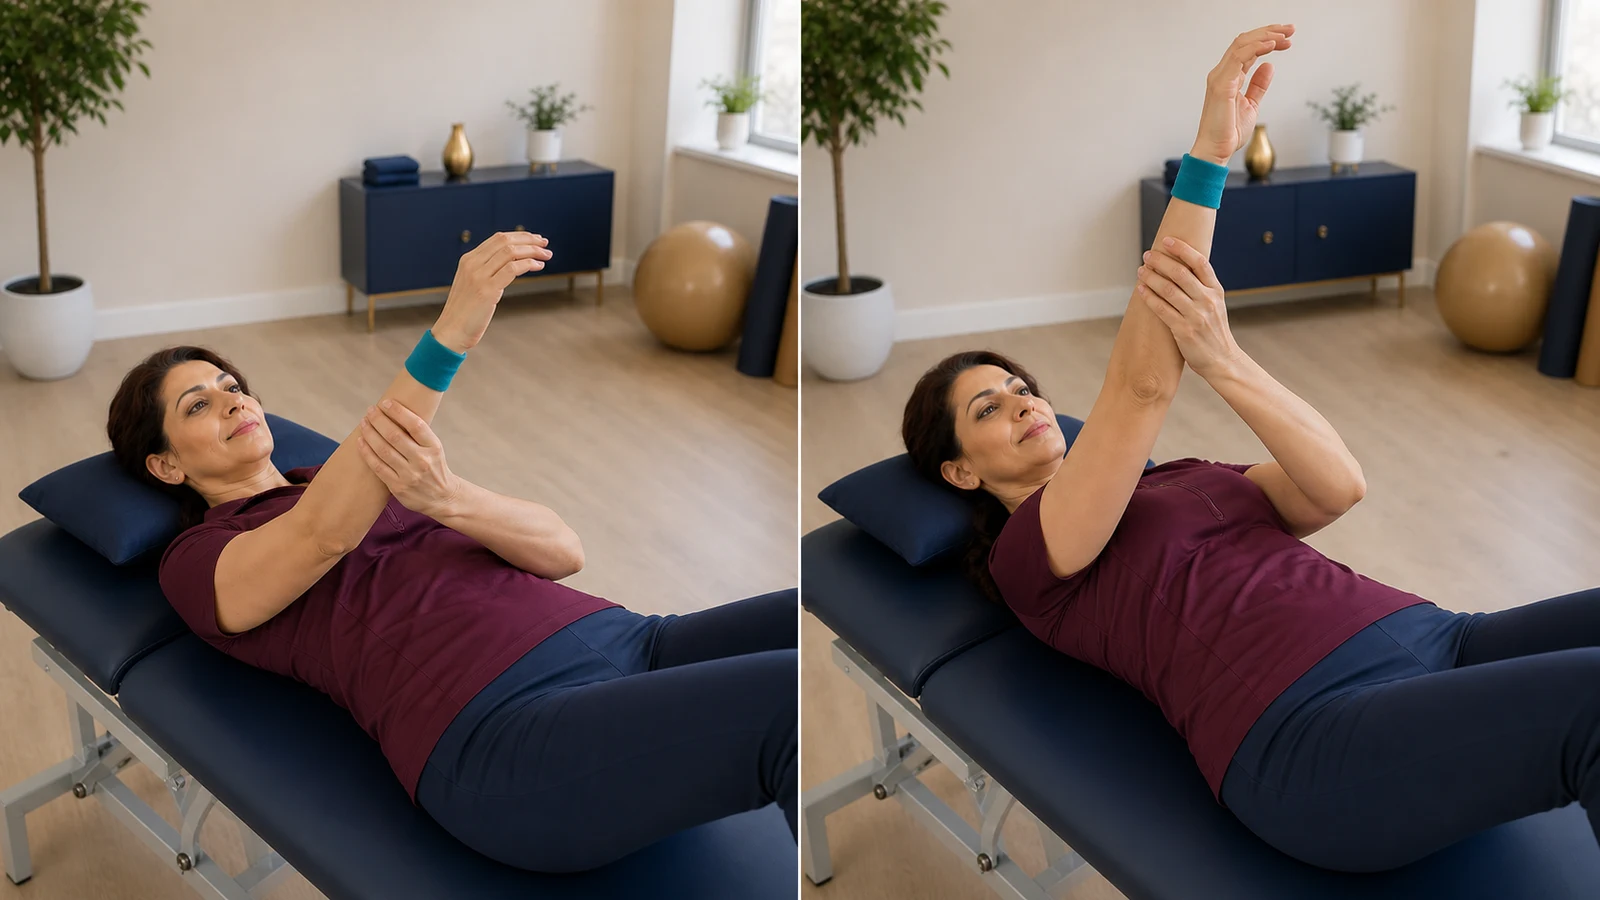
Continuing supported elevation on your back using the healthy hand (Self-Assisted Forward Elevation)
The healthy hand supports the operated arm's weight as you raise it. Exercise in short bouts within your plan. Stop if you develop pain or a pull at the front of the shoulder, or the healthy hand cannot support the arm.
More detailLess detail
Before you start: This card continues passive elevation after initial instruction and a check of your technique. No stick is needed. Lie on your back and place your healthy hand under the operated forearm or wrist to support the arm’s weight. Increase the range only after assessment by your treating team.
How to do it:
- Relax the operated shoulder and support the arm’s weight with your healthy hand.
- Slowly lift the arm using the strength of your healthy hand.
- Stop before pain or your permitted limit; the initial limit still applies until a new assessment.
- Pause briefly without forcing.
- Slowly lower the arm with your healthy hand and support it on a pillow beside your body.
Movement tips: Your healthy hand supports the arm’s weight and guides both lifting and lowering. Do not strain the operated shoulder, back or trunk to lift it. Until a new limit is set, elevation stays below 90 degrees or a lower individual limit. Breathe freely, lower slowly and support the arm between repetitions.
Amount, repetitions and progression: Practise in short bouts, moving gently without pain or a change in technique. Then rest until the muscles relax and support the arm. Follow your individual programme for repetitions per bout. Do not add weights, bands or resistance to this movement. If night pain or next-day swelling increases, reduce the amount and leave any further increase to assessment by your treating team.
Stop immediately if: You develop pain or a pull at the front of the shoulder, or the healthy hand cannot support the arm.
Common mistakes: Avoid actively helping with the operated shoulder, increasing the range without assessment or suddenly letting go of the arm.
Easier version: Reduce the range. If the healthy hand cannot carry the arm’s weight, do not perform the exercise until you have been taught the method again.
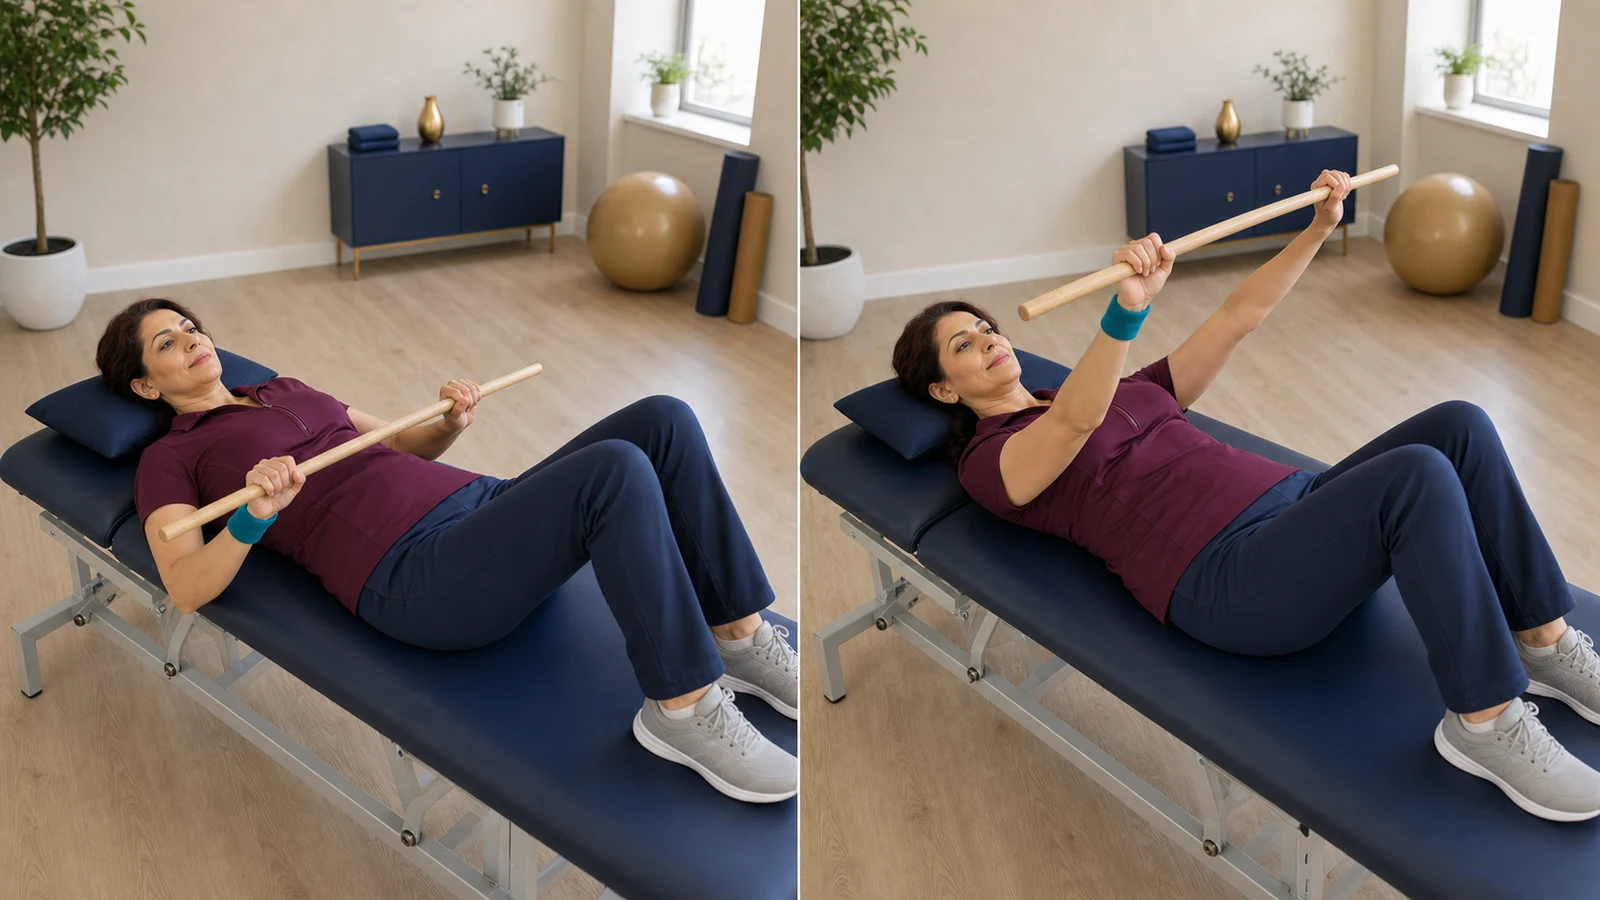
Assisted elevation lying on your back with a stick (Supine Assisted Elevation)
Lift the arm using a stick and help from your healthy hand. Exercise in short bouts within your plan. Stop if you develop pain, catching, or loss of arm control.
More detailLess detail
Before you start: This card is for when the operated shoulder also contributes to lifting and the healthy hand helps with a stick. In this programme, around week ten or later and only after permission for active-assisted movement, lie on your back on a stable bed and hold a light stick with both hands.
How to do it:
- Let the left hand control the stick.
- Slowly move the stick and right arm toward the ceiling.
- Stop before pain or the angle limit.
- Pause briefly without straining.
- Use the left hand to slowly lower the arm.
Movement tips: The healthy hand helps guide the stick, and the operated shoulder contributes only as permitted for this stage. This is different from passive elevation. Move slowly, breathe freely and stay within your programme’s limit. Keep your back on the bed and support the arm between repetitions.
Amount, repetitions and progression: The right amount varies from person to person. Exercise in short bouts without pain or a change in movement technique, then rest until your muscles relax. Follow your plan for repetitions and resistance. Reduce the amount if night pain increases or swelling is worse the next day.
Stop immediately if: You develop pain, catching, or loss of arm control.
Common mistakes: Avoid pushing with the right hand, arching your back, or forcing the end of the range.
Easier version: Return to the forearm slide on a table or shorten the range.
🎯 After the third month: active movement, strengthening, and return to activity
In the large and high-risk programme, active movement may start around week fourteen or later after the surgeon’s permission and suitable control. Isometric pressure without joint movement usually starts during weeks fourteen to eighteen, and resistance exercises during weeks eighteen to twenty-two, after the programme’s criteria and permission for strengthening. These ranges do not give automatic permission.
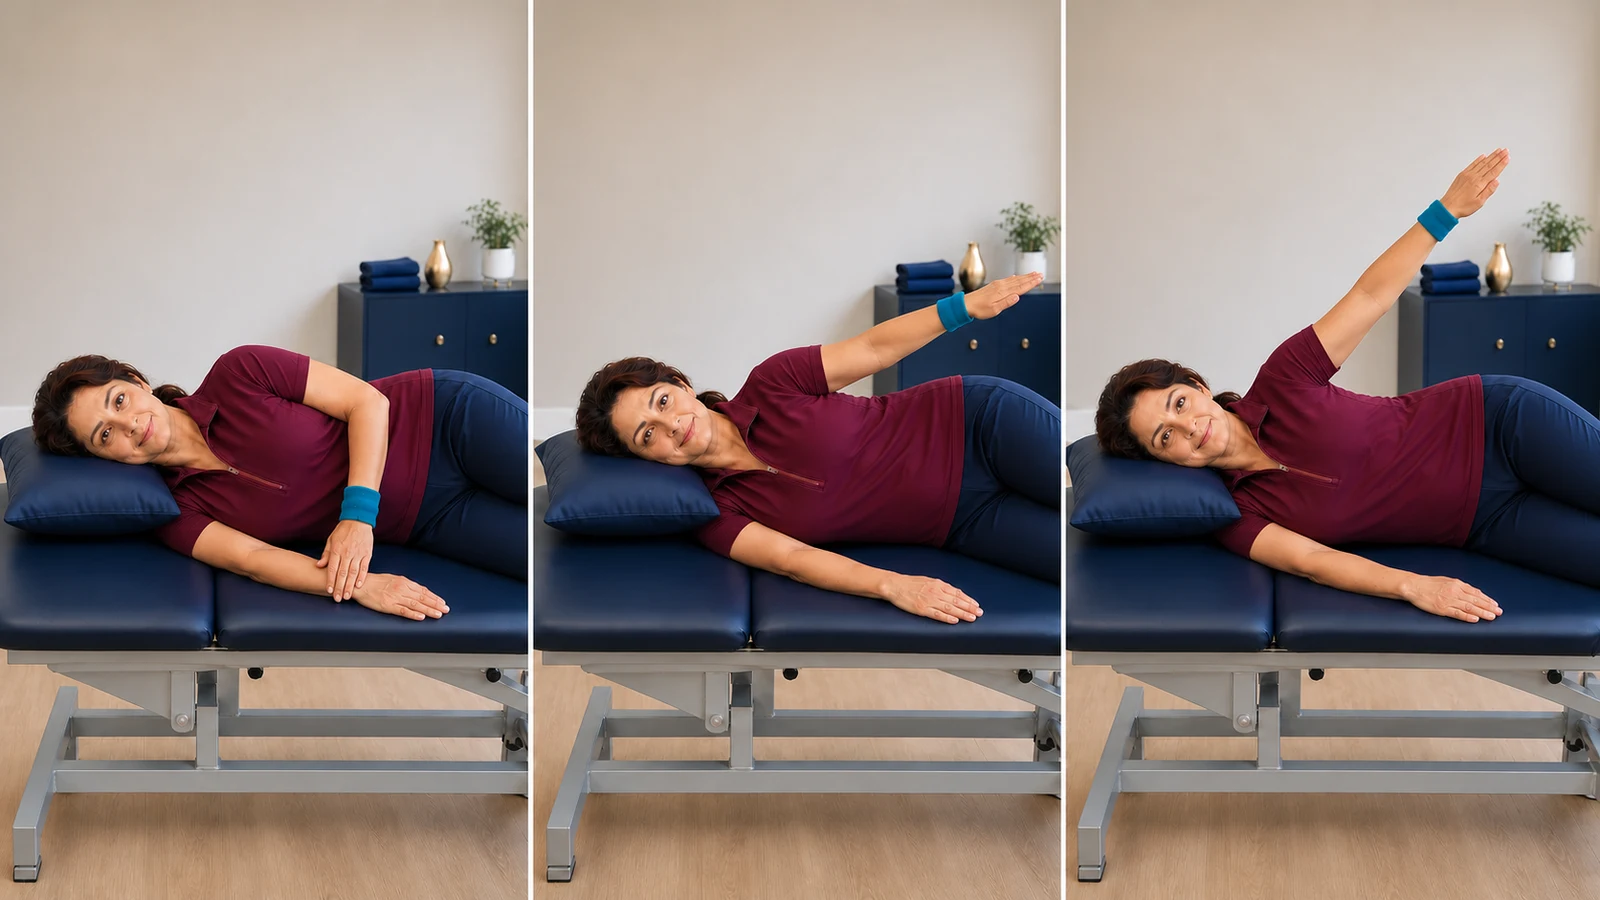
Side-lying arm elevation to 90 degrees (Sidelying Elevation to 90°)
Lying on your healthy side, lift the arm to the permitted height. Exercise in short bouts within your plan. Stop if you develop pain, rotate your torso, shrug, or lose control while lowering the arm.
More detailLess detail
Before you start: This movement practises active arm elevation while lying on your side and is placed after three months in this guide. Only after explicit permission for active movement, lie on your healthy side on a stable bed. The operated arm moves freely and the healthy hand does not help lift it. Your individual programme may set a different start. In this programme, active movement usually starts around week fourteen or later with permission for that movement.
How to do it:
- Adjust the pillow to keep your neck straight.
- Gently lift the right arm away from your side toward the ceiling, using minimal effort.
- Stop at 90 degrees, when the arm is perpendicular to your torso.
- Pause briefly.
- Slowly return the arm to your side with control; do not let it fall.
Movement tips: Do not raise the arm above shoulder height or your plan's lower limit. Do not roll your torso backward. Breathe freely and move slowly up and down. If pain, torso rotation, or shrugging occurs before the limit, return from that point and rest between repetitions.
Amount, repetitions and progression: The right amount varies from person to person. Exercise in short bouts without pain or a change in movement technique, then rest until your muscles relax. Follow your plan for repetitions and resistance. Reduce the amount if night pain increases or swelling is worse the next day.
Stop immediately if: You develop pain, rotate your torso, shrug, or lose control while lowering the arm.
Common mistakes: Avoid rolling your torso backward to gain more range, exceeding 90 degrees, or letting the arm fall while lowering.
Easier version: Halve the range or return to the forearm slide on a table.
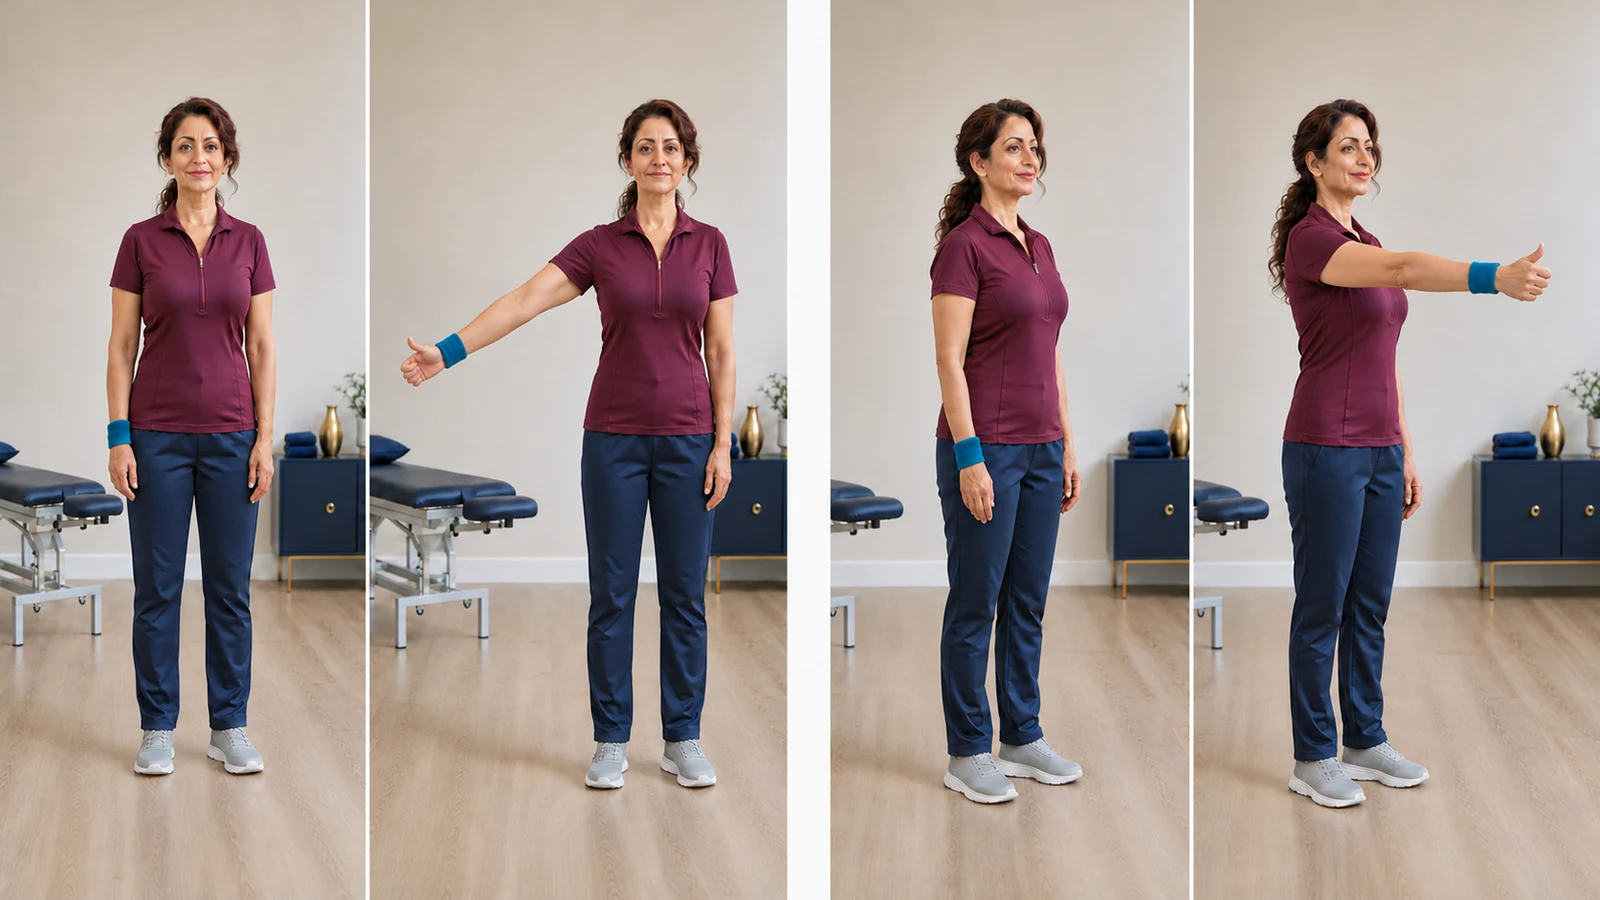
Standing sideways and forward arm raises without weights (Standing Active Abduction & Forward Elevation)
Lift the arm sideways and forward without weights. Exercise in short bouts within your plan. Stop if you develop pain or catching in the shoulder, rotate your torso, shrug, or lose movement control.
More detailLess detail
Before you start: This movement practices forward and sideways arm elevation without weights. Only once standing active movement is allowed, with little pain and good shoulder-blade control, stand on level ground. For large or massive repairs, starting may be around week fourteen or later. For these repairs, obtain specific permission for this movement, which moves the arm away from the torso. Starting other active movements does not automatically permit this exercise.
How to do it:
- From a neutral standing position, gently set the shoulder blades back without straining.
- With the thumb pointing up or slightly forward, lift the right arm out to the side.
- Stop at the first pain, torso rotation, or shoulder shrug, and no later than 90 degrees. The hand must not go above the shoulder.
- Lower the arm slowly and pause briefly in neutral.
- Now lift the right arm straight forward with the palm facing inward and thumb pointing up.
- Stop at the first pain, torso rotation, or shoulder shrug, and no later than 120 degrees. Then slowly return the hand beside your body.
Movement tips: Stay within your plan's range. This card's limits are 90 degrees sideways and 120 degrees forward; they are not targets you must reach. Move slowly, breathe out, and rest between repetitions. Keep the torso upright and do not shrug. These are teaching limits for this card; follow any lower range in your personal plan.
Amount, repetitions and progression: The right amount varies from person to person. Exercise in short bouts without pain or a change in movement technique, then rest until your muscles relax. Follow your plan for repetitions and resistance. Reduce the amount if night pain increases or swelling is worse the next day.
Stop immediately if: You develop pain or catching in the shoulder, rotate your torso, shrug, or lose movement control.
Common mistakes: Avoid arching the back, swinging the arm, turning the thumb downward, or exceeding the angle limit.
Easier version: First reduce the angle or return to wall exercises or exercises lying on your back.
Gentle external-rotation pressure at your side without movement (Submaximal External Rotation Isometric)
Apply gentle outward pressure without moving the joint. Exercise in short bouts within your plan. Stop if pain or forearm and torso movement develops.
More detailLess detail
Before you start: This exercise produces gentle outward pressure without joint movement. In this programme, usually during weeks fourteen to eighteen and only after written permission for strengthening, sit on a chair and keep the operated elbow beside your body with a towel. The resisting surface must be fixed.
How to do it:
- Support the operated elbow beside your body with a towel.
- Place the back of your wrist against a stable surface beside you so the forearm cannot move outward.
- Gently try to move the forearm outward; the stable surface prevents movement.
- Hold the pressure briefly while breathing freely.
- Slowly release the pressure and relax the muscles before the next repetition.
Movement tips: The forearm presses gently against the stable surface without moving. Keep the elbow beside your body and do not rotate your torso. Breathe out as you press and fully relax the muscles after each repetition. Maximal pressure is not allowed.
Amount, repetitions and progression: The right amount varies from person to person. Exercise in short bouts without pain or a change in movement technique, then rest until your muscles relax. Follow your plan for repetitions and resistance. Reduce the amount if night pain increases or swelling is worse the next day.
Stop immediately if: Pain or forearm and torso movement develops.
Common mistakes: Avoid maximal pressure, holding your breath, moving the elbow away from your side, or rotating the torso instead of pressing with the forearm.
Easier version: Halve the pressure or leave out the exercise until your physical therapist checks it.
Gentle internal-rotation pressure at your side without movement (Submaximal Internal Rotation Isometric)
Apply gentle inward pressure without moving the joint. Exercise in short bouts within your plan. Stop if pain around the shoulder or joint movement develops.
More detailLess detail
Before you start: This exercise produces gentle inward pressure without joint movement. In this programme, usually during weeks fourteen to eighteen after written permission for this strengthening, support the elbow beside your body with a towel and place the healthy hand on the inner side of the wrist. After subscapularis repair, separate permission from the surgeon is required.
How to do it:
- Support the operated elbow beside your body.
- Place the healthy hand on the inner side of the operated wrist.
- Gently press the operated hand toward your abdomen while the healthy hand prevents movement.
- Keep the forearm and torso still, and do not hold your breath.
- Slowly release the pressure and relax the muscles before the next repetition.
Movement tips: No joint movement should be visible, and the hand should not move behind your back. Breathe out while pressing gently, keep the torso still, and release all pressure after each repetition. Mild muscle fatigue should settle with rest.
Amount, repetitions and progression: The right amount varies from person to person. Exercise in short bouts without pain or a change in movement technique, then rest until your muscles relax. Follow your plan for repetitions and resistance. Reduce the amount if night pain increases or swelling is worse the next day.
Stop immediately if: Pain around the shoulder or joint movement develops.
Common mistakes: Avoid excessive pressure, reaching behind your back, or moving the elbow away from your side.
Easier version: Reduce the pressure or leave out the exercise until your physical therapist checks it.
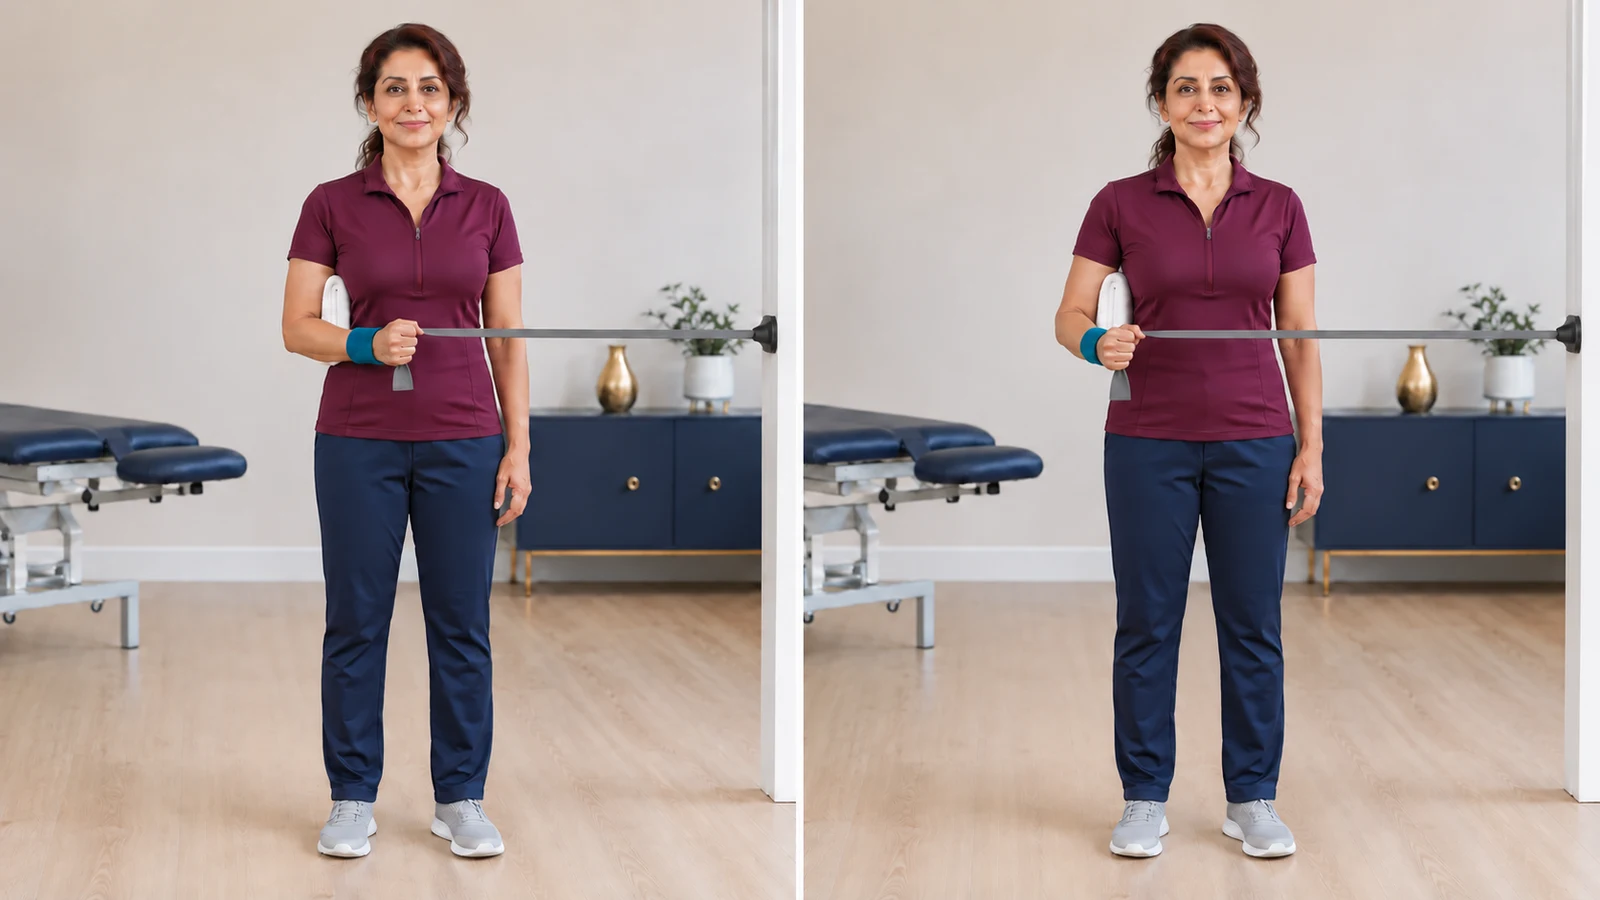
External rotation with a very light band at your side (Light-Band External Rotation)
Rotate the forearm outward with a very light band. Exercise in short bouts within your plan. Stop if you develop pain or the elbow moves away from your side.
More detailLess detail
Before you start: Outward rotation with a band is a shoulder-strengthening stage. After formal permission for strengthening, a suitable pain-free active range and scapular control, attach a very light band to a fixed support on the healthy-hand side of your body. Keep the operated elbow beside your body with a towel. In this programme, resistance exercise usually starts during weeks eighteen to twenty-two and only with permission for that stage.
How to do it:
- Gently stabilize the shoulder blade.
- Keep the elbow on the towel.
- Move the right forearm outward through a small range.
- Pause briefly without holding your breath.
- Slowly control the band's return.
Movement tips: Move the forearm outward only through the small range in your plan. Keep the elbow at your side and the torso still. Breathe out as you pull and return the band slowly. Release the tension between repetitions to let the muscle relax.
Amount, repetitions and progression: The right amount varies from person to person. Exercise in short bouts without pain or a change in movement technique, then rest until your muscles relax. Follow your plan for repetitions and resistance. Reduce the amount if night pain increases or swelling is worse the next day.
Stop immediately if: You develop pain or the elbow moves away from your side.
Common mistakes: Avoid a heavy band, letting the elbow move away, or moving quickly.
Easier version: With permission to begin strengthening still in place, return to gentle external-rotation pressure without movement, or to movement without a band.
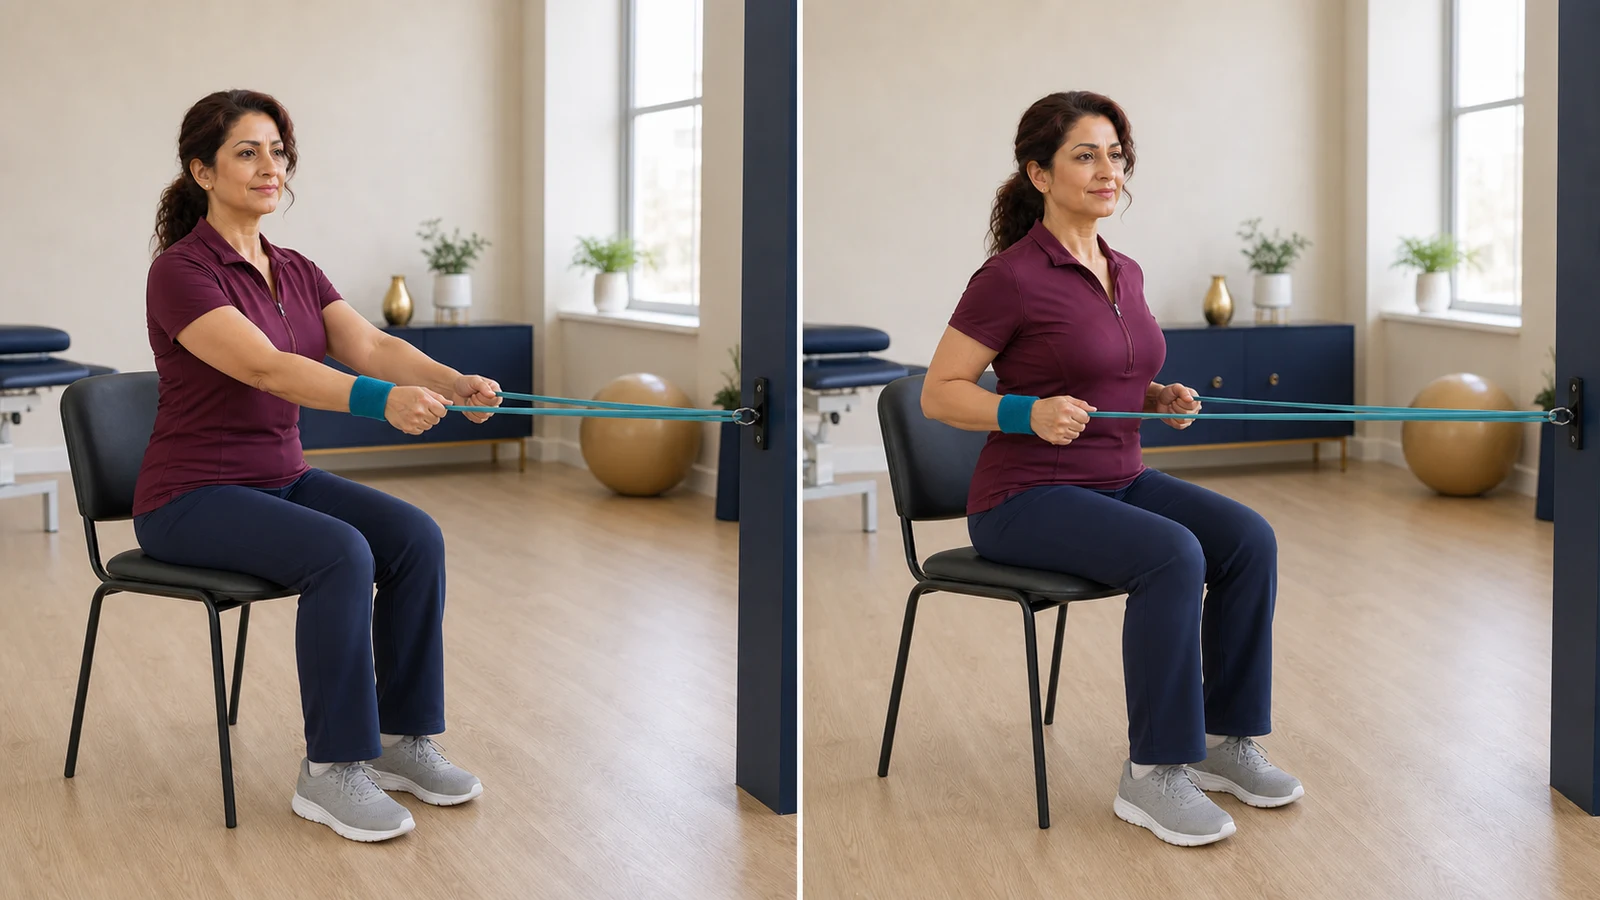
Seated band row (Resistance Band Seated Row)
Using a light band, pull your elbows back only as far as the sides of your torso. Exercise in short bouts within your plan. Stop if you develop pain, the band anchor slips, or movement control declines.
More detailLess detail
Before you start: This movement strengthens the muscles around the shoulder blade with a band. After formally entering the strengthening phase and achieving a suitable pain-free active range, sit on a stable chair and attach a light band to a firm support. After subscapularis or teres minor repair, starting requires permission under that programme. In this programme, resistance exercise usually starts during weeks eighteen to twenty-two and only with permission for that stage.
How to do it:
- Sit upright and gently set the shoulder blades.
- Pull the elbows backward beside your body so the shoulder blades draw closer together.
- Do not let the elbows pass behind the line of your torso.
- Pause briefly without holding your breath.
- Control the band's return slowly; do not let it pull your hands forward suddenly.
Movement tips: Pull the elbows back only as far as your torso. Do not sway or shrug. Gently pull as you breathe out, return the band with control, and rest between repetitions. Effort behind the shoulder blades should not turn into sharp pain.
Amount, repetitions and progression: The right amount varies from person to person. Exercise in short bouts without pain or a change in movement technique, then rest until your muscles relax. Follow your plan for repetitions and resistance. Reduce the amount if night pain increases or swelling is worse the next day.
Stop immediately if: You develop pain, the band anchor slips, or movement control declines.
Common mistakes: Avoid a heavy band, pulling the elbows behind your torso, swaying to pull, or suddenly releasing the band.
Easier version: Return to seated downward shoulder-blade setting without a band, or use a lighter band.
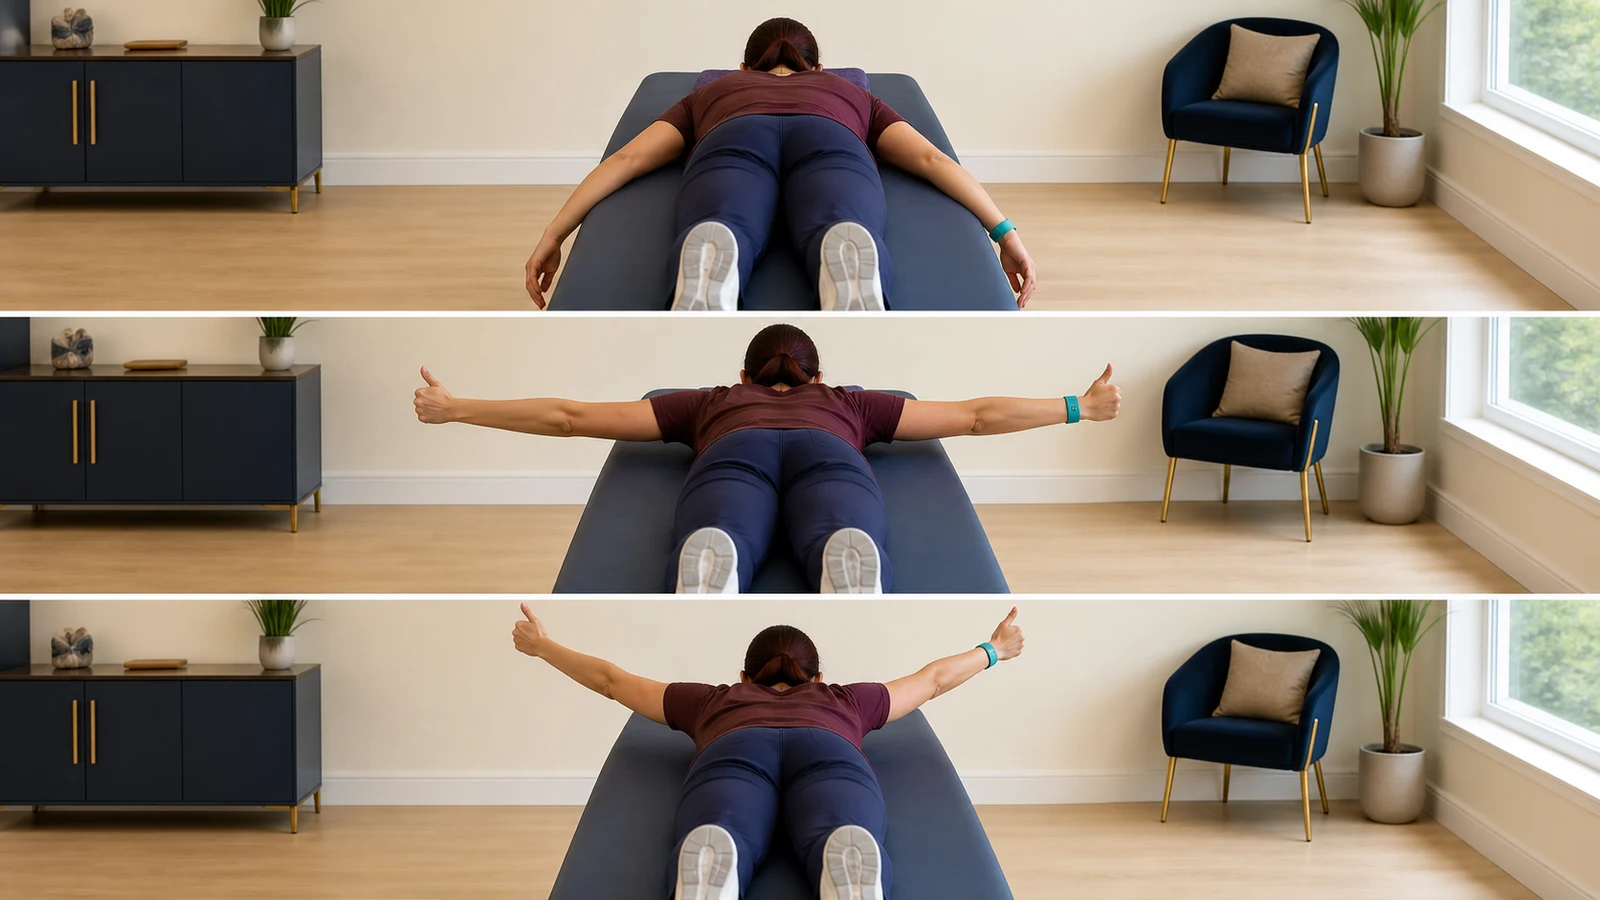
T and Y exercises for the shoulder blades (Scapular T and Y)
Lying on your stomach, practice the T and Y shapes without weights. Exercise in short bouts within your plan. Stop if you develop pain, shrugging, or lifting of the head and back.
More detailLess detail
Before you start: This exercise strengthens scapular control as the arm moves into T and Y shapes. After permission for the strengthening phase and full pain-free active range, lie on your abdomen on a stable bed and support your forehead. Start without any weight. In this programme, resistance exercise usually starts during weeks eighteen to twenty-two and only with permission for that stage.
How to do it:
- Gently set the shoulder blades.
- T: Lift both arms out to the sides, in line with the shoulders, only to bed level, with the thumbs pointing up.
- Pause briefly, then lower slowly.
- Y: Spread the arms diagonally upward at roughly the angle of a Y, again lifting only to bed level.
- Lower slowly and rest for a few breaths between the two shapes.
Movement tips: Keep the arms no higher than bed level, without lifting the head or back. Move slowly while breathing freely and return slowly. Relax the muscles between repetitions and progress only while you maintain movement control.
Amount, repetitions and progression: The right amount varies from person to person. Exercise in short bouts without pain or a change in movement technique, then rest until your muscles relax. Follow your plan for repetitions and resistance. Reduce the amount if night pain increases or swelling is worse the next day.
Stop immediately if: You develop pain, shrugging, or lifting of the head and back.
Common mistakes: Avoid lifting the arms above bed level, lifting the head and neck, arching the back, or adding weights before your technique is complete.
Easier version: Remove the weights, reduce the range, or perform only T and add Y later.
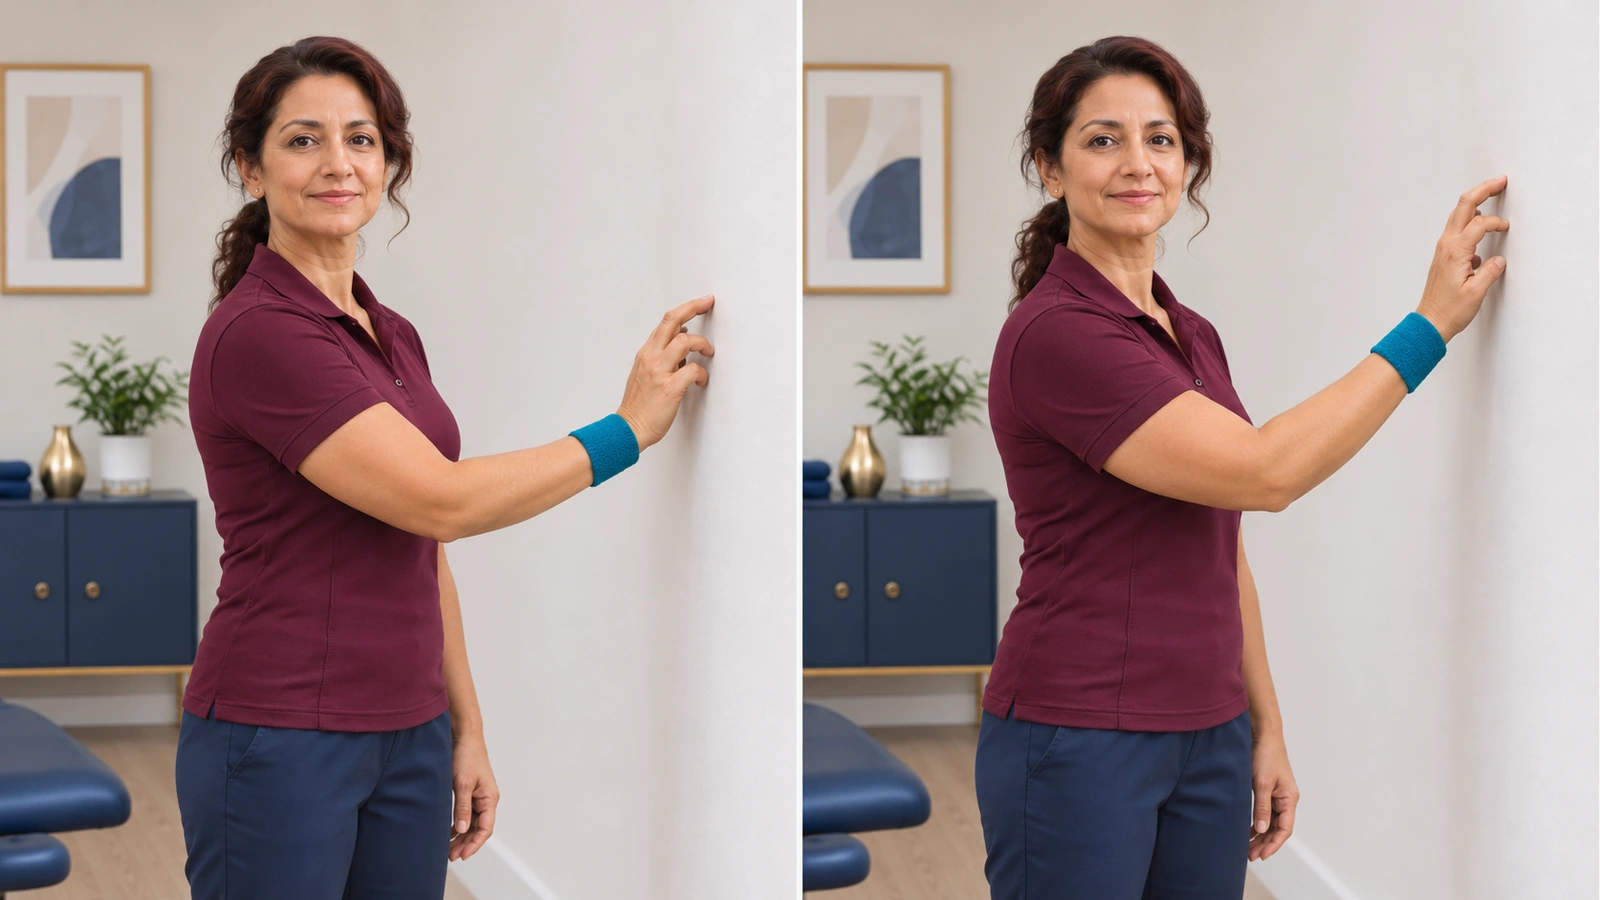
Finger walk up the wall (Wall Climb)
Walk your fingers up the wall without shrugging. Exercise in short bouts within your plan. Stop if you develop pain, catching, or shoulder shrugging.
More detailLess detail
Before you start: Walking the fingers up a wall practises active elevation guided by the wall. Only after permission for standing active movement and good control of the supine movement, stand facing a wall and place the operated fingers on it. No weight is needed, and the wall does not remove all shoulder load. In this programme, standing active movement usually starts around week fourteen or later with permission for that movement.
How to do it:
- Prepare the shoulder blade with the same gentle setting.
- Walk your fingers up the wall like a spider and let the arm follow.
- If needed, step closer to the wall so the elbow does not remain too straight.
- Stop at the first pain, first shoulder shrug, or your angle limit.
- Bring the fingers down just as slowly and relax the arm beside your body.
Movement tips: Use small finger steps to lift the hand only to your plan's limit. Do not shrug or lean your torso backward. Breathe calmly and take your time lowering the arm. Support it between repetitions.
Amount, repetitions and progression: The right amount varies from person to person. Exercise in short bouts without pain or a change in movement technique, then rest until your muscles relax. Follow your plan for repetitions and resistance. Reduce the amount if night pain increases or swelling is worse the next day.
Stop immediately if: You develop pain, catching, or shoulder shrugging.
Common mistakes: Avoid bending your torso toward the wall to reach higher, leaning body weight through the hand, or climbing quickly and dropping suddenly.
Easier version: Place your palm on a soft ball and roll it along the wall, or return to the exercises lying on your back.
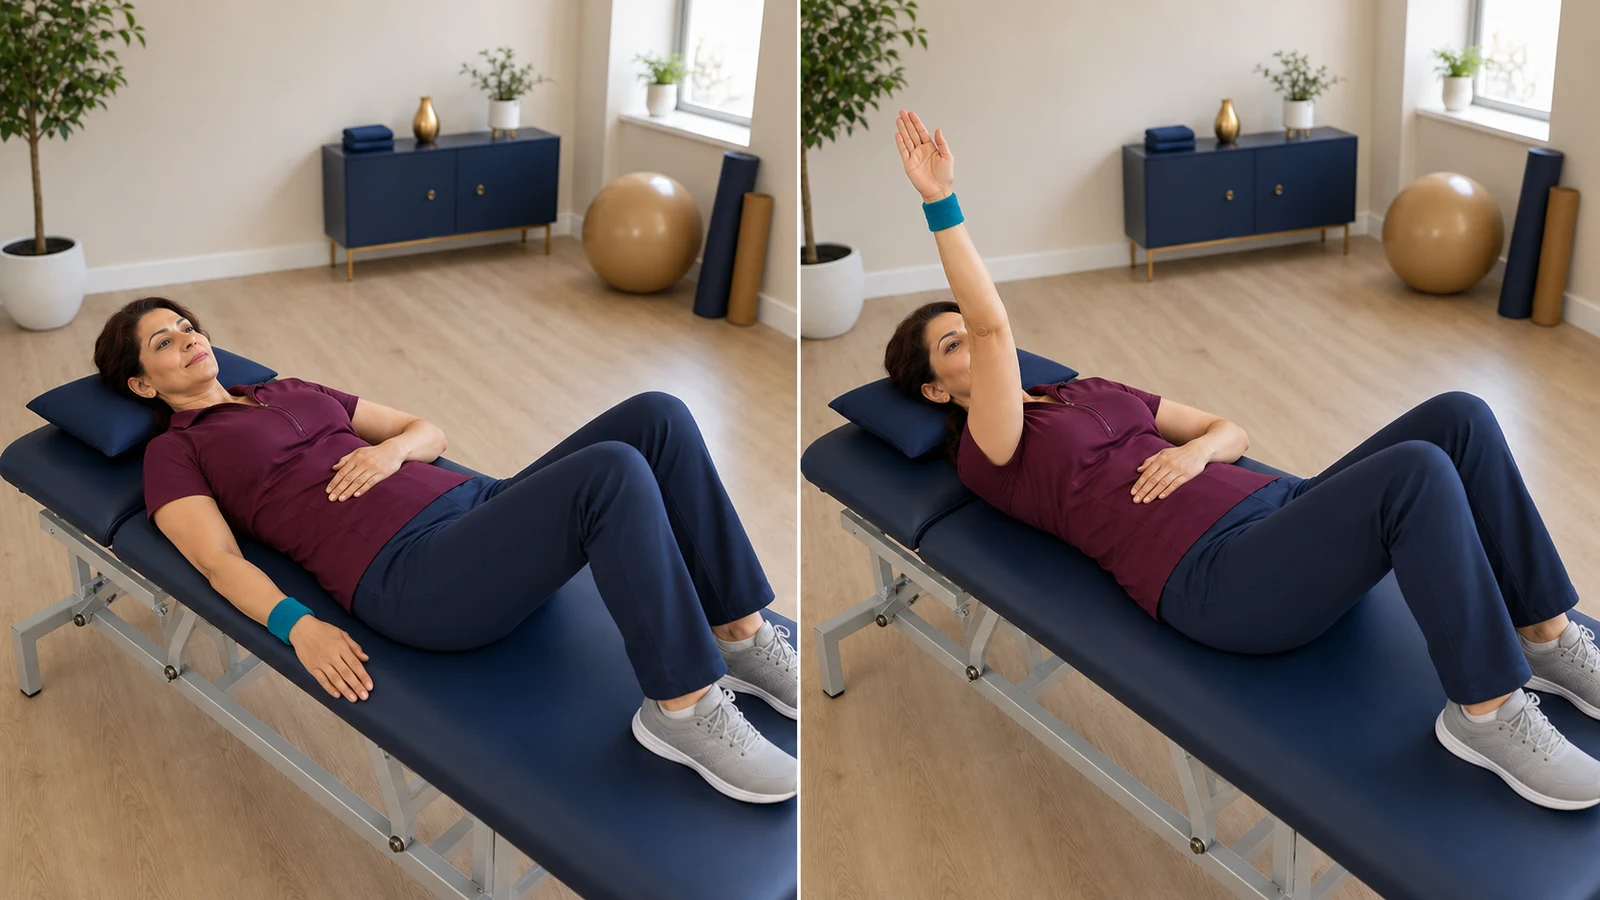
Active arm elevation lying on your back (Supine Active Elevation)
Lying on your back, lift the arm using the shoulder's own strength. Exercise in short bouts within your plan. Stop if you develop pain, catching, shrugging, or a sudden loss of arm control.
More detailLess detail
Before you start: This movement practises lifting the arm with the shoulder’s own strength. After explicit permission for active movement and smooth active-assisted movement, lie on your back on a stable bed. Keep the healthy hand beside your body and hold no weight. In this programme, active movement usually starts around week fourteen or later with permission for that movement.
How to do it:
- Gently stabilize the right shoulder blade on the bed.
- Lift the right arm toward the ceiling under its own power.
- Stop before shrugging or pain.
- Pause briefly.
- Lower the arm slowly without letting it drop.
Movement tips: Lift the operated arm only to your plan's limit and stop before pain or shrugging. Breathe freely as you lower it slowly. Keep your back on the bed and rest the arm beside your body between repetitions.
Amount, repetitions and progression: The right amount varies from person to person. Exercise in short bouts without pain or a change in movement technique, then rest until your muscles relax. Follow your plan for repetitions and resistance. Reduce the amount if night pain increases or swelling is worse the next day.
Stop immediately if: You develop pain, catching, shrugging, or a sudden loss of arm control.
Common mistakes: Avoid help from the left hand, arching the back, or jerky movement.
Easier version: Shorten the range or use the stick again. Do not progress to an inclined or standing position until you have full control.
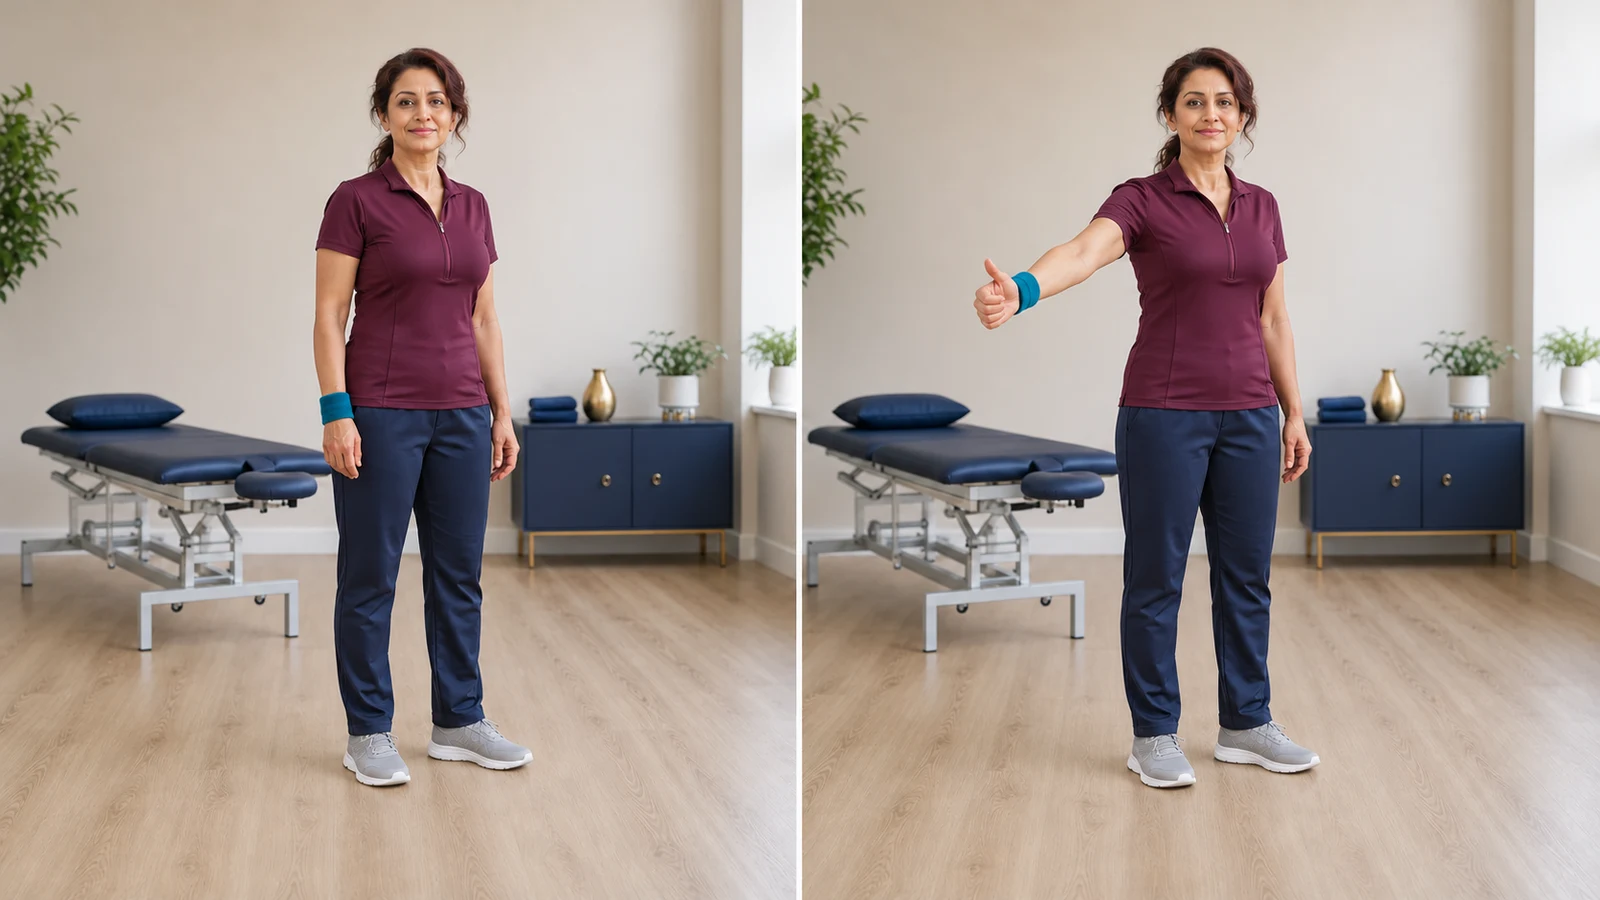
Arm elevation in the shoulder-blade plane without weights (Standing Scaption)
Lift the arm without weights on a line slightly forward of your side. Exercise in short bouts within your plan. Stop if you develop pain or shrugging.
More detailLess detail
Before you start: This exercise practises raising the arm slightly forwards along the natural plane of the shoulder blade. After permission for standing active movement and good control of the supine exercise, stand on level ground with the operated thumb pointing up. No weight is needed. In this programme, active movement usually starts around week fourteen or later with permission for that movement.
How to do it:
- Gently set the shoulder blade.
- Lift the right arm on a line slightly forward of your side.
- Stop before shrugging or reaching the range limit.
- Pause briefly.
- Lower the arm slowly.
Movement tips: Start below shoulder height and stay within your plan's limit. Do not shrug or arch your back. Breathe out as you lift and lower slowly. Relax the arm between repetitions; reduce the range if control declines.
Amount, repetitions and progression: The right amount varies from person to person. Exercise in short bouts without pain or a change in movement technique, then rest until your muscles relax. Follow your plan for repetitions and resistance. Reduce the amount if night pain increases or swelling is worse the next day.
Stop immediately if: You develop pain or shrugging.
Common mistakes: Avoid shrugging, arching the back, or turning the thumb downward.
Easier version: Return to lying on your back or shorten the range.
🚗 Driving, work, and return to activity
🚗 Driving
Do not drive while wearing a sling, taking sedating medicines, or having difficulty steering and making sudden maneuvers. Returning to driving requires your care team's permission and the ability to control the vehicle safely. One date does not suit everyone.💼 Returning to work
Short periods of desk work with the forearm supported may be possible sooner. Carrying loads and working overhead require recovery of strength and movement control. Coordinate your duties and working hours with your care team and workplace.🏊 Sport and swimming
Returning to sport requires an adequate painless range, strength, shoulder-blade control, and tolerance of progressive exercise. Start swimming, throwing sports, and weight training with simple stages and the relevant permission. Fatigue should not reduce movement quality.❤️ Sexual activity
There is no fixed timing that suits everyone. When pain is manageable, choose a comfortable position that supports the operated arm without putting weight or pulling on it. Sling and movement restrictions still apply.🕌 Prayer and floor activities
While supporting yourself or putting weight through the hand is prohibited, do not use the operated hand to lower yourself to the floor or get up. You can pray seated without pressure on the shoulder. For religious guidance specific to your situation, consult a trusted authority.
❓ Frequently asked questions
1) How many weeks should I wear the sling, and when?
Protective plans may require it day and night for up to about six weeks, followed by gradual weaning. Your repair type and instructions determine the exact timing. Having less pain is not a reason to stop using it early.
2) When can I sleep on the operated shoulder?
Do not sleep on the operated shoulder during the protection phase. Lie on your back or partly upright and support the forearm on a pillow. Try sleeping on that side only once permitted and when direct pressure does not cause pain.
3) When should I change the portal dressings?
An intact waterproof dressing stays in place until the wound check on days 10–14. Change it sooner if it becomes wet, dirty, or loose. A standard dressing or an additional incision may have a different schedule.
4) When is showering allowed?
A short shower may be possible from day two with an intact waterproof dressing and extra covering. Support the arm and ask a companion for help. An additional incision, different dressing, or specific restriction requires a separate plan.
5) Is increased pain normal when the nerve block wears off?
Pain may temporarily increase as sensation returns. Take medicines as prescribed. For uncontrolled or increasing pain, follow the warning-signs section.
6) When should I start moving my hand, wrist, and elbow?
The fingers and wrist usually move earlier, but you need adequate sensation and forearm support. After biceps tendon fixation, active elbow movement and turning the palm have separate restrictions.
7) How can I tell whether my pendulum exercise is truly passive?
The operated arm stays relaxed, and small torso movements produce the motion. If you tighten the shoulder muscles to make circles or swing the arm, the exercise is not passive.
8) What is the difference between passive, assisted, and active movement?
In passive movement, the operated arm stays relaxed and the movement comes from the healthy hand, the trunk or a therapist. If the operated shoulder muscles also contribute, it is active-assisted movement. In active movement, the shoulder itself lifts the arm. Clasping the hands or holding a stick alone does not determine the type of movement, and permission for one type does not authorise another.
9) When does physical therapy begin?
Instruction in sling use and arm support can start early. In the large and high-risk programme, however, passive shoulder movement usually starts around week six after instruction; an earlier start needs individual permission. Active-assisted movement, active movement and strengthening each have a separate stage and permission.
10) Why does a large tear follow a slower plan?
A large tear or high-risk repair needs a separate protective programme. Passive movement usually starts around week six, unless your treating team gives individual permission to begin earlier. Your surgeon selects the programme. Slower progress alone does not mean that the operation has failed.
11) What elbow restrictions apply after biceps tenodesis?
This operation fixes the tendon at the front of the upper arm to bone. Actively bending the elbow and turning the palm upward can load the fixation site. Check that repair's plan for the timing of active and resisted movement.
12) Why is external rotation limited after subscapularis repair?
Outward rotation can stretch the tendon at the front of the shoulder. If it was repaired, the rotation limit or permission to begin may be more restricted. Follow the limit written in your own plan.
13) When is driving safe?
Once you have stopped using the sling according to your plan, take no sedating medicine, and can control the vehicle and make sudden maneuvers without pain. Also follow your care team's permission and applicable driving rules.
14) How does returning to desk work differ from heavy work?
Short periods of desk work with the forearm supported may be possible sooner. Heavy or overhead work needs more strength, endurance, and movement control. Increase activity gradually.
15) What criteria are needed to return to swimming, tennis, or weight training?
Time alone is not enough. You need an adequate painless range, strength, movement control, and tolerance of a staged program. Starting and progressing each sport should match your shoulder's condition.
16) What restrictions apply to sexual activity?
Choose a position that supports the operated arm without placing body weight through the hand. Movement and sling restrictions still apply. Change position or stop if you feel shoulder pain or pulling.
17) What should I do for prayer and getting up from the floor?
While putting weight through the hand is prohibited, do not use the operated hand to lower yourself or get up. Praying seated can avoid pressure on the shoulder. Ask a trusted religious authority for guidance suited to your situation.
✅ Summary
In the large tear or high-risk repair programme, protect the arm. Passive movement usually starts around week six after instruction, unless you have individual permission to start earlier. Increase range and exercise amount only after assessment by your treating team. Less pain or time passing does not permit active movement or strengthening.
If you notice a sign requiring same-day contact, phone the clinic that day. Do not wait for an online appointment. For non-urgent questions about your shoulder exercise plan or sling weaning, call Dr Jalil Emad’s clinic on 0913 782 5207, or book an appointment online. In an emergency, do not wait for the clinic to reply; follow the instructions in the warning signs section.
To learn about this surgery, visit this page: Shoulder arthroscopy.
This content provides general education and does not replace an examination, your treating doctor's advice, your discharge sheet, or your surgeon's individual protocol. Timing, movement range, weight bearing, and exercise amount vary with the operation, additional procedures, and individual circumstances. Do not change your medicines, dressing, or exercise plan without consulting your care team.
📚 Scientific references
Show sources
- American Academy of Orthopaedic Surgeons. Management of Rotator Cuff Injuries Clinical Practice Guideline. 2025.
- Thigpen CA et al. ASSET consensus statement on rehabilitation following arthroscopic rotator cuff repair. J Shoulder Elbow Surg. 2016. doi:10.1016/j.jse.2015.12.018. https://scholars.duke.edu/publication/1488364
- Mass General Brigham. Rehabilitation Protocol for Rotator Cuff Repair: Small to Medium Sized Tears. https://georgedyerortho.com/wp-content/uploads/2022/08/2022-rehabilitation-protocol-for-rotator-cuff-tear-small-to-medium-tear.pdf Clinician-hosted copy of the MGH protocol.
- Mass General Brigham. Rehabilitation Protocol for Rotator Cuff Repair: Large to Massive Tears. https://georgedyerortho.com/wp-content/uploads/2022/08/2022-rehabilitation-protocol-for-rotator-cuff-tear-large-to-massive-tear.pdf Clinician-hosted copy of the MGH protocol.
- Mass General Brigham. Rehabilitation Protocol for Biceps Tenodesis. https://georgedyerortho.com/wp-content/uploads/2022/08/2022-rehabilitation-protocol-for-biceps-tenodesis.pdf Clinician-hosted copy of the MGH protocol.
- Mass General Brigham. Rehabilitation Protocol for Subscapularis Repair. https://www.massgeneralbrigham.org/content/dam/unified-xwalk/pdf/patient-education/english/rehabilitation-protocol-for-subscapularis-repair.pdf
- University of Virginia. Post-operative Rehabilitation Protocol: Rotator Cuff Repair. https://med.virginia.edu/orthopaedic-surgery/wp-content/uploads/sites/242/2023/01/Rotator-Cuff-Repair.pdf
- Hasan SS et al. Change in Driving Performance Following Arthroscopic Shoulder Surgery. Int J Sports Med. 2016. doi:10.1055/s-0042-103156.
- Rotator Cuff Consensus Part III: Reverse Total Shoulder Arthroplasty, Revisions, Rehabilitation, and Follow-Up—An International Consensus Expert Statement. Arthroscopy. 2026. doi:10.1002/arj.70367. https://pubmed.ncbi.nlm.nih.gov/42742935/
- Royal National Orthopaedic Hospital. A Patient’s Guide to Rotator Cuff Repair. https://www.rnoh.nhs.uk/patients-and-visitors/patient-information-guides/rotator-cuff-repair-patients-guide
- Cambridge University Hospitals. Rotator cuff repair. https://www.cuh.nhs.uk/patient-information/rotator-cuff-repair/
- MedlinePlus. Shoulder surgery - discharge. https://medlineplus.gov/ency/patientinstructions/000179.htm
- NHS. Pulmonary embolism. https://www.nhs.uk/conditions/pulmonary-embolism/
- NHS. Anaphylaxis. https://www.nhs.uk/conditions/anaphylaxis/
- MedlinePlus. Arterial embolism. https://medlineplus.gov/ency/article/001102.htm
- MedlinePlus. Oxycodone. https://medlineplus.gov/druginfo/meds/a682132.html
- U.S. Food and Drug Administration. Acetaminophen. https://www.fda.gov/drugs/safe-use-over-counter-pain-relievers-and-fever-reducers/acetaminophen
- Haunschild ED et al. Return to Work After Primary Rotator Cuff Repair: A Systematic Review and Meta-analysis. Am J Sports Med. 2021. https://www.briancolemd.com/wp-content/themes/ypo-theme/pdf/return-to-work-after-primary-rotator-cuff-repair.pdf
- U.S. Food and Drug Administration. Boxed Warning updated to improve safe use of benzodiazepine drug class. Drug Safety Communication, 23 September 2020.
- American Academy of Orthopaedic Surgeons OrthoInfo. Platelet-Rich Plasma (PRP). Patient information; first publication date unknown.
- Contribution of platelet-rich plasma to the surgical treatment of rotator cuff tear: An experimental study. Biomedical Reports. 2026;25(4):114. doi:10.3892/br.2026.2187. Electronic publication 11 August 2026; October issue.
- Oxford University Hospitals NHS Foundation Trust. Rotator cuff repair. December 2024. Page 24: clasped-hands assisted arm lift; technique reference only.

Dr. Jalil Emad
Orthopedic specialist and surgeon, board-certified in bone and joint surgery; years of experience in knee and hip replacement, sports injuries and arthroscopy in Isfahan.