On this page
- 🏥 What happens on the day of surgery?
- ⚠️ Warning signs: when to call immediately
- 1Care in the first days after surgery
- 🛡️ The first two weeks: protection, swelling and circulation
- ↔️ The second two weeks: sutures, starting big-toe motion and the first steps
- 🌱 The second month: strength, flexibility and weight coming back
- 🏋️ The third month: loading the big toe and getting the walking pattern back
- 🎯 After the third month: full return to activity and sport
- 🚗 Daily life and returning to activity
- ❓ Frequently asked questions
- ✅ In summary
- 📚 Scientific sources
Recovery and Rehabilitation After Big-Toe Surgery (Hallux Valgus and Hallux Rigidus)
A day-by-day guide after bunion correction and big-toe arthritis surgery: wound care, the long swelling curve, the post-operative shoe and weight-bearing timetable, the corrective toe spacer, stage-by-stage exercises, and realistic timings for normal shoes, driving and sport.
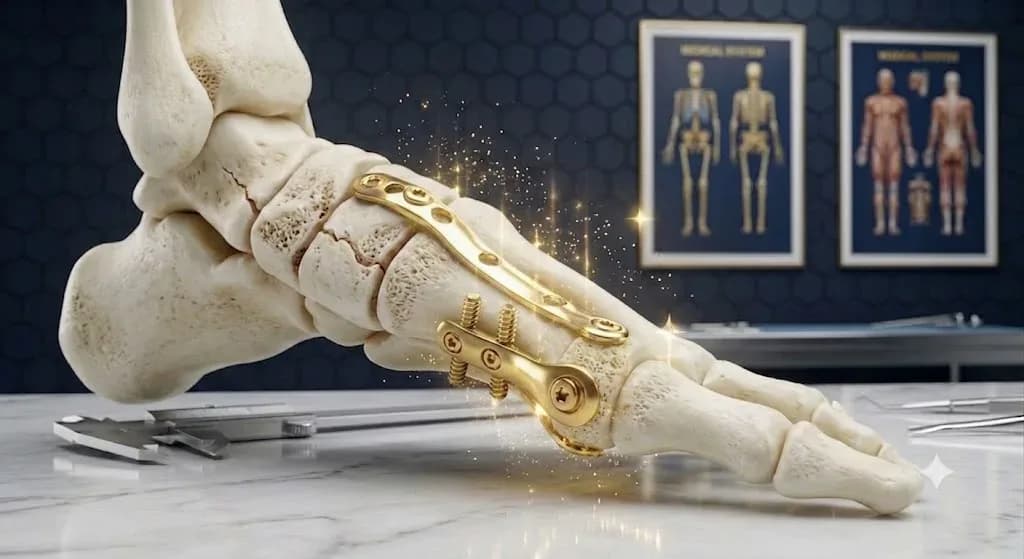
🏥 What happens on the day of surgery?
Big-toe surgery is usually a day-case operation: you go home the same day. What follows is the plan for the days after — from the splint and the dressing to the exercises for each stage and a realistic date for normal shoes.
Anaesthetic: most of these operations are done under an ankle block or a spinal anaesthetic, sometimes with sedation. Your anaesthetist will explain what suits you. An ankle block can keep the foot numb for several hours afterwards; during those hours do not test the foot or put weight on it, because pain cannot warn you.
Length of stay and discharge: you go home once pain and nausea are controlled, you can pass urine, and you have practised walking safely with crutches or a walker. Do not drive yourself; someone must take you home.
What you are given at discharge: your foot already in a below-knee splint, crutches or a walker, the dressing applied underneath it, your prescription, a discharge sheet with your surgeon's own instructions, and your next appointment. If a spacer or corrective bandage between the big toe and the second toe has been prescribed for you, ask that day how to apply it.
Expected pain and swelling versus an abnormal sign: as the block wears off, a throbbing ache across the forefoot is normal and settles with the prescribed painkiller and elevation. Forefoot swelling is the most stubborn part of this operation and lasts months. But pain that the prescribed painkiller does not touch at all, toes that turn cold or dusky, new numbness you did not have before surgery, or severe calf pain and swelling are not normal.
⚠️ Warning signs: when to call immediately
Call the same day: redness or warmth that grows day by day; thick or foul-smelling drainage, or a stain that keeps spreading; the wound edge opening; fever above your discharge-sheet limit, or chills; pain that increases from day four instead of easing; new numbness or tingling in the big toe lasting more than a few hours; toes that look pale or blue, or feel cold; a wet or loose dressing you cannot change safely; strong pressure under the dressing that elevation does not relieve; a fall or a knock to the operated foot.
Emergency — do not wait: Shortness of breath, chest pain or coughing up blood; Pain, swelling, warmth or tightness in the calf, especially on one side only; Fainting, marked confusion, or a high fever with shivering and feeling very unwell; The whole foot turning cold and dusky, or losing its sensation.
If you have questions about your own recovery, or you notice any sign this page lists as «call the same day», call Dr. Jalil Emad’s office at 0913 782 5207, or book an appointment online. In an emergency, do not wait for a response from the office.
To read more about this area of treatment, see the related service page: Deformity correction
1Care in the first days after surgery
In the first days a throbbing ache and a swollen forefoot are not strange; the goal is not a pain-free foot straight away. The goal is a wound that stays clean and dry, swelling that starts to come down, and a foot held in the position in which the corrected bone can heal. The most useful things you can do in these two weeks are to keep the foot up and to leave the dressing alone. Your discharge sheet and your surgeon's own instructions take priority over any general figure in this article.
🩹 Wound care and changing the dressing
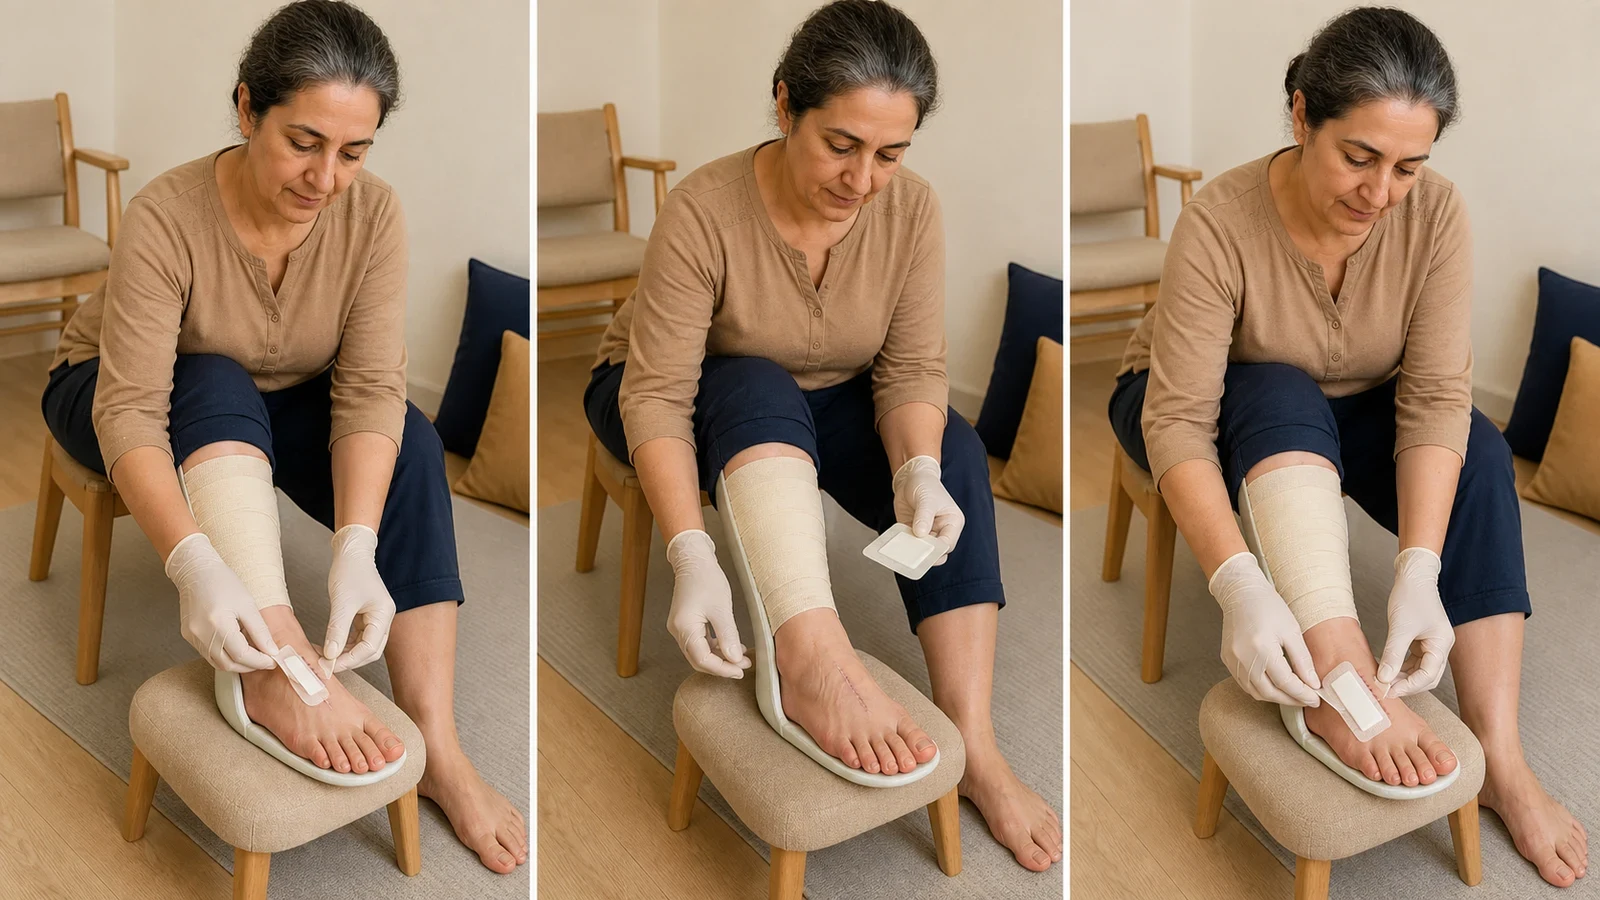
Seeing the wound or changing the first dressing can feel daunting, but there is no hurry. A forefoot dressing is not just a cover: in the first weeks it is part of what holds the big toe in its corrected alignment. So the first rule is this — do not open the dressing and re-wrap it yourself until your surgeon says you may. When you are allowed to, lay out what you need beforehand, sit in good light, and work through each step with clean hands.
More detailLess detail
- Do not open the first dressing on your own initiative. It usually stays until your first planned appointment, because the way it is applied is part of what holds the big toe in alignment. If your discharge sheet gives a different time, that takes priority.
- Wash your hands with soap and water and lay out the clean dressing, gauze, tape and a waste bag on a clean surface. Do not touch the inner face of the fresh dressing.
- Peel the outer layer away from one corner, along the length of the foot, not across it. Do not pull off skin adhesive strips, thin tapes, sutures or scabs, and do not part the wound edges to look inside.
- Clean only in the way written on your discharge sheet. Do not pour alcohol, hydrogen peroxide, povidone-iodine, ointment or cream onto the incision line on your own; these can irritate healing skin and delay closure.
- Apply the fresh dressing dry, flat and without tight pressure. It should lie along the inner border of the foot, must not strap the toes together, and must not wrap tightly around the forefoot. Your toes should stay warm, normally coloured and normally sensate.
- If the dressing becomes wet, dirty or loose, do not leave it. A wet dressing is a route in for bacteria. If you cannot change it safely yourself, call the clinic the same day.
- A small pink or clear stain in the first days can be expected, but it should shrink each day. A stain that grows quickly, thick or foul-smelling discharge, or spreading redness is a reason to call that same day.
- Sutures are usually removed about 2 weeks after surgery. Until then keep the wound out of water and do not scratch the surrounding skin.
🚿 Waterproof cover, showering and soaking
A short shower with the foot covered is not the same thing as putting the foot in water. The first is usually possible with a proper cover; the second is off limits until the incision has fully closed, because standing water softens newly closed skin and lets it open again.
More detailLess detail
- Before showering, cover the foot with a purpose-made waterproof cover or a plastic bag sealed above the ankle, and keep the foot out of the direct stream.
- Sit on a shower chair and do not put the operated foot on a wet floor. A bathroom floor is the slipperiest surface in the house, and in these weeks you are balancing on one foot.
- If the cover leaks and the dressing gets wet, change the dressing that same day or call the clinic; do not leave a wet dressing until tomorrow.
- Baths, swimming pools, the sea and hot tubs are off limits until the incision has fully closed and your surgeon agrees. That is usually some weeks after the sutures come out, not immediately afterwards.
- After the shower, dry the skin around the wound with a clean towel using gentle dabs; do not rub or drag.
💊 Your medicines and how to take them
Take only the medicines written on your own prescription. The aim in these days is to stay ahead of the pain rather than chase it: take the painkiller at regular times so pain does not peak before the next dose, and stretch the intervals gradually as it eases.
More detailLess detail
- Write a simple chart on paper or your phone: drug, time, and whether you have taken it. In the first drowsy days, memory is not reliable.
- If you miss a dose, take it as soon as you remember unless the next one is close; in that case take only the next dose and never double up to make up for it.
- Before adding any over-the-counter medicine — especially anti-inflammatory painkillers and cold remedies — check with your pharmacist or the clinic that it does not interact with your prescription and does not duplicate an ingredient.
- Opioid painkillers can cause constipation, nausea and drowsiness. Enough fluid, fibre and short walks indoors help; do not drive while taking them.
- Continue your regular medicines (blood pressure, diabetes, thyroid and so on) as prescribed unless your discharge sheet says otherwise.
🧊 Controlling the swelling: the most important job this month
Forefoot swelling surprises patients more than anything else: the foot swells from the midfoot to the toes, it is worse in the evening, and it takes months — not weeks — to settle completely. The reason is simple: the forefoot is the lowest point of the body and fluid struggles to leave it. The one tool that genuinely works is gravity.
More detailLess detail
- Keep the foot above the level of your heart, not merely on a footstool. Lie down and rest the calf and foot on two or three pillows so the ankle sits higher than your chest. Sitting on the sofa with the foot hanging down will swell it even if it does not hurt.
- In the first two weeks spend most of your waking hours with the foot up, and put a period of elevation between every period of sitting or standing. A simple rule: however long the foot has been down, give it that long back up.
- Apply cold over the dressing and indirectly: wrap the cold pack in a thin towel, keep it on for at most 20 minutes, and check the skin between applications. Never put ice straight onto skin and never let the dressing get wet.
- Do not apply any bandage or sock so tightly that it presses on the forefoot and toes. The reference rehabilitation guideline states this as an explicit safety limit: misplaced pressure can alter the corrected alignment of the big toe. If you want to use a compression stocking, ask at the clinic first.
- Swelling that is worse in the evening and better in the morning is the normal pattern for this operation. Swelling that appears overnight in one calf with pain and warmth is a different pattern and must be assessed straight away.
- Moving the ankle and the lesser toes is the body's own pump. Start those exercises — they are in the next stage — from the first day; complete stillness increases both the swelling and the risk of a clot.
- Keep expectations realistic: most of the swelling settles within the first 3 months, but mild evening swelling and a shoe that feels tight at the end of the day can persist for up to about a year. That delay is not a sign that the operation has failed.
🚶 Walking in the splint, on crutches, and weight bearing
In this guide the surgeon's protocol is that the foot stays in a below-knee splint for 45 days, walking is done on crutches only, and throughout that time the foot is either held in the air or rests on the heel alone. The post-operative shoe is not the protection of these 45 days; it starts once the splint comes off. That figure is not the same for everyone: a fusion of the tarsometatarsal joint or of the big-toe joint usually needs a longer restriction. What is written on your own discharge sheet is what you follow.
More detailLess detail
- Do not open the splint yourself. The below-knee splint stays on for 45 days and is opened only for the dressing change and the exercises, exactly as your surgeon directs, then closed again straight away. It is the splint that stops the forefoot bending and protects the corrected bone.
- For these 45 days only the heel touches the floor. Either hold the foot in the air or rest the heel alone on the ground; setting the whole sole down, rolling over the big toe and pushing off it are all off limits in this period.
- Take the crutches or walker seriously. In the first weeks you are balancing on one leg, and most setbacks in this period come from a fall at home rather than from exercise.
- Prepare the house for one-legged walking: clear loose rugs and cables, keep the route from bed to bathroom lit at night, and put everyday things within reach.
- Short, frequent walks beat one long walk. After each walk put the foot back up, and judge whether to do more by how the foot reacts that evening and the next morning.
- If a spacer or corrective bandage has been prescribed for you, apply it exactly as you were shown in the clinic. It holds the big toe in its new alignment and has a part in preventing the deformity from returning; do not apply it tightly, and check the skin between the toes daily.
- If your big-toe joint has been fused, the spacer usually does not apply, because the toe's alignment is now held by the screws and plate, not by soft tissue. This follows from the mechanics of the operation and has no direct source; the decision is your surgeon's.
🛡️ The first two weeks: protection, swelling and circulation
The goal of these two weeks is protection, not strength. In the base scenario of this guide you put no weight on the operated foot and you do not move the big-toe joint itself; the reference rehabilitation guideline asks for only three things in this window — swelling control, training in safe non-weight-bearing walking, and keeping the hip and knee moving.
One important exception: if your operation was a cheilectomy (removal of the bone spur), the programme differs from the start — weight bearing as tolerated is allowed and moving the big toe early matters. In that case take your own timetable from your surgeon and do not wait for the end of the second week.
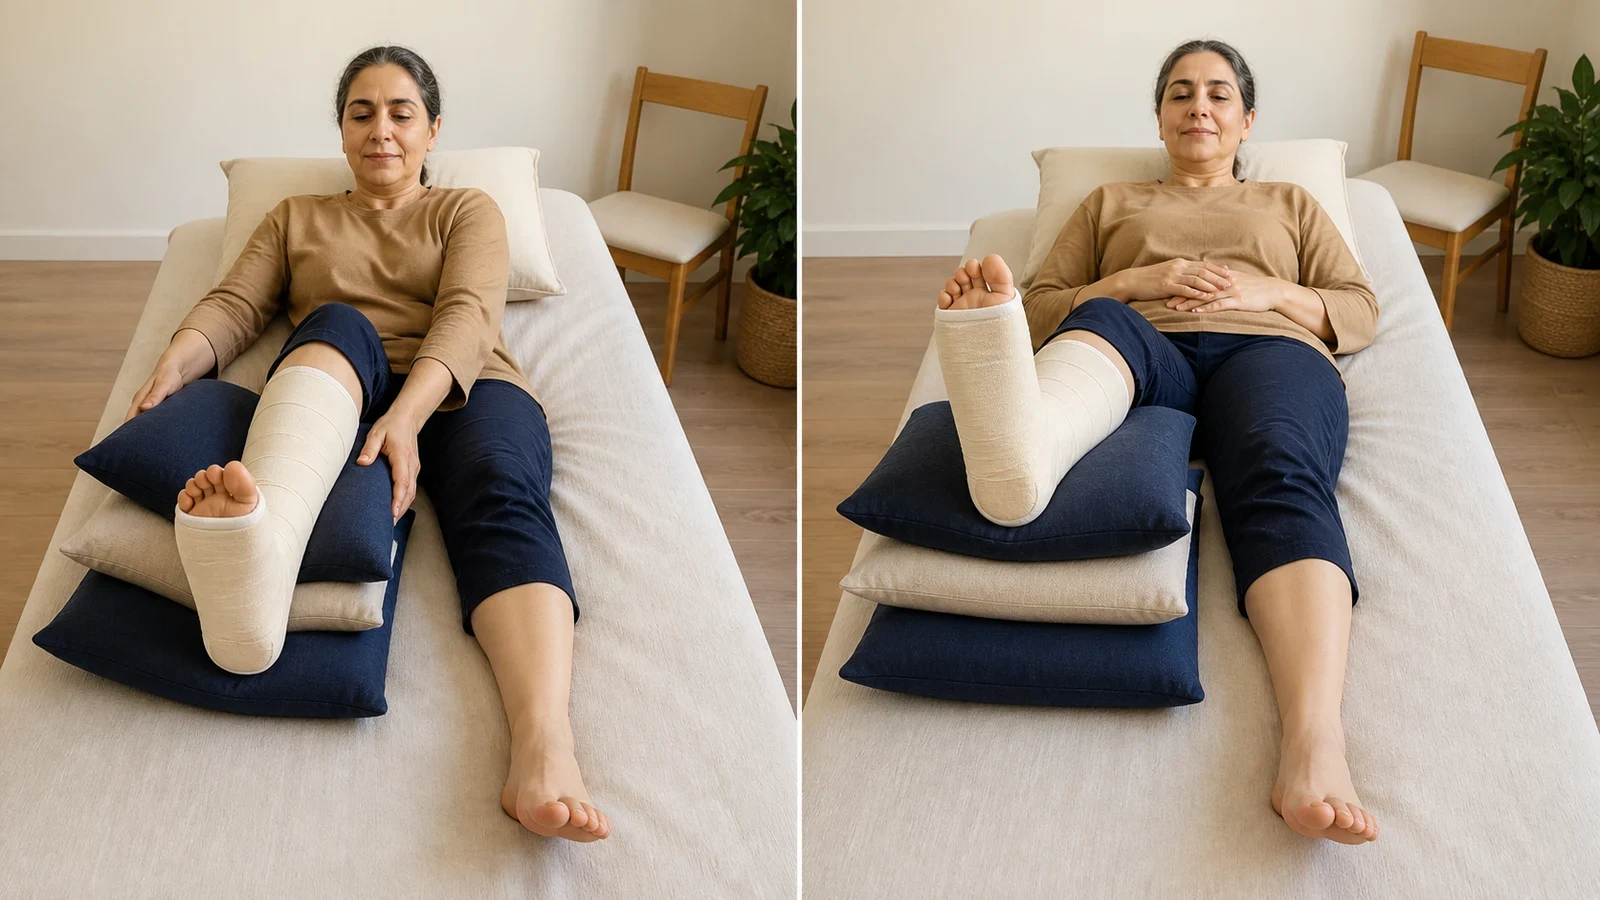
Correct Leg Elevation (Correct Leg Elevation)
The leg goes up with the splint on: position it so the ankle sits higher than your chest; this is the most effective anti-swelling measure of these two weeks, and the reference guideline asks for elevation «above the heart, as much as possible throughout the day». If the toes tingle or turn cold, change the position.
More detailLess detail
Purpose and why it matters: The forefoot is the lowest point of the body and fluid struggles to leave it. Raising the leg above the heart turns gravity to your advantage. Forefoot swelling is the best-known and longest-lasting complaint after this operation, and controlling it in the first weeks shortens the rest of the road.
Stage and starting criteria: From the first hour after surgery, with no precondition. The only exception is if you cannot lie flat for another reason; then raise the leg as high as is comfortable.
Equipment and environmental safety: Two or three firm pillows or a wedge cushion. The surface under the calf should be even and the heel must not rest on a sharp pillow edge. The reference guideline carries an explicit safety limit: no dressing or compression wrap may be applied so as to press on the operated foot and toes and alter the corrected alignment.
Starting position: Lie on your back on a bed or sofa. The whole calf of the operated leg rests on the pillows, the knee slightly bent and relaxed, the toes pointing at the ceiling. The ankle must sit clearly higher than the level of your chest.
How to do it:
- Stack the pillows before you lie down, so you are not rearranging them with the leg already up.
- Lie on your back and rest the calf of the operated leg on the pillows so the heel is supported too.
- Check the height: the ankle must be higher than your chest; if it is not, add another pillow.
- Do not lock the knee straight; leave it slightly bent and relaxed.
- Stay in this position, then get up if you need to and come back to it.
Range, side, and limits: This is a position, not a movement, so it has no range. Only the operated leg goes up; the other stays flat. Enough height is enough: a leg raised so high that the low back arches creates a new problem.
Breathing, speed and rhythm: Breathe calmly and normally. A few slow abdominal breaths in this position both settle you and help blood return from the leg.
Documented dose: The reference guideline gives no exact figure and says «as much as possible throughout the day». In practice that means most of your waking hours in the first two weeks, with a period of elevation between every period of sitting or walking. A workable rule: give the foot back as long up as it has spent down.
Rest: This exercise is itself the rest. Between sessions bring the leg down only for the bathroom, meals, or the short exercises of this stage.
Signs of correct performance: In this position the foot should feel lighter and less throbbing. If the throb in the forefoot eases after a while, the height was right.
Expected response: A gradual easing of throbbing and heaviness, and swelling that returns each time the foot goes down. That back-and-forth is entirely usual in the first two weeks.
Stop immediately if: If the toes tingle, go numb, turn cold or dusky, or the pressure under the dressing increases. Lower the leg a little, and if it does not settle within a few minutes, call the same day.
Common mistakes: Resting the foot on a stool or coffee table while sitting — that height is below the heart and does not reduce swelling. Putting the pillow only under the foot and leaving the calf hanging. And long spells sitting with the foot down on the assumption that «if it does not hurt, it is fine».
Easier version: If lying flat is difficult, stay half-sitting on the sofa and rest the calf on the armrest with two pillows; even a lower height beats a hanging foot.
Progression criteria: Once the morning swelling is clearly less and the foot feels less heavy at the end of the day, you can shorten the sessions — but keep elevating in the evening until the end of the second month.
Ankle Pumps and Lesser Toe Movement (Ankle Pumps and Lesser Toe Movement)
Move the ankle slowly up and down and open and close the four lesser toes, without letting the big toe join in. Several times a day, with the leg elevated. Stop and call if you get sharp calf pain or sudden swelling.
More detailLess detail
Purpose and why it matters: The calf muscle is the venous pump of the leg, and when it stays still for days that pump switches off. Ankle movement keeps it running, and moving the lesser toes drives fluid out of the forefoot — without touching the operated joint. The reference guideline includes ankle motion in the programme from this window onwards.
Stage and starting criteria: From the day of surgery, as soon as the anaesthetic has worn off enough for you to feel the ankle. The lesser-toe movement only if your dressing leaves those toes free; if the dressing covers them, wait until your first appointment.
Equipment and environmental safety: No equipment needed. Do it in the same elevated position so the anti-swelling effect doubles. Take care the heel does not slide off the edge of the pillow as you move.
Starting position: Lying or half-sitting with the calf of the operated leg on the pillow. The knee relaxed, the toes pointing at the ceiling, and the big toe under no pressure or stretch.
How to do it:
- Slowly pull the toes towards your head until you feel a gentle stretch behind the calf, then hold for one or two seconds.
- Slowly point the foot down, only as far as is comfortable, and pause briefly again.
- Repeat that up-and-down a number of times; the movement should be slow, not jerky.
- Then gently curl and straighten the four lesser toes while the big toe stays still.
Range, side, and limits: The comfortable range of the ankle on the operated side. The big toe is not moved at all at this stage, neither actively nor with the hand. If you find yourself curling the toes to point the foot down, or feel a pull inside the dressing, reduce the range. Move the other ankle separately as well.
Breathing, speed and rhythm: Breathe slowly and continuously; out as you pull the toes up, in as you return. Speed adds nothing to this exercise.
Documented dose: The published guidance for this operation gives no sets or repetitions for ankle pumps and lists only «active and passive ankle motion», so we do not invent a number either. The practical principle is that frequency matters more than count: several short rounds spread through the day beat one long session. Take the exact number from your physiotherapist or treatment team.
Rest: No rest is needed between repetitions. If the calf tires, wait a minute and carry on.
Signs of correct performance: A gentle stretch behind the calf as you pull the toes up, and a feeling of warmth in the calf after a few rounds. You should feel no pull or pain in the forefoot or big toe.
Expected response: Ankle stiffness and slightly numb-feeling toes in the first days are normal and ease day by day.
Stop immediately if: Sharp pain or severe cramping in the calf, sudden one-sided calf swelling, warmth and redness at the back of the calf, or pull and pain at the incision line. For the first three, call the same day; calf pain after foot surgery must never be ignored.
Common mistakes: Letting the big toe join in. Doing it fast and jerkily. Doing it with the foot hanging down, which takes away half the benefit. And gripping the toes with the hand and bending them — at this stage only your own active movement is allowed.
Easier version: If the full range is uncomfortable, do only the upper half — pulling the toes towards your head; that alone still works the calf pump.
Progression criteria: Once the movement is free of stiffness and of any pull in the dressing, motion of the big-toe joint itself is added in the next stage — but only if your big-toe joint has not been fused.
Hip and Knee Range of Motion (Hip and Knee Range of Motion)
Lying down, bend and straighten the knee and take the leg out to the side from the hip and back, without the foot touching the floor. Several times a day. Stop if your low back hurts or a pull reaches the incision line.
More detailLess detail
Purpose and why it matters: Two weeks without weight on one leg quickly weakens that leg's thigh and hip muscles and later makes walking without a limp harder. That is exactly why the reference guideline puts active hip and knee movement in the programme for this fortnight. A persistent limp after foot surgery often comes from a weak hip rather than from the foot itself.
Stage and starting criteria: From the second or third day, once the early pain has eased a little. It does not depend on the wound or on weight-bearing permission, because no force reaches the forefoot.
Equipment and environmental safety: No equipment, on a bed or a firm mat. If your back is sensitive, bend the opposite knee and place that foot flat on the bed to flatten the hollow of the low back.
Starting position: Lie on your back with the operated leg straight and the toes pointing at the ceiling, arms by your sides. Throughout the movement the leg slides on the bed surface or stays just above it, and is never placed on the floor.
How to do it:
- Slide the heel along the bed towards your buttock so the knee bends gently, then straighten it again.
- Repeat that bend-and-straighten a number of times at a slow speed.
- Then slide the straight leg out to the side along the same surface and bring it slowly back to the middle.
- Throughout, keep the toes pointing at the ceiling and do not let the leg rotate.
Range, side, and limits: A comfortable, pain-free range in both movements. The foot must not be put on the floor and the toes must not press into the bed. Do the same on the other leg so the two sides keep their balance of strength.
Breathing, speed and rhythm: Breathe normally and keep the movement slow. Do not hold your breath.
Documented dose: The reference guideline names only «active hip and knee range of motion» and gives no sets or repetitions, so we do not invent a number. Several short sessions a day, enough to produce mild fatigue and no more. Take the exact number from your physiotherapist.
Rest: A few seconds between repetitions and a few hours between sessions.
Signs of correct performance: Smooth, painless movement of the knee and hip, a low back that stays on the bed, and a leg that does not rotate.
Expected response: Mild thigh fatigue after a few repetitions is normal and passes within a few minutes.
Stop immediately if: Back pain, knee pain, throbbing in the forefoot, or a pull at the incision line. If the forefoot swells after this exercise, reduce the range and the number next time.
Common mistakes: Putting the foot on the floor to make the movement easier — that is the forbidden weight bearing. Letting the leg rotate as it goes out to the side. Pressing the toes into the bed for leverage. And doing it only on the operated leg and forgetting the other one.
Easier version: If bending the knee is difficult, do only the sliding of the leg out to the side and back. Add the knee bend as the pain settles.
Progression criteria: Once these movements are painless and the foot does not react, and you have permission to bear weight, the next stage moves you on to heel-weight-bearing gait training.
↔️ The second two weeks: sutures, starting big-toe motion and the first steps
Sutures usually come out about 2 weeks after surgery, and two new things start from here: moving the ankle and the lesser toes, and walking on crutches with heel contact while the splint stays on. The reference guideline treats this window as the time to begin active and passive motion of the big-toe joint, with the proviso that no pressure falls on the surgical site.
Know two important exceptions now. If your big-toe joint has been fused (arthrodesis), moving that joint is not allowed at any stage, and the reference guideline repeats that prohibition in every phase. And if your operation was a fusion — of either the big-toe joint or the tarsometatarsal joint — your surgeon may have written a longer weight-bearing restriction of up to 6 to 8 weeks; in that case you start the walking part of this section later.
Heel-Weight-Bearing Gait Training (Heel-Weight-Bearing Gait Training)
Walk in the splint and on crutches, resting the heel alone on the floor; the forefoot and big toe take no load at all. Several short sessions a day. If swelling or pain increases afterwards, walk less next time.
More detailLess detail
Purpose and why it matters: This does two things at once: it returns weight to the foot gradually while protecting the newly healing bone. The reference guideline puts «gait training with heel-touch weight bearing» in the programme for exactly this window. The correct walking pattern is built here; a limp that settles in over a few weeks is harder to undo later.
Stage and starting criteria: From the early days with your surgeon's permission, but for all 45 splint days heel contact is the ceiling and never more. If your operation was a fusion, that permission may be deferred to 6 to 8 weeks. If it was a cheilectomy, weight bearing as tolerated is allowed from the start and this stage began earlier for you.
Equipment and environmental safety: The below-knee splint and crutches or a walker; the post-operative shoe is not worn during these 45 days — its turn comes after the splint. In a randomised trial on exactly these operations, a flat rigid shoe beat the forefoot-offloading shoe on satisfaction with mobility (86% versus 62%) and with stability (91% versus 70%), with no difference in union or in recurrence of the deformity. The route you walk should be dry, well lit and free of loose rugs.
Starting position: Standing, with the below-knee splint on the operated leg and a flat comfortable shoe on the other foot. Crutches correctly positioned and at the right height. Trunk upright and eyes forward, not down at the foot.
How to do it:
- Place the crutches one step ahead and keep the weight on them and on the sound leg.
- Bring the operated foot forward and put the heel down first.
- Keep the heel alone on the floor; the front of the splint stays off the ground and the whole sole is never planted.
- Instead of rolling over the big toe, lift the foot flat off the floor and take the next step with the sound leg.
- Keep the steps short and even, and after each short session put the foot back up.
Range, side, and limits: The amount of weight is exactly what your surgeon has written and no more. The forefoot and big toe take no push-off load: rolling over the big toe is the very movement this stage exists to prevent. The splint stays on throughout and is never opened for walking.
Breathing, speed and rhythm: Breathe normally and keep the rhythm of the steps slow and even. Hurrying and long strides both upset your balance and send load into the forefoot.
Documented dose: The published sources set no distance or step count for this stage, and we do not invent one. The practical principle is this: several short sessions a day, and the measure for doing more is how the foot reacts that evening and the next morning — not how it feels at the time.
Rest: Elevate the foot between sessions. If swelling clearly increases after walking, make the next session shorter and the gap longer.
Signs of correct performance: Short even steps, a heel that touches the ground first, a shoe that sets down flat, and a big toe that at no point bends or takes load.
Expected response: Feeling unsteady and tiring quickly in the first sessions is normal and improves with repetition. A small increase in swelling in the first days of walking is also usual, provided it settles again with elevation.
Stop immediately if: Sharp pain at the operated site when you take weight, a sudden crack, a sensation of something shifting in the forefoot, or swelling that no longer settles with elevation. Stop walking and call the same day.
Common mistakes: Opening the splint for «just a few steps». Rolling over the big toe at the end of the step. Long strides to get there faster. Dropping the crutches before you are allowed to. And one long walk instead of several short ones.
Easier version: If your balance is poor, walk indoors first alongside a wall or with a walker, practising short routes between two fixed points. Put off going outdoors until the step pattern is steady.
Progression criteria: Once you can cover short routes at home without extra swelling and without limping, the same pattern simply continues to day 45. Increasing the weight and giving up the crutches are discussed after the splint comes off and with your surgeon's agreement, and moving out of the post-operative shoe into a wide-toe-box trainer is usually around weeks 10 to 14.
Scar Mobilisation (Scar Mobilisation)
Once the wound has fully closed, press gently on the scar with a fingertip and glide it in different directions. A few minutes daily. Do not start if the wound still has scabs or any discharge.
More detailLess detail
Purpose and why it matters: The scar on the border of the foot sits exactly where the shoe touches. A scar that sticks to the tissue underneath becomes painful in shoes and limits the movement of the big toe. The reference guideline includes scar mobilisation, once the incisions are fully healed, in the programme for this window.
Stage and starting criteria: With the splint opened briefly and closed again afterwards, and only after the wound has fully closed and the scabs have come off by themselves — usually a few days after the sutures are removed. Never start on an open, scabbed or discharging wound.
Equipment and environmental safety: Only your fingertip. If you want to use an oil or moisturiser, ask your treatment team first and do not apply anything to the scar that was not given to you.
Starting position: Sit and rest the operated ankle on the opposite thigh so the inner border of the foot is easy to see and reach. Have enough light to see the colour and condition of the scar.
How to do it:
- Place one or two fingertips on the scar and press gently, just enough to indent the skin a little.
- Without lifting the finger, glide the skin back and forth along the line of the scar.
- Then repeat across the scar, and afterwards in small circles.
- Finish by stroking the surrounding skin gently to reduce its sensitivity to touch.
Range, side, and limits: Only the skin and the tissue beneath it move; the big-toe joint is not displaced in this exercise. The pressure must be gentle: the aim is to glide the skin, not to press on the bone underneath. If the skin blanches or burns, the pressure was too much.
Breathing, speed and rhythm: Breathe normally. If the area is sensitive, start slowly and briefly and lengthen the session as the skin gets used to it.
Documented dose: The published source gives no specific dose for scar mobilisation after this operation and simply lists it as part of the programme. In practice a few minutes daily, done regularly, is enough; consistency matters more than intensity.
Rest: No particular rest is needed. If the skin becomes red and sore, leave a day between sessions.
Signs of correct performance: A scar that moves a little under the finger and is not stuck to the tissue underneath. Over the weeks it becomes softer, paler and less sensitive.
Expected response: Sensitivity to touch, numbness or mild tingling along the scar is common in the first weeks. The dorsomedial sensory nerve of the big toe runs right through this area, and local numbness after big-toe surgery is not uncommon; it usually diminishes with time.
Stop immediately if: Any part of the incision line opening, fresh discharge, spreading redness, or pain that persists after the session. In these cases stop and call the same day.
Common mistakes: Starting before the wound has fully closed. Picking off scabs. Pressing hard on the idea that «harder is better». And rubbing random substances and oils onto a fresh scar.
Easier version: If the area is very sensitive, begin by stroking only the surrounding skin with a soft cloth and add gentle pressure a few days later.
Progression criteria: Once the scar is soft and touching it is not uncomfortable, you can reduce the frequency; but while a shoe still presses on that area, it is worth continuing.
🌱 The second month: strength, flexibility and weight coming back
Two things change this month: more weight returns to the foot, and the programme moves from «moving» to «strengthening». For this window the reference guideline asks for full ankle and big-toe range, stretching, and strengthening exercises for the foot and ankle, and it allows the stationary bike to start — with one explicit exception: after a Lapidus procedure the bike waits until week 10.
Until day 45 you are still in the splint, and the post-operative shoe starts after that; moving out of the shoe into a wide-toe-box trainer is usually around weeks 10 to 14, not before.
Foot and Ankle Strengthening (Foot and Ankle Strengthening)
Seated with the sole flat on the floor, lift the arch of the foot without curling the toes and hold it; then take the ankle in and out against a band. Several sessions a day. Stop if you get cramp in the sole or pain in the forefoot.
More detailLess detail
Purpose and why it matters: After weeks without weight, the small muscles of the sole and the ankle muscles weaken, and that weakness is what makes the foot unsteady when walking. For this window the reference guideline explicitly includes «strengthening exercises for the foot and ankle»; the aim is to prepare the foot to take full weight in the third month.
Stage and starting criteria: From the start of the second month, with the splint opened briefly and provided the wound has fully closed. Until day 45 it is done seated and without weight bearing, and the sole takes no load in it. If you are still under the longer fusion restriction, the band part can be done seated and unloaded; take the timing of the arch part from your surgeon.
Equipment and environmental safety: A firm chair and a light exercise band. The sole should rest on a flat, non-slip surface. Loop the band around the midfoot and not around the toes, so the load does not fall on the forefoot.
Starting position: Sit on the chair with the knees at about 90 degrees and both soles fully on the floor. Trunk upright and weight on both buttocks. For the band part, bring the operated foot slightly forward.
How to do it:
- Without curling the toes and without lifting the heel, raise the inner arch of the foot a little, as if drawing the heel and the ball of the foot gently towards each other.
- Hold for a few seconds, then let go completely. The toes must stay flat and relaxed on the floor throughout.
- For the second part, loop the band around the midfoot and take the ankle slowly outwards against the resistance and back.
- Do the same for the inward direction; the movement must be slow and controlled, not jerked.
Range, side, and limits: The arch rises only a little; this is a small movement, and if the toes curl or the heel lifts it is no longer the same exercise. In the band part keep the range comfortable and never loop the band around the toes or the big toe. If your big-toe joint has been fused this exercise is fine for you, because it does not move that joint.
Breathing, speed and rhythm: Do not hold your breath while holding the arch; breathe out gently. In the band part, breathe out as you push and in as you return.
Documented dose: The reference guideline gives no sets or repetitions for these and names only «strengthening exercises for the foot and ankle», so we invent no number. The practical principle: several short sessions a day, stopping before real fatigue. Get your numbers from your physiotherapist.
Rest: A few seconds between repetitions. If the sole cramps, stop, relax the foot, and start the next session more lightly.
Signs of correct performance: An arch that has lifted a little while the toes stay flat, and in the band part a movement that comes only from the ankle rather than from turning the whole leg or the knee.
Expected response: Mild fatigue in the sole and ankle after a few repetitions is normal. A brief cramp in the sole in the first sessions is also common and settles if you shorten the hold.
Stop immediately if: Pain at the operated site, pain in the forefoot when you push against the band, cramp that does not settle when you relax, or swelling that does not go back down after the session.
Common mistakes: Curling the toes instead of lifting the arch — the commonest error here. Lifting the heel. Looping the band around the toes or the big toe. And turning the whole leg from the knee instead of moving the ankle.
Easier version: If you cannot feel the arch lifting, practise first without the band using very short holds, and hold the toes flat with your hand so they cannot curl.
Progression criteria: Once you can hold the arch without cramping and control the band's resistance easily, the third month moves you on to standing work and calf raises.
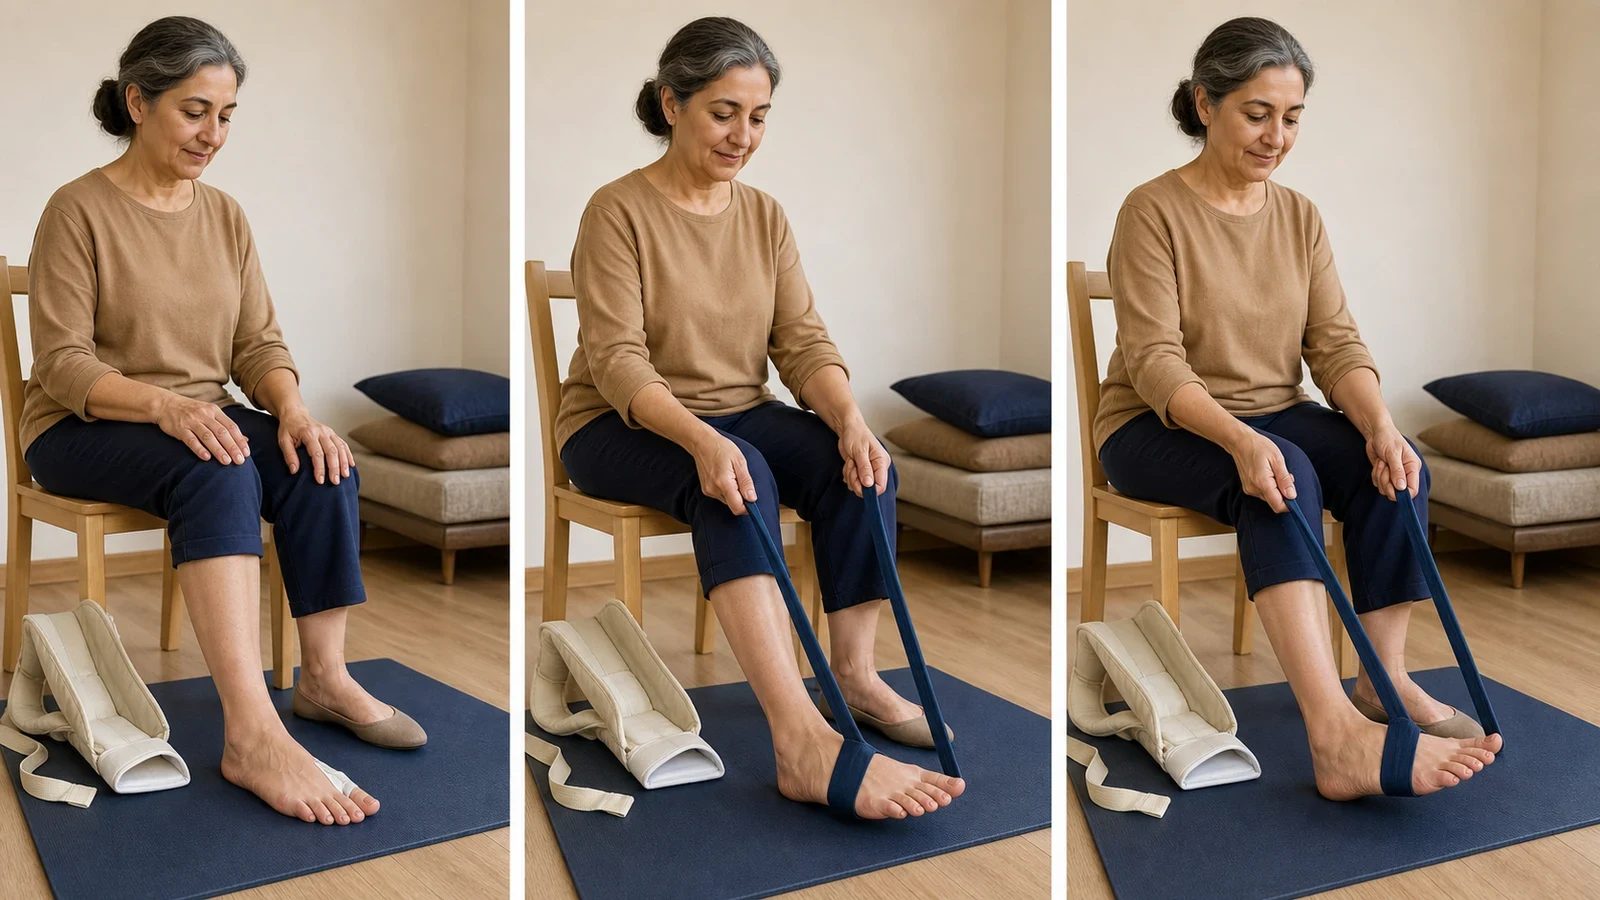
Calf and Achilles Stretch (Calf and Achilles Stretch)
Seated with a towel, or standing facing a wall, stretch the calf gently and hold for a few seconds. Daily and pain-free. If the stretch transfers to the forefoot or the big toe, change the position.
More detailLess detail
Purpose and why it matters: The published forefoot-surgery source gives a clear reason for this stretch: a tight Achilles tendon increases forefoot stresses during gait. In other words a short, tight calf loads exactly the region that has just been operated on. Keeping the calf supple reduces the load on the first ray with every step.
Stage and starting criteria: The seated towel version can start at the beginning of the second month, because no weight goes through the foot. The standing wall version only after weight bearing is permitted and with suitable footwear.
Equipment and environmental safety: A long towel or a band for the seated version, and a wall and a non-slip surface for the standing one. Loop the towel around the heel and midfoot, not around the toes and big toe.
Starting position: Seated version: on the floor or the bed with the leg straight in front of you and the towel around the foot. Standing version: facing the wall, hands on the wall, the operated leg behind with the heel kept down and the toes pointing forward.
How to do it:
- Loop the towel around the foot and hold both ends with your hands.
- Pull the foot gently towards you until you feel a mild stretch behind the calf, keeping the knee straight.
- Hold for a few seconds and release slowly; do not bounce.
- In the standing version, bend the front knee a little so the weight moves forward while the back heel stays on the floor.
Range, side, and limits: The stretch should be felt only behind the calf. If you feel it in the forefoot, in the arch or in the big toe itself, move the towel further back and reduce the range — that means force is reaching the operated area. The stretch must never be painful.
Breathing, speed and rhythm: Breathe out as you take up the stretch and do not hold your breath. The stretch should be steady and calm, not bounced.
Documented dose: The reference guideline lists «stretching» in the programme for this window but gives no duration or count, and we do not invent one. The practical principle: daily, a few repetitions, each time only to the point of a mild stretch. Take the exact numbers from your physiotherapist.
Rest: A few seconds between repetitions. If the calf cramps after a stretch, shorten the hold.
Signs of correct performance: A comfortable, tolerable stretch behind the calf, a knee that has stayed straight, and in the standing version a heel that has not lifted off the floor.
Expected response: Marked calf tightness in the first sessions is normal, especially after weeks of inactivity, and improves week by week.
Stop immediately if: Sharp pain behind the calf, pain at the operated site, or a stretch that is felt in the forefoot. For the first two, stop and raise it at your next appointment.
Common mistakes: Looping the towel around the toes and big toe instead of the midfoot — that sends force straight into the operated joint. Bouncing the stretch. Bending the knee in the seated version. And letting the heel lift in the standing version, which makes the stretch useless.
Easier version: If reaching the foot is difficult, do the same stretch with the knee slightly bent or use a longer band. The seated version is always the safer option.
Progression criteria: Once the seated version is easy and full weight bearing is permitted, move on to the standing wall version; this stretch is the prerequisite for the calf raises of the third month.
Stationary Bike (Stationary Bike)
Pedal a stationary bike at low resistance with the heel on the pedal, not the forefoot. After a Lapidus procedure do not start until week 10. Stop if forefoot pain or swelling increases.
More detailLess detail
Purpose and why it matters: After two months of reduced activity, cardiovascular fitness drops, and that is what makes patients tire quickly on returning to normal life. The reference guideline puts the stationary bike in the programme for this window with exactly that aim, and with the explicit proviso «avoiding pressure on the forefoot».
Stage and starting criteria: From the beginning of the second month for an osteotomy, with your surgeon's permission. For Lapidus the published source is explicit: not until week 10. For a big-toe fusion, ask your surgeon for the timing.
Equipment and environmental safety: A stationary bike with the saddle at the right height, and a shoe with a firm sole. While the splint is on this exercise is not done — it starts after day 45; at that point, if you are still in the post-operative shoe, pedalling in it is usually easier and safer than in a soft shoe. Use a pedal without straps or clips so you can take the foot off freely.
Starting position: Set the saddle so that at the lowest point of the pedal stroke the knee is almost — but not completely — straight. The heel of the operated foot rests on the pedal, not the forefoot. Trunk upright and hands relaxed on the handlebars.
How to do it:
- Before getting on, check the saddle height and that there are no straps on the pedal.
- Place the heel of the operated foot on the pedal and make sure the forefoot is free and takes no pressure.
- Start with very low resistance and a slow cadence, and complete a few full revolutions.
- If it is all pain-free, increase the duration a little in later sessions — not the resistance.
Range, side, and limits: Resistance stays low this month; the aim is circulation and fitness, not strength. The forefoot must at no point press on the pedal, and if you have to put the ball of the foot on the pedal to pedal at all, it is still too early. If your big-toe joint has been fused, pedalling with the heel is fine for you because the joint does not move.
Breathing, speed and rhythm: Breathe at a comfortable rhythm. If you cannot speak a full sentence while pedalling, the intensity is too high.
Documented dose: The reference guideline only permits the bike to start and gives no duration or intensity, so we invent no number. The practical principle: start short, increase duration before resistance, and judge by how the foot reacts that day and the next morning.
Rest: Leave at least a day between sessions so you can see how the foot reacts, and elevate the foot after each one.
Signs of correct performance: A smooth full pedal revolution without forefoot pain, a heel that stays put on the pedal, and a trunk that does not rock to reach the pedal.
Expected response: General fatigue and a little knee stiffness in the first sessions are normal. A small increase in foot swelling on the same day is also usual, provided it settles with elevation.
Stop immediately if: Pain at the operated site, forefoot pain while pedalling, or swelling that has not settled by the next morning. If you have to press through the forefoot to complete a revolution, end the session.
Common mistakes: Putting the ball of the foot on the pedal instead of the heel. Increasing resistance before duration. Using pedal straps or clips. And starting after a Lapidus before week 10.
Easier version: If a full revolution is painful, start with half-revolutions back and forth at zero resistance and build up to a full revolution over a few sessions.
Progression criteria: Once pedalling with the heel is painless and easy and full weight bearing is permitted, you can gradually move the foot to a more normal position on the pedal, and in the third month add walking and calf raises. Swimming and pool walking are usually added from around weeks 10 to 14.
🏋️ The third month: loading the big toe and getting the walking pattern back
This is the month of getting back into a normal shoe and back into a normal step. The reference guideline places the gradual move out of the post-operative shoe into a trainer with a wide, long toe box at around weeks 10 to 14, and adds pool walking and the start of balance and proprioception work in the same window.
Why loading the big toe matters: in the one study that measured plantar pressure after this operation, patients who received a rehabilitation and gait-training programme markedly increased the force passing through the head of the first metatarsal and through the big toe itself by 6 months. A big toe that does not work during the step does not merely stay stiff; it hands its job to the rest of the forefoot.
Double-Leg Calf Raise (Double-Leg Calf Raise)
Stand beside a support and rise slowly onto the balls of both feet, then lower under control. The weight must fall over the big toe and second toe, not on the outer border of the foot. Stop if you feel pain at the operated site.
More detailLess detail
Purpose and why it matters: This is the first exercise that deliberately passes weight over the big toe itself, and it is the frame on which a normal step is built. Without it a patient learns to load the outer border of the foot, and that habit both keeps the limp and shifts load onto the other metatarsals.
Stage and starting criteria: From the start of the third month and only once full weight bearing is painless and your surgeon has agreed. If you are still in the post-operative shoe or under a weight restriction, this exercise is not yet for you.
Equipment and environmental safety: A fixed support beside you — a counter edge, the back of a heavy chair, or a wall — and a trainer with a wide toe box. The surface must be non-slip. The support is for balance, not for hauling yourself up with your arms.
Starting position: Standing with the feet hip-width apart and parallel, weight even on both feet. One hand resting lightly on the support. Trunk upright and eyes forward.
How to do it:
- Shift the weight onto both feet and slightly towards the big toe and second toe.
- Lift both heels off the floor slowly and together until you are on the balls of the feet.
- Hold at the top for one or two seconds and check that the ankles have not rolled outwards.
- Lower the heels slowly and under control; dropping them sends the impact straight into the forefoot.
Range, side, and limits: Only as high as is painless and does not roll the ankles outwards; full height is not the target this month. The weight must pass over the big toe and second toe: if the foot rolls to its outer border, lower the height. Both legs work together — single-leg work comes later.
Breathing, speed and rhythm: Breathe out on the way up and in on the way down. Take two to three seconds up and the same down; speed removes the benefit and adds risk.
Documented dose: The published sources for this operation give no sets or repetitions for calf raises and name only «strengthening exercises for the foot and ankle», so we invent no number. The practical principle: start with few, add only when the foot has not reacted the next day, and take your numbers from your physiotherapist.
Rest: A few seconds between repetitions and at least a day between heavier sessions, so you can see how the foot reacts.
Signs of correct performance: Two heels that rise together and to the same height, ankles that have stayed straight, and pressure felt at the top of the movement under the big toe rather than under the outer border of the foot.
Expected response: Fatigue and mild burning in the calf on the last repetitions is normal. A little stretch in the forefoot and the big-toe joint is also usual in the first sessions and should settle within a few minutes.
Stop immediately if: Sharp pain at the operated site or in the big-toe joint, a sensation of something shifting, swelling that does not settle after the session, or an inability to lower the heels under control. Stop and raise it at your next appointment.
Common mistakes: Rolling the weight to the outer border of the foot to escape pressure on the big toe — the very habit this exercise exists to undo. Hauling yourself up on the support with your arms. Dropping the heels. And rising asymmetrically so the sound leg does all the work.
Easier version: If a full rise is painful, lift the heels only a few centimetres, or take some of the weight through both hands on the support and reduce that help gradually.
Progression criteria: Once the double-leg rise is painless and needs no hand support, and the weight clearly passes over the big toe, single-leg work and uneven surfaces are added in the next stage.
Balance and Proprioception (Balance and Proprioception)
Stand beside a support and transfer your weight onto the operated foot; then practise balancing on it while reducing the help from your hand. Daily and brief. If you lose balance or it hurts, put the hand back on the support.
More detailLess detail
Purpose and why it matters: After weeks without weight, the sense of where the foot is in space becomes slow; that is what makes a patient hesitant on uneven ground. The reference guideline puts the start of proprioceptive, balance and motor-control work in this window, in closed chain — that is, with the foot on the ground.
Stage and starting criteria: From the beginning of the third month, once standing with full weight on the operated foot is painless. If you are still under a weight restriction, practise only partial weight transfer for now.
Equipment and environmental safety: A fixed support beside you and a non-slip surface. Wear a trainer at first; barefoot practice only once balance in shoes is completely steady. Do not add any unstable surface such as a balance pad this month.
Starting position: Standing beside the support with the feet hip-width apart. One hand on the support. Trunk upright, eyes on a fixed point ahead — not on the foot, because looking down makes balance worse.
How to do it:
- Slowly transfer the weight from the sound leg onto the operated one and stay there for a few seconds.
- Lift the sound foot slightly off the floor while one hand is still on the support.
- Once steady, reduce the pressure of the hand until you are only touching the support with your fingertips.
- Hold for a few seconds, then put the sound foot down and rest.
Range, side, and limits: Stay on a flat, firm surface. Keep the eyes open this month; eyes-closed work and unstable surfaces belong to the next stage. If your big-toe joint has been fused, this exercise is allowed and useful for you, because it does not move that joint.
Breathing, speed and rhythm: Breathe normally and calmly. Holding the breath while trying to balance is common and itself makes balance worse.
Documented dose: The reference guideline only places the start of balance and proprioception work in the programme and gives no duration or count, so we invent no number. The practical principle: short and daily beats long and occasional, and end the session as soon as the quality of your balance drops.
Rest: Between repetitions put the sound foot down and rest for a few seconds. Fatigue is the first thing that destroys balance.
Signs of correct performance: A pelvis that stays level, a knee that does not fall inwards, and a foot that makes small adjustments without shaking. The toes should stay relaxed rather than clawing at the floor.
Expected response: Noticeable unsteadiness in the first days is entirely normal and improves within a few weeks. Early fatigue of the sole and calf muscles is also expected.
Stop immediately if: Pain at the operated site, a complete loss of balance, or swelling that persists after the session. If you have to claw the toes hard to stay up, the exercise is still too much for you.
Common mistakes: Looking at the foot instead of at a point ahead. Really leaning on the support instead of touching it lightly. Clawing the toes hard into the floor. And adding an unstable surface before balance on a flat one is steady.
Easier version: If lifting the sound foot is not yet possible, practise only shifting weight from one foot to the other and hold a few seconds on the operated side.
Progression criteria: Once you can stand on the operated foot without touching the support and without wobbling, uneven surfaces and more advanced single-leg work are added in the next stage.
🎯 After the third month: full return to activity and sport
From here on, progress is measured by capability rather than by the calendar. In the roughly 14- to 20-week window the reference guideline adds single-leg activities on varying surfaces and sport-specific movement patterns, and makes return to all activities — sport excepted — conditional on meeting the strength, gait and range-of-motion goals.
High-impact sport is the last thing to come back. From around week 20 the reference guideline allows low-impact sport first (cycling, swimming, elliptical) and only after that is well tolerated, high-impact activity such as running and jumping; a summary based on the UK national guidance likewise gives 3 to 6 months of avoiding sport. Both say the same thing: there is no fixed date, and the criterion is function.
Single-Leg Work on Varying Surfaces (Single-Leg Work on Varying Surfaces)
Stand on the operated foot and repeat the same task on carpet, a mat and a softer surface; then add a single-leg calf raise. Brief and regular. If the pelvis drops or the knee falls inwards, go back to an easier surface.
More detailLess detail
Purpose and why it matters: Real life does not happen on flat ground. That is precisely why the reference guideline places single-leg work on varying surfaces in this window: the foot has to learn to adjust on carpet, gravel, stairs and slopes as well. This is what closes the gap between «I can walk» and «I trust my foot».
Stage and starting criteria: After single-leg standing on a flat surface is possible without hand support and without wobbling — usually from around the fourth month. Going to an unstable surface earlier only raises the risk of a fall.
Equipment and environmental safety: A fixed support always within reach, and surfaces that get progressively softer: hard floor, carpet, a thin mat and then a thicker one. A trainer with a wide toe box. Purpose-made unstable surfaces only on your physiotherapist's advice.
Starting position: Standing on the operated foot with the other foot slightly raised and the support within a step. Pelvis level, knee tracking over the toes, trunk upright. Eyes on a fixed point ahead.
How to do it:
- On a hard floor, practise single-leg standing several times, a few seconds each.
- Once it is steady, repeat the same on carpet and then on a thin mat.
- Next, from that same single-leg position rise slowly onto the ball of the foot and lower under control.
- Finish by taking a few steps on the soft surface, making sure the weight passes over the big toe with each step.
Range, side, and limits: Make the surface harder one step at a time, not several at once. The single-leg calf raise is added only when the double-leg version is completely painless. If your big-toe joint has been fused, these exercises are allowed because they do not move that joint and work only balance and strength.
Breathing, speed and rhythm: Breathe normally and do not hold it. If you find yourself holding your breath, you are straining to stay balanced and the surface is still too hard for you.
Documented dose: The reference guideline names single-leg work on varying surfaces but gives no duration or count, and we invent none. The practical principle: short regular sessions, and progression based on quality rather than on numbers.
Rest: Put both feet down between repetitions. End the session as soon as wobbling starts; balance practice on a tired foot only rehearses a bad pattern.
Signs of correct performance: A level pelvis, a knee that stays over the line of the toes, a foot that makes small adjustments, and the ability to reproduce the same quality on a softer surface.
Expected response: More unsteadiness on a soft surface than on a hard one is normal and improves within a few sessions. Fatigue in the sole and calf is also expected.
Stop immediately if: Pain at the operated site, swelling that persists after the session, or repeatedly losing balance. If you have to tilt the trunk or let the pelvis drop to stay up, go back to an easier surface.
Common mistakes: Jumping from a hard floor to a very unstable surface. Continuing after the wobbling starts. Tilting the trunk to compensate for a weak hip. And adding the single-leg calf raise before the double-leg version is painless.
Easier version: Stay on the hard surface and lengthen the hold a little instead of making the surface harder. Or keep one finger on the support so you feel secure.
Progression criteria: Once you can stand on the soft surface without support and without losing quality, and the single-leg calf raise is painless, review the return-to-sport criteria with your treatment team.
Graded Return to Sport (Graded Return to Sport)
Establish low-impact activity first (cycling, swimming, elliptical) and only once that is fully tolerated move gradually to running and jumping. The criterion is function, not a date. If pain or swelling returns after any step, drop back one step.
More detailLess detail
Purpose and why it matters: Returning to high-impact sport too soon is what puts months of care at risk. A graded programme raises the load step by step and lets you retreat before an injury rather than after it. The good news is that returning to sporting activity after these operations is usual — even after a big-toe fusion, a study comparing patients with other procedures reported comparable return to sport.
Stage and starting criteria: Low-impact activity from around the fourth month onwards and after meeting the strength, gait and range-of-motion goals. High-impact sport only after the low-impact stage is well tolerated; the reference guideline puts it from around week 20 and the summary based on the UK national guidance gives a 3-to-6-month range.
Equipment and environmental safety: A trainer with a wide, long toe box that puts no pressure on the border of the big toe. The reference guideline is explicit: shoe styles that squeeze the toes in any way should not be worn. If your big-toe joint has been fused, high-heeled shoes are out.
Starting position: This is a programme rather than a single movement, so the starting position is the correct position of the activity itself: trunk upright, soft landings, and weight passing over the line of the big toe and second toe rather than the outer border of the foot.
How to do it:
- Step one: build up longer walking, cycling and swimming until they are tolerated without pain and without swelling the next day.
- Step two: add the elliptical or walking uphill and on uneven ground, and again judge by the next day's reaction.
- Step three: begin light running with short run-walk intervals, increasing only one variable per session — duration or speed.
- Step four: add jumping, rapid changes of direction and team sport last, and only with your treatment team's agreement.
Range, side, and limits: Increase only one variable per step. Do not raise distance, speed and surface at once; if something goes wrong you will not know which one caused it. If your big-toe joint has been fused, running and walking are usually possible, but movements that force the toe far upwards — such as sitting back on the toes while kneeling — may remain permanently limited.
Breathing, speed and rhythm: In the early steps you should be able to speak a sentence during the activity. If you cannot, lower the intensity — this is the simplest way to control intensity without equipment.
Documented dose: The reference guideline gives no session counts or durations for return to sport and sets only the order — low impact, then high impact — so we do not invent a numeric plan. A workable practical principle: pass at least two or three sessions at each step with no adverse reaction before moving to the next.
Rest: Leave at least a day between high-impact sessions. If swelling or pain returns after a session, let it settle completely before the next one.
Signs of correct performance: An activity you can do without pain, after which the next day brings neither more swelling nor a return of morning stiffness. The step pattern must stay normal; limping while running means it is still too early.
Expected response: Muscle fatigue and a little delayed muscle soreness after a new step are normal and pass within a day or two. Some evening swelling of the foot may also persist in the first months.
Stop immediately if: Pain at the operated site during or after the activity, swelling that has not settled by the next morning, a limp, or the return of big-toe joint pain. Drop back one step, and if that does not settle it, book an appointment.
Common mistakes: Jumping straight from walking to running. Increasing duration and speed together. Returning to sport by the calendar rather than by capability. And wearing a tight or pointed shoe for sport, which presses directly on the operated area.
Easier version: If running still hurts, stay at the low-impact step and lengthen walking and cycling instead. Pool walking is a good option for the middle steps.
Progression criteria: Once you can do your chosen sport without pain, without a limp and without swelling the next day, you are on the maintenance programme: suitable footwear, weekly balance and strength work, and reviewing any new change with your treatment team.
🚗 Daily life and returning to activity
The commonest questions after this operation are about dates: when can I wear a normal shoe? when can I drive? when can I do sport? The honest answer is that the reliable sources give ranges rather than fixed dates, and those ranges differ with the operation and with your own healing. What follows are the sourced ranges; your own dates come from your surgeon.
One safety point that always comes first: do not drive while you are taking opioid painkillers, however many weeks have passed since the operation.
- The post-operative shoe: in this guide's protocol the post-operative shoe begins once the splint comes off on day 45. The reference rehabilitation guideline keeps you in a boot or post-operative shoe until around weeks 6 to 10 and starts the gradual move into a trainer with a wide, long toe box at around weeks 10 to 14. In Lapidus series using an earlier weight-bearing protocol, the mean return to regular shoes was about 6 weeks (range 2 to 10 weeks).
- Choosing shoes for good: shoe styles that squeeze the toes in any way should not be worn — that is the reference guideline's explicit sentence. After a big-toe fusion, high heels are out as well; trainers, sandals and flat dress shoes are usually fine. After a cheilectomy the opposite applies: a soft, flexible shoe is recommended to encourage the toe to bend upwards.
- Driving: in a study that measured brake reaction time after right-sided surgery — including hallux valgus correction — 95% of patients reached a safe reaction time by 7.6 weeks. Conventional advice and a summary based on the UK national guidance give 6 to 9 weeks and 6 to 8 weeks respectively. All three are compatible with a range of roughly 6 to 9 weeks.
- Driving with the left foot is not a workaround: in one study 37% of patients drove with the left foot after right foot surgery, but in a simulator the time to brake fully and to release the throttle were both significantly longer when driving left-footed. It does not substitute for reaching a safe reaction time.
- Work: the only sourced range available is 2 to 12 weeks off work, and that width is the honest answer: desk work where you can keep the foot up becomes possible much sooner than standing or walking work. No source was found that timed the two separately.
- Sport: the reference guideline allows low-impact sport (cycling, swimming, elliptical) from around week 20 and high-impact sport once that is well tolerated; the summary based on the UK national guidance gives 3 to 6 months. The stationary bike is added at weeks 6 to 10 (after Lapidus, from week 10) and pool walking and swimming at weeks 10 to 14.
- Prayer and sitting on the floor: in the early months, sitting back on the toes while kneeling forces the big toe far upwards and is exactly the movement a recently operated joint will not tolerate. Until it is painless, pray on a chair or position the knee so the toes stay flat. After a big-toe fusion this limitation may be permanent.
- Smoking: the effect of smoking on bone healing has not been measured numerically for these particular foot operations, but the general principle is clear: after fractures, smoking roughly doubles the risk of a bone not uniting. If your operation was an osteotomy or a fusion, stopping smoking is worth most during exactly these months.
❓ Frequently asked questions
1) Why is my foot still so swollen?
Because the forefoot is the lowest point of the body and fluid struggles to leave it. The specialist foot and ankle society's patient sources state plainly that prolonged swelling and difficulty fitting into shoes after foot surgery are very common and may last several months, and that after a tarsometatarsal fusion some residual swelling up to a year is normal. The only effective tool is keeping the foot above the level of your heart.
2) When can I wear a normal shoe?
The first 45 days are spent in the splint and the post-operative shoe only starts after that. From that point on, the reference rehabilitation guideline puts the gradual move out of the post-operative shoe into a wide, long-toe-box trainer at around weeks 10 to 14. In Lapidus series using an earlier weight-bearing protocol, the mean return to regular shoes was about 6 weeks, with a range of 2 to 10 weeks. Your own figure depends on the operation, on bone healing and on how much swelling you have.
3) When can I drive?
A reasonable range is about 6 to 9 weeks. In a study measuring brake reaction time after right-sided surgery — including hallux valgus correction — 95% of patients reached a safe reaction time by 7.6 weeks; conventional advice gives 6 to 9 weeks and a summary based on the UK national guidance gives 6 to 8. Two firm conditions: do not drive while taking opioid painkillers, and the final decision and its responsibility are yours.
4) Can I drive with my left foot to start sooner?
It does not substitute for reaching a safe reaction time. In a study of exactly this question, 37% of patients drove left-footed after right foot surgery, but in a simulator both the time to brake fully and the time to release the throttle were significantly longer left-footed. These studies were also done in left-hand-drive cars, and there are no data for manual transmissions or a different pedal layout.
5) How long should I keep the toe spacer on?
Your surgeon sets the duration. Reported durations in the literature are around 4 to 6 weeks and continuous, but none of those sources is high quality and they do not agree. More important is what the device is for: holding the big toe in alignment while the soft tissue heals — not preventing recurrence. No trial has shown that a spacer stops the deformity from coming back.
6) My big-toe joint has been fused; what is different for me?
Three things. First and most important: that joint must never be moved — the reference guideline repeats this prohibition in every rehabilitation phase, so the big-toe motion exercise is not for you. Second, your weight-bearing restriction may be longer. Third, high heels are out for good and sitting back on the toes may remain permanently limited. In exchange, walking, cycling, swimming and even gentle jogging become possible without pain for most patients.
7) My operation was a cheilectomy; how is my programme different?
Your programme is more active from the start. The published source for cheilectomy allows a compressive dressing, a post-operative shoe and weight bearing as tolerated from the outset, starts physiotherapy at day 7 to 10, and sets self range-of-motion work at 5 to 10 minutes every 2 hours. The stated target is about 60 degrees of upward big-toe movement and a return to normal function by around 3 months. The reason for the hurry is clear: adhesions are the commonest complication of this operation.
8) How likely is it that the deformity comes back?
Depending on how «recurrence» is defined and how long patients are followed, the figures range from about 5% to 25%: one large systematic review reports 4.9% and another meta-analysis 24.9%. At more than 8 years after a scarf osteotomy, radiographic recurrence by a strict threshold becomes common (about 40% beyond 15 degrees), while severe recurrence beyond 25 degrees stays at about 2%. The practical point is that radiographic recurrence is not always painful or in need of further surgery.
9) What is the chance the bone does not unite?
For fusions there are sourced figures. In systematic reviews of early weight bearing, non-union after first tarsometatarsal fusion is about 3.6% and after big-toe joint fusion about 6.4%. A large series using exactly the 2-weeks-non-weight-bearing protocol reported 100% union. The most important things you yourself can do are to respect the weight-bearing restriction precisely and to stop smoking.
10) The side of my big toe is numb; will it recover?
Local numbness along the upper-inner border of the big toe is not uncommon after this surgery, because a small sensory nerve runs exactly along the line of the incision, and studies state plainly that injury to it in big-toe surgery «is not uncommon». It usually diminishes over weeks and months. But new numbness that starts suddenly, or comes with cold and discoloured toes, is a different matter and must be assessed the same day.
11) Will the screw in my foot have to be removed later?
Usually not. A screw or plate is removed only if it causes trouble itself — for instance standing proud under the skin and hurting in a shoe — and then only after the bone has fully united. In published series the need for hardware removal is reported at about 1% to 5%. If one spot on your foot hurts in a shoe repeatedly and predictably, raise exactly that at your appointment.
12) What is the clot risk after foot surgery, and do I need a blood thinner?
The clot risk after elective foot surgery is considered low and lower than after hip or knee replacement, and the reference specialist guidance recommends against routine chemical prophylaxis. No figure specific to these operations was found in the literature, so we quote no percentage. The decision about medication is individual and based on your own risk factors. The most effective general measure is moving the ankle and taking short, frequent walks.
13) When can I shower and put my foot in water?
No reliable source was found for the exact day showering and immersion are allowed after forefoot surgery, and we do not invent a date. What is sourced is the principle: the dressing must stay dry and must not be opened until your surgeon says so, and immersion is off limits until the wound has fully closed. A short shower with a waterproof cover usually becomes possible sooner. Take your own timing from your discharge sheet.
14) Why was I told 2 weeks without weight when someone I know walked sooner?
Because the literature on this genuinely varies and protocols depend on the technique and the fixation. The reference rehabilitation guideline gives 2 weeks non-weight-bearing then 4 weeks of progressive weight bearing for osteotomies, but 6 to 8 weeks for fusions; meanwhile newer Lapidus series weight-bearing at 8 to 15 days report 94% to 100% union. The 2-week protocol sits exactly in the middle of that spectrum and is your surgeon's choice.
15) Which post-operative shoe is better: the flat one or the heel-loading one?
This choice applies to the period after the splint comes off on day 45, not to the 45 days themselves. In the only randomised trial done on exactly these operations, a flat rigid shoe beat the forefoot-offloading shoe on satisfaction with mobility (86% versus 62%) and with stability (91% versus 70%), while no difference was seen in union or in recurrence of the deformity at one year. In other words both are acceptable for safety and the flat shoe is more comfortable. The final choice is your surgeon's.
16) When can I do sport again?
Low-impact activity such as cycling, swimming and the elliptical comes back sooner, and high-impact sport such as running and jumping is the last thing added. The reference guideline sets that order from around week 20 and the summary based on the UK national guidance gives 3 to 6 months. Both say the same thing: there is no fixed date, and the real permission is meeting the strength, range-of-motion and limp-free walking goals.
✅ In summary
Three things influence the outcome of this operation more than anything else, and all three are in your own hands: keep the foot elevated, follow the weight-bearing restriction exactly as written, and wear the post-operative shoe every time the foot goes to the floor. Swelling is the most stubborn part of the road and takes months; that delay is not a sign that the operation has failed.
Rehabilitation after this operation is short, and the programme on this page is written to the real needs of this surgery and no further: elevation and ankle movement in the first two weeks, big-toe motion and the first steps in the second two, strength and flexibility in the second month, loading the big toe and balance in the third, and a graded return to sport after that.
And one rule repeated throughout this guide: if your big-toe joint has been fused, never move it. For every other figure, your discharge sheet and your surgeon's instructions take priority over any general number on this page.
If you have questions about your own recovery, or you notice any sign this page lists as «call the same day», call Dr. Jalil Emad’s office at 0913 782 5207, or book an appointment online. In an emergency, do not wait for a response from the office.
To read more about this area of treatment, see the related service page: Deformity correction
Related guides: Service page: Deformity Correction & Ilizarov
This content is for general education only and does not replace an examination, your treating doctor's advice, your discharge sheet or your surgeon's own protocol. Timing, range of motion, weight bearing and exercise dose differ with the operation, with any procedures done at the same time, and with each person's circumstances. Do not change your medication, dressing or exercise programme without your treatment team.
📚 Scientific sources
View the scientific sources
- Gumuskaya O, Peterson B, Donnelly H, et al. Preoperative and Postoperative Physical and Mechanical Rehabilitation Interventions in Hallux Valgus: A Systematic Review. J Foot Ankle Res. 2025;18(3):e70083. doi:10.1002/jfa2.70083
- Barg A, Harmer JR, Presson AP, Zhang C, Lackey M, Saltzman CL. Unfavorable Outcomes Following Surgical Treatment of Hallux Valgus Deformity: A Systematic Literature Review. J Bone Joint Surg Am. 2018;100(18):1563-1573. doi:10.2106/JBJS.17.00975
- Ezzatvar Y, Lopez-Bueno L, Fuentes-Aparicio L, Duenas L. Prevalence and Predisposing Factors for Recurrence after Hallux Valgus Surgery: A Systematic Review and Meta-Analysis. J Clin Med. 2021;10(24):5753. doi:10.3390/jcm10245753
- Lalevee M, Saffarini M, van Rooij F, Nover L, Nogier A, Beaudet P. Recurrence rates with long-term follow-up after hallux valgus surgical treatment using shaft metatarsal osteotomies: a systematic review and meta-analysis. EFORT Open Rev. 2024;9(10):933-940. doi:10.1530/EOR-23-0093
- Crowell A, Van JC, Meyr AJ. Early Weightbearing After Arthrodesis of the First Metatarsal-Medial Cuneiform Joint: A Systematic Review of the Incidence of Nonunion. J Foot Ankle Surg. 2018;57(6):1204-1206. doi:10.1053/j.jfas.2018.06.011
- Crowell A, Van JC, Meyr AJ. Early Weight-Bearing After Arthrodesis of the First Metatarsal-Phalangeal Joint: A Systematic Review of the Incidence of Non-Union. J Foot Ankle Surg. 2018;57(6):1200-1203. doi:10.1053/j.jfas.2018.05.012
- Dearden PMC, Ray RI, Robinson PW, et al. Clinical and Radiological Outcomes of Forefoot Offloading Versus Rigid Flat Shoes in Patients Undergoing Surgery of the First Ray. Foot Ankle Int. 2019;40(10):1189-1194. doi:10.1177/1071100719858621
- Schuh R, Hofstaetter SG, Adams SB, Pichler F, Kristen KH, Trnka HJ. Rehabilitation after hallux valgus surgery: importance of physical therapy to restore weight bearing of the first ray during the stance phase. Phys Ther. 2009;89(9):934-945. doi:10.2522/ptj.20080375
- McDonald EL, Shakked R, Nicholson K, et al. Return to Driving After Foot and Ankle Surgery: A Novel Survey to Predict Passing Brake Reaction Time. Foot Ankle Spec. 2021;14(1):32-38. doi:10.1177/1938640019890970
- McKissack HM, Chodaba YE, Bell TR, et al. Prevalence and Safety of Left-Footed Driving Following Right Foot Surgery Patients Including a Driving Simulation. Foot Ankle Int. 2019;40(7):818-825. doi:10.1177/1071100719839701
- McCabe FJ, McQuail PM, Turley L, Hurley R, Flavin RA. Anatomical reconstruction of first ray instability hallux valgus with a medial anatomical TMTJ1 plate. Foot Ankle Surg. 2020;27(8):869-873. doi:10.1016/j.fas.2020.11.007
- Uddin A, Bramall JW, Leong Ng K, Klos K, Roth E, Santos D. Early weight-bearing following modified Lapidus arthrodesis: a retrospective review of 104 cases and postoperative protocol. J Foot Ankle Surg. 2026;65(1):24.e1-24.e8. doi:10.1053/j.jfas.2025.09.001
- Mariano AA, Fallat LM. Comparison of surgical procedures for hallux rigidus and postoperative range of motion. J Foot Ankle Surg. 2025;64(5):526-533. doi:10.1053/j.jfas.2025.03.009
- Makwana N, Hossain M, Kumar A, Mbako A. The sentinel vein: an anatomical guide to localisation of the dorsomedial cutaneous nerve in hallux surgery. J Bone Joint Surg Br. 2011;93(10):1373-1376. doi:10.1302/0301-620X.93B10.26547
- Imran B, Jones S, Middleton RG. Hallux Valgus Management: An Update Based on National Institute for Health and Care Excellence (NICE) Guidelines. Cureus. 2025;17(11):e96642. doi:10.7759/cureus.96642
- Weisman MHS, Holmes JR, Irwin TA, Talusan PG. Venous Thromboembolic Prophylaxis in Foot and Ankle Surgery: A Review of Current Literature and Practice. Foot Ankle Spec. 2017;10(4):343-351. doi:10.1177/1938640017692417
- Massachusetts General Hospital Physical Therapy Services. Physical Therapy Guidelines for Hallux Valgus Correction (Bunion Reconstruction), and Common Foot and Ankle Procedures Physical Therapy Guidelines (cheilectomy and Lapidus sections). Institutional protocol documents.
- American Orthopaedic Foot and Ankle Society, FootCareMD patient information: Chevron Osteotomy, Lapidus Procedure, and First MTP Joint Fusion.

Dr. Jalil Emad
Orthopedic specialist and surgeon, board-certified in bone and joint surgery; years of experience in knee and hip replacement, sports injuries and arthroscopy in Isfahan.
Related articles
Total Knee Replacement Surgery: Postoperative Care and Rehabilitation
Read knee replacement recovery step by step, from wound care and medicines to exercise. Progress depends on pain, swelling and movement.
ACL reconstruction
Care and rehabilitation after ACL reconstruction; if your meniscus was repaired in the same operation, pick your version at the top of the article — the type of repair sets the weight-bearing and knee-bend limits of the first weeks.
Hip replacement: care and rehabilitation after surgery
Learn about care after total hip replacement: surgery day, wounds, medicines, warning signs, first-three-month exercises and a safe return to activity.