🏥 What happens on the day of the Latarjet operation?
The Latarjet operation is done under general anaesthetic. Sometimes, depending on your situation, the anaesthetist also numbs the nerves of the shoulder; in that case, for hours after the operation, and sometimes until the next day, the arm and hand feel numb and heavy and do not move. This numbness is normal and wears off on its own.
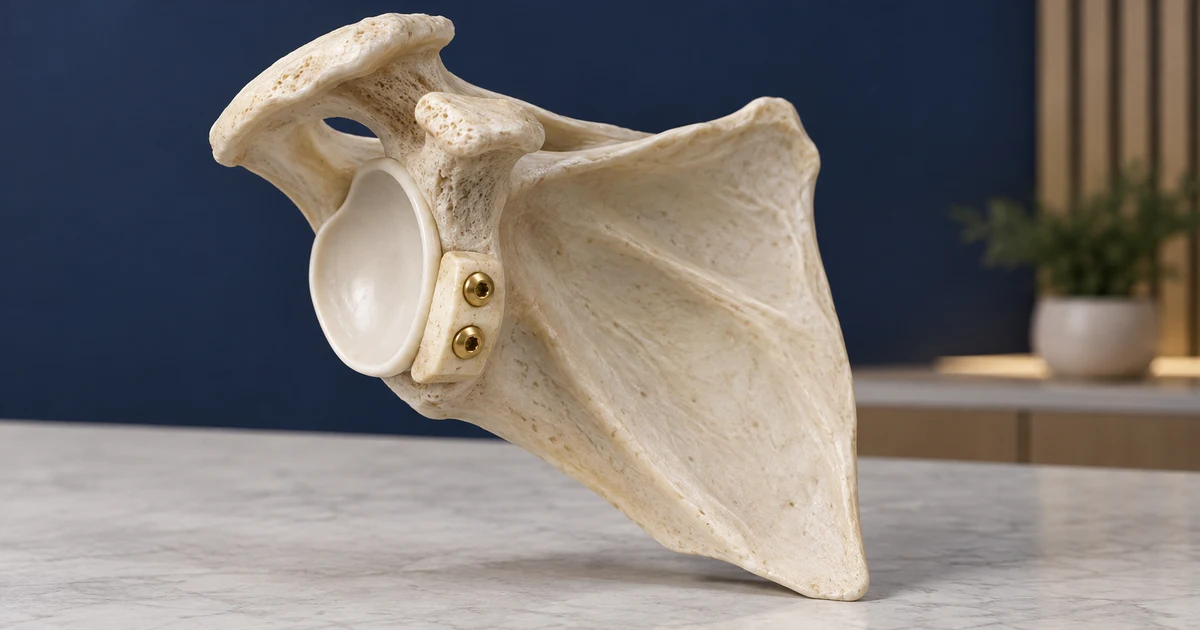
You usually stay one night in hospital. Before you go home, a plain X-ray (radiograph) of the shoulder is taken to show the position of the transferred piece of bone and its two screws, and you learn how to put on and adjust the sling. You can go home once your pain is controlled with tablets and you are able to eat and walk.
When you leave hospital, the sling is on your arm, a waterproof dressing covers the wound, and you have your prescriptions for painkillers, a sleeping medicine and vitamins. Book your day 10 to 14 appointment on the same day as well; at that visit the dressing is changed, the stitches are removed and physiotherapy starts.
Pain at the front of the shoulder, swelling and bruising are expected in the first days and gradually ease. Pain that the medicines do not relieve and that gets worse every day, or new numbness that appears after feeling has returned to the hand, is not normal; the signs that mean you need to get in touch are in the next section.
⚠️ Warning signs: when should you call or go to the emergency department?
Contact the clinic the same day: A temperature of 38.5 °C or higher, or chills; spreading redness or warmth around the wound; pus-like or foul-smelling discharge; wound edges opening; a dressing that keeps getting wet; pain that the medicines do not relieve and that keeps getting worse; marked, firm swelling of the arm; new numbness or weakness in the arm, forearm or hand after feeling has returned; a feeling that the shoulder gave way or slipped, without a change in its shape; any fall, even if you did not land on the shoulder, or a blow to the operated shoulder.
Seek emergency help: Sudden shortness of breath, chest pain, coughing up blood or fainting; a hand that has become cold, or fingers or a whole hand that have turned very pale or blue (not a bruise on the skin of a hand that is warm with normally coloured fingers); sudden inability to move your fingers; swelling and pain in one calf; a real dislocation of the shoulder, meaning an obvious change in the shoulder’s shape, or the arm suddenly locking in one position so that it will not move even with help from the healthy hand, even if your fingers can move and even without a fall or a blow; not moving the arm while it rests in the sling, as this programme instructs, is not a sign of dislocation. In Iran, call the emergency medical service on 115 or go to the nearest emergency department.
If you have questions about the sling, the limits of the movements you are allowed, or your dressing, call Dr Jalil Emad’s clinic on 09137825207, or book an appointment online. In an emergency, do not wait for the clinic to reply; follow the instructions in the emergency box above.
1Care during the first days after surgery
The first four weeks after a Latarjet are spent protecting two things: the piece of bone that was moved to the front of the shoulder socket during the operation and fixed with two screws, and the muscle at the front of the shoulder, which was split along its fibres to reach the socket. Pain and swelling in the first days are expected and are controlled with medicines, ice and the sling.
🩹 Wound care and dressing changes
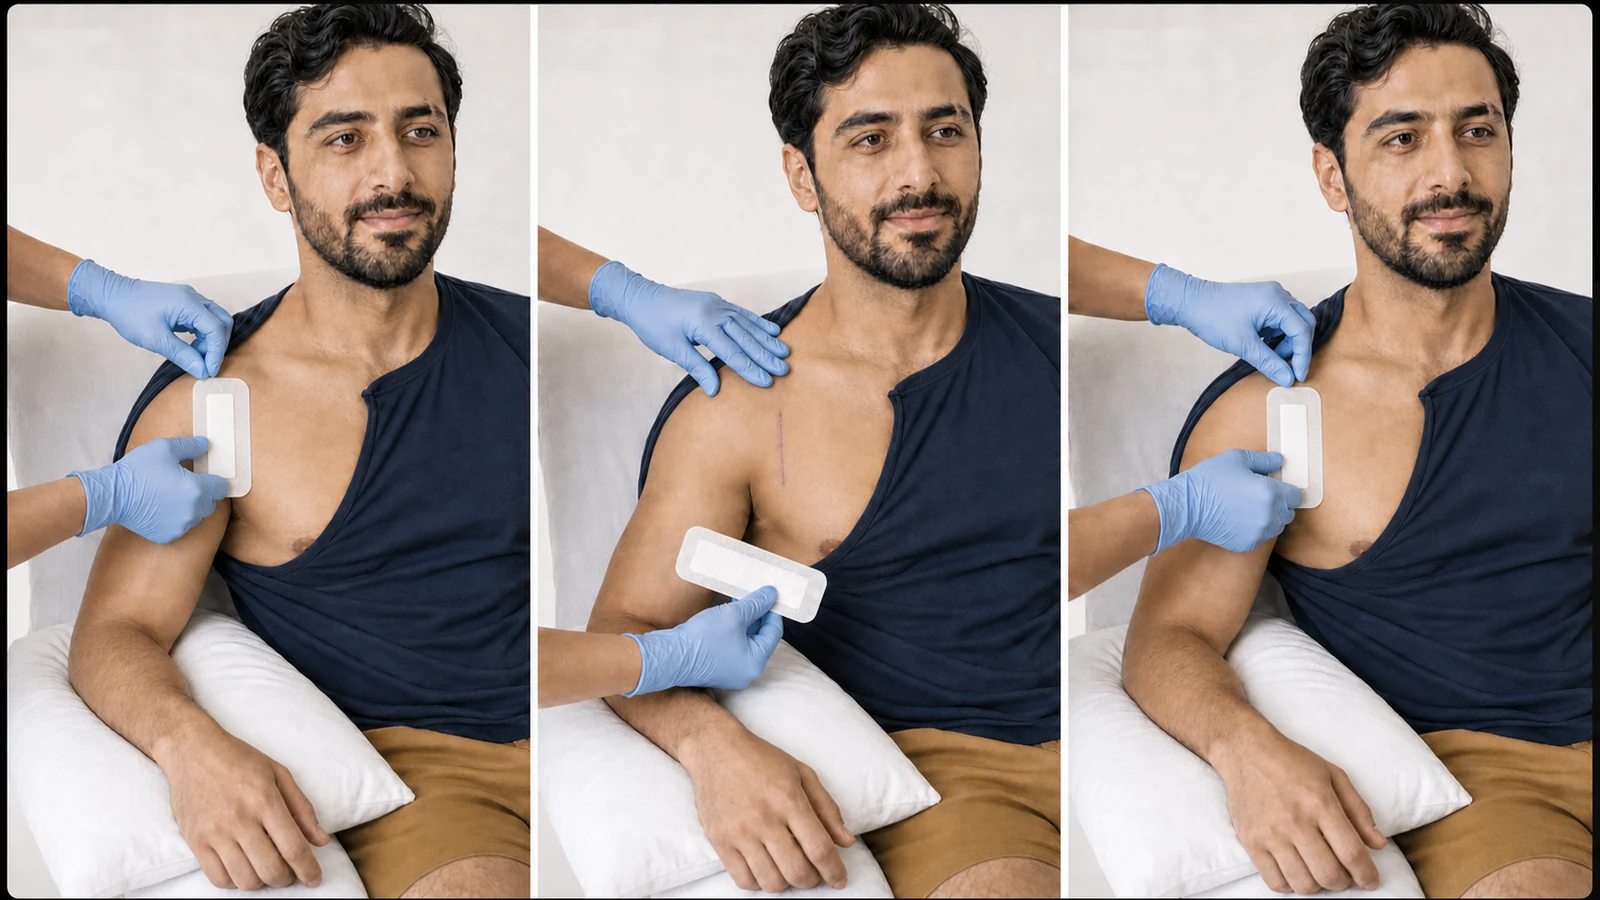
The surgical incision is at the front of the shoulder and is covered with a waterproof dressing. This dressing stays in place until the day 10 to 14 visit and is changed at the clinic on that day. Until then you do not need to look at or clean the wound; your only job is to keep the dressing clean and dry, and if it gets wet or dirty, changing it is not difficult.
More detailLess detail
- Do not remove the dressing before the stitch-removal visit. Only if it gets wet, dirty or loose, change it at home that same day for a fresh waterproof dressing; keep a few waterproof dressings of the same size at home in advance.
- It is best if someone with you does this. You sit and keep the operated arm by your side, in the sling or on a pillow; do not move the arm backward or outward to see the wound.
- The person helping you washes their hands with soap and water, dries them and puts sterile gloves on both hands. Then they lay the fresh dressing out on a clean surface without touching its inner side.
- The person helping you gently peels the edge of the old dressing’s adhesive away from the skin, towards the wound line, and does not pull the dressing off suddenly.
- The wound line should be looked at only briefly, and no pressure should be put on it. The wound should not be washed and nothing should be put on it: no alcohol, no Betadine, no ointment. Thin adhesive strips or scabs should not be picked off either.
- The person helping you sticks the fresh dressing on so that it covers the whole wound line with a small margin, and does not stretch it so much that the skin wrinkles. A small pink or brown spot on the old dressing that does not get bigger is common in the first days.
- If the dressing gets wet again and again, or you see discharge, a bad smell or the edges of the wound opening, contact the clinic the same day.
🚿 Showering with a dry wound
From the second day after surgery you can shower, provided the waterproof dressing is completely covered with an extra layer of plastic. The wound stays dry until the stitch-removal visit.
More detailLess detail
- Before showering, put a clean piece of plastic over the dressing and tape its edges to the skin.
- Sit on a plastic chair, shower with lukewarm water and do not aim the water directly at the shoulder.
- Undo the sling only for the shower and keep the arm by your side. To wash under the armpit, lean forward a little so the arm hangs freely; do not force it away from your body.
- After the shower, remove the plastic and check whether the dressing has stayed dry; if it is wet underneath, change it the same day. Once you have dried yourself, put the sling back on.
💊 Medicines: what, how much and for how long and PRP
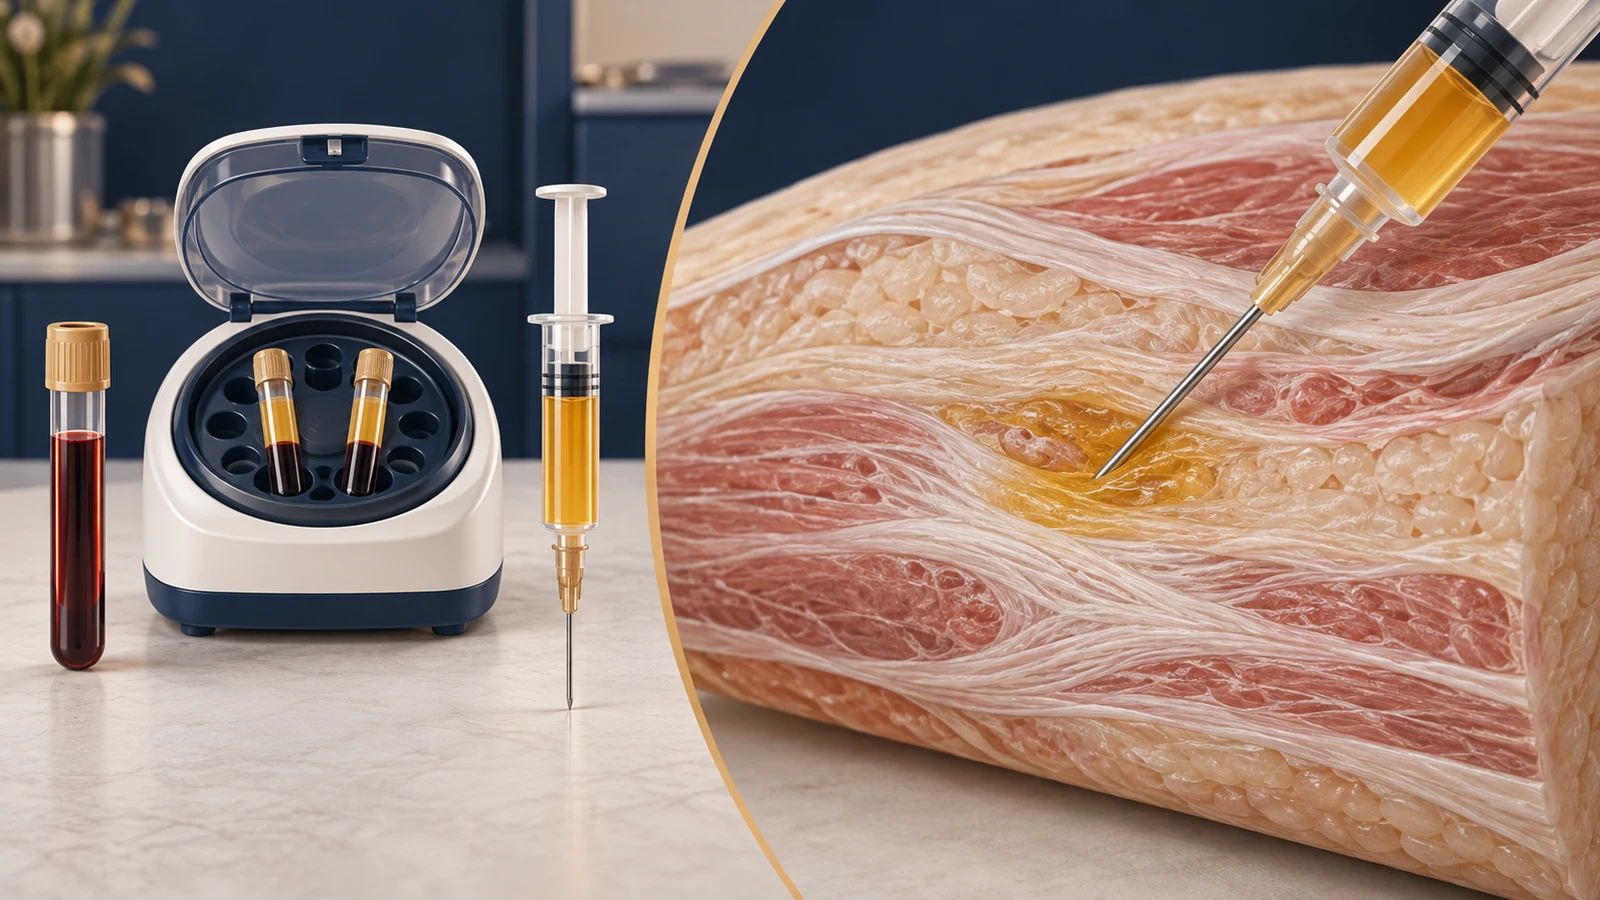
The medicines after a Latarjet are simple: painkillers for the first days, a sleeping medicine for the nights and two vitamins for bone healing. An antibiotic is given by injection only during the operation and is not needed after you go home; a blood thinner to prevent clots is not routinely prescribed either. Platelet-rich plasma (PRP) is prepared from a small sample of your own blood. Platelets contain growth factors; the aim is to support natural tissue healing and, in suitable cases, bone healing.
More detailLess detail
- Acetaminophen-codeine: one tablet every 6 hours if you have pain; no more than 4 tablets a day, and for up to 7 days. During this time, do not take any other medicine that contains acetaminophen, such as cold tablets.
- Oxycodone 5 mg: only for very severe pain in the first days, instead of one dose of acetaminophen-codeine and at least 6 hours after your last tablet of it; take 5 mg per dose, every 6 hours if needed, for no more than 3 days. At each dose, take only one of these two medicines.
- Alprazolam 0.5 mg: take 0.5 mg at night before sleep, for no more than 14 nights. Taken with opioid pain medicines, including acetaminophen-codeine and oxycodone, it can cause severe drowsiness and dangerously slow breathing. Do not combine them on your own; if both are prescribed, clarify the medicine and pain-treatment plan with your prescriber before starting. If you already take alprazolam regularly, do not abruptly stop it in order to take a pain medicine. Do not drive or drink alcohol while taking a sedating medicine or opioid.
- Codeine and oxycodone cause constipation. Have enough water and fruit, and if you become constipated, use a simple laxative.
- Vitamins: vitamin D 1000 to 2000 units daily and vitamin C 500 mg daily, for 6 weeks.
- For up to 6 weeks after surgery, do not take an anti-inflammatory medicine such as ibuprofen, naproxen or Gelofen without checking with the clinic.
- PRP is prepared from your own blood and considered at the clinic as an adjunct for tissue and bone healing in selected cases; see the “Medicines: what, how much and for how long and PRP” section.
- In a Latarjet operation, the transferred bone block needs to unite with the shoulder socket. Dr Emad may consider PRP in selected cases with the aim of supporting tissue and bone healing. Direct evidence for PRP improving bone-block union in Latarjet is still limited, and it does not guarantee faster or certain union. Suitability and injection details are decided at the clinic according to your condition; continue your sling, movement limits and planned imaging checks.
🧊 Pain, swelling and bruising
Pain and swelling at the front of the shoulder are at their worst in the first few days and then gradually ease. Ice, resting in a half-sitting position and taking your painkiller on time are your three main tools.
More detailLess detail
- While the arm and hand are still numb from the nerve block, do not use ice; you cannot feel the cold and the skin can be damaged. Once feeling has returned, wrap the ice pack in a thin cloth and place it on the front of the shoulder for about 20 minutes each time, no longer; repeat this every two hours while you are awake.
- Do not put ice directly on the skin, and take care that the dressing does not get wet.
- Time your painkiller so that it is working before your exercises and before sleep; that way pain does not stop you doing the movements you are allowed. In the first seven days this painkiller is the acetaminophen-codeine, with 6 hours between doses and no more than 4 tablets a day. From day 8, if you still need a painkiller for your exercises, take plain acetaminophen: one or two 500 mg tablets before exercising, at least 6 hours apart and no more than 8 tablets a day. If you weigh less than 50 kg, you may need a lower dose. If this applies to you, or you have liver or kidney disease, check that acetaminophen is suitable for you and confirm your dose with your doctor or pharmacist before taking it. Do not take any other medicine containing acetaminophen at the same time; anti-inflammatories remain off-limits for 6 weeks without checking with the clinic.
- If your hand and fingers swell, open and close your fingers a few times and rest the forearm on a pillow a little higher than the elbow.
- Bruising at the front of the shoulder may spread down over the following days into the arm, elbow and even the forearm and back of the hand. These purple or yellow patches on the skin are normal and gradually fade, as long as the hand is warm, the fingers are a normal colour and they move; a hand that becomes cold, or fingers or a whole hand that turn very pale or blue, is not normal and is listed in the emergency box.
🦾 The sling and using the operated arm
The sling stays on for four weeks, day and night, even while you sleep. It comes off only for the exercises in this article, getting dressed and washing, and it is put aside from day 29.
More detailLess detail
- Adjust the sling strap so that the forearm is horizontal or slightly higher than the elbow, and the wrist does not hang over the edge of the sling.
- If your fingers tingle, loosen the sling strap a little and move your fingers. If it has not improved within half an hour, or the hand has become weak, contact the clinic the same day.
- In the sling, the forearm is in front of your stomach. In the first four weeks, do not turn the forearm outward, away from the front of your body (external rotation); this movement stretches the front shoulder muscle, which was split along its fibres during the operation.
- Until the end of week 6, do not lift anything heavier than a glass of water with the operated arm, and do not put your body weight on that arm; use your healthy hand to help you get up from a bed or chair.
- Short walks several times a day, with the sling on, are helpful. Take extra care on slippery surfaces or in crowds so you do not fall.
🛏️ Sleeping and getting dressed
In the first weeks, sleeping is usually the hardest part of the day. Sleep half-sitting or on your back, with the sling on.
More detailLess detail
- Prop your back up with two or three pillows or sleep in a reclining armchair, and put a pillow or a folded towel under the operated elbow so the elbow does not drop backward.
- Do not sleep on the operated shoulder.
- Wear loose clothes that open at the front. When dressing, gently put the operated arm into the sleeve first; when undressing, take the healthy arm out first.
- To change your clothes, undo the sling but keep the arm by your side, and do not raise it or move it outward.
🛡️ First two weeks: protection and gentle assisted movement
Goal: protect the piece of bone and the front shoulder muscle, reduce pain and swelling, and keep the fingers, wrist, elbow, neck and shoulder blade moving. At this stage, all shoulder movements are “assisted”; the arm moves with help from the healthy hand or another person, and the operated shoulder’s muscle does no work.
Movement limits: raising the arm forward up to 120 degrees at most, which means the straight arm reaches about the level of the top of your head and does not go above your head; raising it to the side up to 90 degrees at most, which means level with the shoulder. The forearm also does not turn outward, away from the front of the body.
Order of starting: from the day of surgery, the ball squeeze and moving the elbow, wrist and neck; from day 4, the shoulder blade exercises and the assisted raise with clasped hands. From week 2, also the assisted straight-arm raise in two directions, forward and to the side.
Expected response: a stretch or mild pain during exercise is normal. If severe pain lasts more than 30 minutes after an exercise, do it more gently or with fewer repetitions next time.
Not allowed in these two weeks: raising the arm using the operated shoulder’s muscle, turning the forearm outward, lifting anything heavier than a glass, leaning on the operated arm and sleeping on the operated shoulder.
End of this stage: pain is controlled with medicines, the wound is dry and the stitches have been removed at the day 10 to 14 visit.
Gentle soft-ball squeeze (Gentle Ball Squeeze)
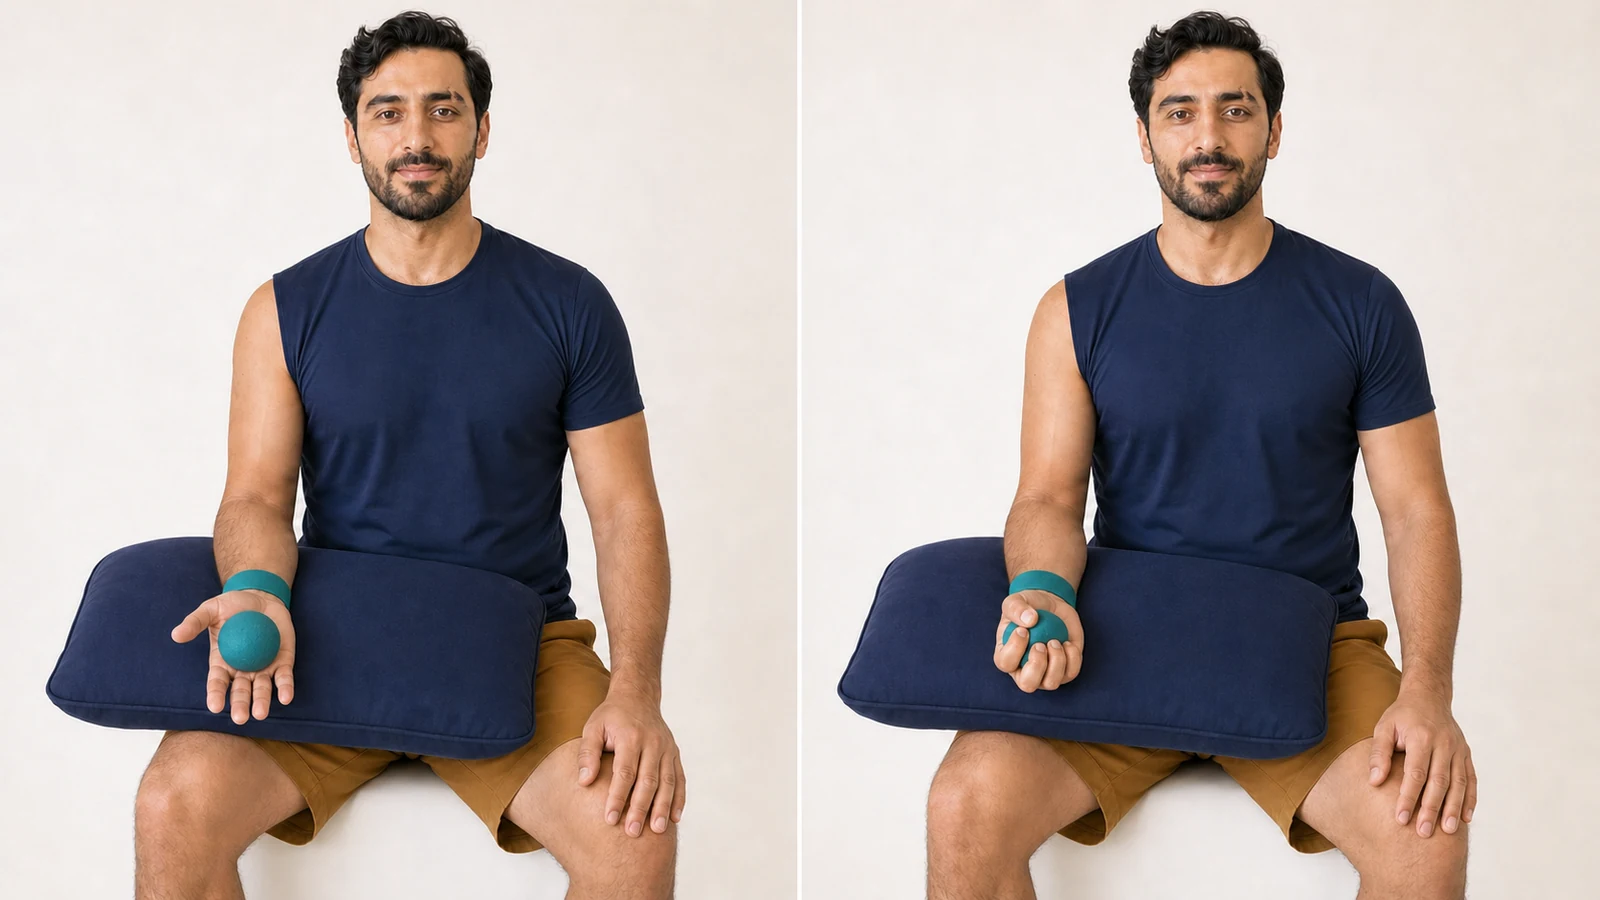
Gently squeezing a soft ball with the operated hand, to help blood flow and reduce swelling in the hand; 15 times, 3 times a day. If tingling, numbness or wrist pain increases while squeezing, stop.
More detailLess detail
Before you start: This exercise starts on the day of surgery; it keeps blood flowing in the hand and forearm and helps the swelling in the fingers go down. You need a soft palm-sized ball or a rolled-up sock, and a pillow. Sit on a chair, put the pillow on your lap and rest the operated forearm on it; the upper arm stays by your side. You can also do this exercise with the arm in the sling.
How to do it:
- Hold the ball in the operated hand; the forearm rests on the pillow and the elbow is by your side.
- Squeeze the ball gently until your fingers close around it, and hold for a moment.
- Open your fingers fully and spread them apart, then repeat.
Movement tips: Only the fingers and palm work; the forearm stays still on the pillow, the elbow stays still by your side, and the shoulder does not lift. Breathe calmly and let the hand relax for a moment between repetitions. A gentle squeeze is enough; there is no need to push to your limit. After a few minutes, the swelling in your fingers may go down.
Amount, repetitions and progression: 15 times, 3 times a day. In the first days, if your hand is swollen, you can also do it more often during your waking hours.
Stop immediately if: tingling, numbness or wrist pain increases while squeezing.
Common mistakes: Lifting the forearm off the pillow or shrugging the shoulder; squeezing with all your strength and holding your breath.
Easier version: If the ball is hard, squeeze a rolled-up sock or a folded cloth instead.
Elbow and wrist movement with the arm supported (Supported Elbow and Wrist Range of Motion)
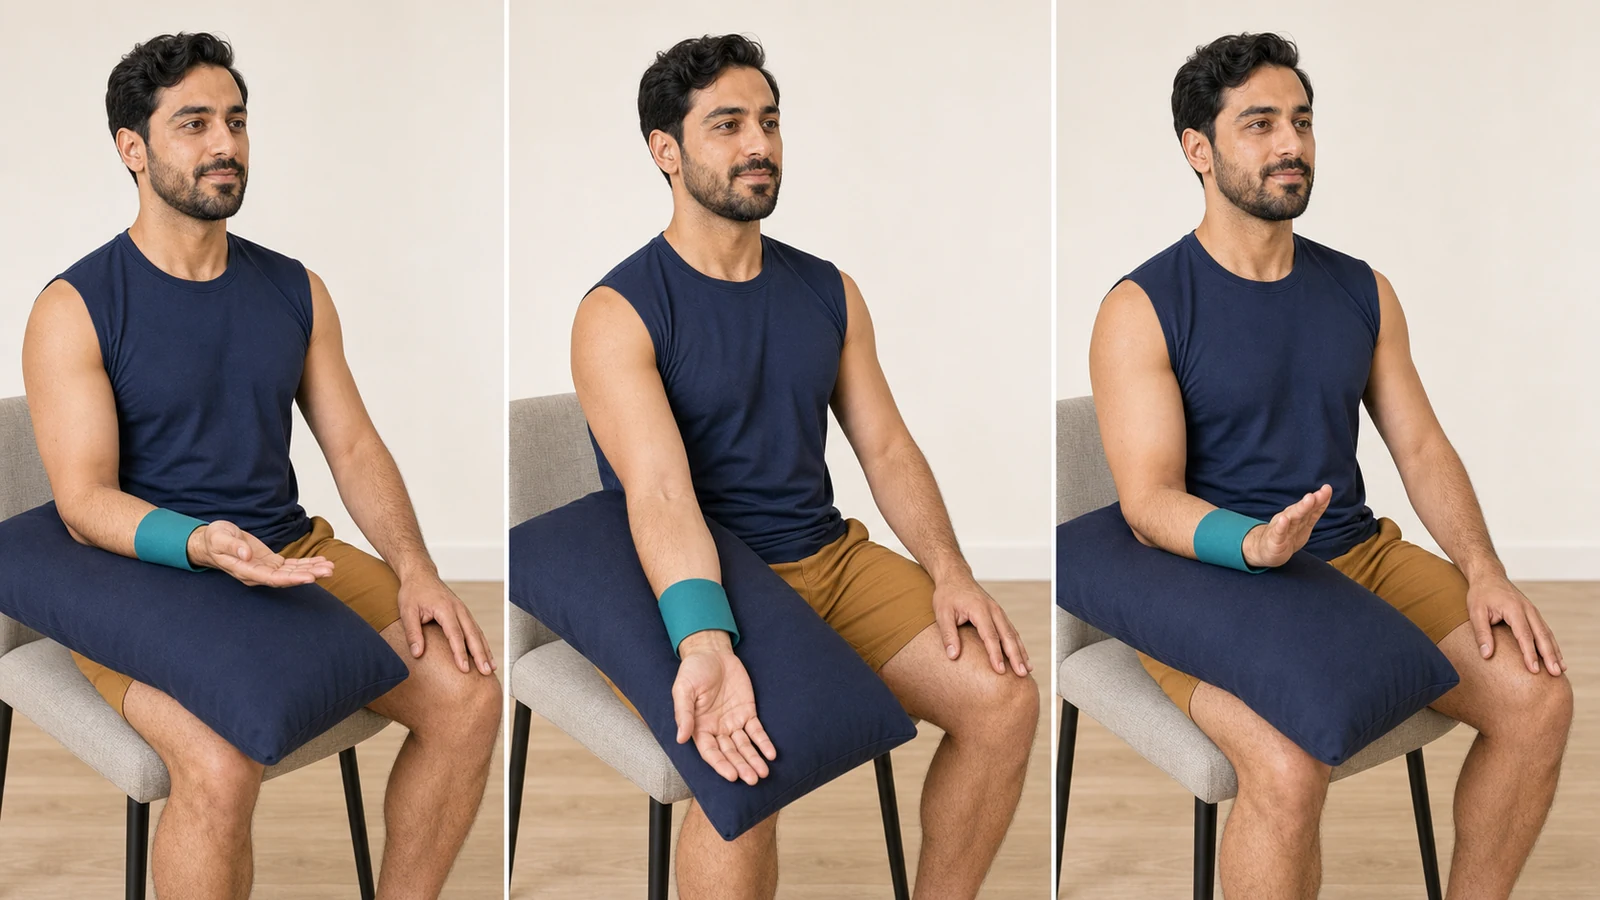
Straightening and bending the elbow and moving the wrist while the arm rests by your side; 15 times, 3 times a day. If sharp pain appears at the front of the shoulder while you move the elbow, stop.
More detailLess detail
Before you start: From the day of surgery, take the forearm out of the sling and move the elbow and wrist so they do not stiffen. The shoulder does not move in this exercise. Sit on a chair, rest the operated arm by your side on a pillow, and keep your healthy hand ready to help if needed.
How to do it:
- Keep the arm by your side on the pillow and take the forearm out of the sling.
- Slowly straighten the elbow so the forearm comes down, then bend it again so the hand comes up towards the shoulder.
- With the elbow bent, gently move the wrist up and down, and turn the palm to face up and then down.
- When you have finished, put the forearm back in the sling.
Movement tips: The arm stays by your side the whole time and does not move forward or outward; only the elbow and wrist move. Move slowly and without jerking, and do not hold your breath. If bending the elbow is hard, let your healthy hand guide the forearm. No weights or bands are used at this stage, because the tendon attached to the transferred bone is still being protected. A little stretch in the elbow is normal.
Amount, repetitions and progression: 15 times, 3 times a day. Once the movement is comfortable, increase only how fully the elbow straightens and bends, not the speed or the number of repetitions.
Stop immediately if: sharp pain appears at the front of the shoulder while you move the elbow.
Common mistakes: Moving the arm away from your side or forward; holding a weight or a bottle in the hand.
Easier version: Let your healthy hand hold under the wrist and guide the forearm as it straightens and bends.
Gentle neck movement (Gentle Neck Range of Motion)
Gently turning and tilting the head to the left and right so the neck does not stiffen during the sling days; 10 times for each movement. If pain, tingling or numbness shoots down into the arm or hand, stop.
More detailLess detail
Before you start: Wearing the sling and sleeping half-sitting can make the neck stiff and sore. This movement is done from the day of surgery and needs no equipment. Sit up straight on a chair, with the operated arm staying in the sling.
How to do it:
- Slowly turn your head to the right to look over your shoulder, then come back to the middle.
- Do the same to the left.
- Gently tilt your ear towards the shoulder on the same side, come back to the middle and do the other side.
Movement tips: Only the head moves; the shoulders stay down and relaxed, and the shoulder does not rise towards the ear. Move slowly and only as far as you feel a gentle stretch, not pain. Breathe normally throughout the movement.
Amount, repetitions and progression: 10 times for each movement; in the first days you can do them every hour during your waking hours. Increase the range only as far as is comfortable.
Stop immediately if: pain, tingling or numbness shoots down into the arm or hand.
Common mistakes: Shrugging the shoulder while tilting the head; moving the head quickly or jerkily.
Easier version: Make the range shorter and turn only halfway.
Gentle shoulder blade squeeze (Scapular Setting)
Gently drawing the shoulder blades back and down, without moving the arm, for good posture; 2 sets of 10 with a 5-second hold, from day 4. If sharp pain at the front of the shoulder or a pulling feeling on the wound appears, stop.
More detailLess detail
Before you start: During the sling days, the shoulders usually hunch forward and up. This exercise keeps the shoulder blade in its proper place and starts on day 4. Sit up straight on a chair, with the operated arm staying in the sling and your back not leaning against the chair.
How to do it:
- Sit up straight and look straight ahead.
- Gently draw your shoulder blades a little back and down, so that your shoulders move away from your ears.
- Hold for 5 seconds and slowly let go.
Movement tips: Only the shoulder blade moves; the arm stays in the sling and the elbow by your side. The shoulder does not rise towards the ear and the lower back does not arch. Breathe normally while holding, and rest for 30 seconds between the two sets. Done correctly, your chest opens slightly and your neck looks longer.
Amount, repetitions and progression: 2 sets of 10, holding 5 seconds each time, with 30 seconds’ rest between sets; 3 times a day. Do not squeeze harder; progress means holding this same position more easily.
Stop immediately if: sharp pain at the front of the shoulder or a pulling feeling on the wound appears.
Common mistakes: Shrugging the shoulders towards the ears; arching the lower back or pushing the chest out instead of moving the shoulder blades.
Easier version: Draw the shoulder blades back only a little, without holding, and let go.
Shoulder blade clock (Gentle Scapular Clock)
Gently moving the operated shoulder blade up, down, forward and back, without moving the arm; 10 repetitions, 3 times a day, from day 4. If sharp pain at the front of the shoulder or a pulling feeling on the wound appears, stop.
More detailLess detail
Before you start: This exercise starts on day 4 and keeps control of the shoulder blade, which is the base of shoulder movement, right through the sling weeks. No equipment is needed. Sit up straight on a chair, with the operated arm staying in the sling.
How to do it:
- Gently lift the operated shoulder blade a little, as if bringing the shoulder towards the ear, and return to the middle.
- Gently lower the shoulder blade and return to the middle.
- Move the shoulder blade a little forward and then a little back, returning to the middle each time.
Movement tips: The movements are small and only the shoulder blade shifts; the arm stays in the sling and the elbow by your side. Breathe calmly and rhythmically, and do each direction without rushing. Done correctly, the top of the shoulder moves up and down and forward and back, but the hand does not move.
Amount, repetitions and progression: 10 repetitions, 3 times a day. One repetition means one full round of all four directions. As the movement becomes easier, make the range slightly bigger.
Stop immediately if: sharp pain at the front of the shoulder or a pulling feeling on the wound appears.
Common mistakes: Moving the whole arm instead of the shoulder blade; leaning the trunk forward or to the side.
Easier version: Do only the up and down directions, and add forward and back later.
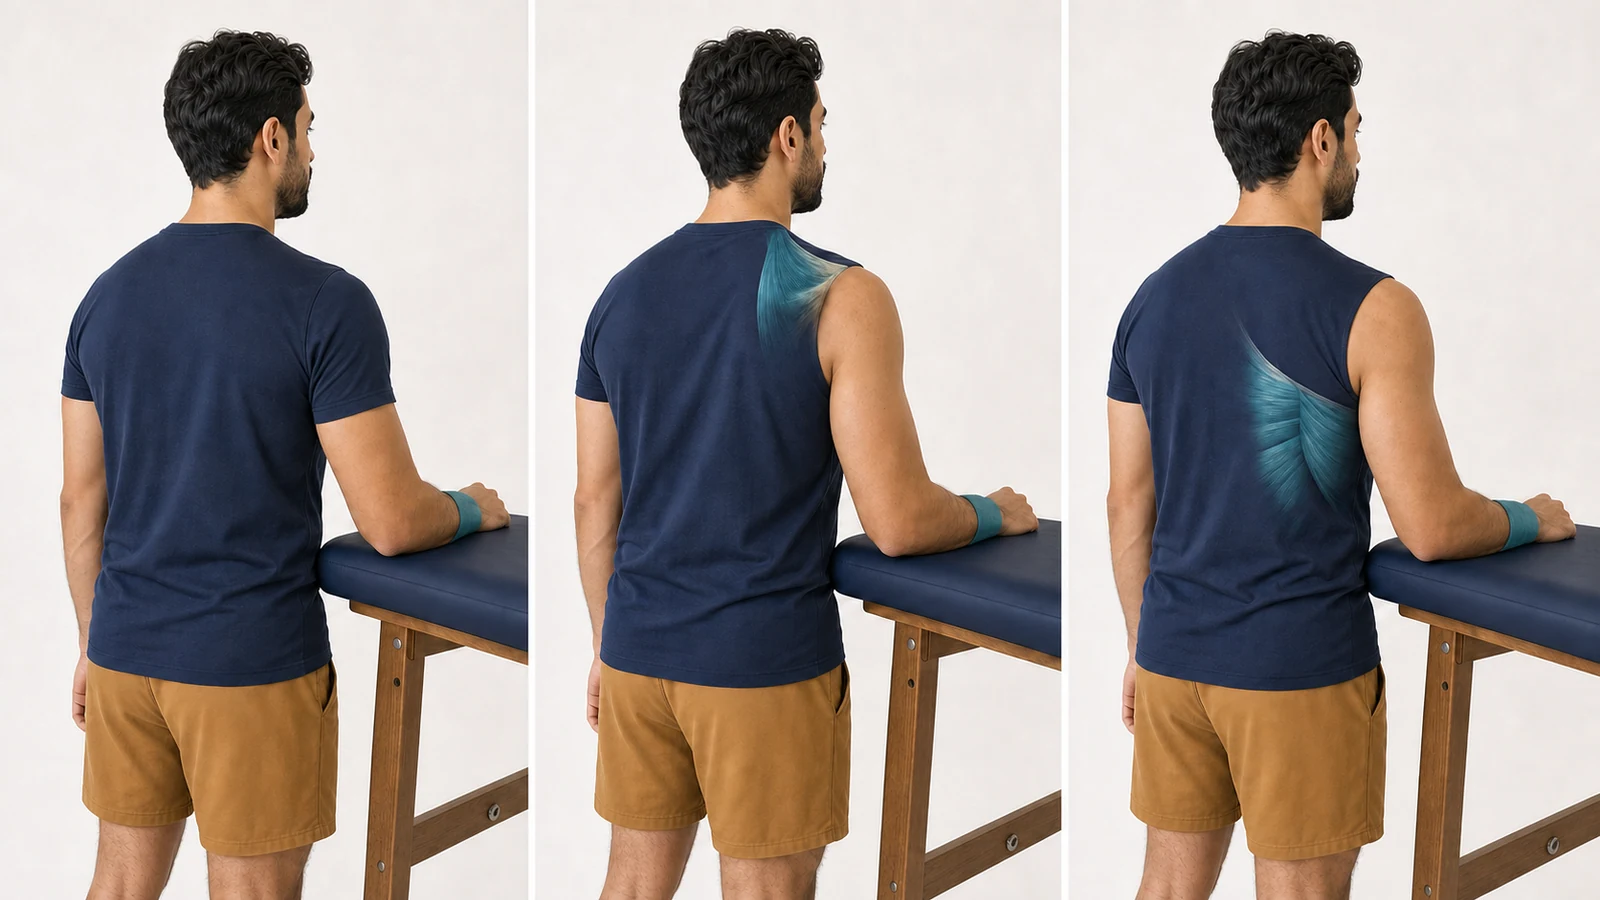
Assisted forward arm raise with clasped hands (Clasped-Hands Assisted Forward Elevation)
Standing or sitting, you interlace the fingers of both hands and, with straight elbows, raise both arms forward together, at most to 120 degrees, where the hands are level with the top of your head; 10 repetitions, a minute’s rest and another 10 repetitions, 3 times a day, from day 4. If sharp pain at the front of the shoulder, an unusual sound or a feeling that the shoulder is slipping appears, stop.
More detailLess detail
Before you start: This is the first shoulder movement and starts on day 4 so the shoulder does not stiffen. The healthy hand lifts the operated arm, and the operated shoulder’s muscle does no work in it. No equipment is needed. Stand or sit up straight, undo the sling and let both hands hang in front of your body.
How to do it:
- Interlace the fingers of both hands in front of your body; the elbows are straight and the hands are in front of your thighs.
- Using the strength of the healthy hand, slowly raise the clasped hands forward and up with straight elbows; the operated arm only goes along with it.
- Raise them only until you feel a gentle stretch; the hands reach at most the height of the top of your head and do not go above it.
- Slowly lower them until the hands are back in front of your thighs.
Movement tips: The limit for this movement is 120 degrees; that means the clasped hands reach at most the height of the top of your head and do not go above it. Both arms rise together, straight forward, not out to the side, and the elbows do not bend. Breathe calmly and move without jerking. Done correctly, the operated shoulder is relaxed, the shoulder does not rise towards the ear, and the healthy hand does the work.
Amount, repetitions and progression: 10 repetitions, a minute’s rest, another 10 repetitions; 3 times a day. Each day, go higher only as far as a gentle stretch, and do not go past the 120-degree limit.
Stop immediately if: sharp pain at the front of the shoulder, an unusual sound or a feeling that the shoulder is slipping appears.
Common mistakes: Raising the arm with the operated shoulder’s own muscle; bending the elbows; taking the hands above the head or out to the side.
Easier version: Raise the clasped hands only to shoulder level.
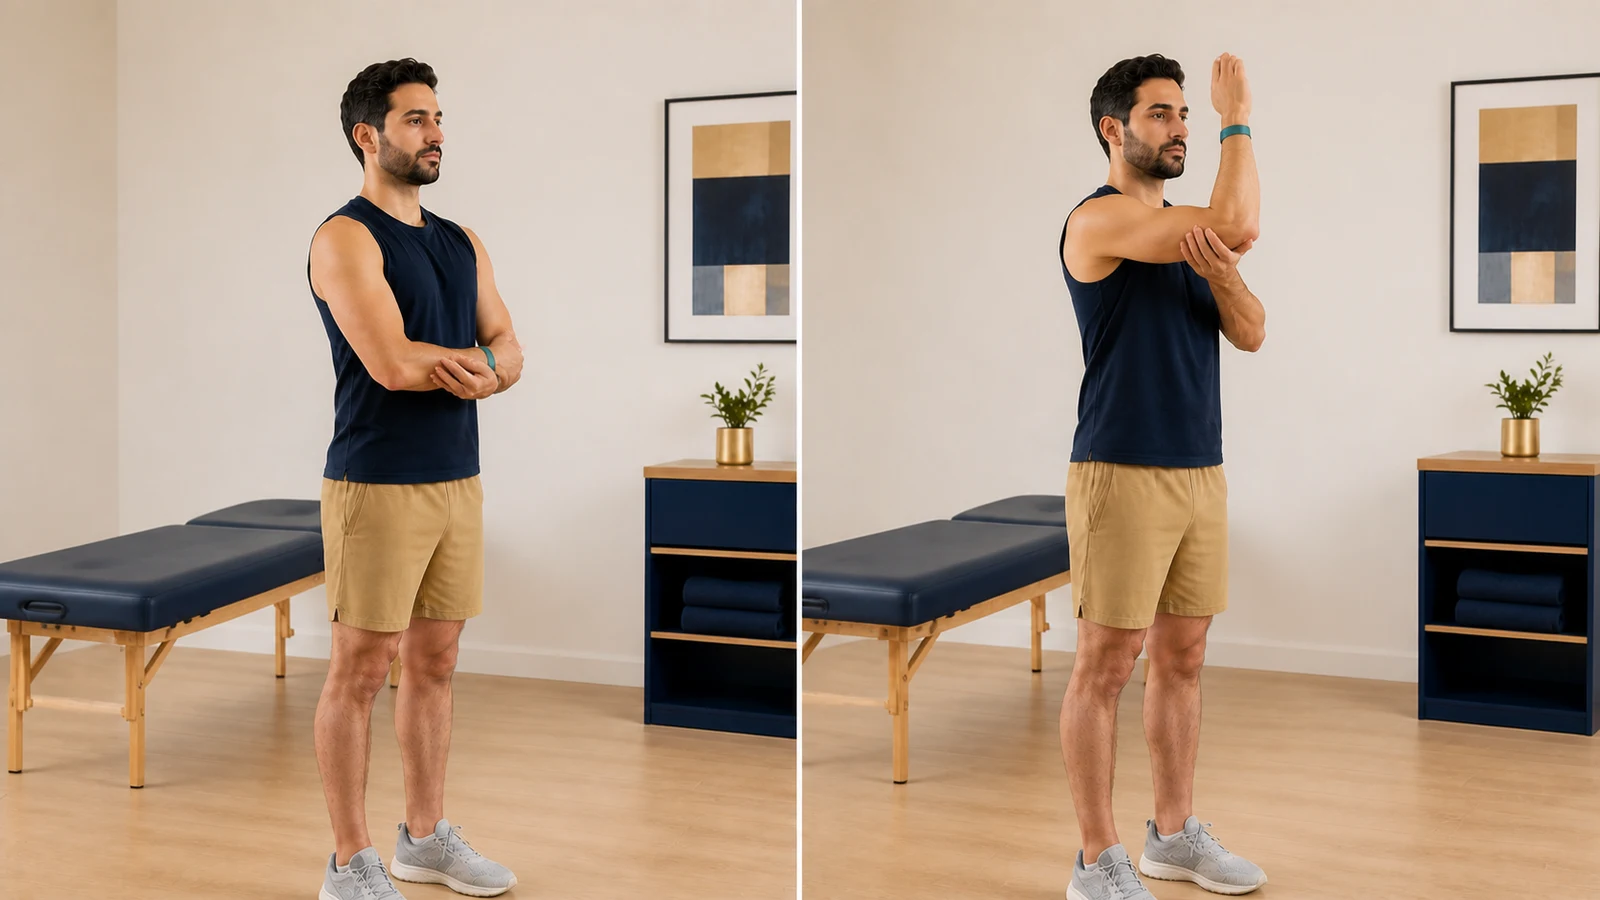
Assisted straight-arm raise in two directions: forward and to the side (Long-Lever Assisted Elevation, Two Directions)
Lying on your back, clasp your hands together and use the healthy hand to raise the straight arm forward up to 120 degrees; to move to the side, ask another person to move the straight arm slightly in front of your side, up to 90 degrees; 10 repetitions, a minute’s rest and another 10 repetitions, 3 times a day, from week 2. If sharp pain at the front of the shoulder, or a feeling that the shoulder is slipping or dislocating, appears, stop.
More detailLess detail
Before you start: This exercise starts in week 2 and has two directions, forward and to the side. Going forward, the healthy hand lifts the operated arm; going to the side, another person helps move the arm. The operated shoulder’s muscle stays relaxed in both directions. Lie on your back on the bed and undo the sling; both arms are by your sides, with the operated palm facing your body.
How to do it:
- For the forward direction, clasp your hands together and keep both elbows straight.
- Forward: use the healthy hand to raise the clasped hands forward and up until the arm goes a little past pointing straight up at the ceiling, towards your head, at most to 120 degrees, then slowly bring it back.
- To the side: After finishing the forward direction, unclasp your hands and put the healthy arm by your side. Ask another person to stand on your operated side and support the forearm from underneath near the wrist. They should move the straight arm away from your body on the bed, slightly in front of your side, with the palm facing your body, at most to shoulder level (90 degrees). Then they should slowly bring the arm back.
- After finishing both directions, put the arm by your side and fasten the sling.
Movement tips: Remember the two limits by two landmarks: going forward, the arm goes a little past pointing straight up at the ceiling, towards your head, but does not come to rest on the bed beside your head (120 degrees); going to the side, the hand does not go higher than shoulder level (90 degrees). Going to the side, the palm faces your body with the thumb pointing to the ceiling, and the forearm does not turn outward. Move slowly and without jerking, and take a few deep breaths between the two directions.
Amount, repetitions and progression: In each direction, 10 repetitions, a minute’s rest, another 10 repetitions; 3 times a day. Increase the range each day only as far as a gentle stretch, and do not go past the two limits.
Stop immediately if: sharp pain at the front of the shoulder, or a feeling that the shoulder is slipping or dislocating, appears.
Common mistakes: Going above shoulder level when moving to the side; the palm turning to face the ceiling, which means the forearm has turned outward.
Easier version: Keep the arm straight and, in each direction, raise it only halfway to the limit.
↔️ Second two weeks: more assisted movement, still in the sling
Goal: reach the allowed limits of assisted movement and continue the programme with physiotherapy, which started at the day 10 to 14 visit on the clinic’s referral.
Condition for starting: the stitches have been removed and the wound is closed and dry.
Movement limits: the same limits as in the first two weeks: forward up to 120 degrees, to the side up to 90 degrees, and no turning of the forearm outward. From week 3, gentle static contractions are also added; that is, you tighten the muscle without the hand moving.
Daily life: the sling stays on day and night until the end of day 28. Desk work is possible from the end of week 2; work with the sling on and take short breaks now and then.
Day 29: the sling is put aside and assisted turning of the forearm outward, up to 45 degrees, begins. Its exercise is in the next stage.
End of this stage: assisted raising forward up to about 120 degrees is possible without severe pain.
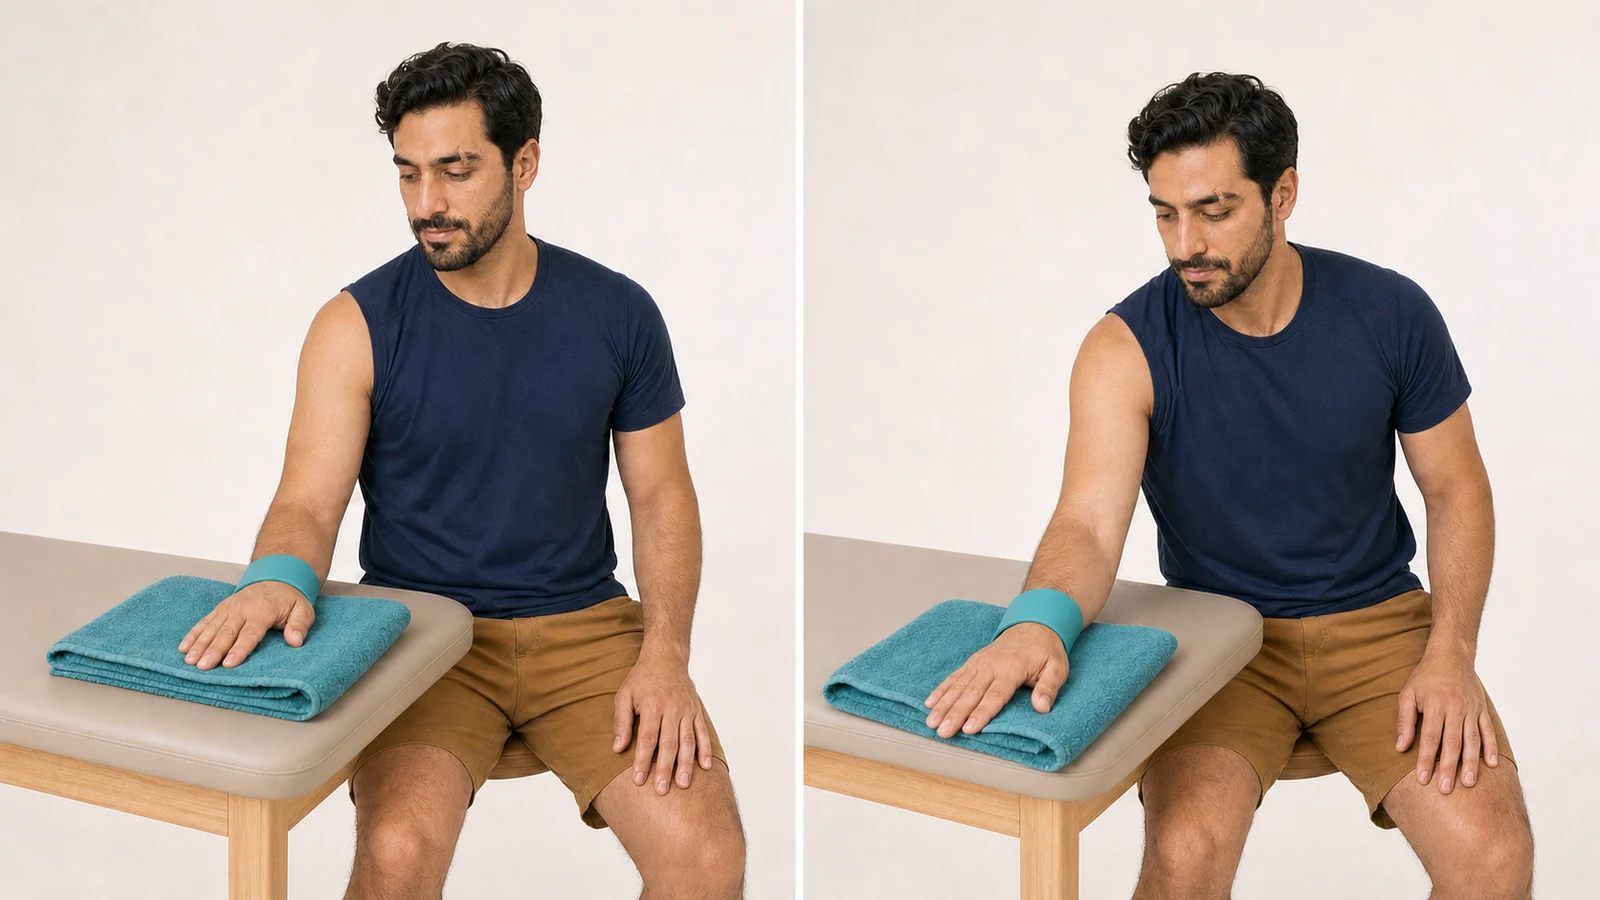
Forearm slide on a table (Seated Table Slide)
Sitting beside a table, you slide the operated forearm forward on a towel so the shoulder opens up a little; 10 repetitions, a minute’s rest and another 10 repetitions, 3 times a day. If sharp pain at the front of the shoulder or a feeling that the shoulder is slipping appears, stop.
More detailLess detail
Before you start: After the stitches are removed, this exercise continues raising the shoulder with the table as support; the table takes the weight of the arm and the shoulder muscle does almost no work. You need a table at about stomach height, a chair without wheels and a small towel. Sit beside the table, undo the sling and rest the operated forearm on the towel, palm down.
How to do it:
- Sit beside the table and rest the operated forearm on the towel; your healthy hand rests freely on your lap.
- Slowly lean your trunk forward from the waist so the forearm slides forward on the towel.
- Go forward until you feel a gentle stretch in the shoulder, and stay there for a moment.
- Slowly sit up straight so the forearm returns to where it started.
Movement tips: The movement comes from leaning the trunk, not from lifting the arm; the trunk leans forward only about a third of the way to horizontal, so you do not go past the 120-degree limit. The hand stays on the table and the shoulder does not rise. The forearm points straight ahead and does not turn outward. Breathe calmly and move at a steady pace. Done correctly, you feel a gentle stretch at the front of the shoulder and under the armpit that settles within a few minutes.
Amount, repetitions and progression: 10 repetitions, a minute’s rest, another 10 repetitions; 3 times a day. When it becomes comfortable, lean a little further forward, but do not let the trunk go further than a third of the way to horizontal, and do not let sharp pain come on.
Stop immediately if: sharp pain at the front of the shoulder or a feeling that the shoulder is slipping appears.
Common mistakes: Lifting the hand off the table; shrugging the shoulder towards the ear; turning the forearm outward.
Easier version: Shorten the range and lean only slightly forward.
Slow walk back from a table (Supported Table Walk-Back)
Standing, with both hands staying on the table, you take a few short steps back so the shoulder opens up with the table as support; 10 repetitions, a minute’s rest and another 10 repetitions, 3 times a day. If sharp pain at the front of the shoulder, dizziness or a feeling that the shoulder is slipping appears, stop.
More detailLess detail
Before you start: This exercise is the same forward opening of the shoulder, but standing and by leaning the trunk; the table holds the arm and your body weight does not go onto your hands. You need a sturdy table or a kitchen counter, and a floor that is not slippery. Stand facing the table, undo the sling and put both palms on the table.
How to do it:
- Put both palms on the table; the elbows are straight and the feet are hip-width apart.
- Take a few small steps back and, at the same time, lean your trunk forward from the hips so your arms open out forward.
- Go until you feel a gentle stretch, and stay there for a moment.
- Return to where you started with short steps and stand up straight.
Movement tips: The hands stay fixed on the table and you do not put your body weight on them; only the trunk goes down. The limit for this movement is also 120 degrees: the trunk leans at most halfway to horizontal and the head stays higher than the hands. Breathe calmly and come back without jerking. Done correctly, you feel a gentle stretch under the armpit.
Amount, repetitions and progression: 10 repetitions, a minute’s rest, another 10 repetitions; 3 times a day. As the movement becomes easier, step back a little further, without going past the limit.
Stop immediately if: sharp pain at the front of the shoulder, dizziness or a feeling that the shoulder is slipping appears.
Common mistakes: Putting your body weight on your hands; lowering the head to the level of the hands and going past the limit; arching the lower back.
Easier version: Step back only a little and lean the trunk less.
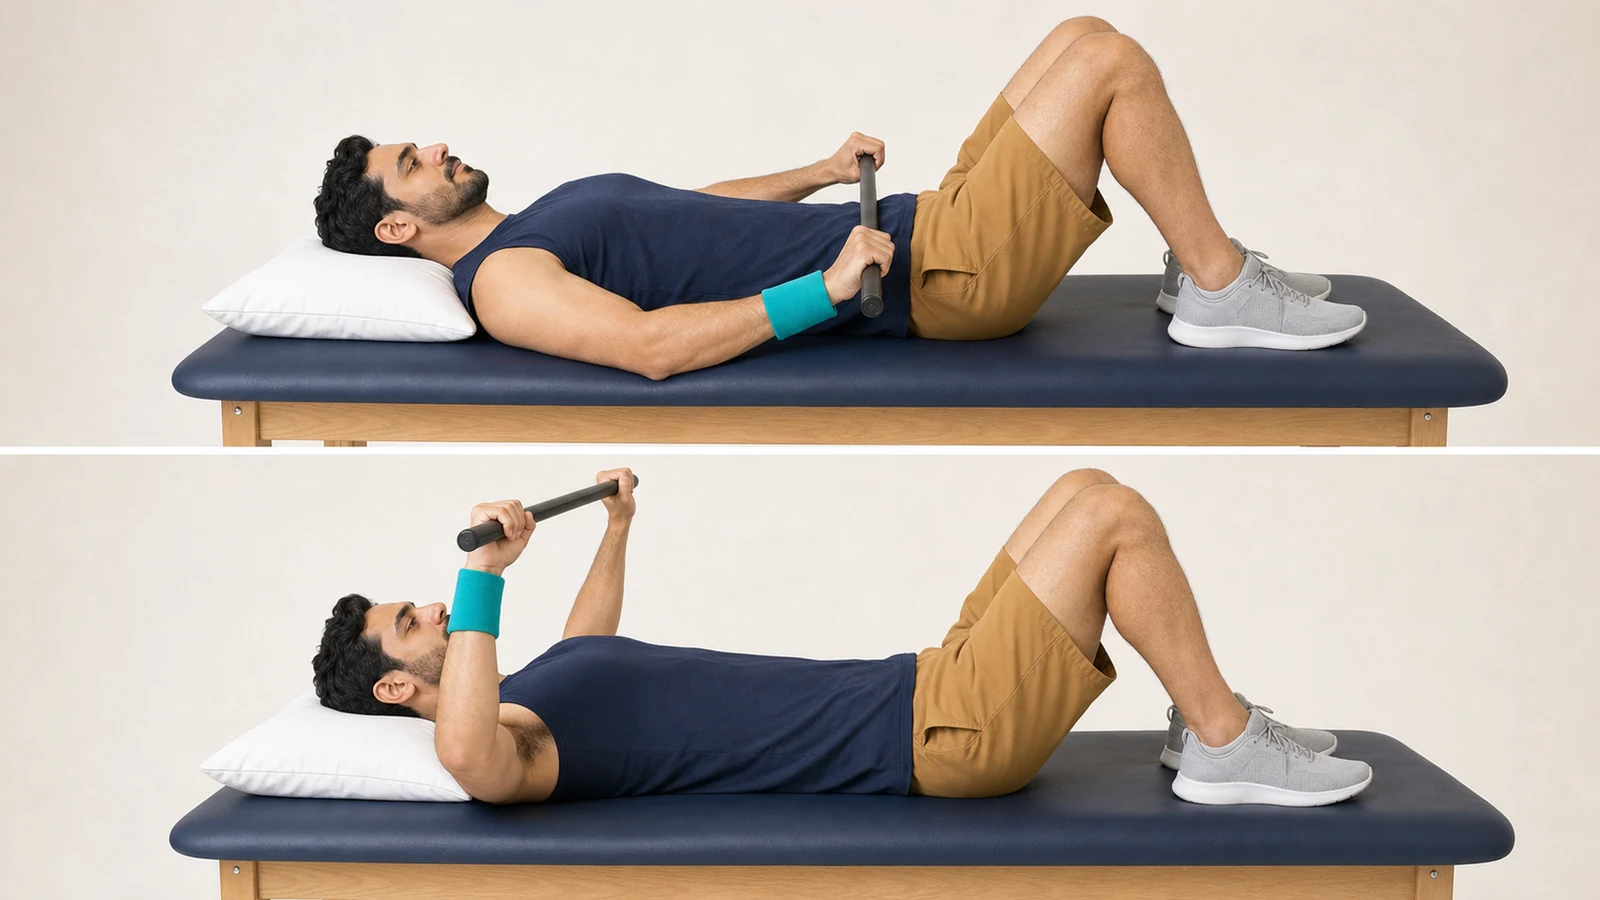
Assisted arm raise with a stick, lying on your back (Supine Wand-Assisted Forward Elevation)
Lying on your back, both hands hold a light stick and the healthy hand raises the operated arm forward up to 120 degrees; 5 times, holding 10 seconds each time. If sharp pain at the front of the shoulder or a feeling that the shoulder is slipping appears, stop.
More detailLess detail
Before you start: In this exercise the stick makes the healthy hand’s work easier and the movement smoother; the operated shoulder’s muscle still does no work. A light stick, a broom handle or a plastic pipe is enough, as long as it is a little longer than the distance between your two shoulders. Lie on your back with your knees bent and hold the stick with both hands, shoulder-width apart.
How to do it:
- Hold the stick with both hands over your stomach; the elbows are straight.
- Pushing with your healthy hand, slowly take the stick forward and up; the operated hand only holds the stick.
- When your arms have gone a little past pointing straight up at the ceiling, towards your head, hold for 10 seconds.
- Slowly bring it back until the stick rests on your stomach.
Movement tips: The limit is 120 degrees: the arms go a little past pointing straight up at the ceiling, towards your head, but the stick does not come to rest on the bed above your head. The elbows stay straight, the two hands stay the same distance apart, and the stick does not tilt. Breathe normally while holding. Done correctly, the healthy hand does the work and the operated shoulder is relaxed.
Amount, repetitions and progression: 5 times, holding 10 seconds each time; twice a day. Progress means reaching the limit more easily, not going past it.
Stop immediately if: sharp pain at the front of the shoulder or a feeling that the shoulder is slipping appears.
Common mistakes: Raising the stick with the strength of the operated hand; the stick tilting towards the operated hand; arching the lower back.
Easier version: Limit the range to pointing straight up at the ceiling.
Static shoulder contraction in a neutral position (Submaximal Neutral Shoulder Isometrics)
Tightening the shoulder muscle without moving the hand, by pressing gently against a wall in three directions; 10 times in each direction with a 5-second hold, from week 3. If pain comes on at the front of the shoulder, press more lightly; if it stays even with light pressure, stop.
More detailLess detail
Before you start: From week 3, this exercise puts the shoulder muscles to work without the joint moving. You need only a wall and a folded towel. Stand next to the wall; the operated elbow is bent to a right angle, like the corner of a book, the arm is by your side, and the towel goes between your hand or elbow and the wall.
How to do it:
- Forward: stand facing the wall, place your fist on the towel against the wall and gently push forward.
- To the side: stand side-on to the wall and gently press the outside of your elbow against the wall through the towel.
- Backward: stand with your back to the wall and gently press the back of your elbow against the wall.
- Hold for 5 seconds in each direction and slowly let go.
Movement tips: The pressure is gentle, much less than your full strength, and the hand and elbow do not move at all. The arm stays by your side and the forearm points forward. Do not hold your breath while holding. Turning the hand inward is not part of this exercise, because the front shoulder muscle, which was split along its fibres during the operation, is still being protected.
Amount, repetitions and progression: 10 times in each direction, holding 5 seconds each time; twice a day. Progress means steadier pressure, not more pressure.
Stop immediately if: pain at the front of the shoulder stays even with light pressure.
Common mistakes: Pushing with all your strength; moving the hand or turning the trunk; holding your breath.
Easier version: Press more lightly and hold for a shorter time.
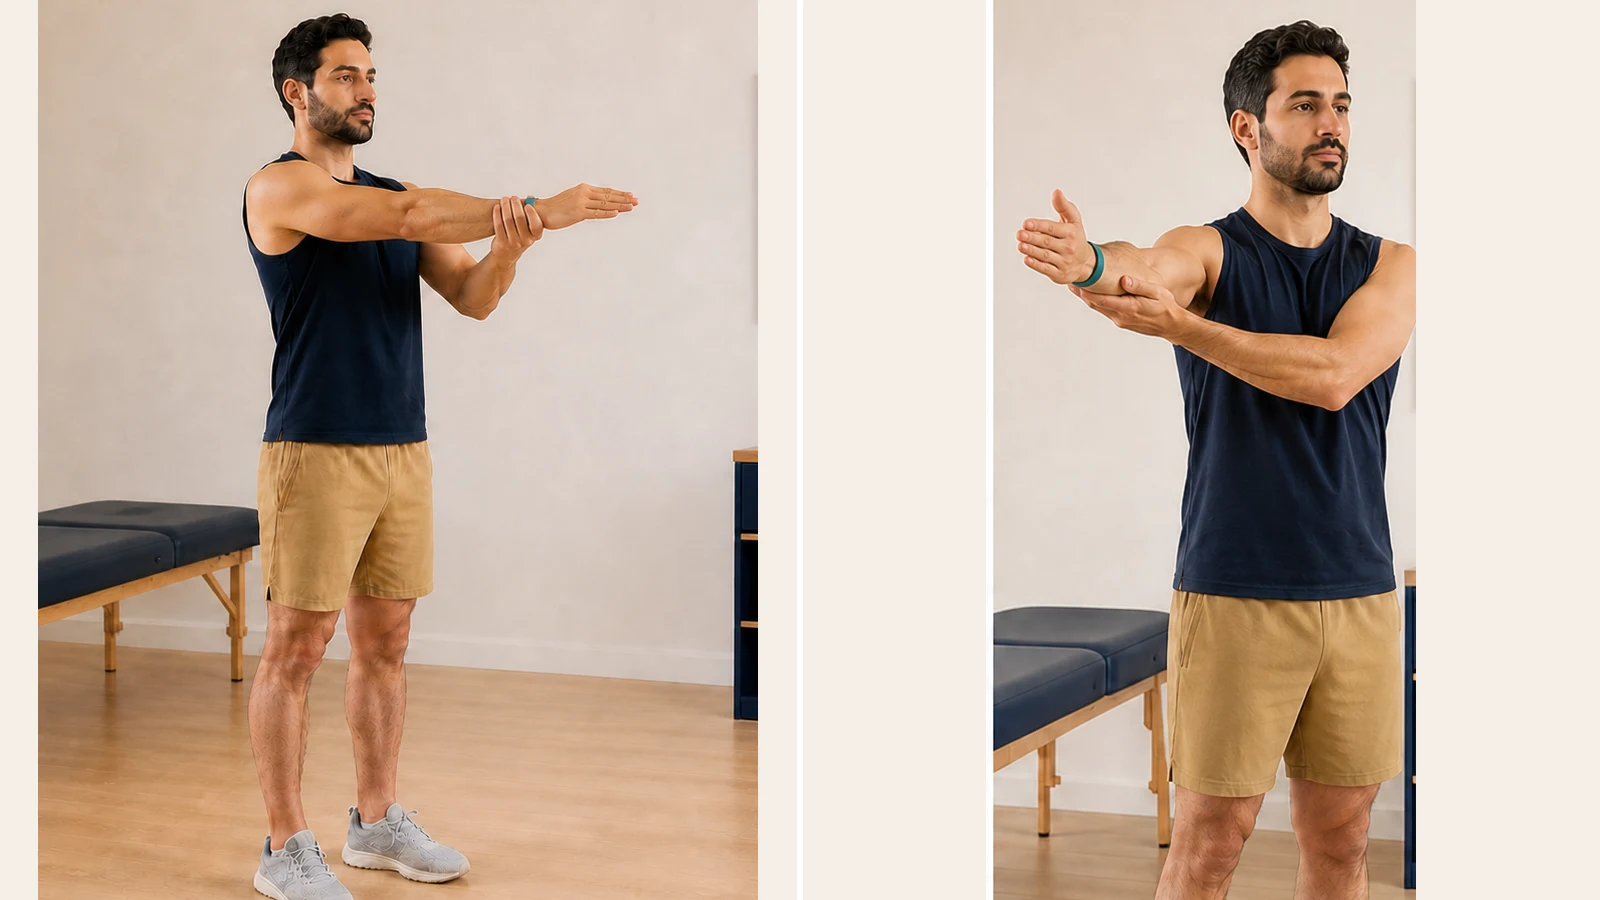
Assisted reach to the stomach and the opposite shoulder (Assisted Hand-to-Abdomen and Opposite Shoulder)
The healthy hand gently brings the operated hand onto the stomach and then towards the opposite shoulder; 10 repetitions, 3 times a day. If sharp pain at the front or back of the shoulder or a feeling that the shoulder is slipping appears, stop.
More detailLess detail
Before you start: This movement helps with everyday tasks such as doing up buttons and washing your face, and is done in weeks 3 and 4. No equipment is needed. Sit up straight on a chair, undo the sling, and keep the operated elbow by your side and bent.
How to do it:
- With your healthy hand, hold the operated wrist; the operated elbow is bent and by your side.
- Gently bring the operated hand onto your stomach.
- With help from the healthy hand, slowly move the hand across your chest towards the opposite shoulder until you feel a gentle stretch.
- Slowly bring it back and rest the hand by your side.
Movement tips: The healthy hand does the work and the operated shoulder’s muscle is relaxed. The elbow stays low and close to the body and does not rise to shoulder level. Move slowly and at a steady pace. A gentle stretch at the back of the shoulder is normal.
Amount, repetitions and progression: 10 repetitions, 3 times a day. Each day, go a little closer to the opposite shoulder, only as far as a gentle stretch.
Stop immediately if: sharp pain at the front or back of the shoulder, or a feeling that the shoulder is slipping, appears.
Common mistakes: Raising the elbow to shoulder level; pulling the hand forcefully towards the opposite shoulder.
Easier version: Only bring the hand onto your stomach, and do not move it towards the opposite shoulder.
🌱 Month 2: no sling, and the start of active movement
Goal: everyday use of the arm without the sling, a greater range of motion, and a gentle start to muscle strengthening.
Timing: from day 29, assisted turning of the forearm outward up to 45 degrees. From week 6 (day 36), active movement, that is, raising the arm with the shoulder’s own muscle, and exercises with a light band. From the end of week 6 (day 42), the 120- and 90-degree limits are lifted, and each day raising the arm goes only as far as a gentle stretch, without pain. From week 8 (day 50), a light weight for the muscle at the front of the upper arm. After the end of week 8 (from day 57), turning the forearm outward is increased gradually, each day only as far as a gentle stretch, without pain.
Daily life: until the end of week 6, do not lift anything heavier than a glass; from week 7 to the end of month 2, at most 1 kilo, such as a one-litre bottle of water, with the arm down and close to your body. Driving is possible after the end of week 8 (from day 57).
Not allowed this month: raising the arm to the side while turning it outward at the same time, as in the position for throwing a ball or putting your hand behind your head, until the end of week 8. Inward-turning exercises with a band are also not allowed.
End of this stage: you can raise your arm above shoulder level without help, without the shoulder rising towards the ear.
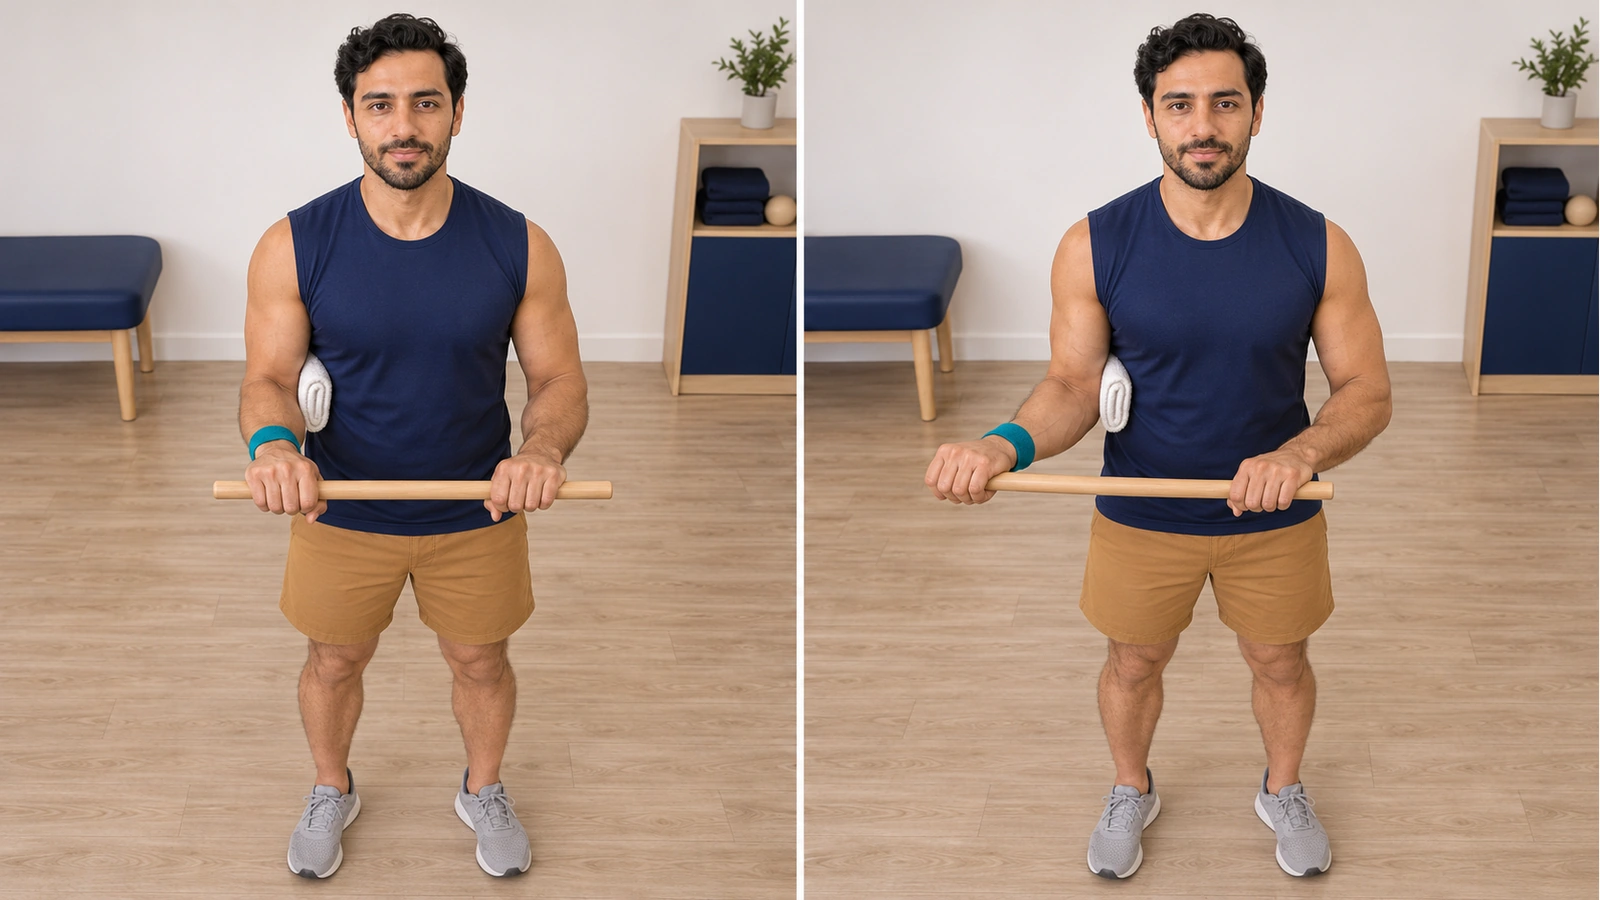
Assisted outward forearm turn with a stick (Stick-Assisted External Rotation)
Standing, with a rolled towel between the elbow and your side, the healthy hand uses a stick to gently turn the operated forearm outward, up to 45 degrees; 10 repetitions, a minute’s rest and another 10 repetitions, 3 times a day, from day 29. If sharp pain at the front of the shoulder appears, or during the movement you feel the shoulder giving way or starting to slip, stop.
More detailLess detail
Before you start: Turning the forearm outward is the last movement to come back, because this very movement stretches the front shoulder muscle, which was split along its fibres during the operation. This exercise starts on day 29, after the sling has been put aside. You need a light stick or a broom handle and a rolled-up towel. Stand up straight, put the towel between the operated elbow and your side, and hold the stick in front of your stomach with both hands; both elbows are bent to a right angle.
How to do it:
- Keep the towel between the operated elbow and your side, and hold the stick horizontally in front of your stomach with both hands.
- With your healthy hand, gently push the stick towards the operated hand so the operated forearm turns outward.
- Keep the elbow against your side. Your hand does not need to reach your side. Through the end of week 8, 45 degrees is the upper limit for turning outward. If you feel a gentle stretch earlier, pause there.
- Slowly bring it back until the forearm points forward again.
Movement tips: Until the end of week 8 the limit is 45 degrees; that means the forearm goes only halfway towards the side. After the end of week 8, this same movement is increased gradually; each day go only as far as a gentle stretch, without pain. The towel stays between the elbow and your side the whole time and does not fall; if it falls, the elbow has come away from your body. Breathe calmly and move without jerking. A gentle stretch at the front of the shoulder is normal.
Amount, repetitions and progression: 10 repetitions, a minute’s rest, another 10 repetitions; 3 times a day. Until the end of week 8, do not go past 45 degrees; after that, go further each day only as far as a gentle stretch.
Stop immediately if: sharp pain at the front of the shoulder appears, or during the movement you feel the shoulder giving way or starting to slip.
Common mistakes: The elbow coming away from the body and the towel falling; turning the trunk instead of the forearm; going past 45 degrees before the end of week 8.
Easier version: Make the range shorter and turn outward only a third of the way.
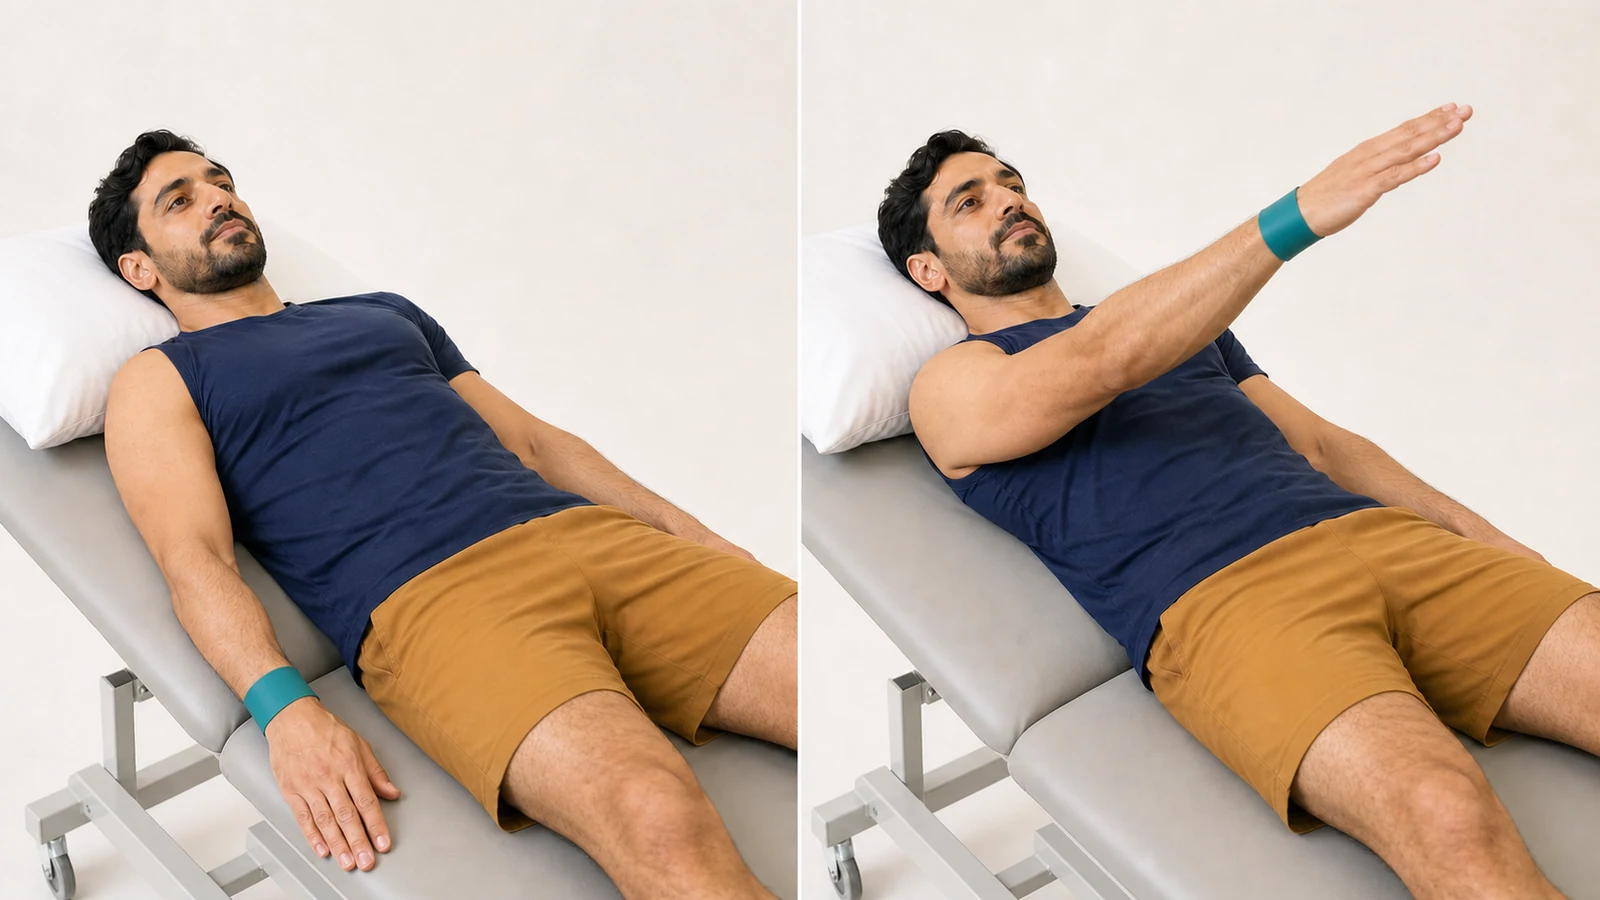
Active arm raise lying on your back (Supine Active Forward Elevation)
Lying on your back, this time you raise the operated arm forward with the shoulder’s own muscle; 2 sets of 10 with a 5-second hold, once or twice a day, from week 6. If sharp pain at the front of the shoulder or a feeling that the shoulder is slipping appears, stop.
More detailLess detail
Before you start: From week 6, the shoulder muscle raises the arm by itself for the first time. Lying on your back is the first step, because in this position less of the arm’s weight falls on the shoulder. If needed, let the healthy hand or a stick help. Lie on your back with your knees bent and the operated arm by your side, palm facing your body.
How to do it:
- Keep the elbow straight and the palm facing your body.
- Slowly raise the arm forward and up using the shoulder muscle; if it is hard, let the healthy hand help under the wrist.
- Hold for 5 seconds at the highest comfortable point.
- Slowly bring it back until the arm rests by your side.
Movement tips: Until the end of week 6 the limit is 120 degrees, meaning the arm goes a little past pointing straight up at the ceiling, towards your head; after that, each week go higher only as far as a gentle stretch, without pain. The forearm does not turn outward and the shoulder does not rise towards the ear. Breathe calmly and lower the arm more slowly than you raise it. A slight trembling of the arm in the first days is normal and lessens with practice.
Amount, repetitions and progression: 2 sets of 10, holding 5 seconds each time, with 30 seconds’ rest between sets; once or twice a day. When you can do it without help from the healthy hand and without shrugging the shoulder, move on to the seated exercise.
Stop immediately if: sharp pain at the front of the shoulder or a feeling that the shoulder is slipping appears.
Common mistakes: Shrugging the shoulder towards the ear; bending the elbow to make it easier; letting the arm drop down.
Easier version: Let the healthy hand hold under the wrist and do half of the work.
Active side raise, lying on your side (Side-Lying Active Elevation)
Lying on your healthy side, you raise the straight operated arm from your side towards the ceiling; 2 sets of 10, once or twice a day, from week 6. If sharp pain at the front of the shoulder appears, or during the movement you feel the shoulder giving way or starting to slip, stop.
More detailLess detail
Before you start: This exercise comes after the exercise lying on your back and makes the muscle at the top of the shoulder work against the weight of the arm. It is done from week 6, once the exercise lying on your back has become comfortable. You need a mat and a pillow. Lie on your healthy side and rest your head on your arm or a pillow; the operated arm lies straight along your side and thigh, palm facing the thigh.
How to do it:
- Lie on your healthy side; the operated arm is straight along your side and the palm rests on your thigh.
- Slowly raise the straight arm from your side towards the ceiling; the palm keeps facing your feet.
- Stay there for a moment and slowly lower it until the hand rests on your thigh again.
Movement tips: Until the end of week 6 the hand does not go higher than pointing at the ceiling, and after that it also progresses only little by little. The palm faces your feet the whole way and the hand does not turn towards your head or behind it; turning the hand outward while raising it from the side is not allowed until the end of week 8. The body does not roll backward. Breathe calmly and lower the arm slowly.
Amount, repetitions and progression: 2 sets of 10, once or twice a day. When you can do it without the trunk rolling and without pain, increase the range little by little.
Stop immediately if: sharp pain at the front of the shoulder appears, or during the movement you feel the shoulder giving way or starting to slip.
Common mistakes: Turning the palm to face the ceiling or your head; taking the hand behind the line of the body; the trunk rolling backward.
Easier version: Bend the elbow so the arm feels lighter, and follow the same path.
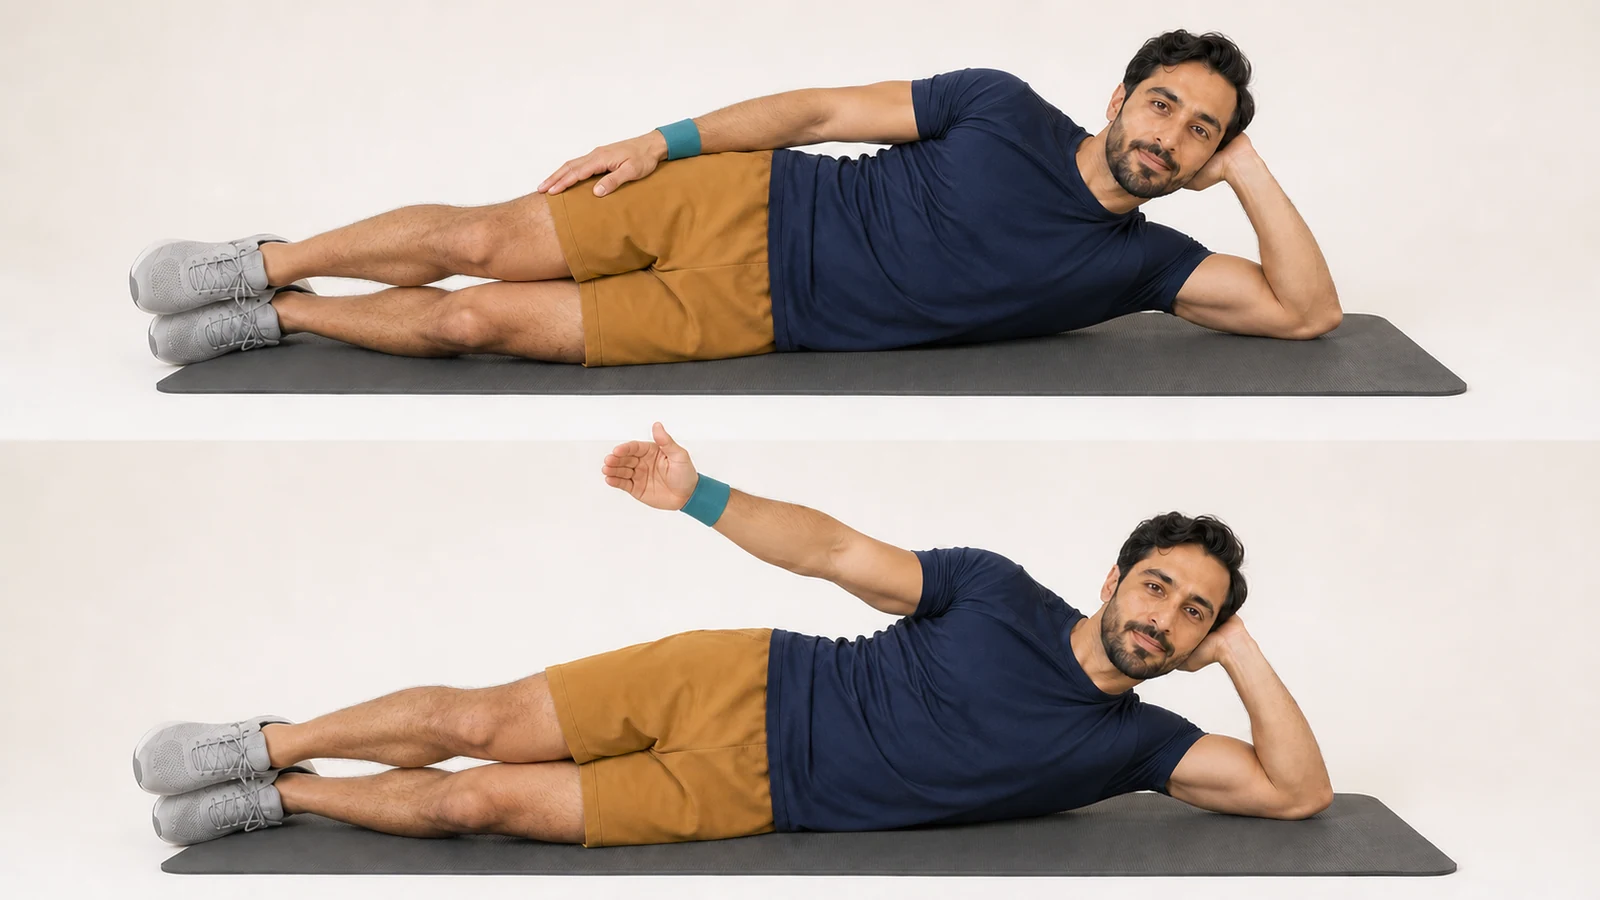
Active arm raise, sitting (Seated Active Forward Elevation)
Sitting, you raise the straight arm forward with the shoulder muscle; 10 repetitions, once or twice a day, from week 6 and once the exercise lying on your back has become comfortable. If the shoulder rises towards the ear, reduce the range; if sharp pain at the front of the shoulder or a feeling that the shoulder is slipping appears, stop.
More detailLess detail
Before you start: In this position the shoulder muscle lifts the full weight of the arm; that is why it comes after the exercise lying on your back. No equipment is needed. Sit up straight on a chair in front of a mirror so you can see your shoulders; the arm is by your side, palm facing your body.
How to do it:
- Sit up straight and draw your shoulder blades slightly back and down.
- Slowly raise the straight arm forward and up; the thumb points to the ceiling.
- Go only as far as the shoulder does not rise, then slowly bring it back.
Movement tips: In the mirror, both shoulders should stay level; if the operated shoulder rises towards the ear, that point is your limit for today. Until the end of week 6, the hand does not go higher than the level of the top of your head. Breathe calmly and lower the arm slowly. Muscle tiredness after the exercise is normal.
Amount, repetitions and progression: 10 repetitions, once or twice a day; each week, increase the range only as far as the shoulder does not rise.
Stop immediately if: sharp pain at the front of the shoulder or a feeling that the shoulder is slipping appears.
Common mistakes: Shrugging the shoulder and leaning the trunk back to get more range.
Easier version: Bend the elbow and raise the arm only to shoulder level.
Outward forearm turn against a light band, elbow by your side (Band External Rotation at the Side)
Standing, with the elbow pressed against your body, you turn the forearm outward against a light band, only up to 45 degrees until the end of week 8; 2 sets of 10, twice a day, from week 6. If pain at the front of the shoulder appears, or during the movement you feel the shoulder giving way or starting to slip, stop.
More detailLess detail
Before you start: From week 6, this exercise strengthens the muscles at the back of the shoulder; these are the muscles that hold the head of the upper arm bone in the socket. You need a light band and a small towel. Tie the band to a door handle or another firm point at elbow height, stand so that your healthy hand is towards the door, and put the towel between the operated elbow and your side.
How to do it:
- Keep the towel between the elbow and your side; the elbow is bent to a right angle, the forearm is in front of your stomach and you are holding the band.
- Slowly turn the forearm outward; the elbow stays pressed against the towel.
- Until the end of week 8, go only halfway between pointing forward and pointing to the side, which is about 45 degrees.
- Slowly come back until the forearm is in front of your stomach again.
Movement tips: The towel must not fall; if it falls, the elbow has come away from your body. The shoulder does not rise and the trunk does not turn. Come back more slowly than you go out, and do not hold your breath. After the end of week 8, the range is increased gradually; each day go only as far as a gentle stretch, without pain. Tiredness at the back of the shoulder after the exercise is normal.
Amount, repetitions and progression: 2 sets of 10, twice a day. When you can do both sets without pain and without the elbow coming away, use the next stronger band.
Stop immediately if: pain at the front of the shoulder appears, or during the movement you feel the shoulder giving way or starting to slip.
Common mistakes: Moving the elbow away from the body; turning the trunk instead of the forearm; going past 45 degrees before the end of week 8.
Easier version: Hold the band looser, or do it without a band, using only the weight of your hand.
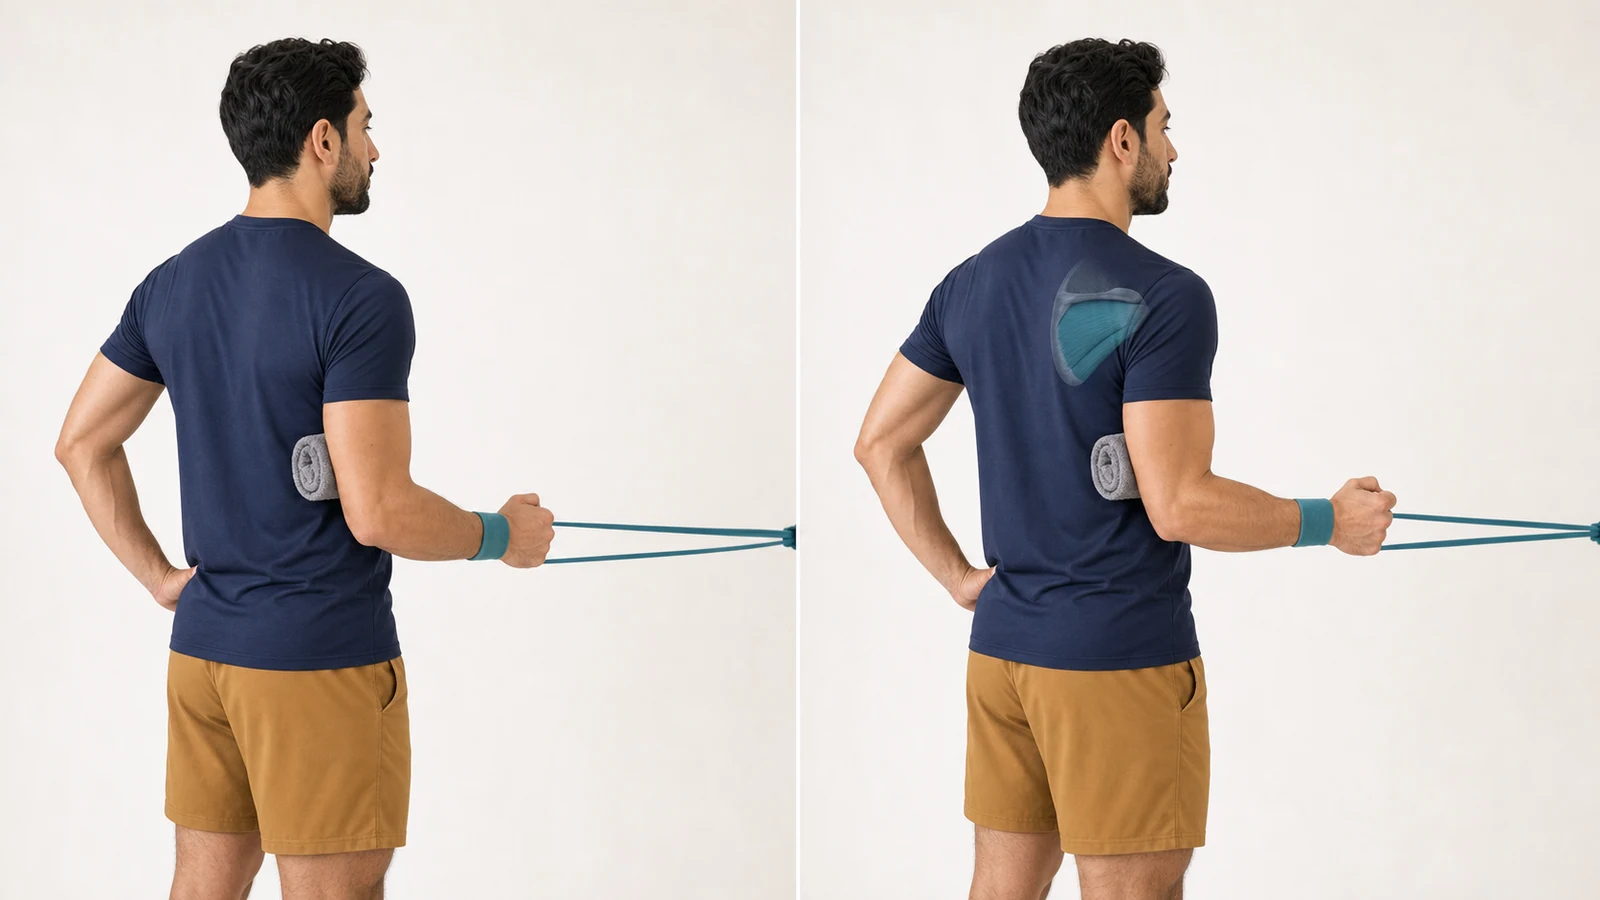
Light band row
Standing, you pull a band back with the operated hand until the elbow reaches your side and the shoulder blade draws in; 2 sets of 10, once a day, from week 6. If pain at the front of the shoulder or a feeling that the shoulder is slipping appears, stop.
More detailLess detail
Before you start: From week 6, this exercise strengthens the muscles of the shoulder blade and the back of the shoulder, and helps your posture. You need a light band. Tie the band securely to a firm door handle, stand facing it, and hold the end of the band with the operated hand; the elbow is straight, the hand points forward, and the healthy hand rests freely by your side.
How to do it:
- Stand facing the door and hold the end of the band with the operated hand; the band is slightly stretched.
- Bend the elbow and pull it back, close to your body, until it reaches your side and the shoulder blade draws in towards the spine.
- Hold for a moment and slowly return.
Movement tips: The elbow stays close to the body and comes back only as far as your side, not behind it; if the elbow goes behind the body, the front of the shoulder is stretched. The shoulder stays down and the trunk does not turn. Breathe out as you pull, and rest for 30 seconds between the two sets. Tiredness between the shoulder blades after the exercise is normal.
Amount, repetitions and progression: 2 sets of 10, with 30 seconds’ rest between sets; once a day. When both sets are comfortable, use the next stronger band.
Stop immediately if: pain at the front of the shoulder or a feeling that the shoulder is slipping appears.
Common mistakes: Taking the elbow behind the line of the body; shrugging the shoulder; turning the trunk instead of pulling with the arm.
Easier version: Step a little forward so the band is looser.
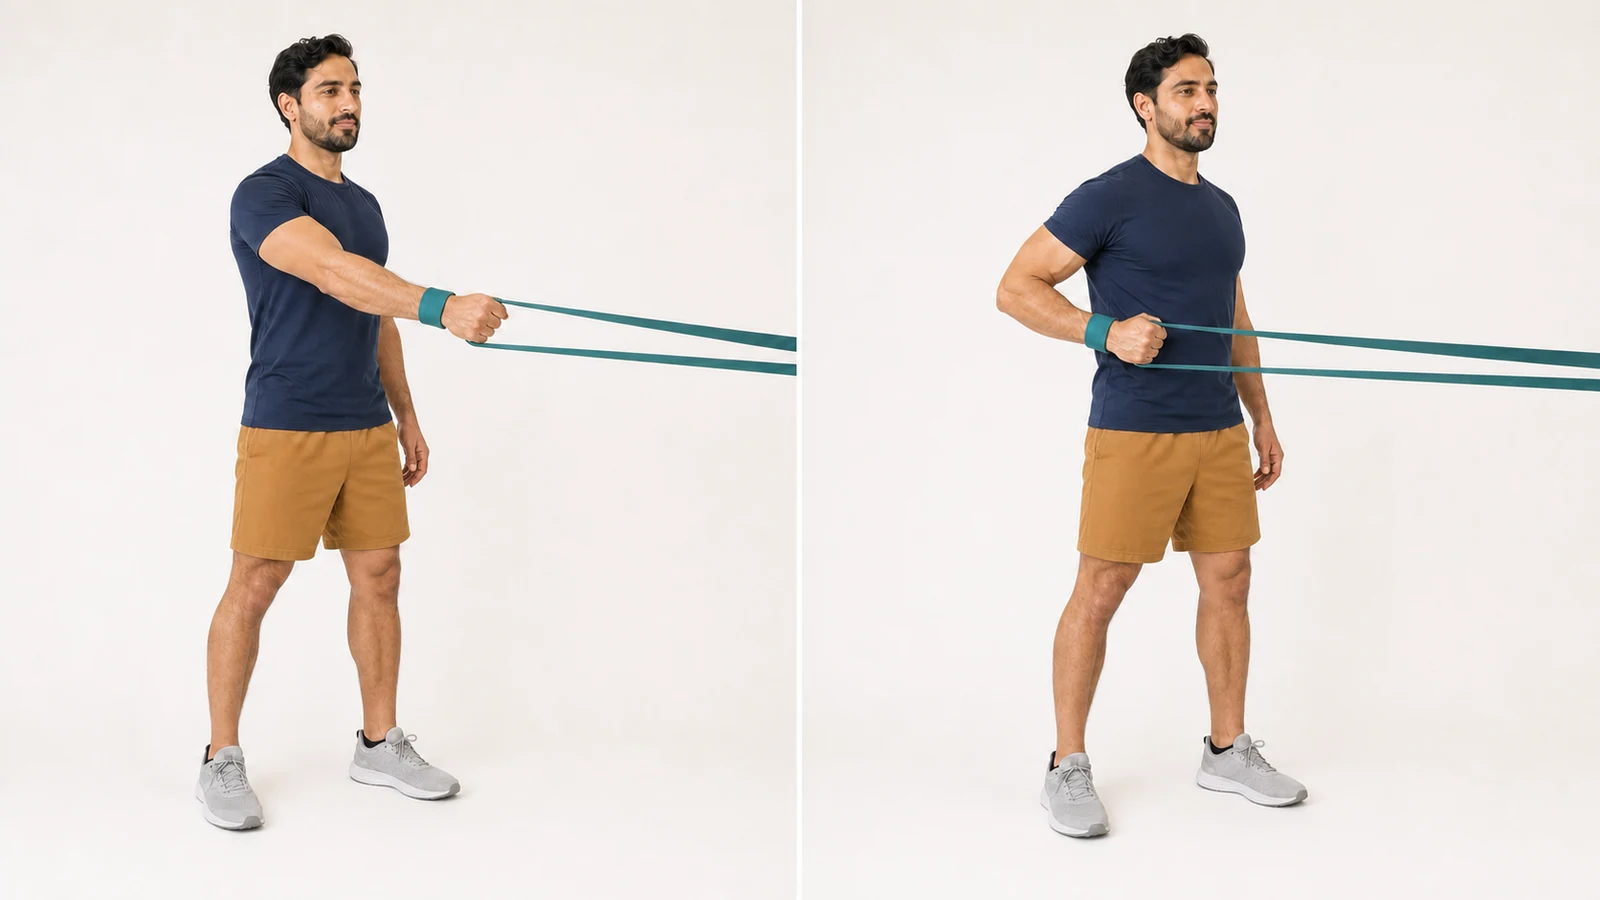
Elbow bend with a light weight (Light Biceps Curl)
With the elbow by your side, you lift a light weight, at most 1 kilo until the end of month 2, by bending the elbow; 10 repetitions, twice a day, from week 8. If pain at the front of the shoulder or upper arm, or a pulling feeling at the operation site, appears, stop.
More detailLess detail
Before you start: One of the tendons of the muscle at the front of the upper arm is attached to the piece of bone that was moved during the operation; that is why weight exercises for this muscle start in week 8. A light weight or a small bottle of water is enough. Stand or sit up straight; the arm is by your side, the elbow is straight and the palm faces forward.
How to do it:
- Hold the weight with the palm facing forward; the elbow is by your side.
- Slowly bend the elbow so the weight comes up towards your shoulder.
- Slowly lower it until the elbow is straight.
Movement tips: Only the elbow moves; the arm does not move forward from your side and the shoulder does not rise. Lower the weight more slowly than you lift it, and do not swing your trunk. Breathe out as you lift. Tiredness in the muscle at the front of the upper arm is normal, but pain at the front of the shoulder is not.
Amount, repetitions and progression: 10 repetitions, twice a day. When you can do all the repetitions without pain and without swinging your trunk, make the weight slightly heavier, but no more than 1 kilo until the end of month 2 and no more than 3 kilos in month 3.
Stop immediately if: pain at the front of the shoulder or upper arm, or a pulling feeling at the operation site, appears.
Common mistakes: Swinging the trunk to lift the weight; moving the elbow forward; letting the weight drop quickly.
Easier version: Do it without a weight, using only the weight of your hand.
🏋️ Month 3: strength and control
Goal: stronger shoulder and shoulder blade muscles with bands and light weights, and a range of motion close to full.
Timing: turning the forearm outward progresses gradually, only as far as a gentle stretch without pain; the aim is for its range to be at least 80 percent of the healthy arm’s by week 12. From week 9, raising the arm to the side while turning it outward is no longer forbidden, and you gradually return to it in everyday tasks; band exercises in this position start from month 4. Inward-turning exercises with a band start from week 12 (day 78).
Daily life: light everyday tasks with the operated arm are allowed, and you can lift up to 3 kilos with the arm down and close to your body. Swimming and heavy work are not allowed yet; their timing is in the next stage.
Not allowed this month: contact and throwing sports, swimming, and lifting heavy loads, especially overhead.
End of this stage: your range of motion is almost full and pain-free, and you can do the band exercises without help from your lower back and without shrugging your shoulder.
Ball roll on the wall (Supported Wall Ball Roll)
Face the wall. With the palm on your operated side, roll the ball clockwise for one minute, then anticlockwise for one minute. That is one round. Do two rounds in each session, with two sessions each day. If pain at the front of the shoulder or a feeling that the shoulder is slipping appears, stop.
More detailLess detail
Before you start: In month 3, this exercise trains control and stability of the shoulder with a little support from the wall; the wall takes part of the weight of the arm. You need a medium-sized ball, such as a volleyball or a plastic ball. Stand facing the wall and hold the ball against the wall with the operated palm at chest height; the elbow is slightly bent.
How to do it:
- Press the ball gently against the wall at chest height with the operated palm.
- Roll the ball on the wall in small clockwise circles.
- After one minute, change direction and roll it the opposite way for one minute.
Movement tips: The circles are small and slow, and the hand does not go higher than shoulder level. The shoulder stays down and you do not lean your trunk on the wall. Breathe normally. Done correctly, you feel mild tiredness around the shoulder and shoulder blade.
Amount, repetitions and progression: One minute clockwise and one minute anticlockwise; repeat this once more, twice a day. As it becomes easier, make the circles slightly bigger.
Stop immediately if: pain at the front of the shoulder or a feeling that the shoulder is slipping appears.
Common mistakes: Taking the ball higher than shoulder level; shrugging the shoulder; large, fast circles.
Easier version: Place the ball lower, at stomach height, and make the circles smaller.
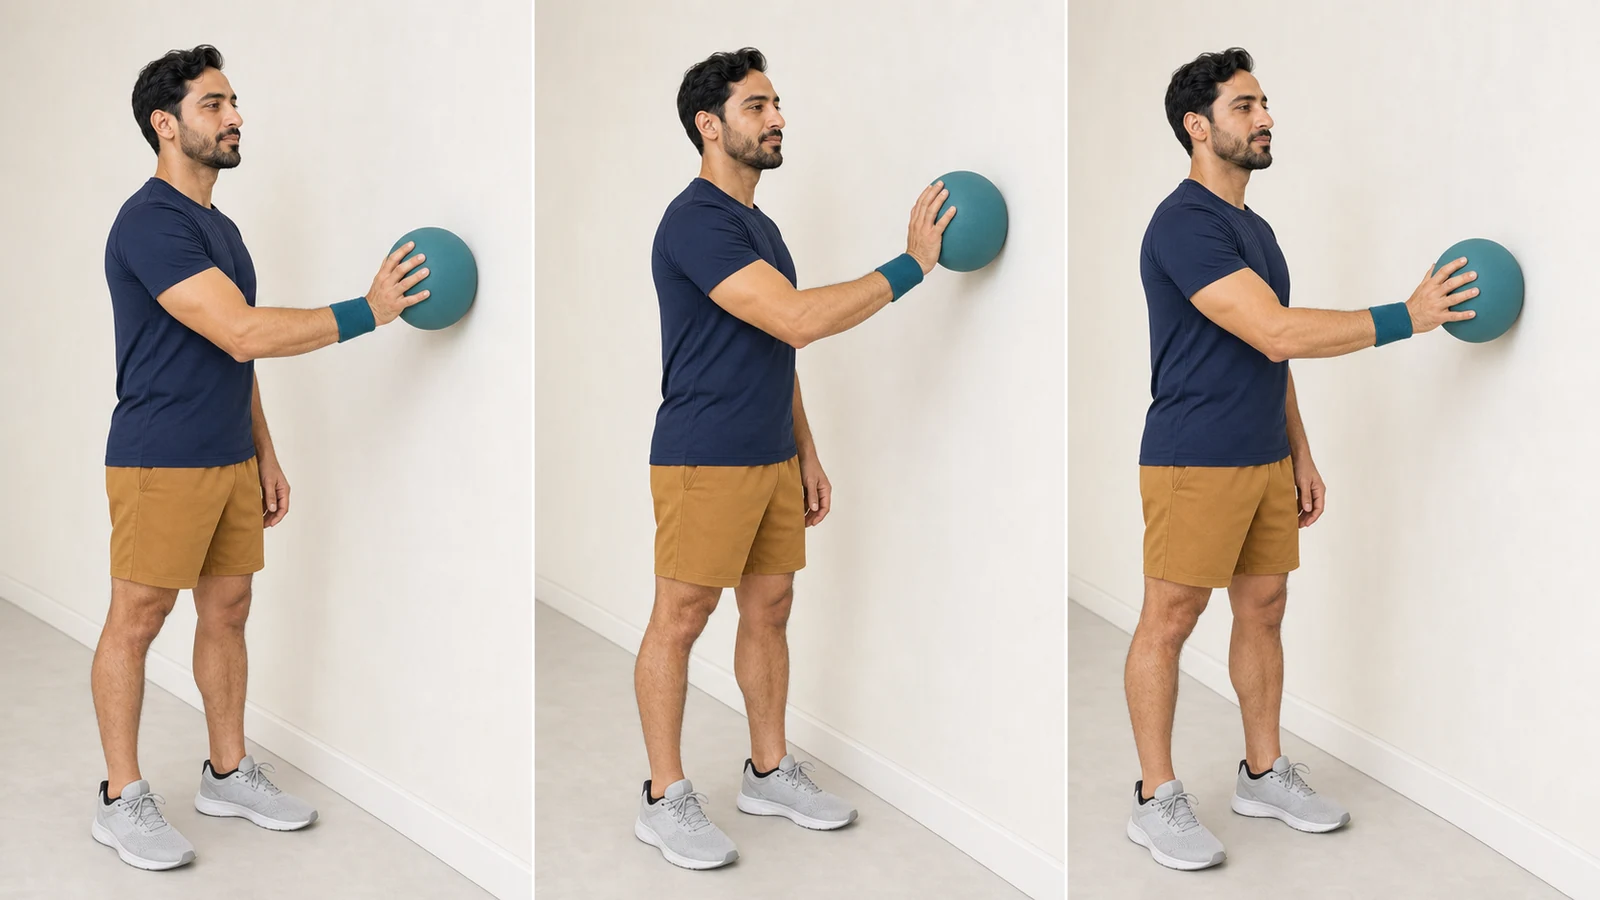
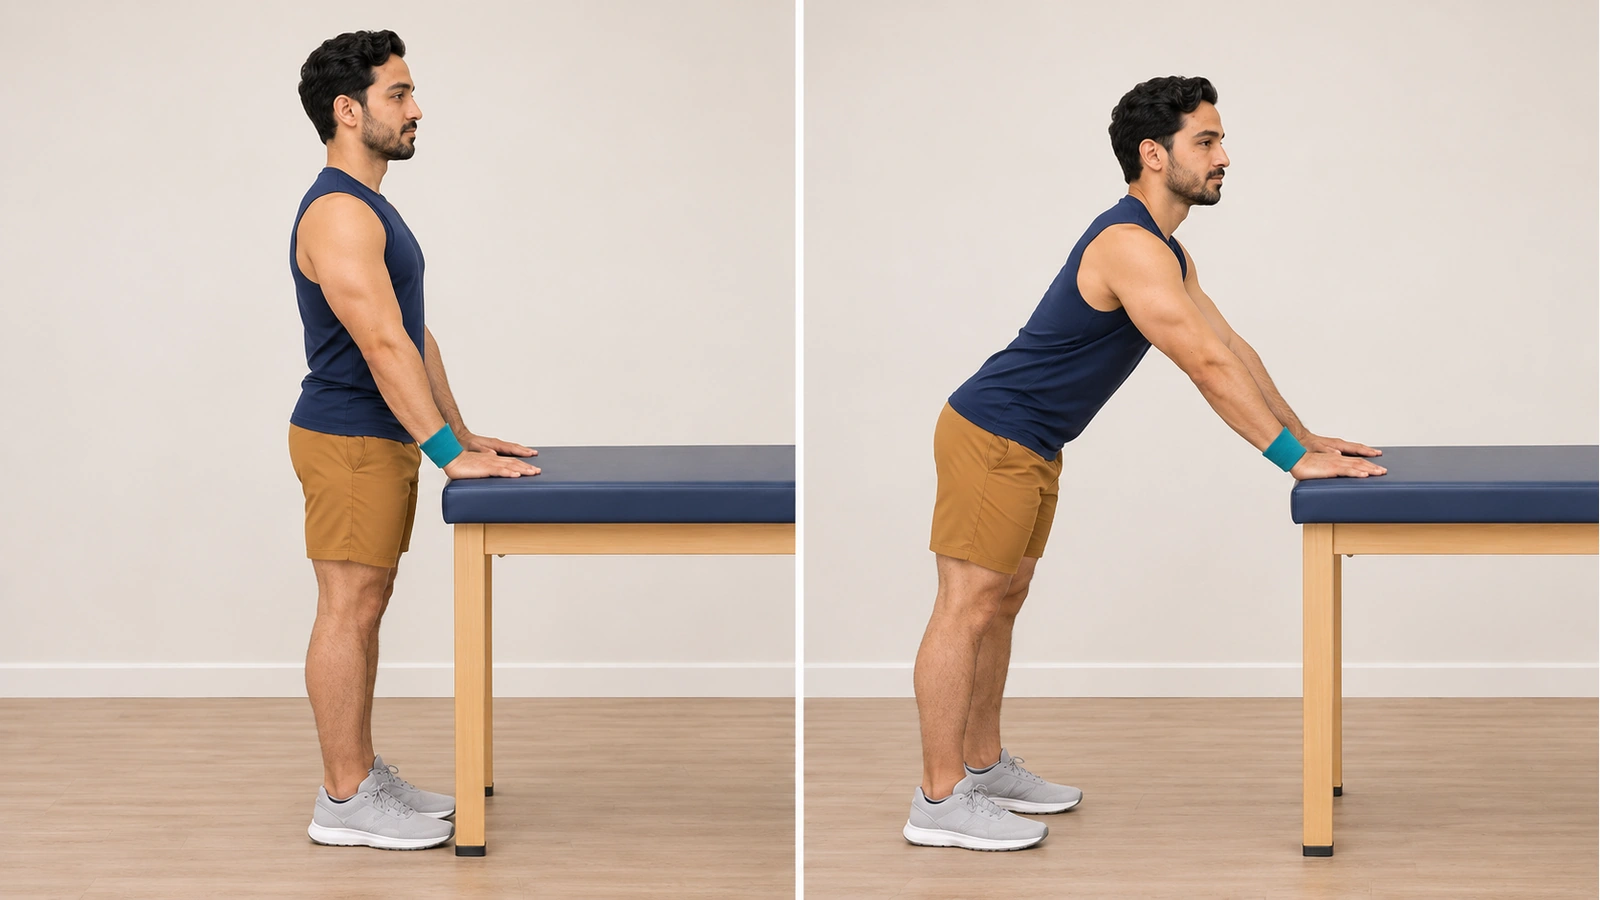
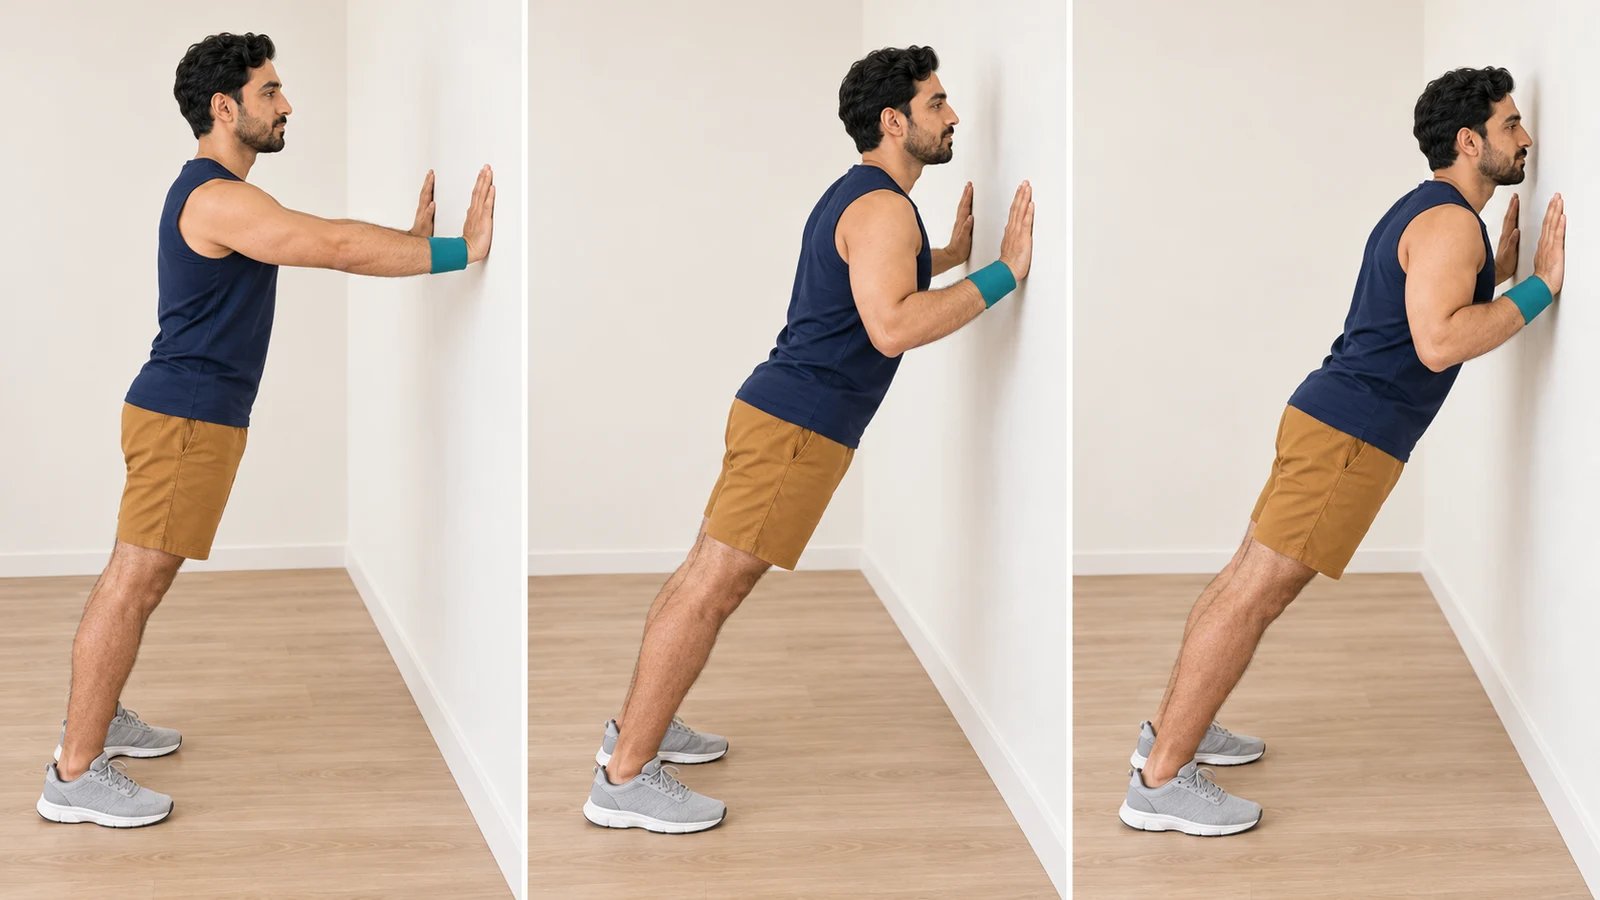
Wall push-up
Standing facing a wall, you bring your body towards and away from the wall by bending and straightening your elbows; 2 sets of 10, twice a day. If pain at the front of the shoulder appears, or during the movement you feel the shoulder giving way or starting to slip, stop.
More detailLess detail
Before you start: In month 3, this is the first exercise in which the shoulder carries part of your body weight, but at a low, safe angle. You need only a wall and a floor that is not slippery. Stand a little more than an arm’s length from the wall and place your palms on the wall at shoulder height and shoulder-width apart.
How to do it:
- Place your palms on the wall at shoulder height and shoulder-width apart; your body is straight from head to heels.
- Slowly bend your elbows so your chest comes closer to the wall; the elbows point down and stay close to your body.
- Stop before your chest touches the wall, and come back by straightening your elbows.
Movement tips: The hands are shoulder-width apart, not wider, and the elbows do not open out to the sides; hands placed very wide and elbows pointing outward put strain on the front of the shoulder. The chest does not go further forward than the line of the hands. Breathe out as you move away from the wall, and keep your back straight. Tiredness in the chest and the back of the upper arm is normal.
Amount, repetitions and progression: 2 sets of 10, twice a day. When both sets are comfortable, stand a little further from the wall.
Stop immediately if: pain at the front of the shoulder appears, or during the movement you feel the shoulder giving way or starting to slip.
Common mistakes: Placing the hands wider than shoulder-width; the elbows opening out to the sides; the chest going further forward than the line of the hands.
Easier version: Stand closer to the wall so less weight goes onto your hands.
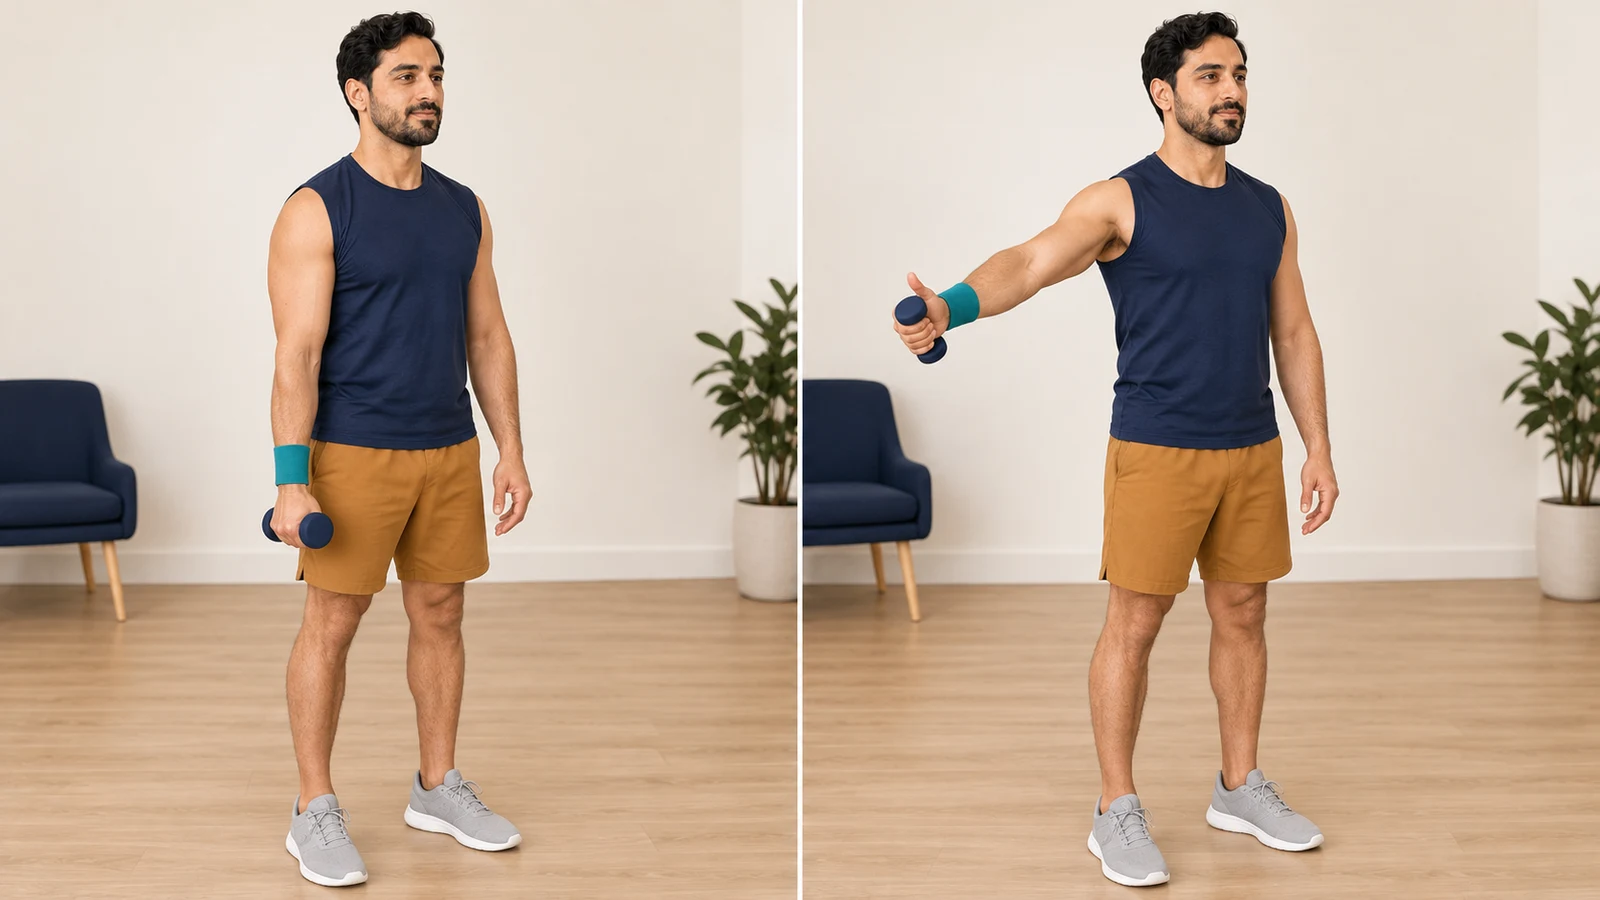
Arm raise slightly in front of the side with a light weight (Scaption with a Light Weight)
Standing, you raise the straight arm with a light weight along a path slightly in front of your side, up to shoulder level; 2 to 3 sets of 10, twice a day. If pain at the front of the shoulder or a feeling that the shoulder is slipping appears, stop.
More detailLess detail
Before you start: In month 3, this exercise strengthens the muscles at the top of the shoulder along the path that is easiest for the joint. You need a light weight or a bottle of water. Stand up straight in front of a mirror; the arm is by your side with the thumb pointing forward.
How to do it:
- Hold the weight with the thumb pointing forward; the arm is by your side and the elbow is straight.
- Slowly raise the arm along a path slightly in front of your side, about halfway between forward and to the side.
- When the hand reaches shoulder level, stay there for a moment and slowly lower it.
Movement tips: The thumb points up the whole way; this means the shoulder is in a safe position. The hand does not go higher than shoulder level and the shoulder does not rise towards the ear. Lower the arm more slowly, and rest a little between sets. Tiredness at the top of the shoulder is normal.
Amount, repetitions and progression: 2 to 3 sets of 10, twice a day. When you can do 3 sets without shrugging the shoulder, make the weight slightly heavier.
Stop immediately if: pain at the front of the shoulder or a feeling that the shoulder is slipping appears.
Common mistakes: Turning the thumb down; raising the hand higher than the shoulder; leaning the trunk back.
Easier version: Do it without a weight, using only the weight of your hand.
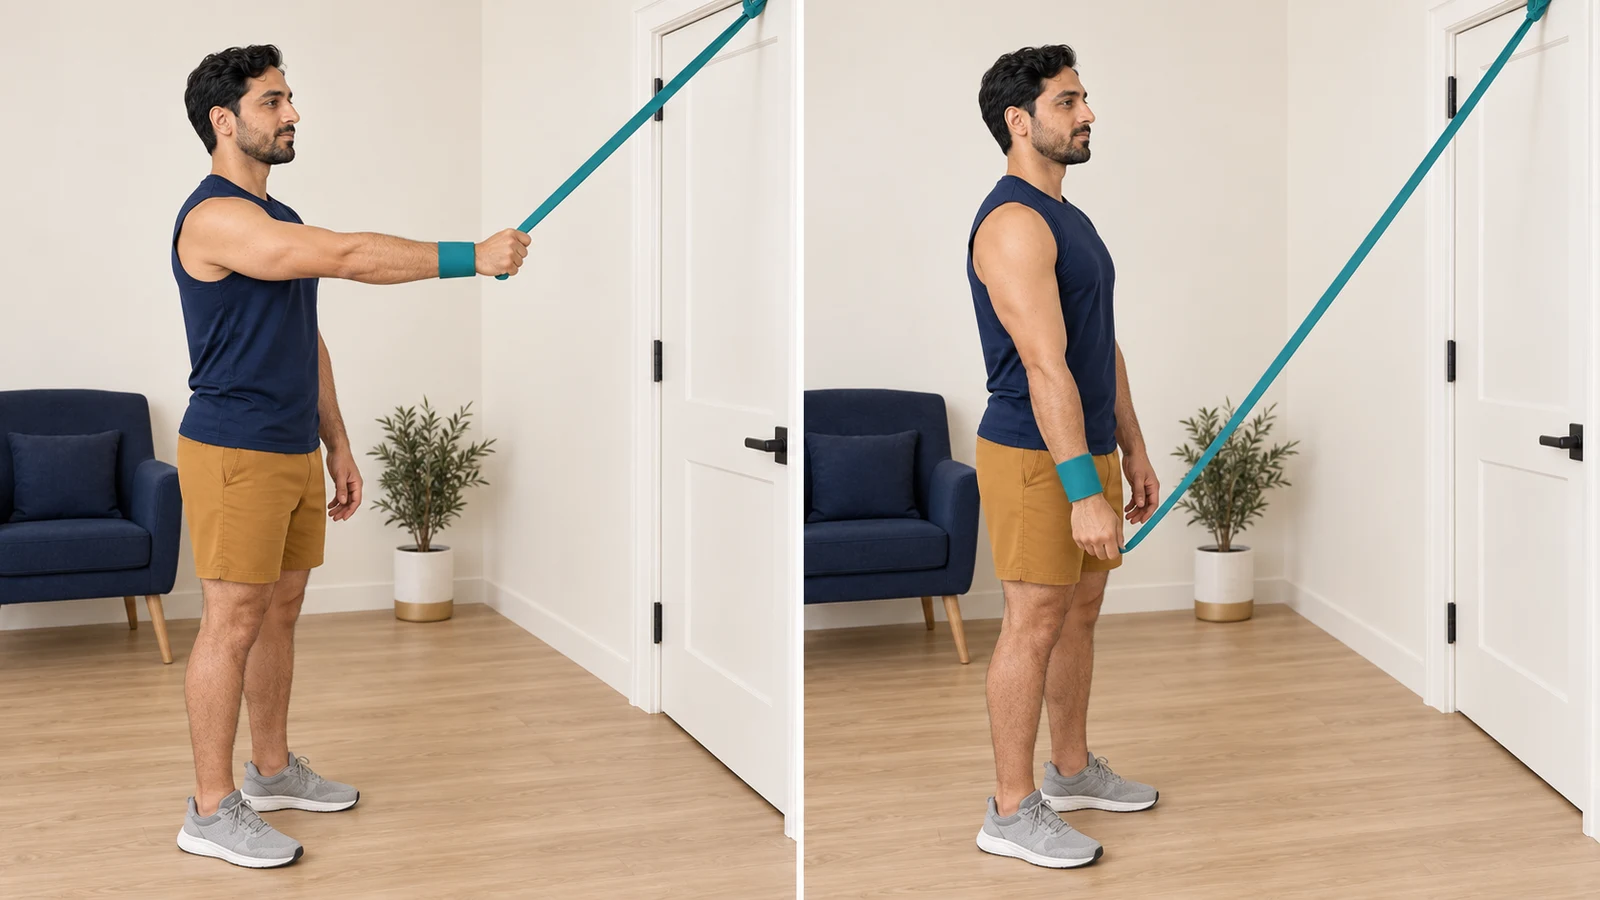
Taking the arm back with a band (Band Shoulder Extension)
Standing, you pull the straight arm down from in front of you against a band until it reaches the side of your thigh; 10 repetitions, twice a day. If pain at the front of the shoulder or a feeling that the shoulder is slipping appears, stop.
More detailLess detail
Before you start: In month 3, this exercise strengthens the muscles at the back of the shoulder and the shoulder blade. You need a light band. Tie the band higher than your head, to the top of a door or another firm point, and stand facing it; the operated arm is straight and pointing forward, a little below shoulder level, holding the band.
How to do it:
- Hold the band with the straight arm, a little below shoulder level.
- Slowly pull the straight arm down until it reaches the side of your thigh.
- Stay there for a moment and slowly return.
Movement tips: The hand comes down to the side of your thigh and does not go further back than the line of the body. The elbow stays straight and the shoulders are down. Breathe out as you pull, and return slowly. Tiredness at the back of the shoulder is normal.
Amount, repetitions and progression: 10 repetitions, twice a day. When it becomes comfortable, add another set or use the next stronger band.
Stop immediately if: pain at the front of the shoulder or a feeling that the shoulder is slipping appears.
Common mistakes: Taking the hand behind the line of the body; bending the elbow; leaning the trunk forward.
Easier version: Step a little forward so the band is looser.
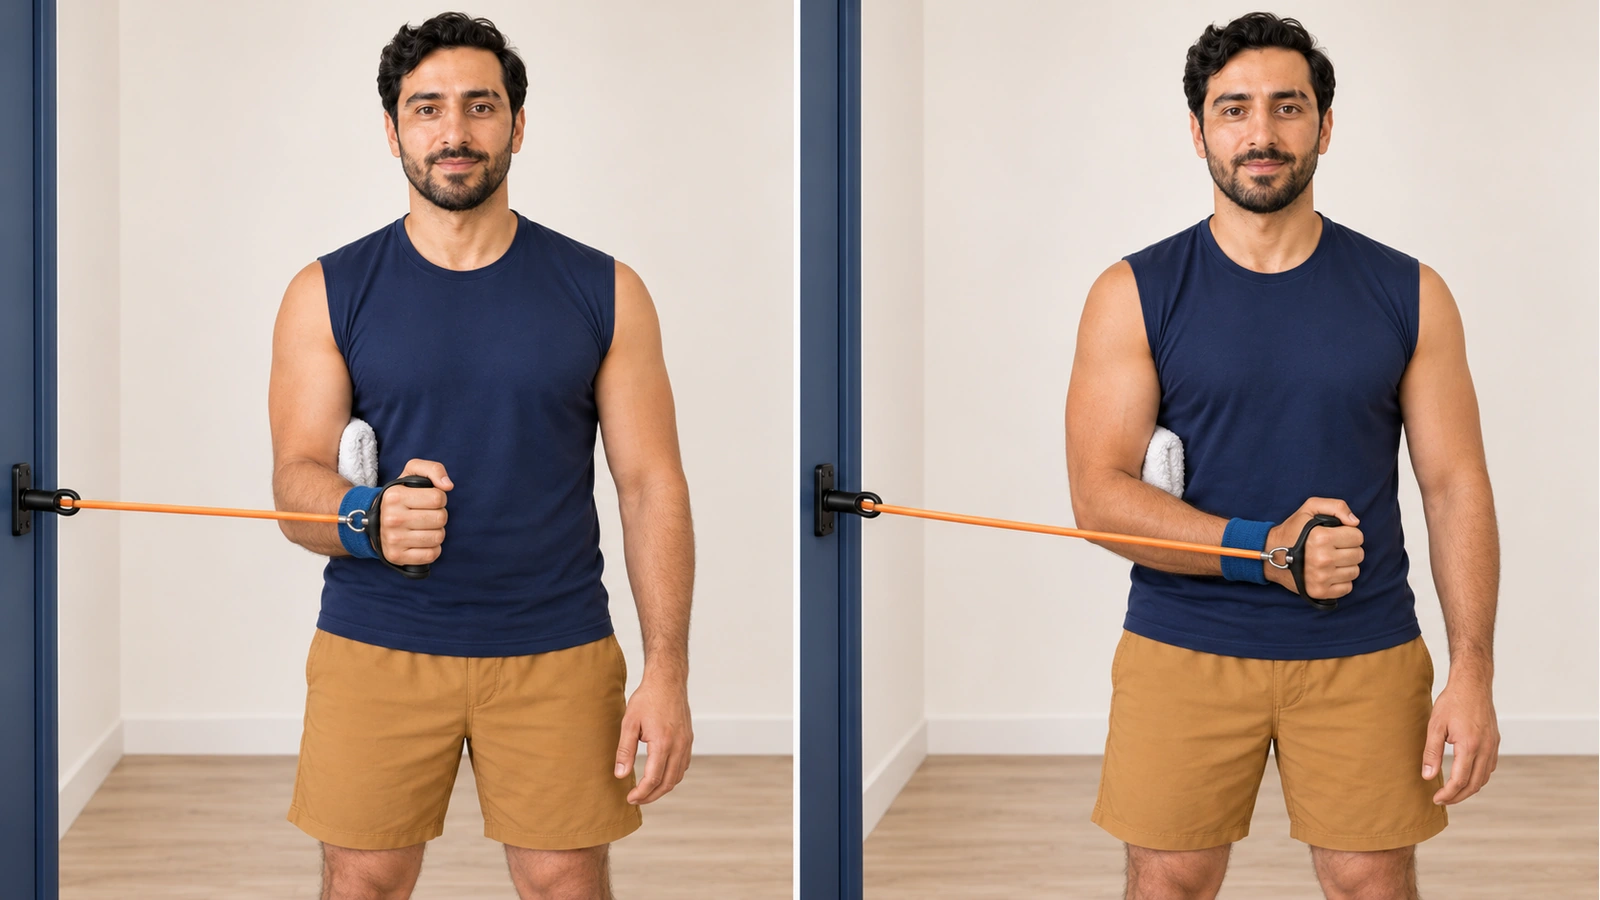
Inward forearm turn against a band, elbow by your side (Band Internal Rotation at the Side)
Standing, with the elbow pressed against your body, you turn the forearm towards your stomach against a light band; 10 repetitions, twice a day, from week 12. If sharp pain at the front of the shoulder or a feeling that the shoulder is slipping appears, stop.
More detailLess detail
Before you start: This exercise strengthens the front shoulder muscle, the same muscle that was split along its fibres during the operation. That is why this exercise starts in week 12. You need a light band and a small towel. Tie the band to a door handle at elbow height, stand so that your operated hand is towards the door, and put the towel between your elbow and your side.
How to do it:
- Bend the operated elbow to a right angle and keep the towel between the elbow and your side; the forearm points forward and the band is in your hand.
- Slowly turn the forearm towards your stomach; the elbow stays pressed against the towel.
- Slowly come back until the forearm points forward again.
Movement tips: The movement goes from pointing forward to in front of your stomach, and on the way back the forearm does not go outward past pointing forward. The elbow does not come away from your body and the trunk does not turn. Come back slowly and do not hold your breath. Tiredness at the front of the shoulder is normal, but sharp pain is not.
Amount, repetitions and progression: 10 repetitions, twice a day. When you can do all the repetitions without pain, add another set, and then use the next stronger band.
Stop immediately if: sharp pain at the front of the shoulder or a feeling that the shoulder is slipping appears.
Common mistakes: The elbow coming away from the body; turning the trunk; taking the forearm back outward past the pointing-forward line.
Easier version: Do it without a band, with the healthy hand pressing gently on the wrist to resist the movement a little.
🎯 After month 3: returning to heavy work, swimming and sport
Goal: reach the strength and confidence needed for heavy work and sport.
Timing: swimming, all kinds, is allowed from month 4. Returning to heavy work is between months 4 and 6, once the shoulder is strong enough for that particular work. Contact and throwing sports, such as football, wrestling, volleyball and martial arts, are not allowed before 6 months after surgery.
Criteria for returning to sport: time alone is not enough. Your shoulder’s range of motion should be close to the healthy arm’s, your strength in turning inward and outward should have come close to the healthy arm’s, and you should feel confident in your shoulder. These criteria are checked at your clinic visit.
Expected response: muscle tiredness and soreness after heavier exercises is acceptable if it has gone by the next day.
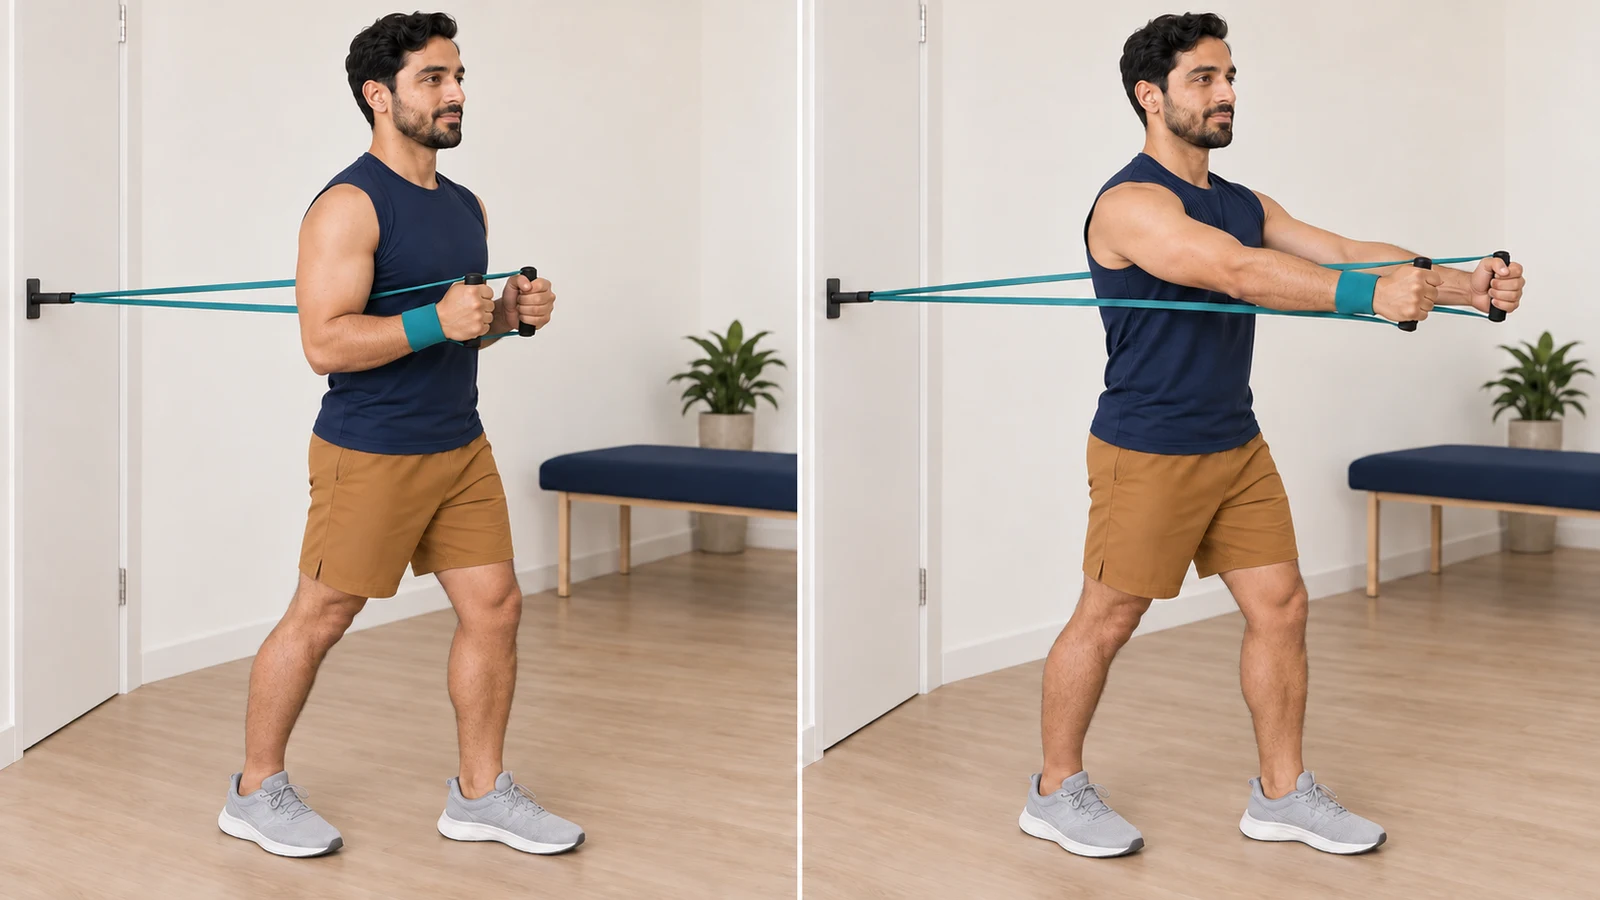
Standing band push forward (Standing Band Forward Press)
With your back to a door, you push a band forward with both hands at chest height; 10 repetitions, twice a day, from month 4. If pain at the front of the shoulder or a feeling that the shoulder is slipping appears, stop.
More detailLess detail
Before you start: After month 3, this exercise prepares the muscles at the front of the chest and shoulder for everyday pushing tasks. You need a band. Tie the middle of the band to the door handle behind you at chest height, stand with your back to the door and put one foot forward; the two ends of the band are in your hands beside your chest.
How to do it:
- Hold the two ends of the band beside your chest; the elbows are bent and close to your body.
- Slowly push your hands forward at chest height until your elbows are straight.
- Slowly come back until your hands are beside your chest again.
Movement tips: The hands are at chest height and shoulder-width apart, and on the way back the elbows do not go further back than the line of the body. The shoulders stay down and the lower back does not arch. Breathe out as you push. Tiredness in the chest and the front of the shoulder is normal.
Amount, repetitions and progression: 10 repetitions, twice a day. When it becomes comfortable, add another set or use the next stronger band.
Stop immediately if: pain at the front of the shoulder or a feeling that the shoulder is slipping appears.
Common mistakes: Taking the elbows behind the line of the body on the way back; raising the hands higher than the chest; arching the lower back.
Easier version: Step back a little so the band is looser.
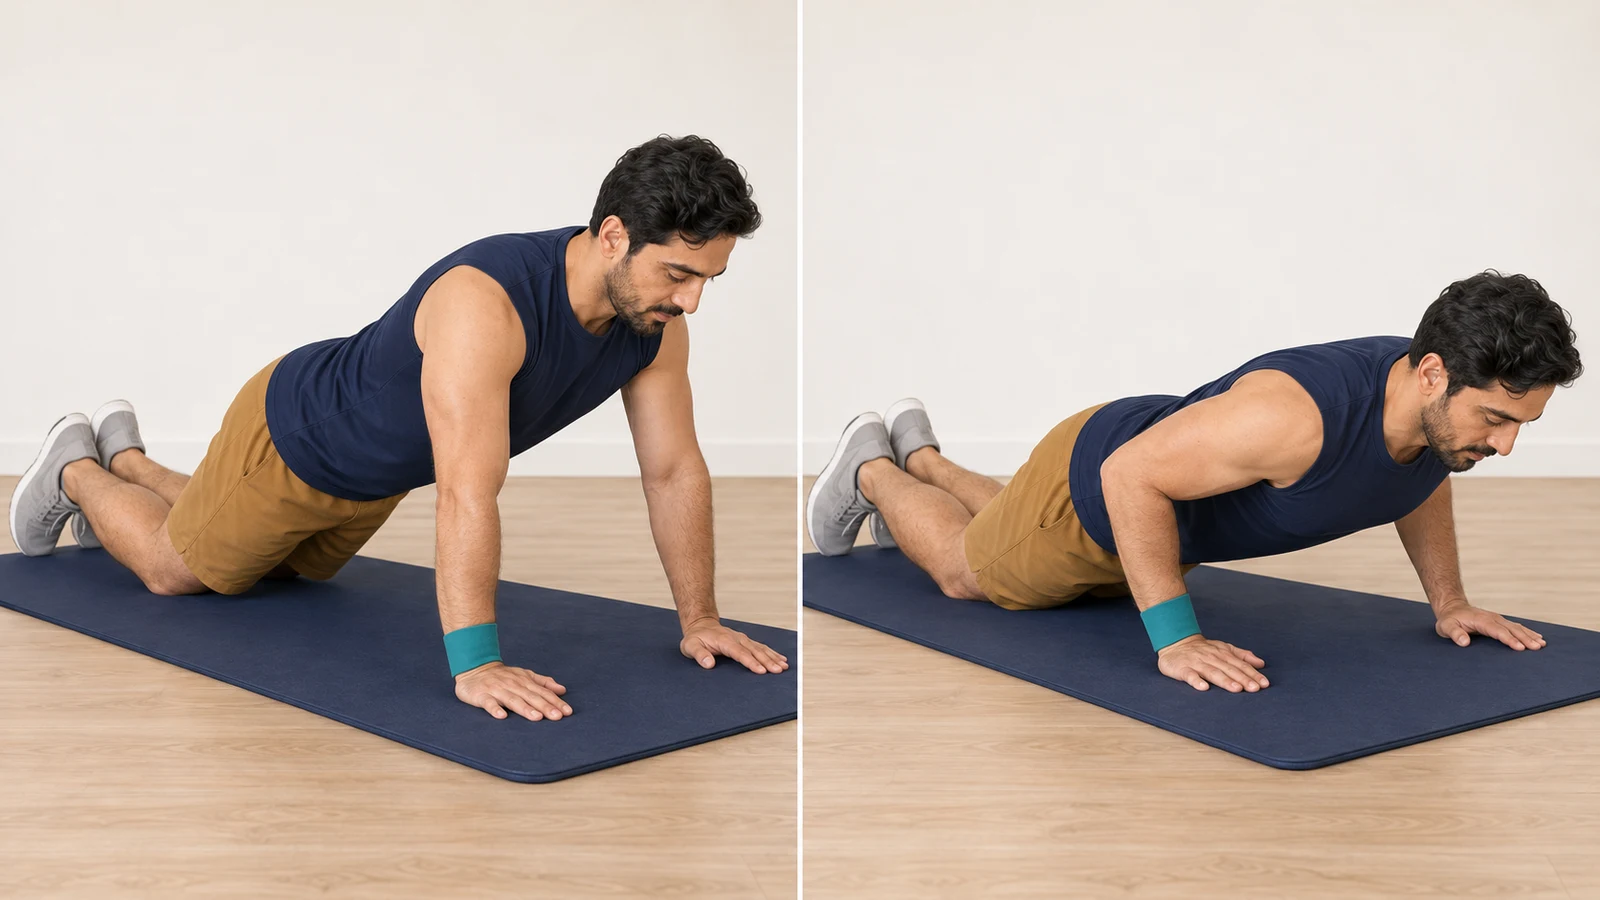
Knee push-up
On the floor, with your knees resting down, you lower and raise your body by bending and straightening your elbows; 10 repetitions, twice a day, from month 4 and once the wall push-up has become comfortable. If pain at the front of the shoulder appears, or during the movement you feel the shoulder giving way or starting to slip, stop.
More detailLess detail
Before you start: This exercise is the next step after the wall push-up and puts more of your body weight on the shoulder. You need a mat or a soft rug. Get on your hands and knees, then move your knees back a little until your body is straight from head to knees; the palms are under the shoulders and shoulder-width apart.
How to do it:
- Place your palms under your shoulders, shoulder-width apart; your body is straight from head to knees.
- Slowly bend your elbows so your chest comes closer to the floor; the elbows point backward and stay close to your body.
- Stop before your chest reaches the floor, and come back by straightening your elbows.
Movement tips: As with the wall push-up, the hands are no wider than shoulder-width and the elbows do not open out to the sides; at the lowest point the chest is still a few centimetres off the floor. The lower back neither sags nor hunches. Breathe out as you come up. Tiredness in the chest and the back of the upper arm is normal.
Amount, repetitions and progression: 10 repetitions, twice a day. When all the repetitions are comfortable with correct form, add another set.
Stop immediately if: pain at the front of the shoulder appears, or during the movement you feel the shoulder giving way or starting to slip.
Common mistakes: Placing the hands wider than shoulder-width; the elbows opening out to the sides; bringing the chest down to the floor.
Easier version: Go back to the wall push-up, or put your hands on the edge of a sturdy sofa.
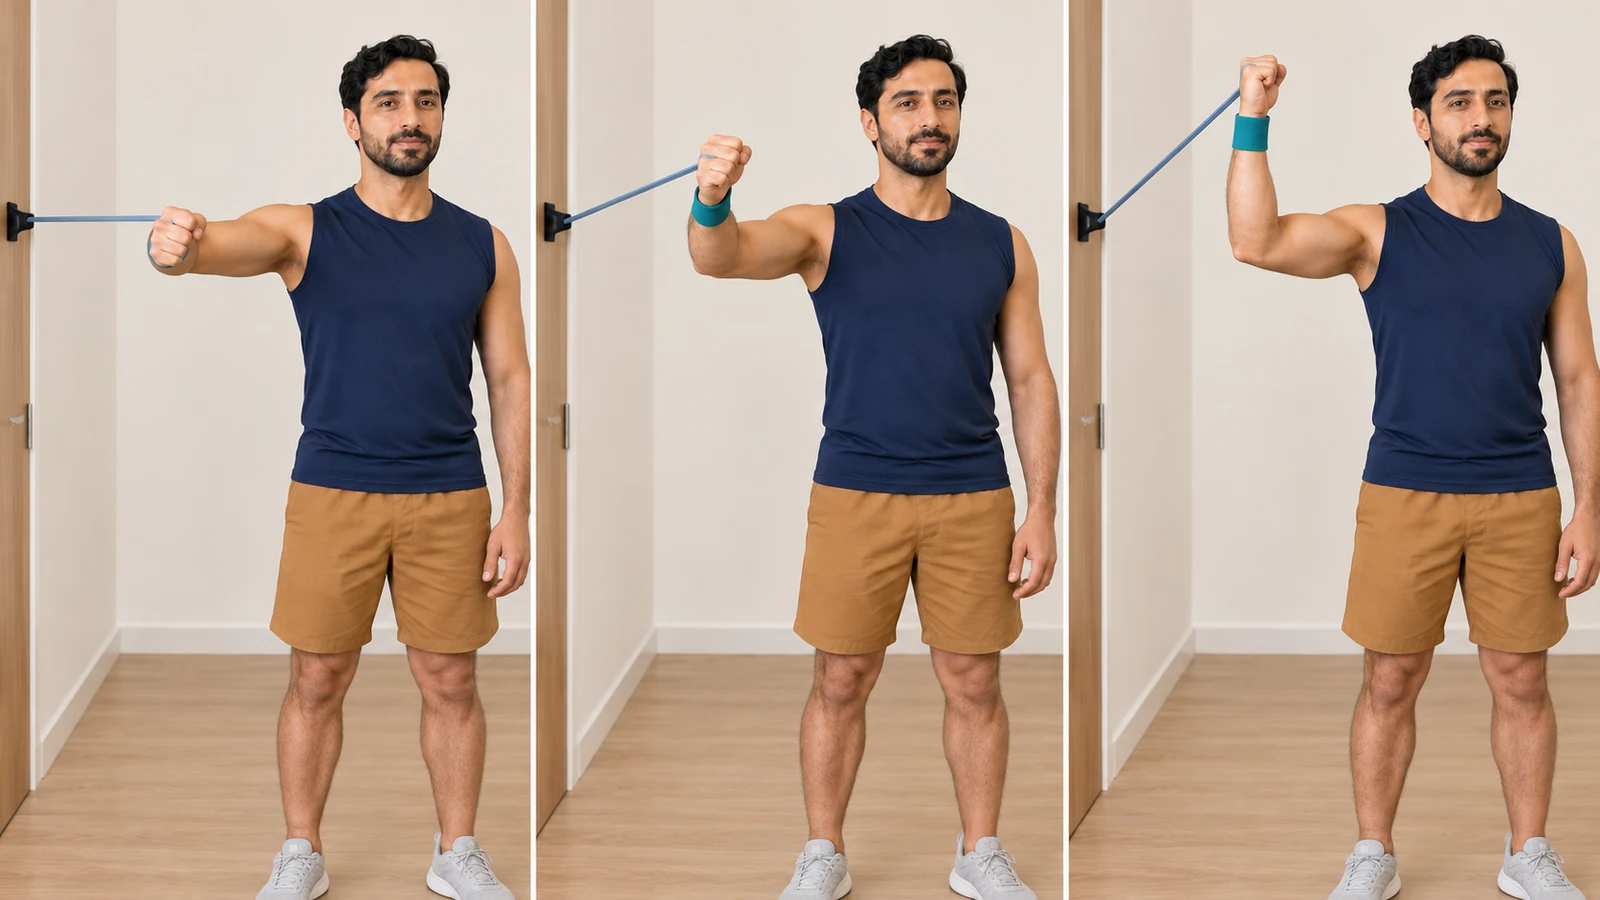
Outward forearm turn against a band, arm at shoulder level (Band External Rotation at 90° Abduction)
With the arm at shoulder level and the elbow bent to 90 degrees, you turn the forearm upward against a band; 2 to 3 sets of 10, twice a day, from month 4, to prepare for throwing sports. If during the movement you feel the shoulder giving way or starting to slip, or pain at the front of the shoulder appears, stop at once.
More detailLess detail
Before you start: This exercise strengthens the shoulder in the very position that throwing sports need; a position that was not allowed until the end of week 8. It is done from month 4, and only once turning the forearm outward with the arm by your side has become comfortable and pain-free. You need a light band. Tie the band to a firm point at shoulder height and stand facing it.
How to do it:
- Raise the operated arm, slightly in front of your side, up to shoulder level and bend the elbow to 90 degrees; the forearm points forward and the band is in your hand.
- Slowly turn the forearm upward until it is vertical; the arm stays at shoulder level.
- Slowly come back until the forearm points forward again.
Movement tips: The forearm turns only as far as pointing straight up at the ceiling and does not go further back, behind your head. The elbow stays at shoulder level and slightly in front of the line of the body, and does not drop. The movement is slow, not jerky, and do not hold your breath. Tiredness at the back of the shoulder is normal, but a feeling that the front of the shoulder is giving way is not.
Amount, repetitions and progression: 2 to 3 sets of 10, twice a day. When you can do 3 sets without pain and without the shoulder feeling as if it gives way, use the next stronger band.
Stop immediately if: during the movement you feel the shoulder giving way or starting to slip, or pain at the front of the shoulder appears.
Common mistakes: Taking the forearm past the vertical line; taking the elbow behind the line of the body; letting the elbow drop below shoulder level.
Easier version: Keep the arm lower, about halfway to shoulder level, and do it without a band.
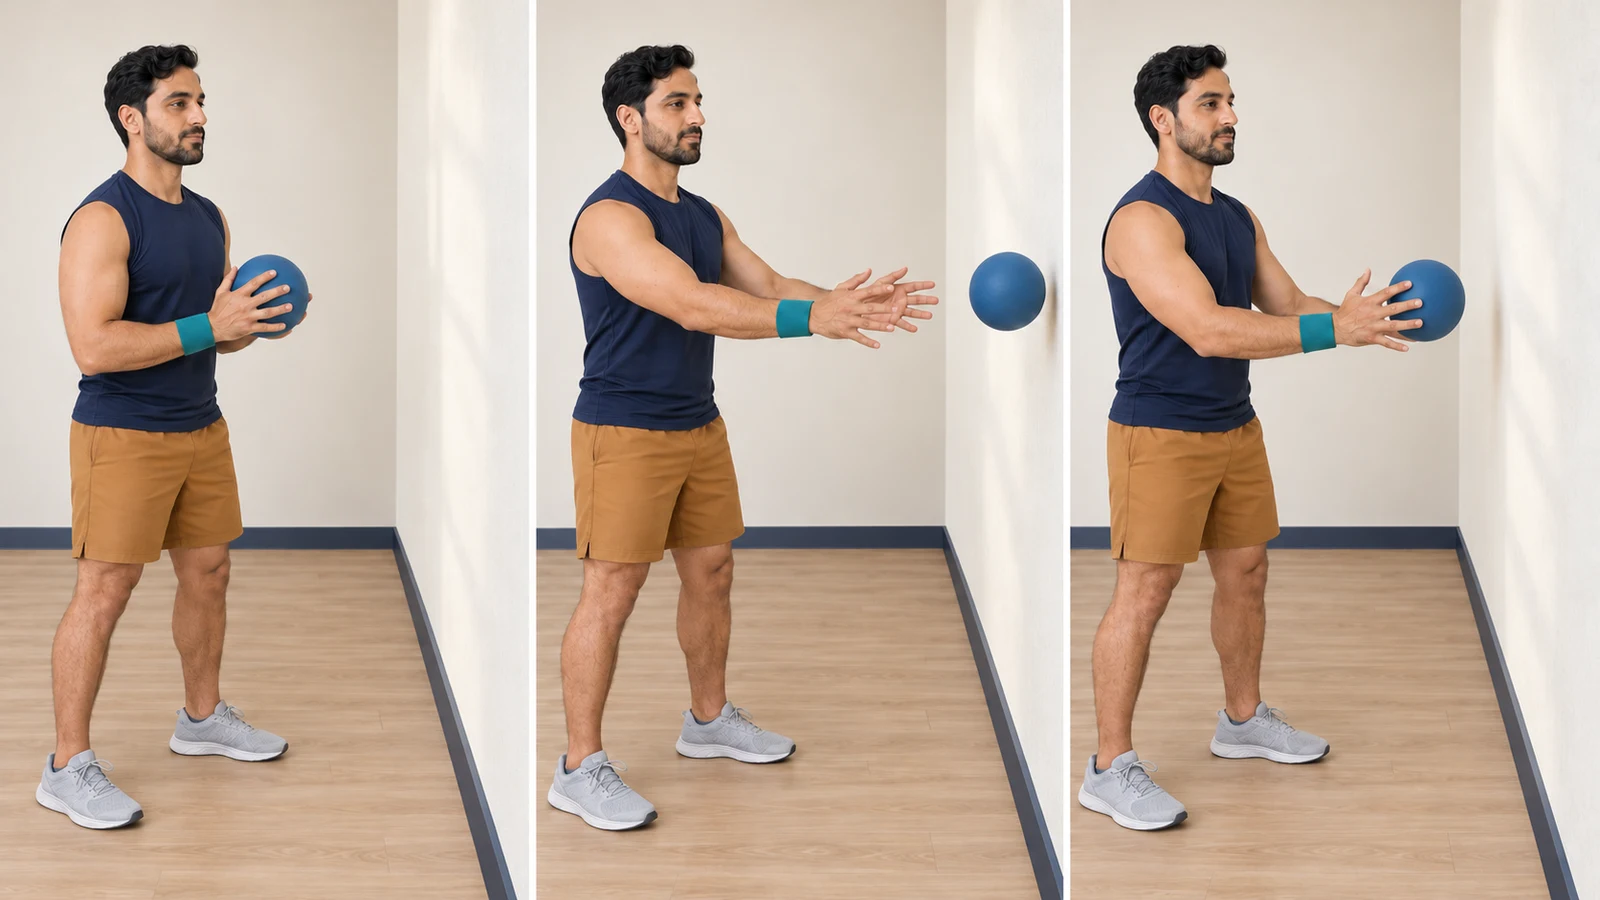
Ball throw and catch against a wall (Wall Ball Throw and Catch)
Standing facing a wall, you throw a light ball against the wall with both hands at chest height and catch it; 3 sets of 30 seconds, once a day, from month 4. If pain at the front of the shoulder appears, or during the movement you feel the shoulder giving way or starting to slip, stop.
More detailLess detail
Before you start: This exercise prepares the shoulder’s quick reactions for sport, and is done after month 3, once the shoulder’s range and strength are sufficient. You need a light ball, such as a volleyball or a rubber ball. Stand a little more than an arm’s length from the wall and hold the ball in front of your chest with both hands.
How to do it:
- Hold the ball in front of your chest with both hands; the elbows are bent and close to your body.
- Throw the ball against the wall with a quick, short movement at chest height.
- When the ball comes back, catch it with both hands and throw it again.
Movement tips: The throw is from in front of the chest, not from overhead; the hands do not go higher than shoulder level. Start with both hands, and only when it is completely comfortable try a one-handed throw from in front of the chest. Keep a steady rhythm and rest a little between sets. Tiredness in the shoulder and chest is normal.
Amount, repetitions and progression: 3 sets of 30 seconds, once a day. Progress means a steadier rhythm, not harder throws or throws from overhead.
Stop immediately if: pain at the front of the shoulder appears, or during the movement you feel the shoulder giving way or starting to slip.
Common mistakes: Throwing from overhead; standing very close to or very far from the wall; throwing with all your strength.
Easier version: Instead of throwing, press the ball gently against the wall; then ease the pressure from your hands without letting go of the ball.
🚗 Daily life and returning to activity
The times below are for a Latarjet without complications and depend on the results of your clinic visits and how your exercises are progressing; the passing of time alone is not enough, and the shoulder must also have reached the movement and strength needed.
- Desk work: from the end of week 2, with the sling until day 28 and with short breaks.
- Heavy and physical work: from month 4 to 6, once the shoulder is strong enough for that particular work.
- Driving: after the end of week 8 (from day 57), provided you are not taking codeine, oxycodone or alprazolam, and you can turn the steering wheel quickly with both hands and brake suddenly.
- Swimming: all kinds of swimming are allowed from month 4.
- Contact and throwing sports: not allowed before 6 months after surgery, and even then only once the shoulder’s range of motion and strength have met the criteria for return.
- Lifting: until the end of week 6, do not lift anything heavier than a glass; from week 7 to the end of month 2 at most 1 kilo, and in month 3 at most 3 kilos, with the arm down and close to your body; start heavy loads between months 4 and 6.
❓ Frequently asked questions
1) Why do I have to wear a sling for four weeks? I have heard that some people do not wear one at all.
This clinic’s programme is four weeks in a sling, so that the transferred piece of bone and the front shoulder muscle are protected in the first weeks. It is true that in a recent study that randomly placed 86 patients into two groups, the patients who did not wear a sling had results at 6 months similar to the group that wore a sling for three weeks, and at two years they reported better function and stability scores. Even so, your programme is four weeks, so do not stop wearing the sling earlier. Wearing the sling in this programme does not mean keeping the arm still; the exercises in this article are done from the first days by taking the sling off.
2) When does the piece of bone heal, and how will I know it has healed?
In the first weeks, the piece of bone moved to the front of the shoulder socket gradually fuses to the bone of the socket. At 6 weeks, a plain X-ray (radiograph) is taken to check the position of the piece and the screws, and if needed, a CT scan will be discussed with you.
3) Do the screws need to be taken out later?
Usually not; the screws stay in place for good. In a five-year study, a screw was taken out in only 2 percent of patients because of a problem it had caused.
4) How likely is the shoulder to dislocate again after a Latarjet?
The chance is low. In a five-year study, instability came back in 6 percent of patients, and at a follow-up of about 17 years, a full dislocation had happened again in about 3 percent. Completing the exercise programme and not returning to contact sport too early help keep this result.
5) Why is part of my hand or forearm numb after the operation?
If the nerves of the shoulder were numbed for the operation, numbness for hours afterwards, and sometimes until the next day, is normal. Mild tingling in the fingers in the first days is also sometimes caused by pressure from the sling or by swelling; loosen the sling strap a little and move your fingers, and if it has not improved within half an hour, or the hand has become weak, call the same day. Real nerve injury after a Latarjet is uncommon, about one percent, and in recent reports most of it was temporary; but new numbness or weakness that appears after feeling has returned to the hand needs a call the same day.
6) When can I drive?
Driving is possible after the end of week 8, that is, from day 57 after the operation. The condition is that you are not taking codeine, oxycodone or alprazolam, and that you can turn the steering wheel quickly with both hands and brake suddenly. Before driving on the road, try it first in a quiet place.
7) When can I go back to work?
Desk work is possible from the end of week 2; until day 28, work with the sling on. Heavy and physical work, such as lifting loads or working with tools overhead, is from month 4 to 6, once the shoulder is strong enough for that particular work.
8) When can I swim?
You can start all kinds of swimming from month 4. The arm action in swimming combines raising and turning the shoulder, and before then the shoulder is not yet ready for this combination.
9) When can I return to sport, especially contact sport?
Contact and throwing sports, such as football, wrestling, volleyball and martial arts, are not allowed before 6 months after surgery, and even then only once the shoulder’s range of motion and strength have come close to the healthy arm’s. In a review of studies, about 9 out of 10 athletes returned to sport and about 7 out of 10 reached their previous level; the average time to return was about 6 months.
10) When is sexual activity allowed after the operation?
Whenever pain allows, provided there is no pressure on the operated shoulder. In the first four weeks, keep the sling on; until the end of week 6, do not put your body weight on the operated arm, and until the end of week 8, do not raise the arm out to the side while turning it outward, and do not put the hand behind your head. Lying on your back or on your healthy side is usually more comfortable.
11) How should I perform my prayers?
Until the end of week 6, pray seated on a chair, because in bowing (ruku) and prostration (sujud) your body weight falls on the operated arm, and during this time that arm must not bear load. For ablution (wudu), wash the operated arm with help from the healthy hand and keep within the movement limits of your current rehabilitation stage; until the end of week 8, raising the arm out to the side while turning it outward is not allowed. From week 7, as your exercises progress, gradually return to praying standing, and in prostration put more of your weight on the healthy hand. Until the end of week 8, do not raise the operated hand up beside your ear for the takbir, because raising the arm while turning it outward is not allowed until then.
12) When can I go back to the gym and lift weights?
Exercises with a light band start from week 6, and a light weight for the muscle at the front of the upper arm from week 8; the month 3 exercises continue with light weights. Heavy weights, especially overhead, are added from month 4 to 6, in step with your shoulder’s strength.
13) Months after the operation, I am still afraid my shoulder will dislocate; is this normal?
Yes, it is fairly common. In one study, about half of the patients reported some worry or a feeling that the shoulder was unstable two years after the operation, although none of them had dislocated again. In a review of studies, fear of getting injured again was one of the main reasons athletes did not return to sport; gradually practising the same sporting movements helps confidence come back. Fear or a feeling of insecurity when you move, without anything actually happening to the shoulder, is common and does not need a call; but if you feel the shoulder give way or slip at that moment and then come back, call the same day. If the shoulder has really dislocated, meaning its shape has clearly changed or the arm has suddenly locked and will not move even with help from the healthy hand, follow the instructions in the emergency box.
14) Do I need to take medicine to prevent clots?
Not routinely. Most of the data are on camera-guided shoulder surgery (arthroscopy), not the open Latarjet; in those patients, a clot that caused symptoms was seen in fewer than 1 in every 400 people, and the benefit of aspirin or anticoagulant injections in preventing it has not been proven. Short, regular walks from the first days are enough. Take swelling and pain in one calf, or sudden shortness of breath, seriously, and act as described in the warning signs section.
15) When can I lift shopping bags or a child?
Until the end of week 6, do not lift anything heavier than a glass with the operated arm. From week 7 to the end of month 2 you can lift at most 1 kilo, such as a one-litre bottle of water, and in month 3 at most 3 kilos, with the arm down and close to your body. Lifting a child or heavy loads, especially with the arm away from your body or overhead, becomes possible from month 4 to 6.
16) Will my shoulder movement come back fully?
Raising the arm usually comes back fully. Turning the forearm outward opens up more slowly; the aim is for its range to be at least 80 percent of the healthy arm’s by week 12, and in the long term it stays slightly less than the healthy arm’s in some patients, which is usually not noticeable in everyday tasks. Strength in turning the hand inward may also take 6 to 12 months to come back.
✅ Summary
After a Latarjet, the first four weeks are about protection: the sling day and night, assisted movement with the healthy hand up to the stated limits, and completely avoiding turning the forearm outward. In month 2 the sling comes off and active movement and a light band begin; in month 3 strength is built; swimming is allowed from month 4, and contact sport is not allowed before 6 months. Move through each stage by its criteria, not only by the calendar; in a review of studies, about 9 out of 10 athletes returned to sport after a Latarjet.
If you notice a sign requiring same-day contact, phone the clinic that day. Do not wait for an online appointment. For non-urgent questions about your shoulder, when to start exercises, or returning to work and sport, call Dr Jalil Emad’s clinic on 09137825207, or book an appointment online. In an emergency, do not wait for the clinic to reply; follow the instructions in the warning signs section.
For more about this area of treatment, visit the related service page: Shoulder and elbow surgery.
Related guides: Pre-operative guide: Recurrent shoulder dislocation: a guide before surgery · Service page: Shoulder & Elbow Surgery · Also related: Shoulder tendon repair: care and rehabilitation
This content is for general education only and does not replace an examination, the advice of your treating doctor, your discharge sheet or your surgeon’s own protocol. Timing, range of motion, weight-bearing and the amount of exercise vary with the type of operation, any procedures done at the same time and each person’s circumstances. Do not change your medicines, dressing or exercise programme without checking with the clinic, except where this guide itself tells you to.
📚 Scientific references
View scientific references
- Immediate Self-Rehabilitation With Versus Without Sling Immobilization After Open Latarjet Procedures for Recurrent Anterior Shoulder Instability: A Randomized Controlled Trial. Goetti P, Bothorel H, Martinho T, et al. J Bone Joint Surg Am. 2026. PMID 42735230. doi:10.2106/JBJS.25.00560
- Return to Play After the Latarjet Procedure for Anterior Shoulder Instability: A Systematic Review. Hurley ET, Montgomery C, Jamal MS, et al. Am J Sports Med. 2019;47(12):3002-3008. PMID 31038983. doi:10.1177/0363546519831005
- Long-term outcomes of the Latarjet procedure for anterior shoulder instability: a systematic review of studies at 10-year follow-up. Hurley ET, Jamal MS, Ali ZS, et al. J Shoulder Elbow Surg. 2019;28(2):e33-e39. PMID 30545784. doi:10.1016/j.jse.2018.08.028
- Short-term complications of the Latarjet procedure: a systematic review. Hurley ET, et al. J Shoulder Elbow Surg. 2021. PMID 33607332
- Internal rotation strength recovers fully after the open Latarjet via a subscapularis-split: a systematic review and meta-analysis. Geuskens, et al. 2026. PMID 42565128
- Long-term minimum 5-year follow-up 3D CT evaluation of bone graft status after Latarjet in patients with no or minimal preoperative glenoid bone loss. Neyton L, Sewpaul Y, Lajoinie L, et al. J Shoulder Elbow Surg. 2026;35(9):2180-2187. PMID 41791451. doi:10.1016/j.jse.2026.02.020
- Results and return to sports at 5 years after Latarjet for anterior instability with or without pre-operative glenoid bone loss. Billaud, et al. 2026. PMID 42762867
- Diagnosis of shoulder apprehensions two years after Latarjet procedure: a retrospective observational study. Disegni, et al. Ann Med. 2025. PMID 40944573
- While the Incidence of Venous Thromboembolism After Shoulder Arthroscopy Is Low, the Risk Factors Are a Body Mass Index Greater than 30 and Hypertension. Momenzadeh, et al. 2023. PMID 38149088
- Venous Thromboembolism Chemical Prophylaxis in Patients Undergoing Shoulder Arthroscopy. Budin, et al. JBJS Rev. 2024. PMID 38466802
- Latarjet Procedure: Stage 1 Physiotherapy Exercise and Advice. North Tees and Hartlepool NHS Foundation Trust (patient leaflet PI075, reviewed 2026)
- Shoulder Stabilization with Latarjet Procedure — Rehabilitation Protocol. Banff Sport Medicine (revised March 2020)
- Latarjet — CO.RE patient rehabilitation booklet, stages 1–6. Dr David Colvin, shoulderandkneesurgery.com.au
- Discharge Instructions & Physical Therapy Protocol: Anterior Stabilization of the Shoulder — Latarjet Procedure. Jourdan M. Cancienne, MD (Midwest Orthopaedics at Rush)
- Most Athletes Who Fail to Return to Sport After Latarjet Procedure Cite Psychological Factors: A Systematic Review. Ryan, et al. Arthroscopy. 2024. PMID 39550042. doi:10.1016/j.arthro.2024.11.003
- Early post-operative nerve complications after primary open Latarjet: a single-surgeon series of 164 shoulders. Vervaecke, et al. JSES Int. 2026. PMID 42199638. doi:10.1016/j.jseint.2026.101710
- Open Latarjet Yields a Low 90-Day Complication Rate in Primary and Revision Shoulder Stabilization. Villarreal-Espinosa JB, et al. Arthroscopy. 2026. PMID 41858236. doi:10.1002/arj.70066
- Sprains and strains. NHS (reviewed 23 April 2024)
- Brachial Plexus Nerve Block for Shoulder Surgery — patient information. Delaney R, Lane J. Dublin Shoulder (2021)
- Paracetamol for adults. NHS (reviewed 24 March 2026)
- Acetaminophen. MedlinePlus, U.S. National Library of Medicine (revised 15 October 2025)
- Broken arm or wrist. NHS (reviewed 26 May 2023)
- Arthroscopic Anterior Stabilisation / Latarjet — Recovery Guidelines. ShoulderDoc (Funk L, Wrightington, UK)
- Platelet-Rich Plasma (PRP): American Academy of Orthopaedic Surgeons patient information (accessed 2026-10-11). Full text
- Complex Revision Glenoid Reconstruction with Use of a Distal Tibial Allograft. JBJS Essent Surg Tech. 2021. PMID:34123548. PubMed record (abstract)
- FDA. New Safety Measures Announced for Opioid Analgesics, Prescription Opioid Cough Products, and Benzodiazepines. 2016.
- FDA. Boxed Warning updated to improve safe use of benzodiazepine drug class. 2020.