
On this page
🧭 Pick your situation
This guide comes in separate versions for different situations; read the one that matches yours.
Neck Pain With Arm Symptoms Under 50: Daily Routines and Exercises
A practical guide to cervical radiculopathy under 50: the centralization rule, relief postures, nerve glides, nine routines, nine home exercises, and a staged return to the gym.
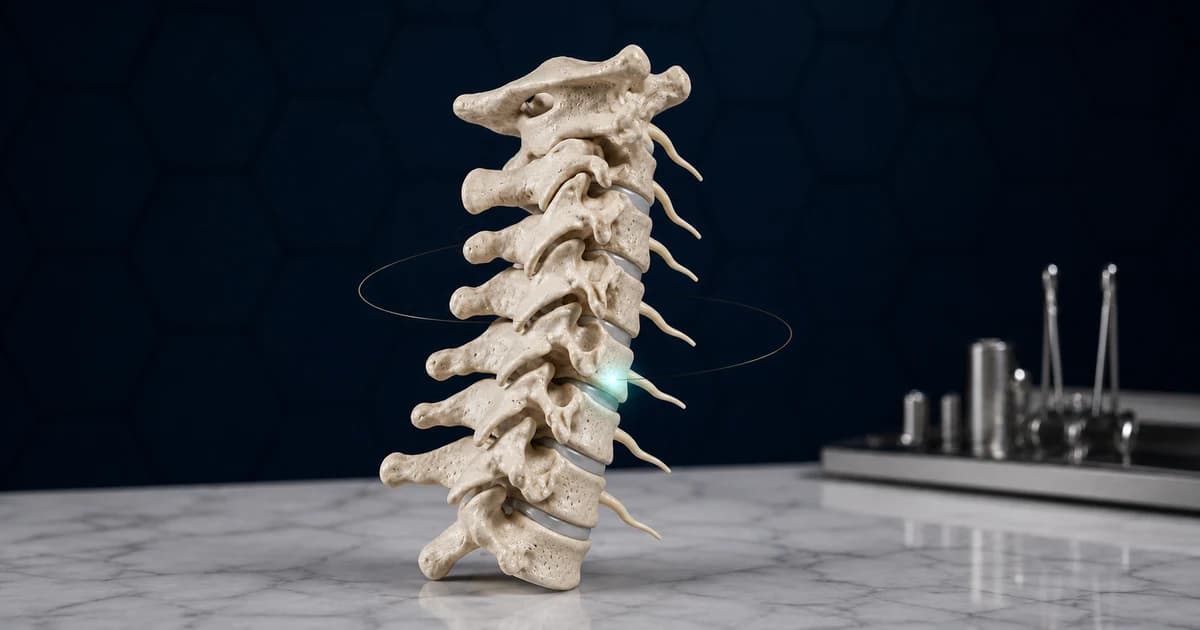
This version is for you if you are under 50 and your neck pain does not stay in the neck: it shoots into the shoulder and arm and sometimes down to the fingers, or comes with pins and needles and numbness. This pattern usually comes from pressure on one of the nerve roots in the neck, and it follows a course of its own. Here you will read what to change during your day, which exercise is safe, and where you must stop. This article is general education and does not replace an examination; with progressive weakness or red-flag signs, get seen first.
1🦴 What is this condition, and what does your version mean?
Between the neck vertebrae, nerve roots leave through small openings, and each one supplies its own share of the shoulder, arm and hand. When a bulging disc or a bony spur narrows that opening, the root becomes irritated and the pain no longer stays in the neck: it shoots into the shoulder blade and the arm, sometimes down to the fingers, and it may bring pins and needles, numbness or weakness. That is why clinical guidelines separate this picture from simple mechanical neck pain and give it a management path of its own. The good news is that its natural course is usually favourable, and most patients improve markedly with non-surgical care over weeks to a few months.
Systematic reviews show that the evidence for non-surgical treatments in this condition is limited and of low certainty; in other words there is no magic prescription, and the work rests on two pillars: staying intelligently active and dropping the patterns that provoke you. Urgent imaging is needed only when red-flag signs are present; an early MRI without them does not change the treatment decision. Surgery comes up for a small group — progressive weakness or stubborn pain — and that decision is made by examination, not by a scan. The most important rule in this article is the centralization rule: a movement is good when it draws the symptoms out of the hand and back towards the neck; a movement that sends the symptoms towards the fingers is, for now, too much for you.
2🏠 Daily routines you need to adjust
🚶 Stay active; complete rest is not allowed
Lying down until the pain settles is tempting, but more than a day or two of complete rest weakens the neck muscles and lengthens the painful episode. Carry on with your daily tasks at a lower intensity, and break activities into pieces instead of dropping them. The sign that the amount of activity is right is that your arm symptoms return to their previous level within half an hour and do not travel further down.
More detailLess detail
- Do not put on a cervical collar on your own initiative for long periods; immobility weakens the muscles and drags the problem out.
- On bad days reduce the workload but do not take it to zero; a few short walks are almost always possible.
- In the symptomatic phase hand heavy lifting and overhead work to someone else for a while — not your whole daily life.
🧭 Make the centralization rule your compass
For every task and every exercise you have one simple measure: which way are the symptoms moving. If the pain and tingling gather out of the hand and closer to the neck, you are on the right path — even if the neck pain itself increases for a while. The sign to stop is that the symptoms travel further down, reach the fingers, or the numbness spreads.
More detailLess detail
- Before and after every exercise, mark the furthest point the symptom reaches on your arm or hand; this one habit turns the decision from a guess into an observation.
- This rule is not only for exercise: judge your sleeping position, your desk layout and the way you hold your phone by exactly the same measure.
- The criterion is a lasting change: if the symptoms return to their previous level within half an hour, that movement is fine.
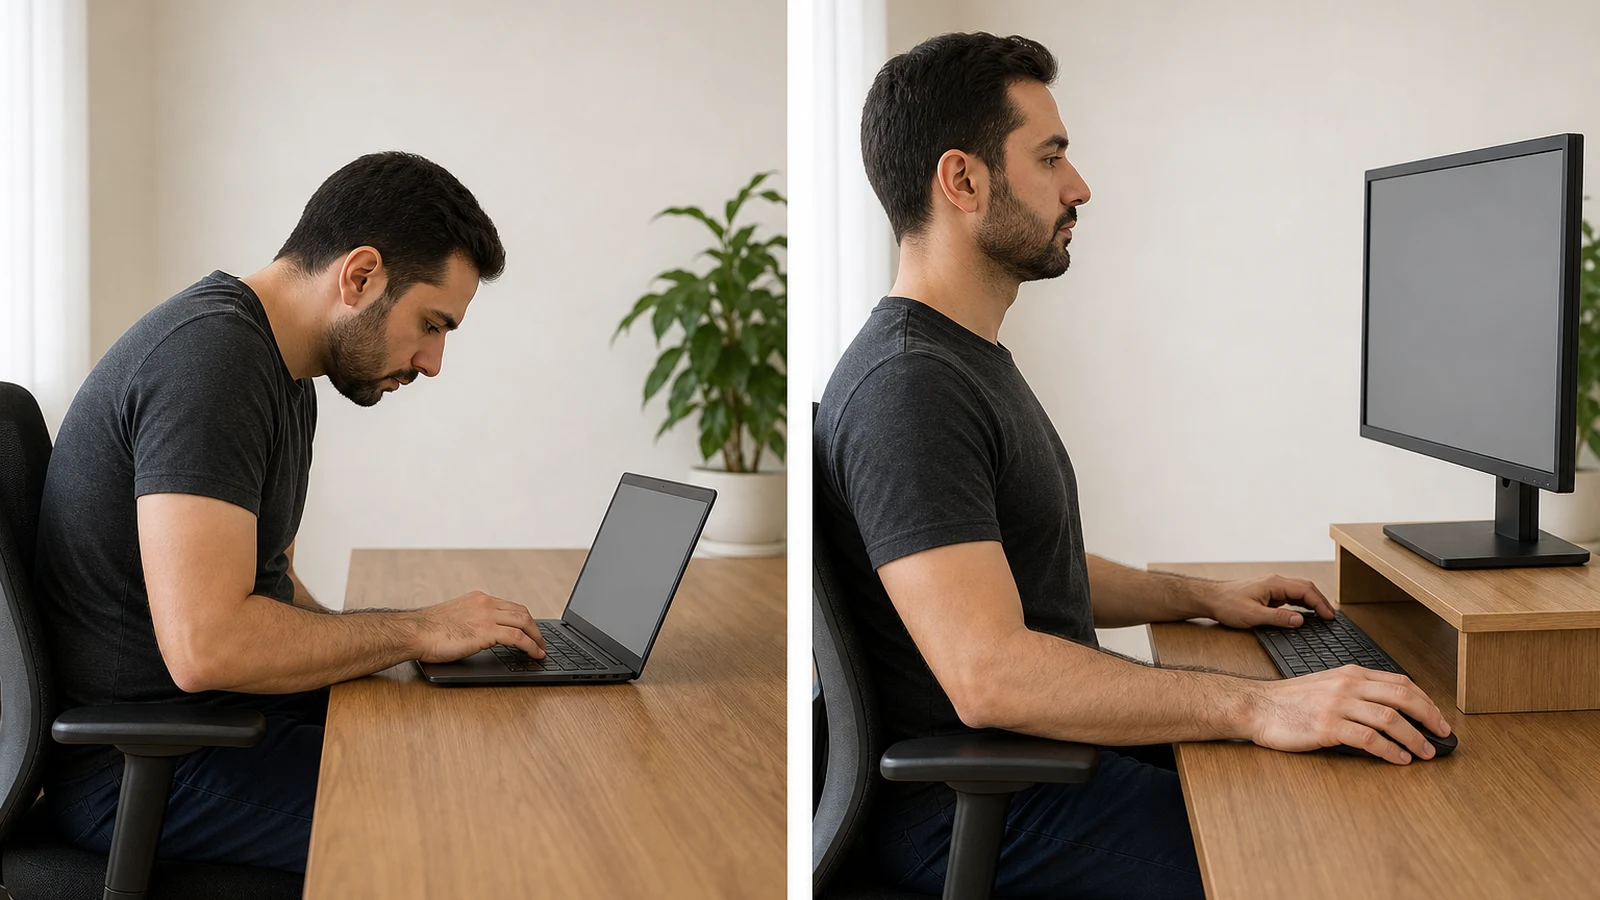
💻 Set up your desk and monitor so your neck does not bend
Most of your neck's hours are spent at a desk, and a neck bent forwards narrows those same nerve openings further. Put the top edge of the monitor at eye level and directly in front of you, rest your forearms on the desk and let your shoulders drop. The sign of a good layout is that after half an hour of work your arm symptoms are no worse.
More detailLess detail
- A laptop on the desk bends your neck; put a few books under it and buy a separate keyboard and mouse.
- A supported forearm reduces the tension on the nerve; a dangling arm keeps the arm symptoms awake.
- A side monitor keeps your neck rotated for hours, and in this version it is the worst possible layout.
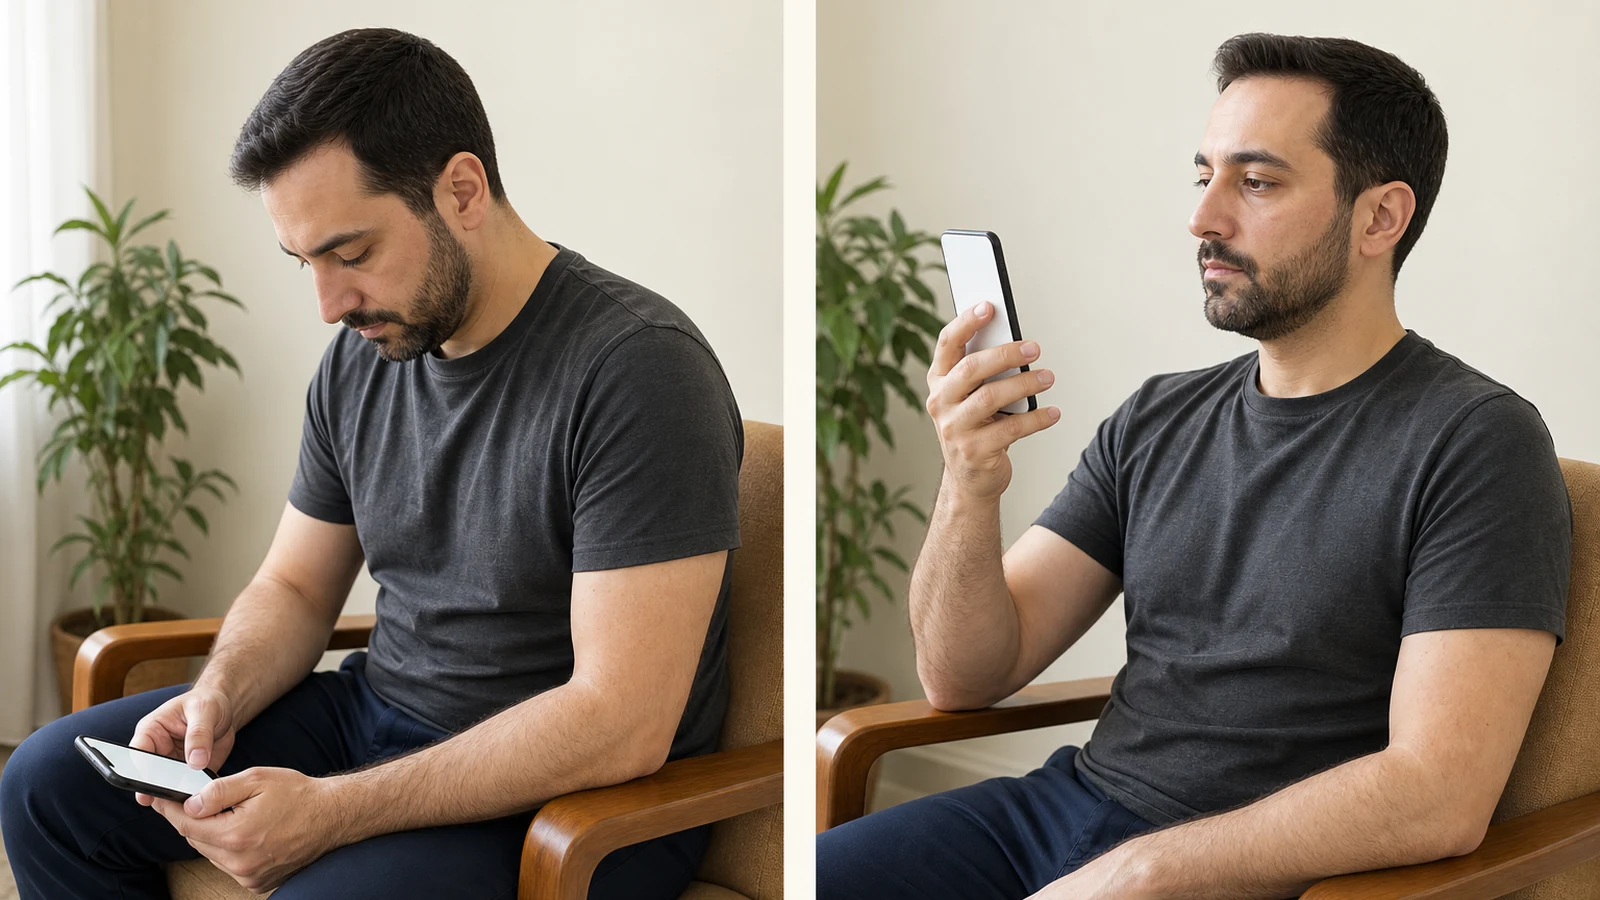
📱 Bring the phone up, not your head down
Every time you bend your head to look at the phone the load on the neck multiplies; in your version that means more pressure on the irritated root. Bring the phone up close to your line of sight and rest your elbow against your body or on a cushion. The sign that it is right is that your eyes go down but your chin does not touch your chest and your arm is not left hanging in mid-air.
More detailLess detail
- For long texts and video calls put the phone on a stand; holding the phone between your shoulder and ear is forbidden in this situation.
- Increase the font size on your phone; more legible text means a less forward head.
- If tingling in the hand starts after a few minutes, switch hands and shorten the session.
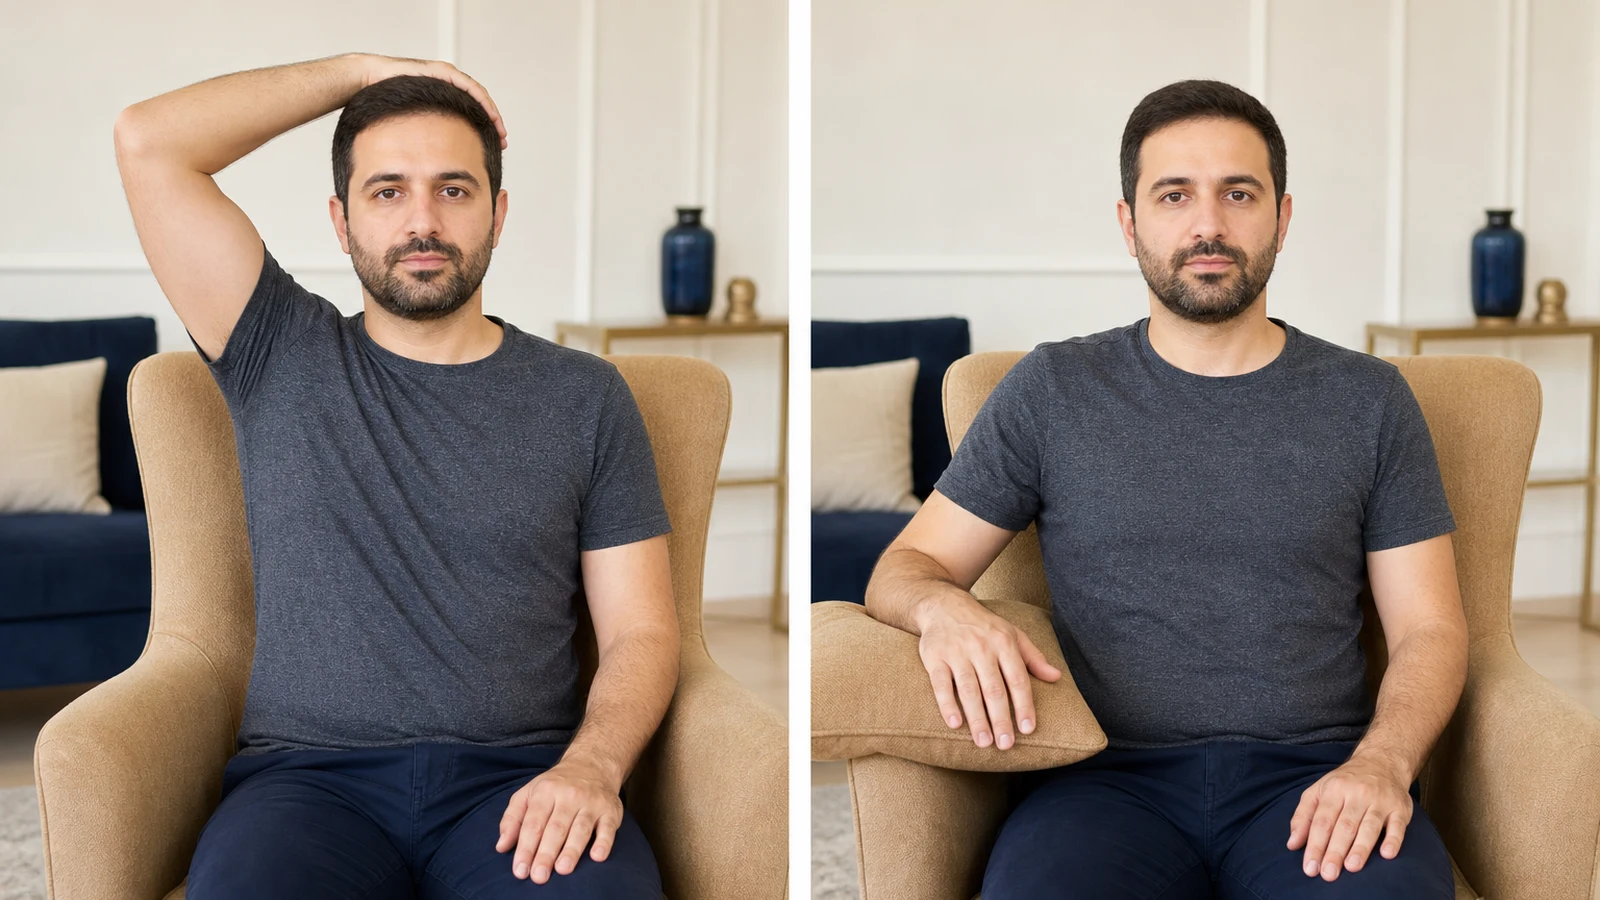
🙌 Learn the relief postures
Many patients with this version notice that when they rest the forearm on top of the head the arm pain eases; this "shoulder abduction relief posture" is a well-recognized phenomenon and is worth mentioning at your visit. When sitting, too, rest your forearm on a cushion or the arm of the chair so that the weight of the arm is taken off the neck. The sign of a good position is that in that very posture the symptoms gather back towards the neck.
More detailLess detail
- This is a relieving posture, not a treatment; staying in it for hours tires the shoulder.
- On the sofa and in bed as well, put a pillow under the elbow on the painful side so you have the same support.
- If, on the contrary, raising the arm makes the symptoms worse, do not insist; the criterion is the centralization rule.
🛏 Sleep with the arm supported
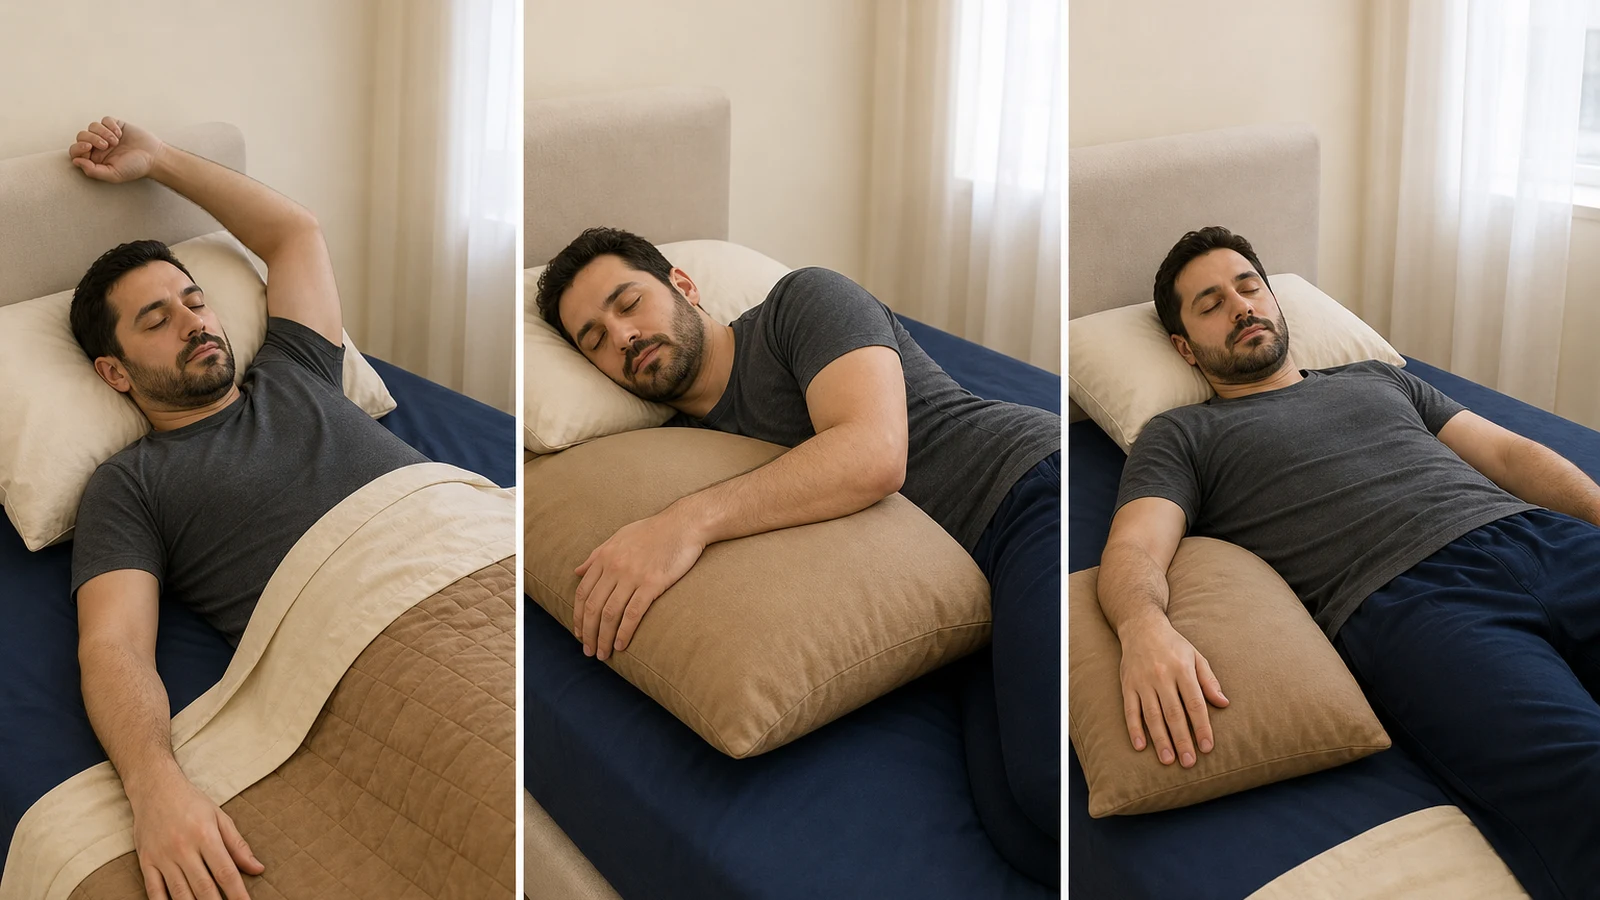
At night the neck stays in one position for hours, and an unsupported arm starts the morning with tingling. Sleep on the unaffected side, put a pillow under your head as thick as the distance from shoulder to ear, and lay the painful arm on a pillow in front of your body. The sign of the right choice is that in the morning the numbness and tingling in your hand are no worse than the night before.
More detailLess detail
- Sleeping with the arm above the head or under the pillow keeps the nerve on stretch for hours and is sometimes the real culprit behind morning tingling.
- Sleeping on your stomach is the worst position, because it keeps your head fully rotated all night long.
- If you wake in the middle of the night with tingling, change the position of the arm and open and close your fingers a few times.
🚗 Driving: a supported elbow and planned stops
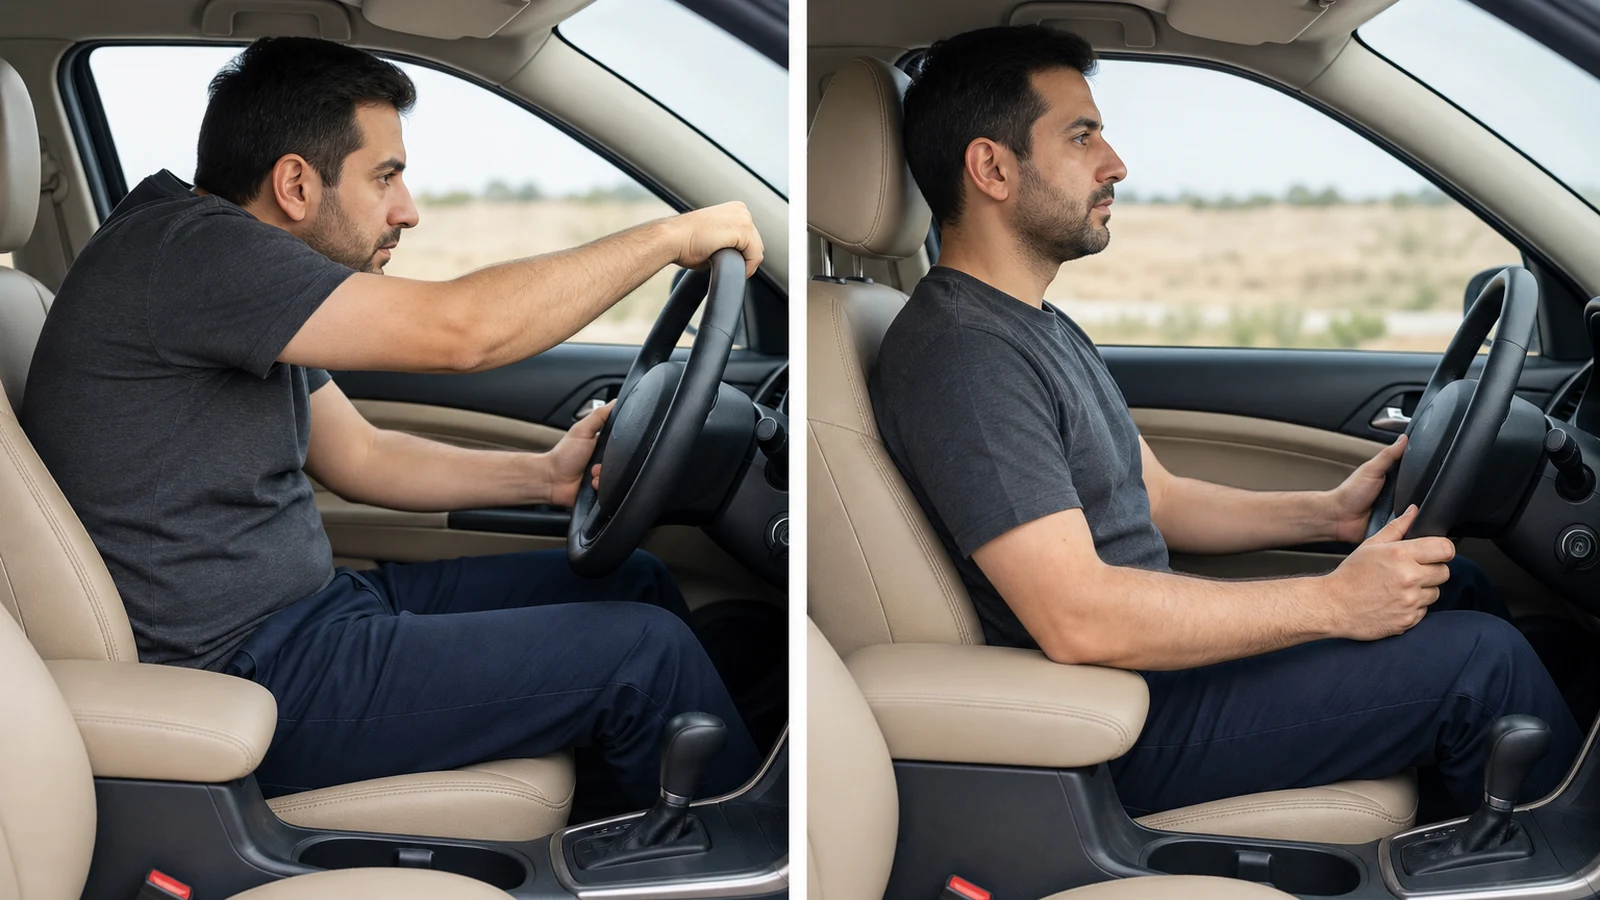
While driving, the neck stays fixed for hours and the hands hang unsupported on the wheel; a combination that wakes the arm symptoms up. Set the backrest close to upright, pull the seat forwards so your elbows stay bent, and set the top edge of the headrest level with the top of your head. The sign of a good setup is that after half an hour of driving your shoulders have not crept up and your hand has not gone numb.
More detailLess detail
- Place your hands lower on the wheel and rest your elbow; a high, extended arm increases the tension on the nerve.
- On a long trip stop every hour or two and do a few repetitions of the chin tuck.
- A backrest reclined too far brings the head forwards and creates exactly the pattern you should be avoiding.
🤧 Manage sneezing, coughing and straining
Sneezing, a hard cough and straining raise the pressure inside the spinal canal all at once and can flare the arm symptoms for hours. When you sneeze or cough, brace your hand on your thigh or the table and keep the neck neutral with the chin slightly tucked, rather than in a sudden bend. The sign that you are doing it right is that you feel no fresh shooting down the arm after the sneeze.
More detailLess detail
- Constipation and prolonged straining have the same effect; enough water and fibre are part of caring for your neck.
- Take a chronic cough or untreated allergy seriously; dozens of sneezes a day cancel out the effect of the exercises.
- Lifting objects while holding your breath creates the same pattern; breathe out and keep the load close to your body.
🤕 Recognize and record cervicogenic headache
If your headache starts at the back of the neck, is usually one-sided and gets worse with long spells at the desk, the pattern of "cervicogenic headache" is in question; a headache whose source is the neck itself and which improves when the neck is treated. Writing down its pattern for a few weeks is the best thing you can do for your visit. The sign that you are on the right path is that as the neck improves, the number of headache days falls.
More detailLess detail
- For every headache write down: what time, how many hours, which side, and how long you spent at the desk that day.
- A review of the studies shows that exercise therapy for the neck and shoulder blade reduces the intensity and frequency of cervicogenic headache; the exercises in the next section are treatment for your headache too.
- Frequent painkiller use creates headaches of its own; if you take painkillers more than a few days a week, say so at your visit.
3🏋️ Home exercises
Your compass is the centralization rule: keep doing the exercise that gathers the symptoms back towards the neck, and drop the one that sends the symptoms further down. The Cochrane systematic review also makes an important point: stretching alone is not enough, and the backbone of the programme is strengthening the neck and shoulder-blade muscles. The doses below are the ranges commonly used in exercise therapy, and your care team can change them.
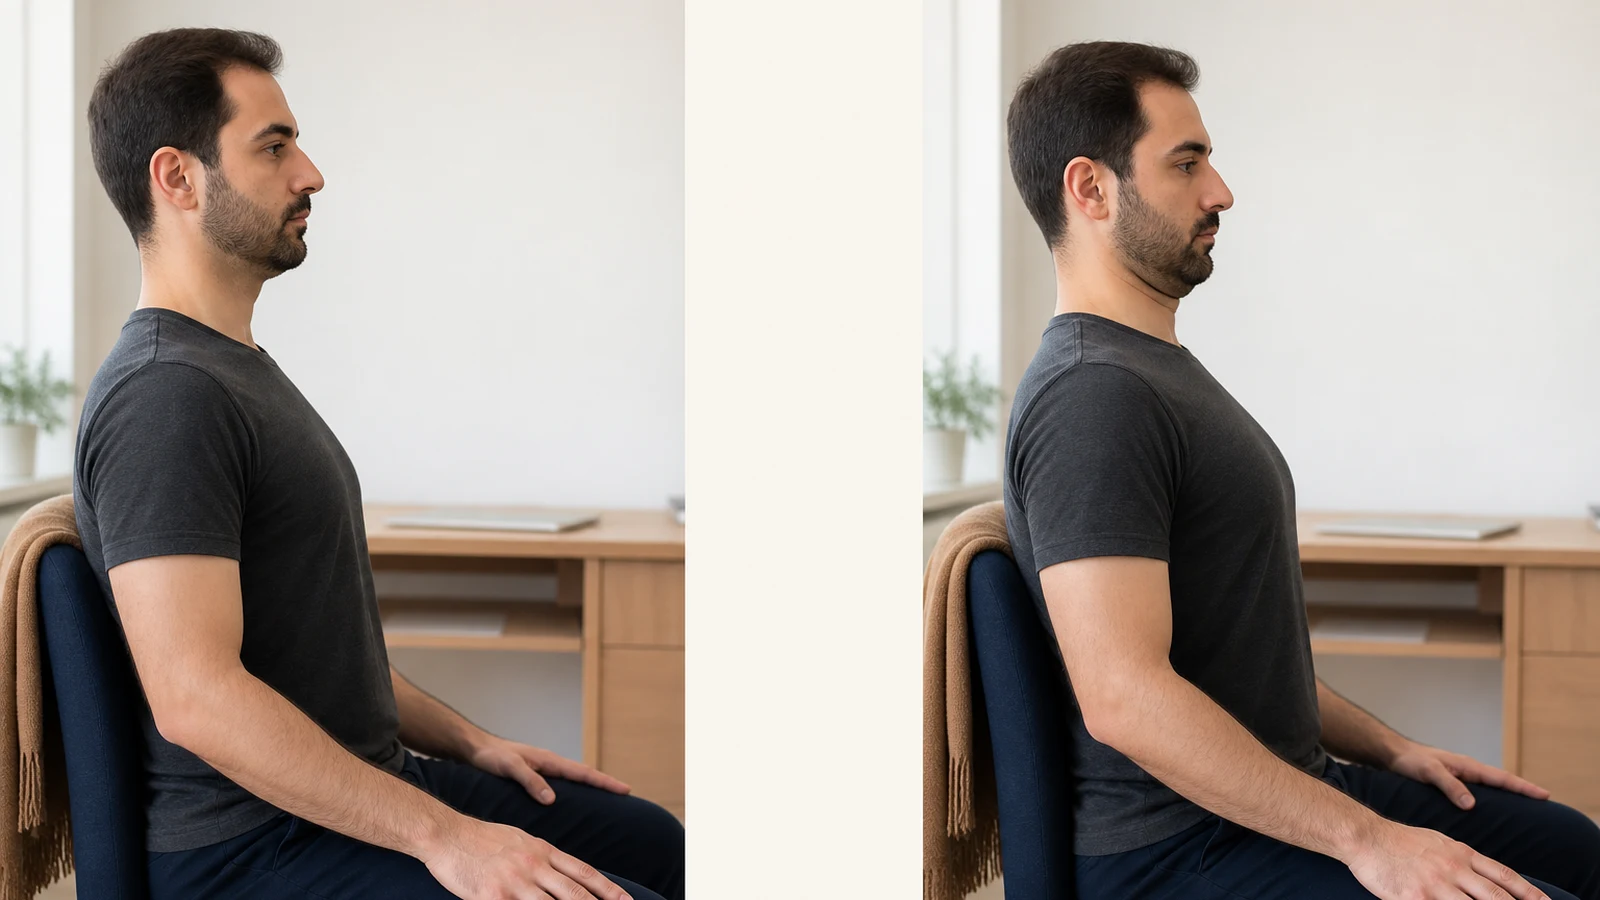
Chin Tuck (Chin Tuck)
Draw the chin slightly back without bending the neck, so the deep muscles switch on. 10 repetitions with a 5-second hold, 2 to 3 times a day. Stop immediately if the arm symptoms travel further down or get more intense.
More detailLess detail
Purpose and why it matters: It wakes up the deep muscles that hold the neck and brings the head back over the spine; that return to neutral is calming for the irritated root.
Starting position: Seated with a straight back; shoulders relaxed and gaze straight ahead.
Step by step:
- Gently draw the chin back, as if making a small double chin; the head must not tip forwards.
- Keep your gaze level and feel a mild stretch at the back of the neck.
- Hold for 5 seconds and release slowly.
Documented dose: 10 repetitions with a 5-second hold, 2 to 3 times a day (the usual range for deep neck muscle training).
Stop immediately if: the arm symptoms travel further down or intensify, or sharp neck pain or dizziness appears.
Common mistakes: tipping the head down instead of drawing the chin back; holding the breath; pushing sharply.
Easier version: the same movement lying on your back, with the weight of the head on the floor.
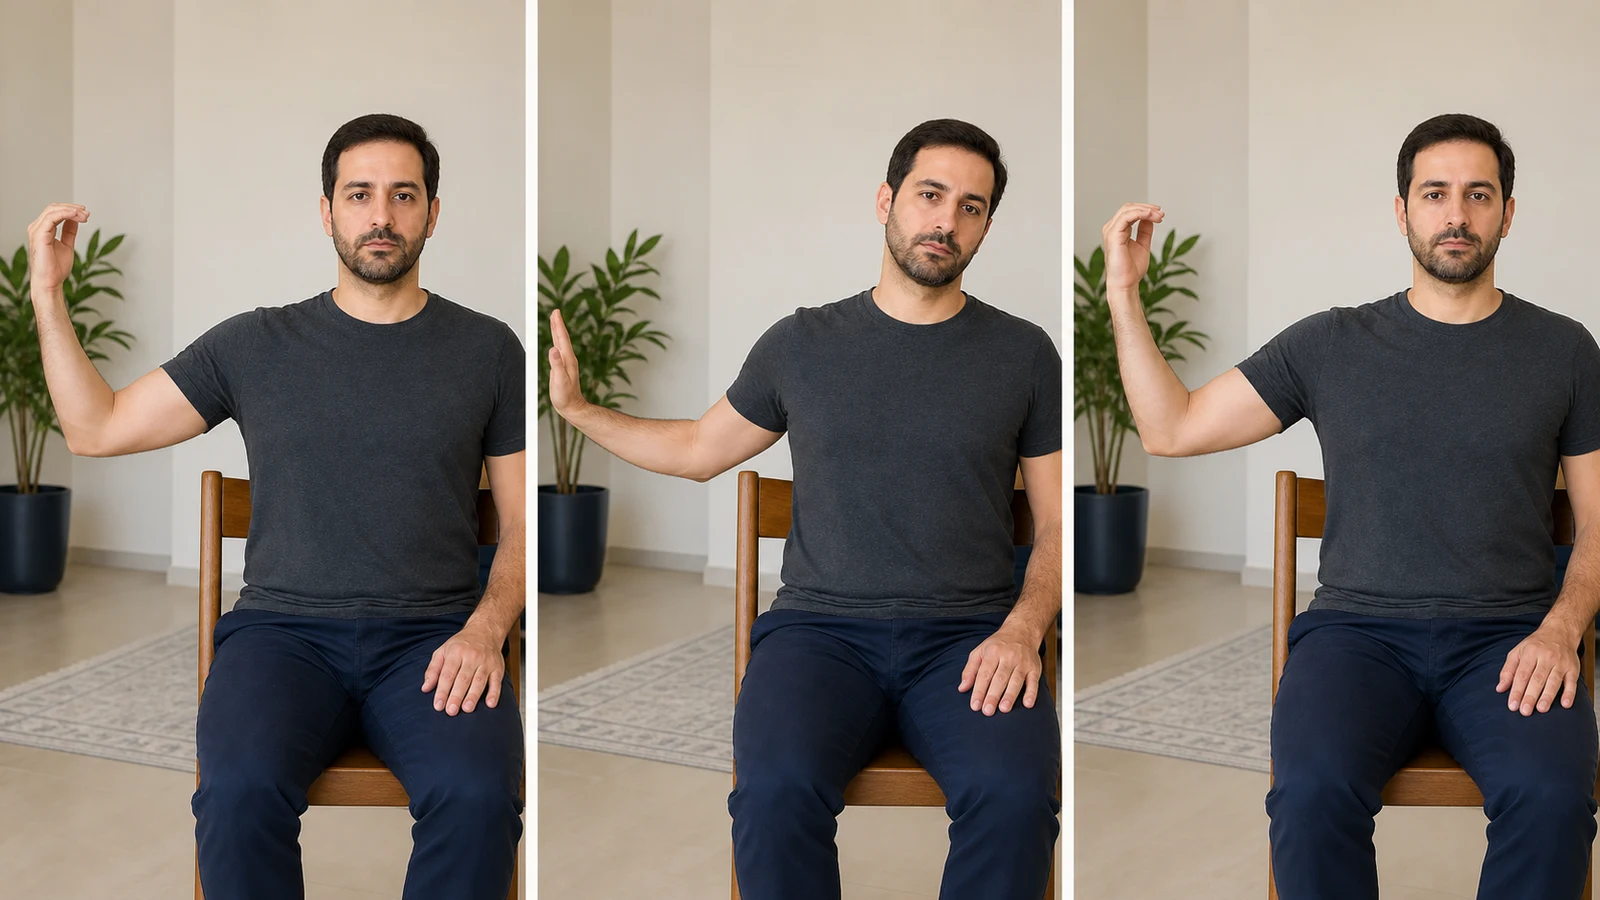
Symptom-Free Neck Movement (Symptom-Free Cervical Range of Motion)
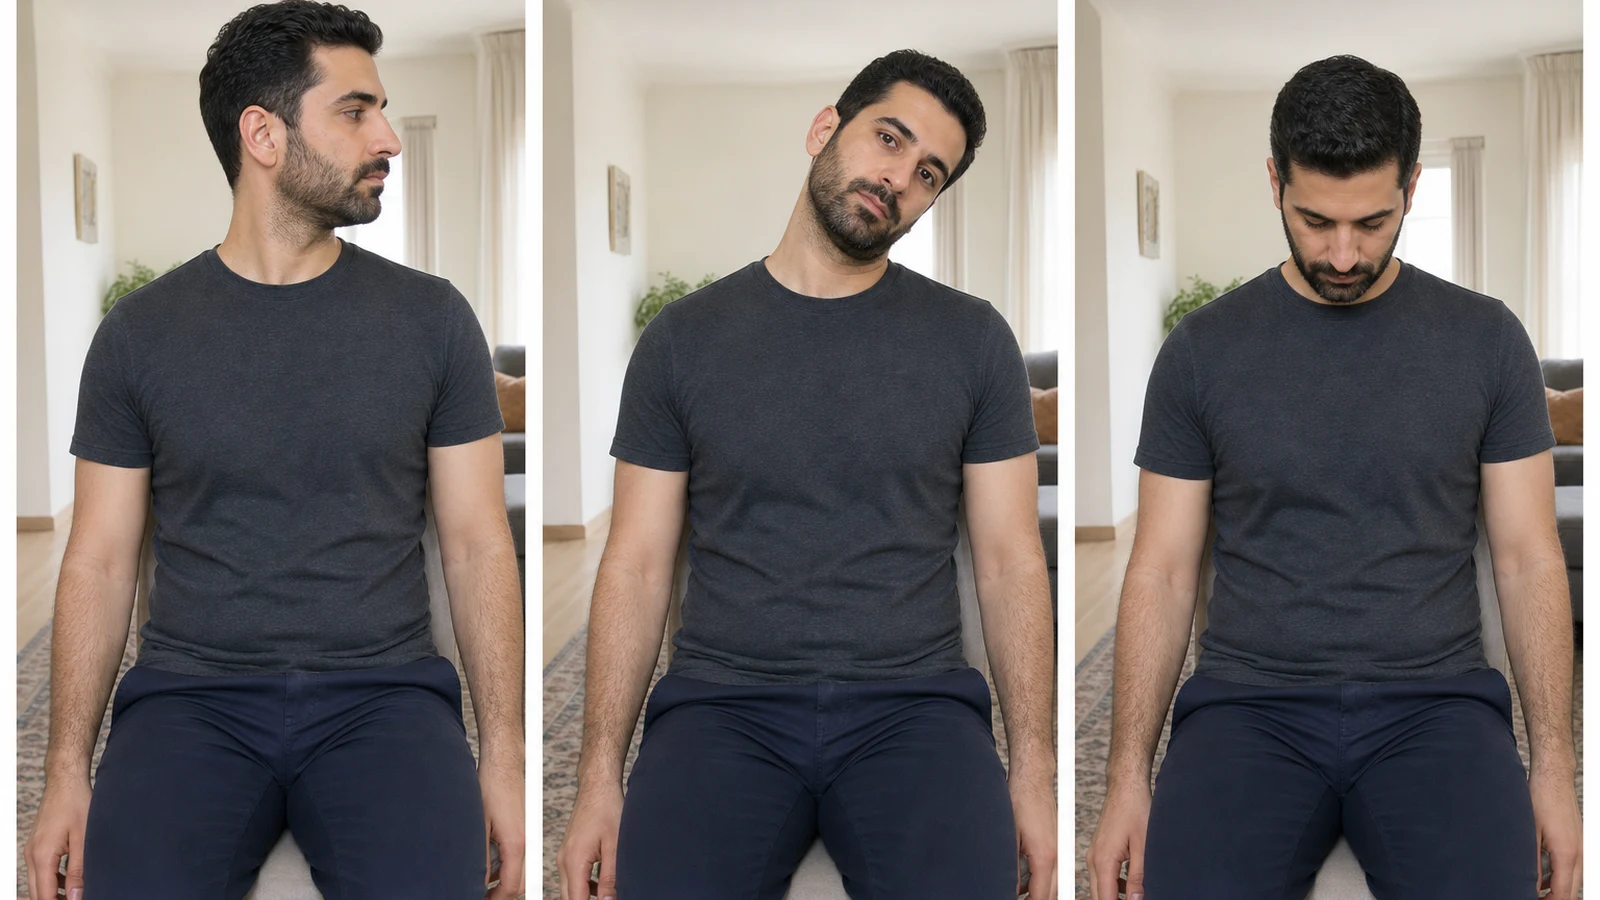
Turn left and right and bend to each side, but only as far as the point where the arm symptoms do not wake up. 5 repetitions in each direction, 1 to 2 times a day. Stop immediately if the arm symptoms travel further down or get more intense.
More detailLess detail
Purpose and why it matters: A neck kept still out of fear of pain only gets stiffer. In your version the "comfortable range" becomes the "symptom-free range": the limit of the movement is the point where the arm symptoms begin.
Starting position: Seated with a straight back and relaxed shoulders.
Step by step:
- Turn the head slowly to the right and stop before the first hint of a symptom in the hand.
- Repeat the same to the left, then tip the ear towards each shoulder.
- Perform every movement slowly and under control.
Documented dose: 5 repetitions in each direction, 1 to 2 times a day (the usual range for neck range-of-motion exercise).
Stop immediately if: the arm symptoms travel further down or intensify, or dizziness or blurred vision appears.
Common mistakes: rolling the neck in circles; going to the end of the range; bending the head backwards.
Easier version: half the range and fewer repetitions, lying on your back.
Median Nerve Glide (Median Nerve Glide)
A slow, short movement of the arm so the nerve glides more easily — not a long, forceful stretch. 5 to 10 slow repetitions, 1 to 2 times a day. Stop immediately if the tingling becomes intense or the arm symptoms travel further down.
More detailLess detail
Purpose and why it matters: The nerve has to glide along its own path, and root irritation limits that glide. The aim is to move the nerve, not to pull on it; so keep the movement short, slow and without pausing at the end of the range.
Starting position: Seated or standing; the arm by your side, the elbow bent and the palm facing up.
Step by step:
- Slowly straighten the elbow while at the same time drawing the wrist and fingers back a little, until you feel the first mild stretch.
- Come back before the tingling starts, and tip your head slightly towards the same shoulder.
- Continue the movement as a smooth back-and-forth, without pausing at the end of the range.
Documented dose: 5 to 10 slow repetitions, 1 to 2 times a day (the usual range for nerve glide exercises).
Stop immediately if: the tingling or numbness becomes intense, the arm symptoms travel further down or intensify, or you develop new weakness.
Common mistakes: turning it into a 30-second stretch; tipping the head to the opposite side; too many repetitions.
Easier version: just bending and straightening the elbow.
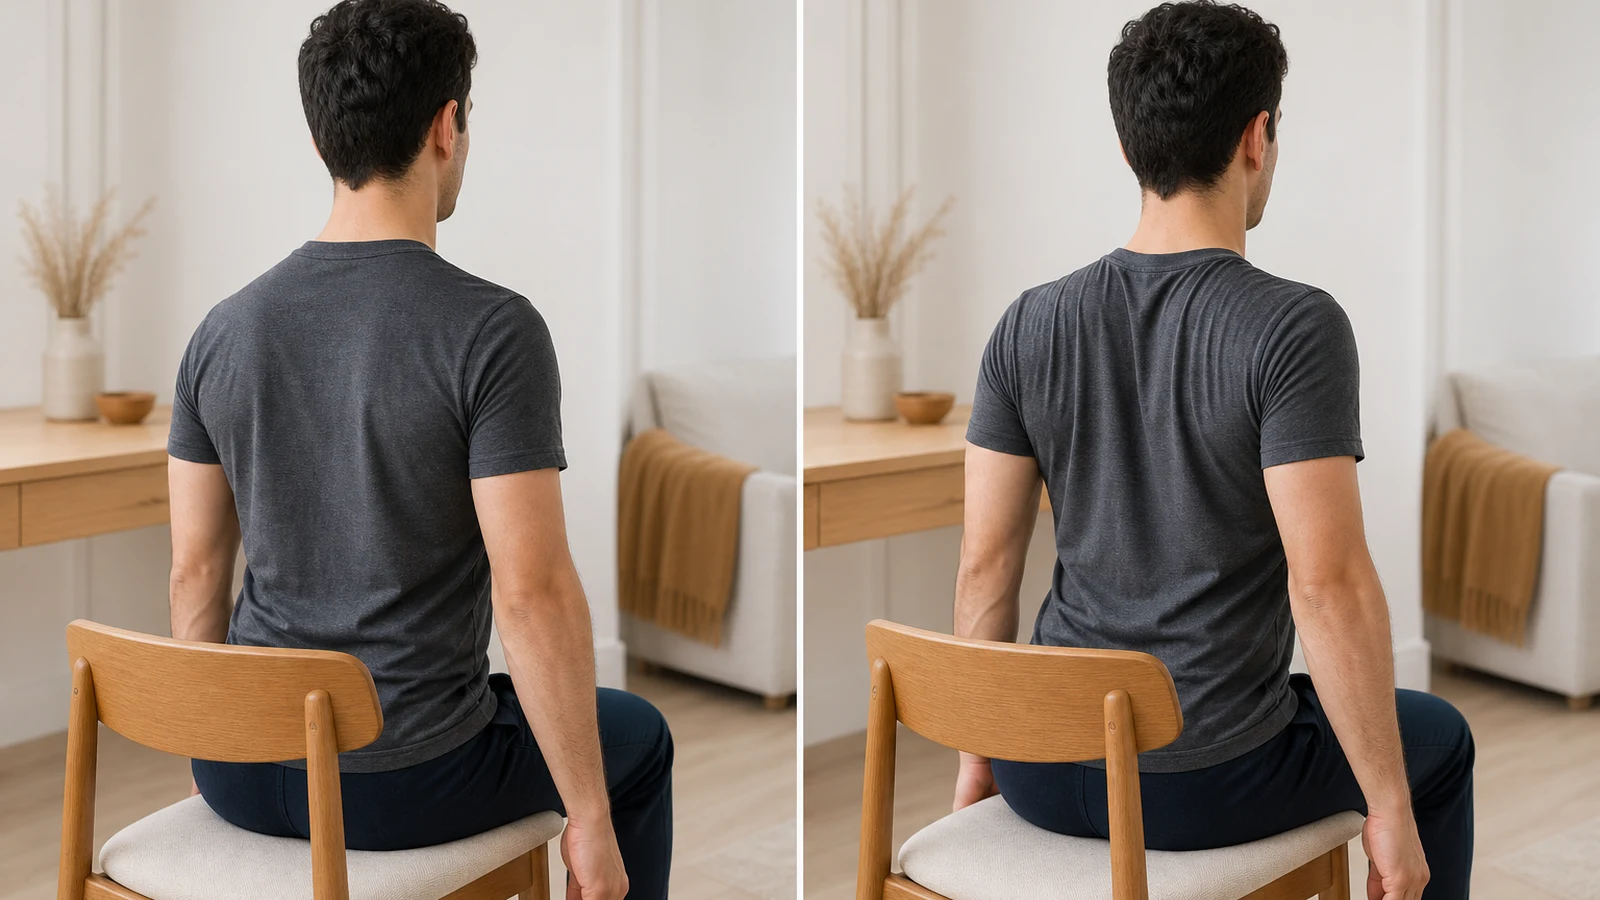
Shoulder Blade Squeeze (Scapular Retraction)
Draw the two shoulder blades together, as if holding a pencil between them. 10 to 12 repetitions with a 5-second hold, 2 sets. Stop immediately if the arm symptoms travel further down or get more intense.
More detailLess detail
Purpose and why it matters: The muscles between the shoulder blades build a stable base for the neck; when they are weak the shoulders fall forwards and the head follows them. The load in this exercise is low and it is doable in the symptomatic phase.
Starting position: Seated or standing with a straight back and the arms by your sides.
Step by step:
- First let the shoulders drop a little so they do not ride up.
- Slowly draw the two shoulder blades together and hold for 5 seconds; keep the neck relaxed.
- Release slowly and take one full breath.
Documented dose: 10 to 12 repetitions, 2 sets, most days of the week (the usual pattern for neck and shoulder-blade exercise).
Stop immediately if: the arm symptoms travel further down or intensify, or you feel a sharp pain between the shoulder blades.
Common mistakes: shrugging the shoulders up instead of drawing the blades together; arching the lower back; letting the head come forwards.
Easier version: a 3-second hold with a smaller range.
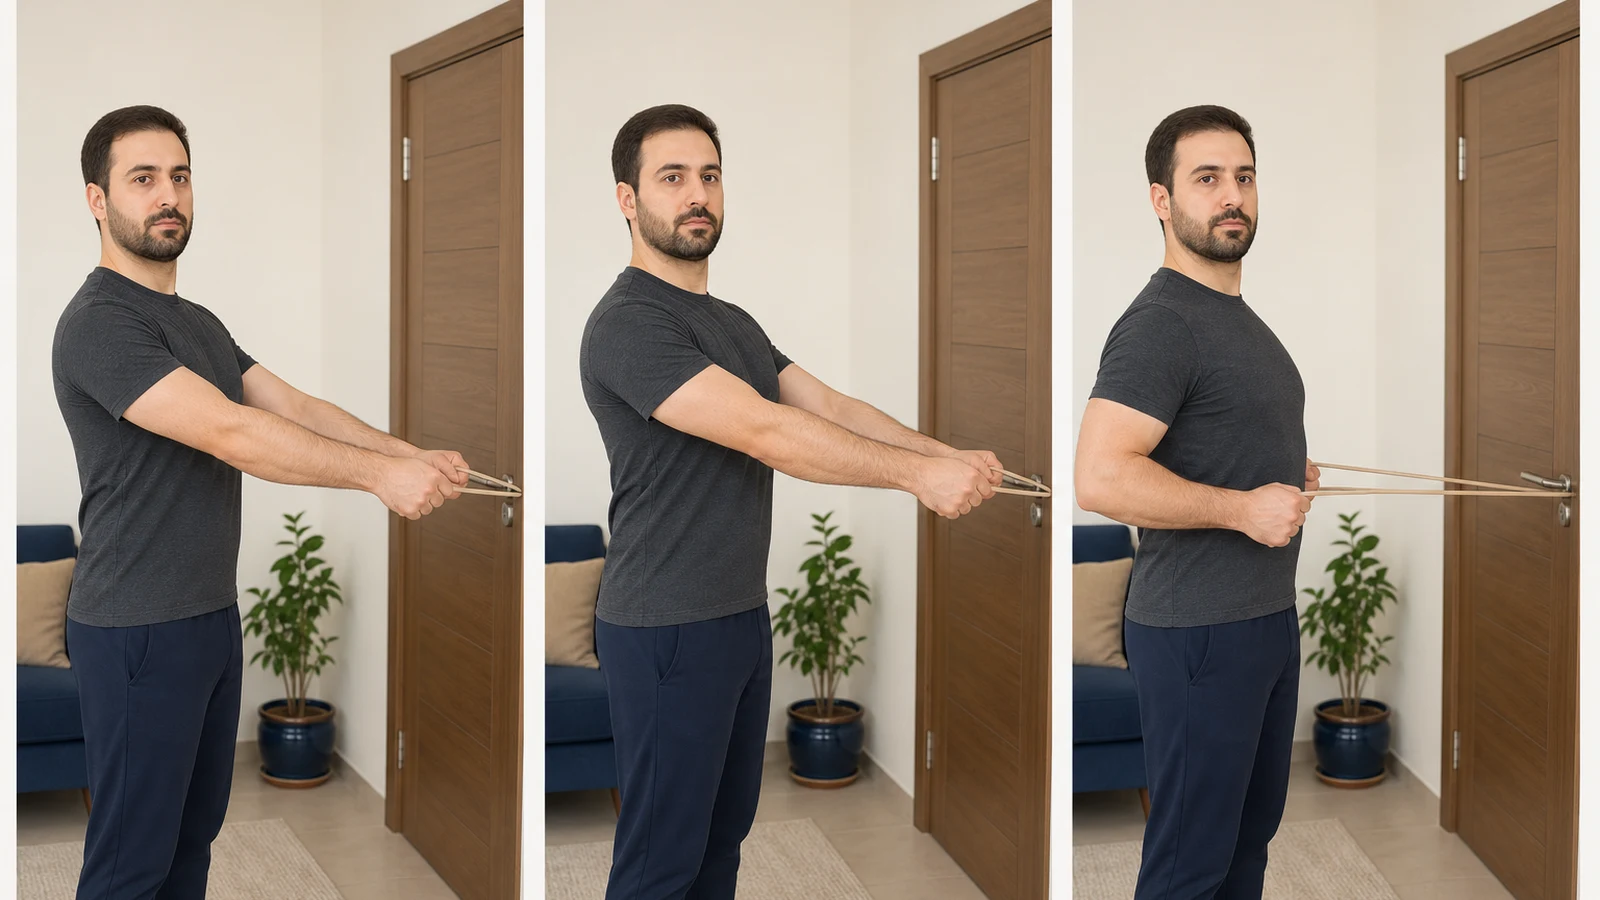
Light Band Row (Light Band Row)
With a thin band, pull the elbows back and draw the shoulder blades together; a light band is the first choice. 10 to 12 repetitions, 2 to 3 sets, 3 days a week. Stop immediately if the arm symptoms travel further down or get more intense.
More detailLess detail
Purpose and why it matters: Neck and shoulder-blade strengthening is the backbone of the programme, and the row represents it; because it is performed below shoulder level, it usually does not provoke the arm symptoms.
Starting position: Seated or standing; fix the band to a door handle and hold both ends, elbows close to your body.
Step by step:
- First draw the shoulder blades together, then pull the elbows back and keep them beside your body.
- Pause for a moment at the end; the shoulders must not ride up and the head must not come forwards.
- Return slowly to the start and breathe out during the pulling phase.
Documented dose: 10 to 12 repetitions, 2 to 3 sets, 3 days a week (the usual pattern for light resistance training).
Stop immediately if: the arm symptoms travel further down or intensify, or sharp neck and shoulder pain appears.
Common mistakes: a band that is too stiff; a shrugged shoulder; the head coming forwards.
Easier version: a thinner band, a shorter range, or one arm at a time.
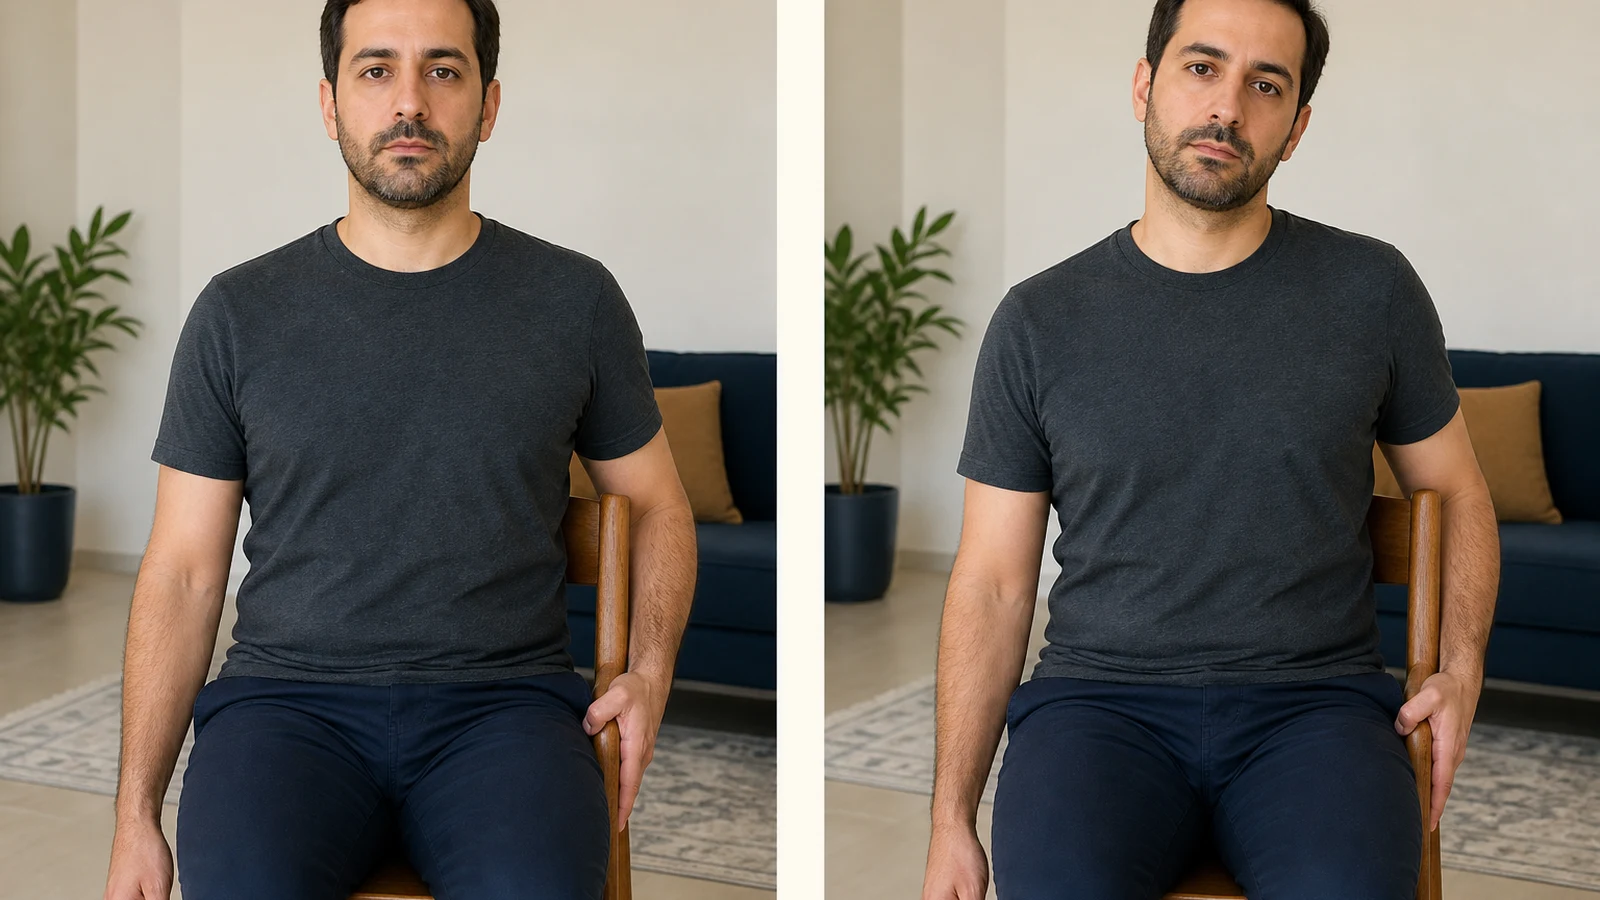
Cautious Upper Trapezius Stretch (Cautious Upper Trapezius Stretch)
Slowly tip the head to one side until you feel a mild stretch over the opposite shoulder; in this version it is gentler than usual. 15 to 30 seconds, twice on each side. Stop immediately if tingling starts or the arm symptoms travel further down.
More detailLess detail
Purpose and why it matters: The upper trapezius tightens up with a shrugged shoulder; but tipping the head to the opposite side can increase the tension on the irritated root. So this stretch is a supplement, and the first tingle means the end of it.
Starting position: Seated on a chair; hold the hand on the stretched side under your thigh so that the shoulder does not ride up.
Step by step:
- Slowly tip the head to the opposite side, as if bringing the ear closer to the shoulder.
- Stop at the very first sensation of a mild stretch; in this version do not add pressure with your hand.
- Stay for 15 to 30 seconds and come back slowly.
Documented dose: 2 repetitions of 15 to 30 seconds on each side (the lower end of the usual static stretching range).
Stop immediately if: the arm symptoms travel further down or intensify, new tingling or numbness appears, or you feel sharp neck pain.
Common mistakes: yanking the head suddenly; rotating the neck at the same time; carrying on despite tingling.
Easier version: just letting the weight of the head fall to one side, with no extra pressure.
Isometric Neck Strengthening in Four Directions (Isometric Neck Holds)
Press your palm against your forehead, the back of your head and each side of your head, and resist with the neck without the head moving. 5 seconds in each direction, 5 repetitions, once a day. Stop immediately if the arm symptoms travel further down or get more intense.
More detailLess detail
Purpose and why it matters: A static contraction strengthens the neck muscles without moving the joints; for a neck that wakes the symptoms up with too much movement, it is the safest form of strengthening.
Starting position: Seated with a straight back, the head neutral and the chin slightly tucked.
Step by step:
- Place your palm on your forehead and press gently, while the neck resists and the head stays still.
- Repeat the same with the hand behind the head and then on each side of the head.
- 5 seconds in each direction; keep the pressure gentle rather than maximal, and do not hold your breath.
Documented dose: 5 repetitions in each direction, once a day (the usual range for isometric neck exercise).
Stop immediately if: the arm symptoms travel further down or intensify, or sharp pain or dizziness appears.
Common mistakes: maximal pressure; holding the breath; letting the head move.
Easier version: light pressure held for 3 seconds, only in the symptom-free directions.
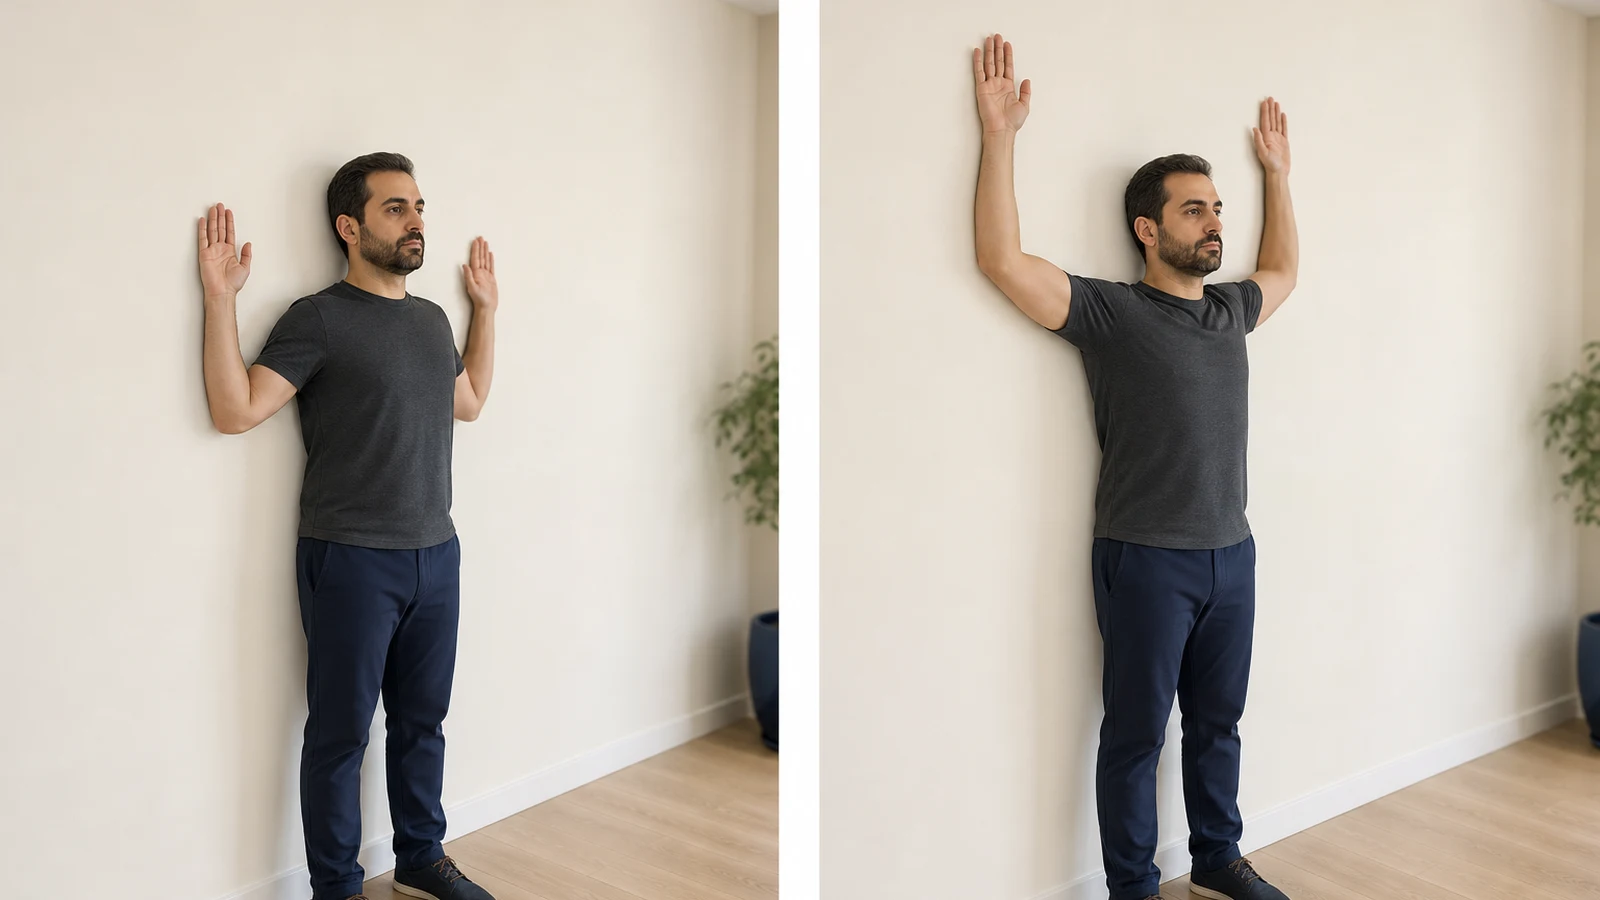
Wall Angel (Wall Angel)
With your back to the wall, move your arms up and down in the "surrender" position without losing contact with the wall; only as high as the point where the arm symptoms do not wake up. 8 to 10 repetitions, 2 sets. Stop immediately if the arm symptoms travel further down or get more intense.
More detailLess detail
Purpose and why it matters: It opens the chest and activates the shoulder blades at the same time; the "opposite of your day" exercise for someone who is bent forwards all day long. Your limit: the height that sends the symptoms into the hand is your ceiling for today.
Starting position: Back to the wall, feet a little forwards, the back of the head, the lower back and the buttocks in contact with the wall.
Step by step:
- Bend the elbows to about 90 degrees and press the backs of your hands against the wall.
- Raise the arms slowly, as far as contact with the wall is kept and the arm symptoms do not wake up.
- Lower them slowly; keep the neck neutral and the shoulders down.
Documented dose: 8 to 10 repetitions, 2 sets, most days of the week.
Stop immediately if: the arm symptoms travel further down or intensify, or sharp shoulder and neck pain appears.
Common mistakes: letting the lower back come off the wall; a shrugged shoulder; insisting on reaching overhead during the symptomatic phase.
Easier version: a short range up to shoulder level.
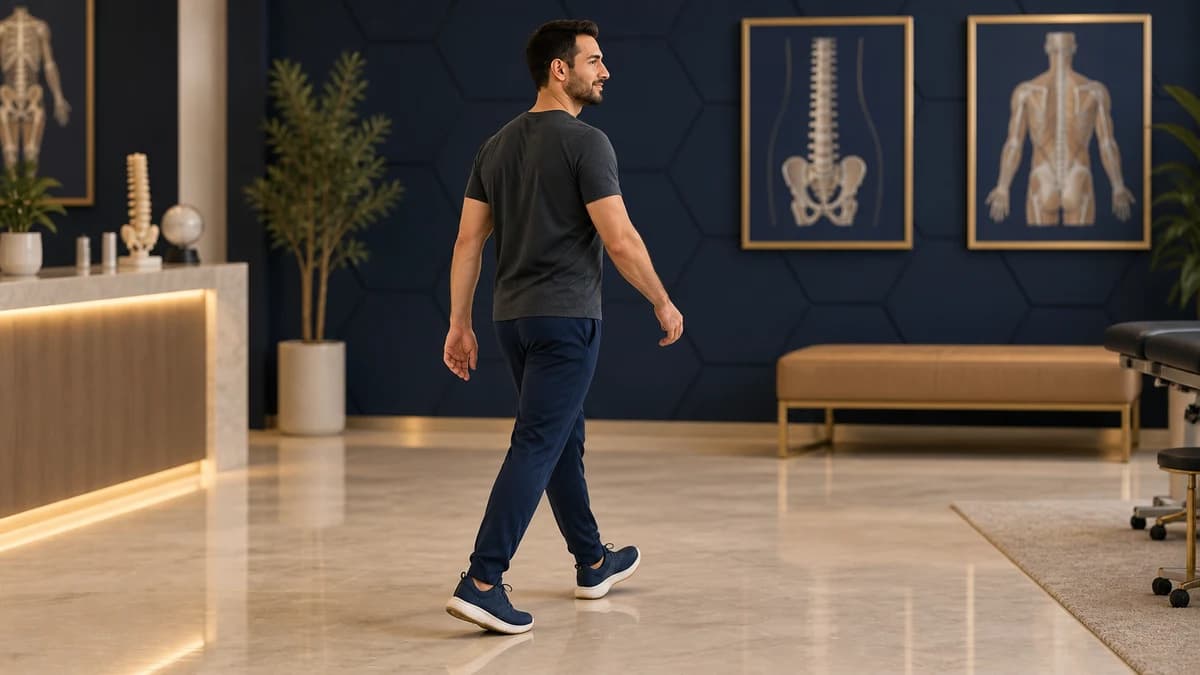
Daily Walking (Daily Walking)
The simplest form of staying active, and what takes the place of complete rest. Start with 10 to 15 minutes and build up to about 30 minutes on most days of the week. Stop immediately if the arm symptoms travel further down or get more intense.
More detailLess detail
Purpose and why it matters: Regular aerobic activity lowers sensitivity to pain and improves sleep and mood; the simplest way to stay in motion without provoking the neck.
Starting position: Comfortable shoes, a tall posture, gaze straight ahead and the phone in your pocket.
Step by step:
- In the first week, 10 to 15 minutes a day at a comfortable pace.
- Add a few minutes each week until you reach about 30 minutes.
- Raise the pace to the point where your breathing quickens but you can still talk.
Documented dose: about 30 minutes on most days of the week.
Stop immediately if: the arm symptoms travel further down or intensify, or dizziness and chest pain appear.
Common mistakes: walking with the neck bent over the phone; carrying a heavy bag on the painful shoulder.
Easier version: several 10-minute walks spread through the day.
4🏟️ Principles of training at the gym
The gym is not forbidden, but its rules change: as long as the symptoms travel into the hand, train with seated machines and light loads, and the centralization rule holds here too — any movement that sends the symptoms further down is dropped there and then. What follows is not a set-by-set programme; your trainer writes that.
Warm-up and cool-down
Start every session with 5 to 10 minutes of light aerobic work, then a few repetitions of the chin tuck, symptom-free neck movement and the shoulder blade squeeze. End the session with a few minutes of walking and light stretching.
Choosing the weight and the progression rule
In the symptomatic phase choose a weight that gives you 12 to 15 comfortable repetitions. When two consecutive sessions finish without the arm symptoms waking up, add about 5 percent. The measure of progress is not the number on the weight alone: the day after a session your arm symptoms must not be worse.
Form and breathing
The golden rule: head neutral, chin slightly tucked, shoulders down and back. Breathe out during the effort phase; holding your breath under a weight raises the internal pressure and can flare the arm symptoms. If you rotate your neck to see yourself, move the mirror rather than your neck.
Session order and structure
Put the rowing and mid-scapular movements at the start of the session, where your form is better. Leg and hip movements, which do not involve the neck, can make up the bulk of the session. Prefer seated machines with a backrest over free standing movements.
High-risk patterns and safe alternatives
Every "don't" has an alternative; there is no need to give up the gym entirely:
- Behind-the-neck shoulder press and lat pulldown → the same movement in front, with a light load and the shoulder blades drawn together.
- Any overhead movement during the symptomatic phase → rows and movements below shoulder level until the symptoms settle.
- Heavy shrugs → mid-scapular strengthening; your upper trapezius is already overworked as it is.
- Crunches with the hands laced behind the neck → planks with the neck in line with the spine.
- Pull-ups and heavy dips → light seated lat pulldown on a machine with a backrest.
Manage a bad day, do not cancel it
On days when the symptoms are more awake, make the session smaller rather than skipping it: drop the weight by 30 to 50 percent, cut out the overhead movements and work on the legs and shoulder blades. Cancelling altogether is the right call when the symptoms have travelled further down, new weakness appears, or pain wakes you at night.
A staged return and a weekly template
2 to 3 resistance sessions a week focusing on the back, shoulder blades and legs, plus walking on the other days, is enough; leave a day between two sessions. The return to overhead movements and heavy loads is staged: only after several symptom-free weeks in the arm, with a light load and a gradual increase.
Signs to stop at the gym
Stop the set there and then if: the symptoms travel further down towards the fingers, new tingling or numbness starts, your hand becomes weak, you get dizziness or blurred vision, or a headache starts with one particular movement.
5⚠️ Red flags — see a doctor immediately
These signs mean you should close this article and be seen today:
- Progressive weakness in the hand, or dropping objects
- New clumsiness of the hands or loss of balance while walking (a sign of pressure on the spinal cord)
- Loss of bladder or bowel control
- Symptoms appearing in both hands at the same time
- Neck pain after a blow, an accident or a significant fall
- Fever, chills, persistent night pain, unexplained weight loss or a history of cancer
- Pain that is getting worse after a few weeks despite correct treatment
6✅ Summary and next step
At your age, arm-radiating pain usually follows a favourable course, and most patients get better with non-surgical care over weeks to a few months. Three things are the key: staying active instead of resting completely, correcting your desk and phone layout and your sleeping position, and exercising the neck and shoulder blades regularly with the centralization rule as your compass. Stretching on its own is not enough, and in this version it must be done cautiously. If you have progressive weakness, or the pain worsens despite correct treatment, an examination is needed.
If the pain and tingling in your hand are not improving with this programme, or you are worried about weakness in your hand, book an appointment for an assessment.
To learn more about this area of care, see the spine care page.
Related guides: Service page: Non-Surgical Spine Care · Also related: Low back pain
This content has been prepared for general education only and does not replace an examination and the opinion of your own doctor. If you have any of the red flags above, or your pain has not improved with these adjustments within a few weeks, be examined before continuing the exercises. Adjust the intensity and type of exercise to your own particular circumstances and the opinion of your care team.
View the scientific sources
- Blanpied PR, et al. Neck Pain: Revision 2017. Clinical Practice Guidelines. J Orthop Sports Phys Ther. 2017. doi.org/10.2519/jospt.2017.0302
- Plener J, et al. Conservative Management of Cervical Radiculopathy: A Systematic Review. Clin J Pain. 2023. doi.org/10.1097/AJP.0000000000001092
- Gross A, et al. Exercises for mechanical neck disorders. Cochrane Database Syst Rev. 2015. doi.org/10.1002/14651858.CD004250.pub5
- El-Allawy A, et al. Clinical Practice Guideline: Nonspecific Neck Pain. Dtsch Arztebl Int. 2025. doi.org/10.3238/arztebl.m2025.0119
- Bini P, et al. The effectiveness of manual and exercise therapy on headache intensity and frequency among patients with cervicogenic headache: a systematic review and meta-analysis. Chiropr Man Therap. 2022. doi.org/10.1186/s12998-022-00459-9

Dr. Jalil Emad
Orthopedic specialist and surgeon, board-certified in bone and joint surgery; years of experience in knee and hip replacement, sports injuries and arthroscopy in Isfahan.
Related articles
Low back pain
Explore daily habits and exercise choices for low back pain. Read each guide's description; suitable exercise depends on your symptoms and assessment.
Hydrotherapy for the Low Back: Twenty Aquatic Exercises for Chronic Back Pain
Learn 20 aquatic exercises for low back pain, with water depths, movement instructions and pool safety, guided by your physiotherapy plan.
Total Knee Replacement Surgery: Postoperative Care and Rehabilitation
Read knee replacement recovery step by step, from wound care and medicines to exercise. Progress depends on pain, swelling and movement.