
On this page
🧭 Pick your situation
This guide comes in separate versions for different situations; read the one that matches yours.
Low Back Pain Under 50 Without Disc Involvement: Daily Routines and Exercises
A practical guide for mechanical low back pain under 50: sitting and lifting fixes, a walking programme, six home exercises, gym principles, and red flags.
13 min read
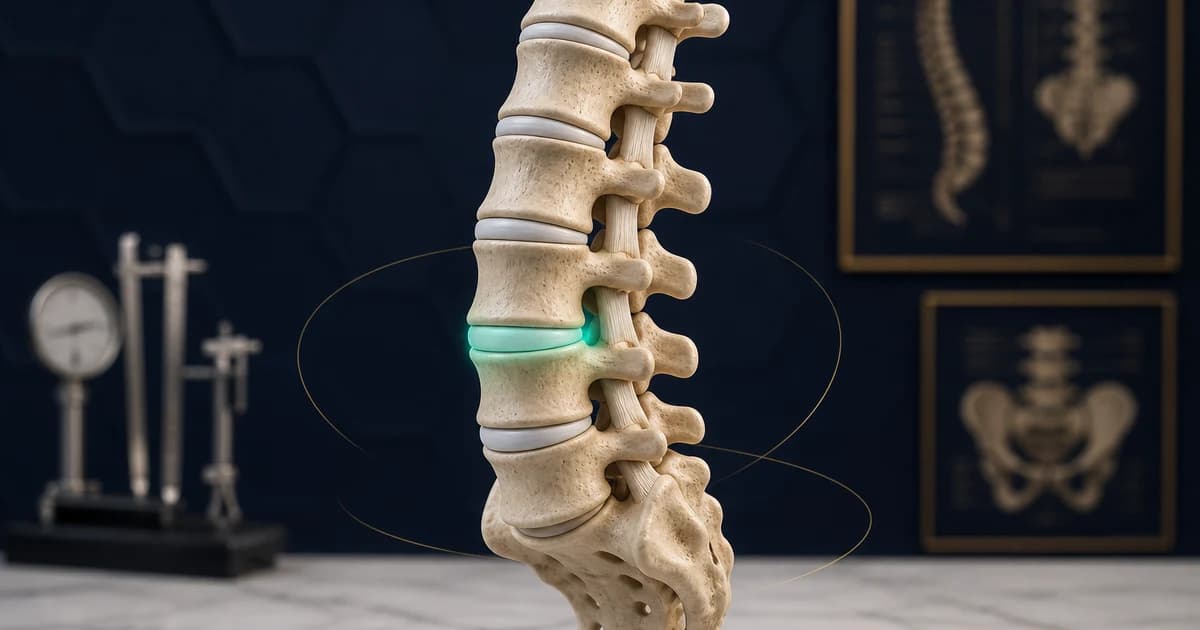
This version is for you if you are under 50 and your back pain is mechanical, with no disc involvement. In this type of back pain, the body is on the side of movement: the more active you stay, the sooner you recover. This article is general education and does not replace an examination; with severe symptoms or red flags, see a doctor first.
1🦴 What is this condition, and what does your version mean?
Mechanical back pain comes from the muscles, ligaments, and small joints of the lower back, and it eases or worsens with movement and posture; in your version there is no sign of pressure on a nerve root (pain radiating down the leg, numbness, or weakness). Its natural course is benign, and most acute episodes settle within a few weeks — provided you stay active and avoid complete bed rest. In this situation, X-rays and MRI are usually unnecessary; clinical guidelines reserve imaging for red flags or for pain that has not improved after about six weeks of proper treatment. Your treatment rests on three pillars: correcting daily habits, regular exercise, and informed patience; medication and physiotherapy are supplements, and decisions about them are made after an examination.
2🏠 Daily routines you should correct
🪑 Break up long sitting
Every 30 to 45 minutes, take a short break to stand up and walk a few steps; a back held still becomes painful sooner.
More detailLess detail
- Set a reminder; a one-minute break is enough. Support the hollow of your lower back with the chair's backrest or a small cushion.
- "The best posture is the next posture": switch between different sitting positions; no single pose is healthy for hours on end.
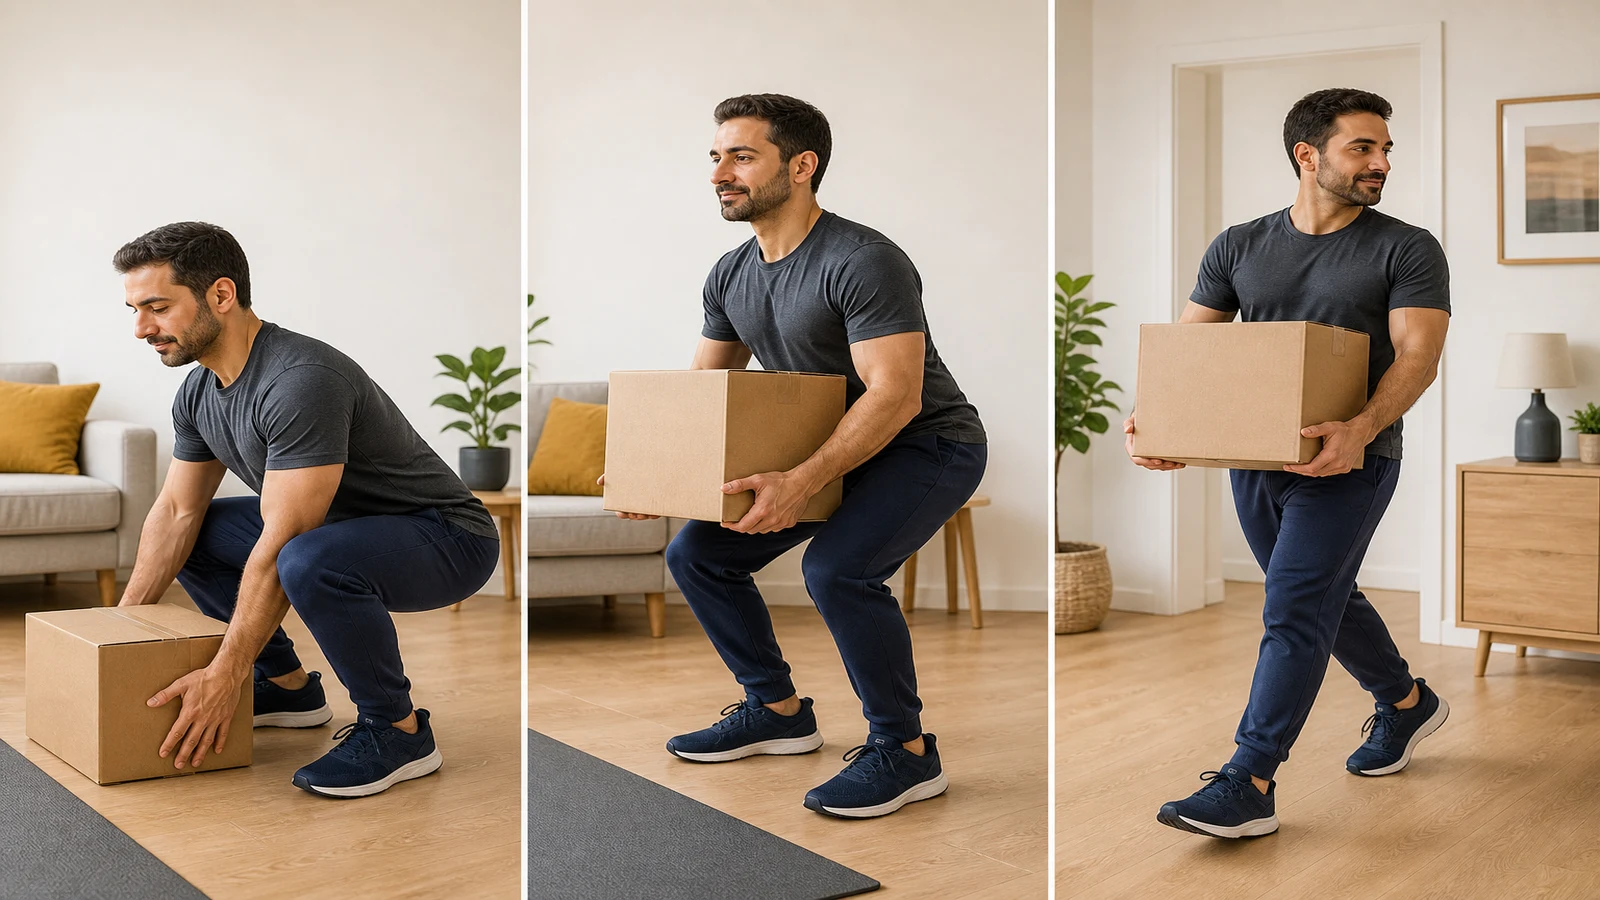
📦 Lift with your legs, not your back
To pick anything up from the floor, bend your knees and keep the object close to your body.
More detailLess detail
- Stand close to the object, lower yourself by bending your knees and hips, and let your legs take the strain of lifting; keep the object pressed close to your body.
- Instead of twisting your back while carrying a load, turn your whole body by stepping around; split a very heavy load into parts or ask for help.
🛏 Tidy up your sleeping position
Sleep on your side with a pillow between your knees, or on your back with a pillow under your knees, so your back stays in a comfortable alignment through the night.
More detailLess detail
- Use a medium-firm, even mattress; a sagging mattress keeps your back bent all night.
- To get up, first roll onto your side, lower your legs over the edge of the bed, and push up with your arm. Getting enough sleep is a treatment in itself.
⚖️ Keep your weight in a healthy range
Every extra kilogram adds to the daily load on your vertebrae; gradual weight loss helps reduce pain.
More detailLess detail
- Instead of a harsh short-term diet, make small sustainable changes: cut out sugary drinks, use a smaller plate, walk daily.
- The walking program in the exercise section also helps with weight control; two birds with one stone.
🚭 Quit smoking
Tobacco reduces the blood supply to the tissues of the spine and is linked to chronic back pain and slower healing.
More detailLess detail
- If quitting completely feels too hard for now, cutting down is a good first step; ask your family doctor for a quit plan.
- Frequent coughing is itself a repeated strain on the back.
😴 Take stress and sleep seriously
Stress keeps the back muscles constantly tense, and lack of sleep lowers your pain threshold.
More detailLess detail
- A few minutes of slow belly breathing each day, walking in fresh air, and a regular bedtime are the simplest tools.
- In this type of back pain, pain does not mean serious damage; knowing this alone reduces the fear of movement, and less fear means less pain.
3🏋️ Home exercises
Exercise is the most effective proven treatment for chronic back pain, and even in the acute phase, staying active beats any amount of rest. Do the exercises within a range free of sharp pain; a gentle stretch and mild fatigue are normal. The doses given are common ranges from exercise-therapy programs, and your care team can adjust them for you.
Progressive Walking (Progressive Walking)
In a large trial, regular walking markedly delayed the recurrence of back pain. Start with 10 minutes and build up over a few weeks to about 30 minutes, five days a week. Stop if you feel sharp pain or pain radiating into a leg.
More detailLess detail
Purpose and rationale: Rhythmic movement improves nourishment of the discs and muscles and reduces fear of movement; it is the backbone of your anti-recurrence program.
Starting position: Comfortable shoes, tall posture; phone in your pocket, not in your hand with a bent neck.
Step-by-step execution:
- In the first week, walk 10 to 15 minutes a day at a comfortable pace.
- Add about 5 minutes each week until you reach 30 minutes.
- Increase your pace until your breathing quickens but you can still hold a conversation.
Documented dose: Target of the recurrence-prevention program: about 30 minutes, 5 days a week.
Stop immediately if: sharp back pain, pain radiating into a leg, numbness, or light-headedness.
Common mistakes: starting with too long a distance; walking with your neck bent over your phone.
Easier version: several short 5-minute walks spread through the day.
Cat–Camel (Cat–Camel)
A gentle movement of the spine between a rounded and an arched position; the best warm-up for the back. 8 to 10 slow repetitions. Stop if you feel sharp pain.
More detailLess detail
Purpose and rationale: Smooths the movement of the vertebrae and reduces stiffness, without loading the back.
Starting position: On all fours; hands under shoulders, knees under hips.
Step-by-step execution:
- As you exhale, gently round your back and drop your head.
- As you inhale, slightly arch your lower back and look up.
- Move between the two positions at a slow rhythm, like a soft wave.
Documented dose: 8 to 10 repetitions, 1 to 2 sessions a day.
Stop immediately if: sharp pain or pain radiating into a leg.
Common mistakes: rushing; pushing to the painful end of the range.
Easier version: halve the range and stay well within the fully comfortable zone.
Glute Bridge (Glute Bridge)
Strong glutes take load off the lower back. 8 to 12 repetitions with a short pause at the top, 2 to 3 sets. Stop if the pain concentrates in your back.
More detailLess detail
Purpose and rationale: The glutes are the main engine for standing up and walking; when they are weak, the burden falls on the lower back.
Starting position: On your back, knees bent, feet flat on the floor hip-width apart.
Step-by-step execution:
- Tighten your abdomen slightly so your back does not over-arch.
- Pressing through your heels, lift your hips until there is a straight line from shoulders to knees.
- Pause for 2 to 3 seconds, then lower slowly.
Documented dose: 8 to 12 repetitions, 2 to 3 sets.
Stop immediately if: sharp back pain or severe cramping in the back of the thigh.
Common mistakes: lifting the hips too high and arching the back; pushing through the toes instead of the heels.
Easier version: a shorter range without the pause, or simply squeezing the glutes.
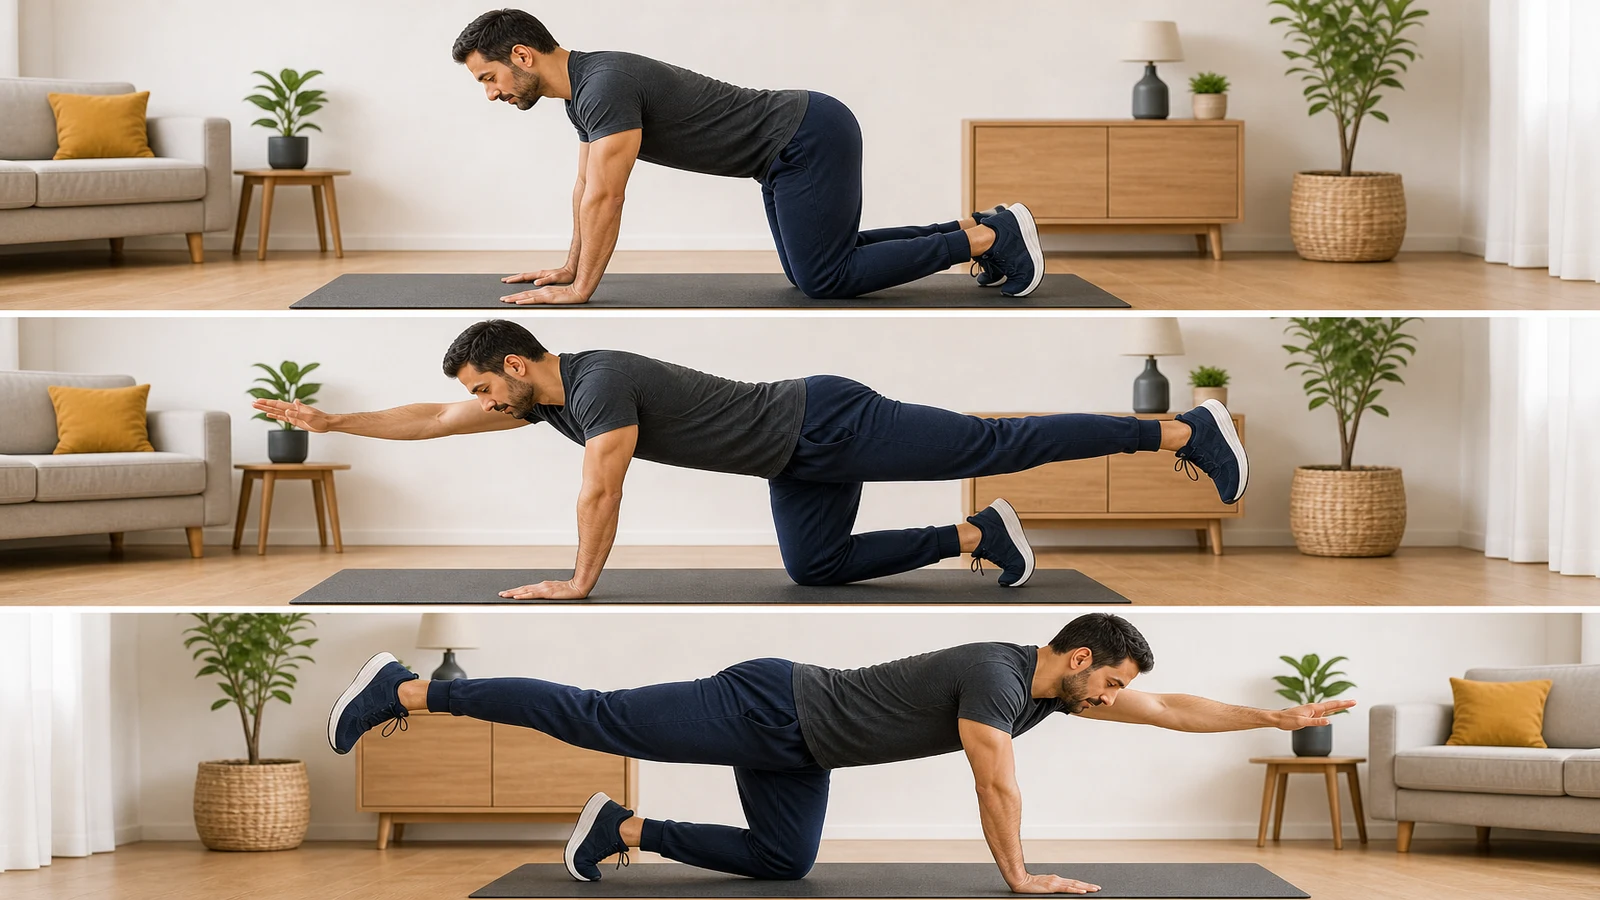
Bird-Dog (Bird-Dog)
The key back-stability exercise: the opposite arm and leg extend without the back twisting. 6 to 8 repetitions per side with a 5-second hold, 2 sets. Stop if your back hurts.
More detailLess detail
Purpose and rationale: Trains "quiet back, moving limbs" — a skill that keeps your back safe in everyday tasks.
Starting position: On all fours, back in its natural position, eyes on the floor.
Step-by-step execution:
- Gently tighten your abdomen, as if fastening an invisible belt.
- Slowly extend your right arm and left leg at the same time until they are in line with your trunk.
- Hold for 5 seconds without letting your pelvis tilt; then switch to the opposite side.
Documented dose: 6 to 8 repetitions per side, 2 sets.
Stop immediately if: sharp pain or repeatedly losing your balance.
Common mistakes: raising the arm and leg above the line of the trunk; rotating the pelvis; holding your breath.
Easier version: extend only the arm or only the leg.
Modified Side Plank (Modified Side Plank)
Strengthens the side muscles that support the trunk from the flanks. 3 to 5 holds of 10 seconds per side. Stop if your shoulder or back hurts.
More detailLess detail
Purpose and rationale: The lateral trunk muscles protect the back from unwanted sideways bending.
Starting position: On your side, elbow under your shoulder, knees bent.
Step-by-step execution:
- Lift your hips until there is a straight line from shoulder to knees.
- Hold for 10 seconds; do not hold your breath.
- Lower slowly and repeat after a short rest.
Documented dose: 3 to 5 holds of 10 seconds per side.
Stop immediately if: sharp pain in your flank, shoulder, or back.
Common mistakes: letting the hips sag; rotating the trunk forward.
Easier version: 5-second holds with more of your weight resting on your knees.
Hip Flexor Stretch (Hip Flexor Stretch)
Prolonged sitting shortens the front of the hip and pulls the lower back into extra arching. Hold 20 to 30 seconds, 2 to 3 times per leg. Stop if your groin or back hurts.
More detailLess detail
Purpose and rationale: Opens the front of the hip so you can stand and walk without extra arching of the lower back.
Starting position: Half-kneeling on one knee; front leg bent, foot flat on the floor.
Step-by-step execution:
- Tighten your buttocks slightly so your pelvis tilts backward.
- Shift your weight gently forward until you feel a mild stretch at the front of the back thigh.
- Hold for 20 to 30 seconds, then return slowly.
Documented dose: 2 to 3 repetitions of 20 to 30 seconds per leg.
Stop immediately if: sharp pain in the groin or back.
Common mistakes: arching the back instead of bringing the pelvis forward; pushing suddenly.
Easier version: the same stretch standing next to a wall, with a smaller range.
4🏟️ Principles of training at the gym
In your version, the gym is not only allowed — regular strength training is one of the best insurance policies for your back. Follow these principles:
- Start every session with 5 to 10 minutes of light aerobic warm-up and the cat–camel.
- Form first, then weight: consolidate your technique with light loads, and increase the load gradually, week by week.
- In the deadlift and squat, keep your back in its natural position and let your hips and legs move the load; ask a coach to teach you these two lifts.
- On days when the pain flares up, do not drop your workout; lighten it: machines instead of free weights, smaller range and lighter weight.
- 2 to 3 strength sessions a week for the trunk, glutes, and legs are enough.
5⚠️ Red flags — see a doctor immediately
These symptoms mean close this article and get seen today:
- Loss of control or retention of urine or stool, or numbness in the genital area
- Progressive leg weakness or a foot that drops while walking
- Persistent night pain that does not ease with rest or a change of position
- Fever, chills, or night sweats accompanying the back pain
- Unexplained weight loss or a history of cancer
- Back pain after a significant blow or fall
6✅ Summary and next step
At your age, mechanical back pain is usually a guest, not a resident — provided you stay active. Break up your sitting, lift correctly, walk every day, and do this article's strengthening exercises two or three times a week. If the pain has not improved after a few weeks, or you notice a red flag, an examination is needed.
If you have questions about your own back, or the pain is not improving with this program, book an appointment for a personalized assessment.
To learn more about this area of care, see the spine care page.
This content is provided for general education only and does not replace an examination and your doctor's advice. If you have red-flag symptoms, or the pain does not improve within a few weeks despite these changes, get examined before continuing the exercises. Adjust the intensity and type of exercise to your own condition and your care team's advice.
View scientific sources
- Hayden JA, et al. Exercise therapy for chronic low back pain. Cochrane Database Syst Rev. 2021. doi.org/10.1002/14651858.CD009790.pub2
- Pocovi NC, et al. Effectiveness and cost-effectiveness of an individualised, progressive walking and education intervention for the prevention of low back pain recurrence (WalkBack): a randomised controlled trial. Lancet. 2024. doi.org/10.1016/S0140-6736(24)00755-4
- Karlsson M, et al. Effects of exercise therapy in patients with acute low back pain: a systematic review of systematic reviews. Syst Rev. 2020. doi.org/10.1186/s13643-020-01412-8
- Bailly F, et al. Clinical guidelines and care pathway for management of low back pain with or without radicular pain. Joint Bone Spine. 2021. doi.org/10.1016/j.jbspin.2021.105227
- Apeldoorn AT, et al. Management of low back pain and lumbosacral radicular syndrome: the KNGF Guideline. Eur J Phys Rehabil Med. 2024. doi.org/10.23736/S1973-9087.24.08352-7
- Hutchins TA, et al. ACR Appropriateness Criteria: Low Back Pain, 2021 Update. J Am Coll Radiol. 2021. doi.org/10.1016/j.jacr.2021.08.002

Dr. Jalil Emad
Orthopedic specialist and surgeon, board-certified in bone and joint surgery; years of experience in knee and hip replacement, sports injuries and arthroscopy in Isfahan.
Related articles

Total Knee Replacement: The Pre-Operative Guide
What to know before knee replacement: what knee osteoarthritis is, what happens if you do not operate, how to prepare, what takes place in the operating room, and answers to 20 questions about returning to daily life.
Carpal Tunnel Release Surgery: Wound Care and Finger Movement
A short, evidence-based guide to the first days after carpal tunnel release—from the dressing, showering and warning signs to finger movement, returning to work and common questions.
Latarjet Shoulder Surgery: Postoperative Care and Rehabilitation
A complete, criteria-based guide to surgery day and care after Latarjet shoulder surgery—from wound care, sling use, medicines, and warning signs to the first 90 days of rehabilitation and a safer return to activity.