
On this page
- 🏥 What happens on ACL surgery day?
- ⚠️ Warning signs: when should you call urgently?
- 1Care during the first days after surgery
- 🛡️ First two weeks
- ↔️ Weeks three to six
- 🌱 After week six: days 43–60
- 🏋️ Month 3: days 61–90
- 🎯 After 90 days: running and return to sport
- 🚗 Driving, work, prayer and daily activities
- ❓ Frequently asked questions
- ✅ Summary and appointments
- 📚 Scientific references
ACL Reconstruction with a Complex Meniscal Repair: Care and Rehabilitation
If your meniscus was repaired alongside your ACL reconstruction and the tear was radial, root or horizontal: no weight goes on the operated leg for six weeks and the knee stays within 90 degrees; standing exercises begin after those six weeks.
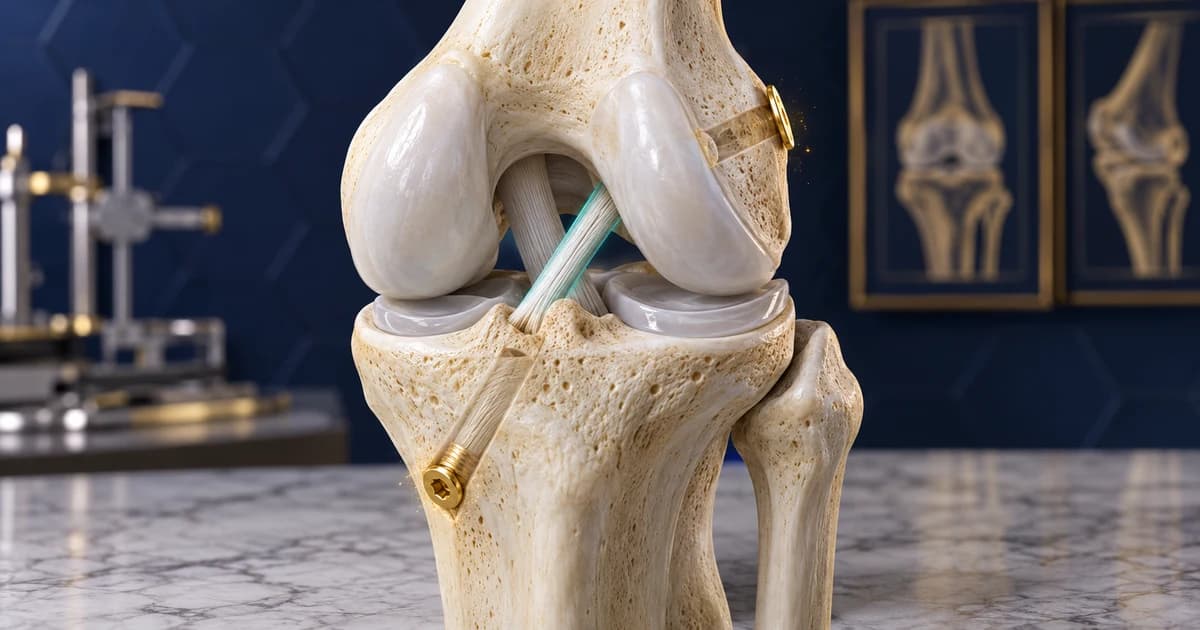
🧭 What was done to your meniscus (the shock-absorbing cartilage inside the knee)?
The weight-bearing and knee-bend limits of the first weeks depend on this. If you are not sure which is yours, ask at your first visit and follow the stricter version until then.
🏥 What happens on ACL surgery day?
Anaesthesia: Surgery may use general or spinal anaesthesia. Sometimes the nerves around the surgical area are temporarily numbed with a nerve block to control pain in the first hours. Your anaesthetist will explain the appropriate option.
Recovery and stay: Pain, nausea, alertness, blood circulation and sensation in the foot, and safe crutch use are checked after surgery. Dr. Emad's plan includes an overnight stay; your readiness for discharge is also assessed.
At discharge: you receive a discharge sheet with care instructions, the prescription for your medicines, walking aids (such as crutches) and a knee brace — in Dr Emad’s programme every patient is given a brace. Arrange for someone to take you home.
Pain and swelling: both are expected early, but do not assume that increasing or uncontrolled pain, or sudden or increasing swelling, is normal; in those cases, contact your care team the same day.
⚠️ Warning signs: when should you call urgently?
Same-day contact with your care team: steadily increasing wound redness, warmth or drainage, wound edges opening, thick foul-smelling discharge, a fever of 38.5°C or above, pain not controlled by the prescribed plan, sudden or increasing swelling, substantial calf or thigh pain and swelling even without breathlessness or chest pain, numbness that is still there after one week or new numbness appearing after that, or sudden loss of a movement you could previously perform.
Seek emergency help: shortness of breath, chest pain, a very fast heartbeat, coughing blood, fainting, a cold or blue foot, progressive weakness or numbness, or substantial calf or thigh pain and swelling together with breathlessness or chest pain. In Iran, call emergency medical services on 115.
If your symptom is on neither list above, first look at the section of this guide that covers it. If you are still worried, then today call Dr. Jalil Emad’s office at 09137825207, or book an appointment online. In an emergency, do not wait for a response from the office.
1Care during the first days after surgery
During the first few days, the knee is not expected to be completely free of pain or swelling. The aim is to keep both manageable, keep the incision clean and dry, and begin simple movement without adding unnecessary stress. Work through the steps below calmly and consistently; that routine usually makes the early days more predictable.
🩹 Wound care and dressing changes
Seeing the incision or changing the first dressing can feel unsettling, but there is no need to rush. Take a few minutes, set out the supplies first and work through each step calmly; the aim is simply to keep the wound clean and dry without unnecessarily disturbing healing skin.
More detailLess detail
- Before you begin, wash your hands with soap and water and prepare the supplies on a clean surface.
- Do not open the dressing before your first clinic visit, 10 to 14 days after surgery; it is changed at that visit, in the clinic. Only if it becomes wet, dirty, loose or soaked with blood or drainage before then, replace it at that moment with a clean, dry dressing and call for an earlier appointment.
- Peel the outer layer slowly from one corner. If an area sticks, do not pull suddenly; sutures, skin adhesive, narrow closure strips and scabs should remain in place. Under Dr. Emad's plan, sutures that need removal are taken out 2 to 3 weeks after surgery.
- Look briefly at the wound and surrounding skin without pressing. Do not touch the incision line, pull the edges apart or leave the dressing off longer than needed.
- Wash the wound with clean water, with mild soap if needed, then pat it dry with a clean towel. Do not put alcohol, hydrogen peroxide, povidone-iodine, ointment or a new solution on the incision line; these irritate healing skin and slow it down.
- Finish with a clean, dry dressing that is not tight. The tape should hold it in place without pulling the skin or causing numbness or a colour change.
- A small clear or pale-pink stain can appear during the first few days, but it should lessen from day to day. If the drainage does not lessen from day to day or increases, or if you see increasing redness or warmth, wound-edge separation, or thick foul-smelling drainage, read the warning-sign section and follow what it says.
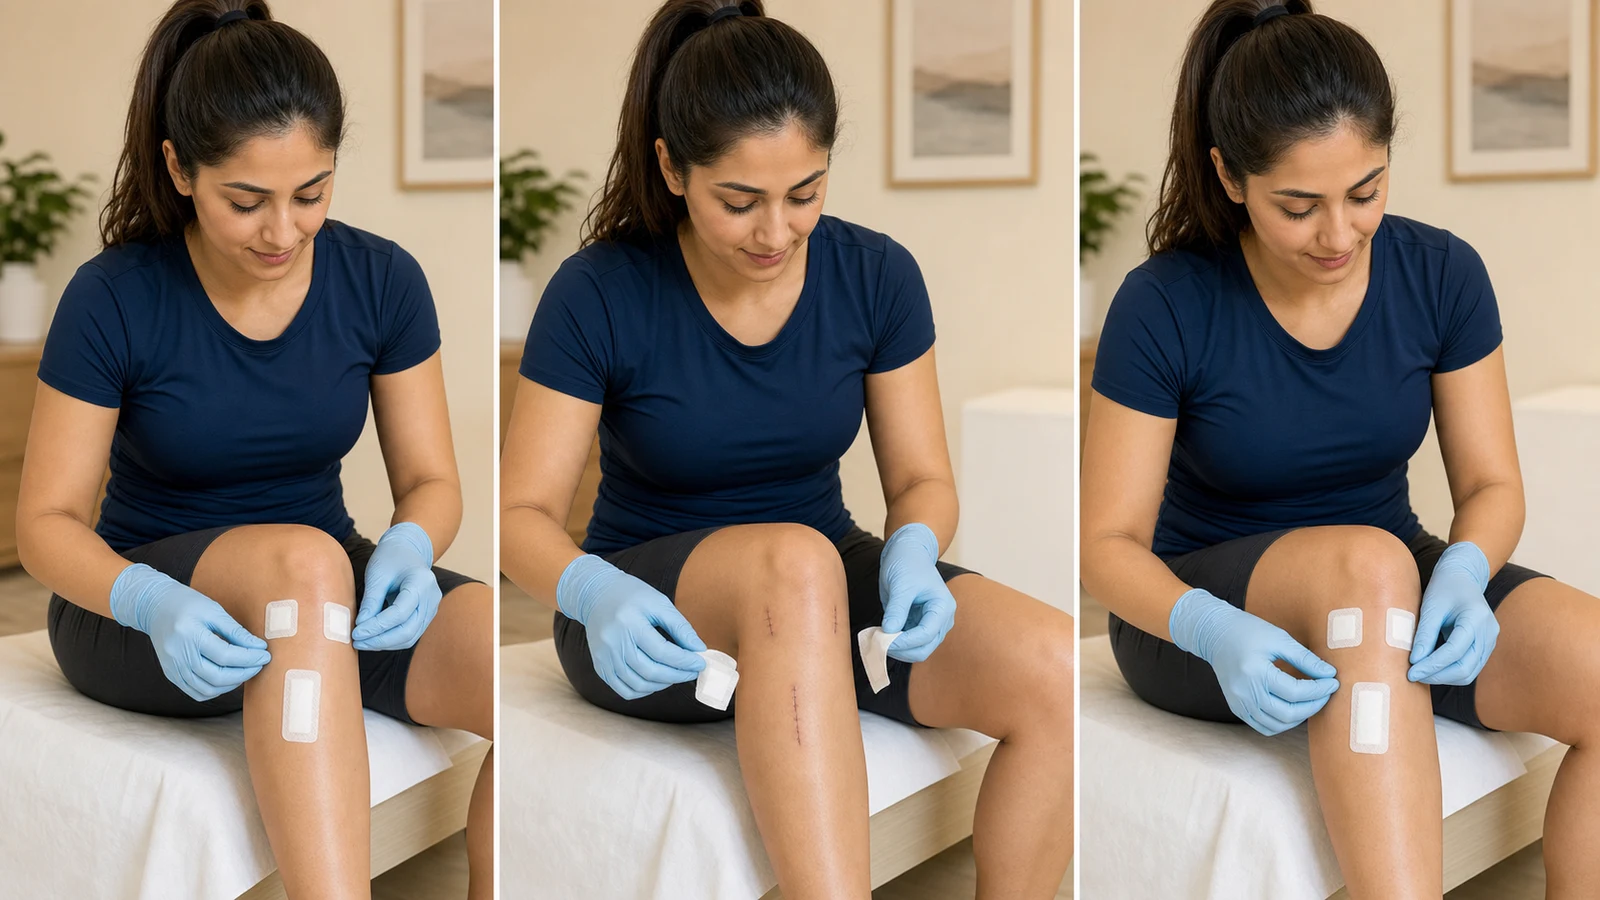
🚿 Waterproof dressings and showering
The key when showering is to stop water getting underneath the dressing and avoid rubbing healing skin.
More detailLess detail
- From 48 hours after surgery you may take a short shower, provided the wound is dry and the waterproof dressing is intact.
- Do not aim a forceful stream directly at the knee or scrub the incision with soap or a washcloth. Afterwards, pat around the dressing dry with a towel.
- The waterproof cover goes over your own dressing and does not replace it; after each shower take off only the cover and leave the dressing underneath alone. Replace it straight away if an edge lifts, water gets underneath or it becomes dirty.
💊 Your medicines and how to take them
Not every patient is prescribed all of these medicines. Read the amount and duration from your own prescription, and if you are unsure, ask your doctor or pharmacist.
More detailLess detail
- Cephalexin: This antibiotic prevents infection at the surgical site and is taken for 7 days. If hives, swelling of the face or shortness of breath appear, stop the medicine and call emergency services right away.
- Aspirin or apixaban: To prevent blood clots in the leg veins after surgery, Dr Emad prescribes one of these two depending on your risk. Take it at a fixed time, do not stop it on your own, and if bleeding will not stop or you see black stools or red urine, call the clinic right away, and if you get no answer, go to the emergency department.
- Famotidine or pantoprazole: One of these two medicines is prescribed to protect the stomach from pain relievers and aspirin. Take it as prescribed.
- Collagen: Collagen is a food supplement, not a medicine. In Dr Emad’s programme 10 g of collagen a day is recommended until the end of the third month after surgery; take it alongside your physiotherapy exercises, not instead of them.
- Alprazolam: This calming medicine is prescribed only in the first days, when needed. On days when you take oxycodone, do not take alprazolam, because together these two medicines can slow your breathing dangerously.
- Gabapentin: In Dr Emad’s programme, gabapentin is sometimes prescribed alongside pain relievers to reduce pain after surgery. Do not stop this medicine suddenly.
- Acetaminophen with codeine: This tablet contains codeine, an opioid pain medicine; take it only when you are in pain, and for as long as you are taking it, do not take any other medicine that contains acetaminophen, such as a cold tablet, syrup or powder. This tablet may cause constipation. If you are breastfeeding, tell your doctor before taking it.
- Oxycodone: Take this opioid pain medicine only if it is on your prescription and you need it; it is usually not needed for more than a few days. On days when you take it, do not take alprazolam and do not drink alcohol.
- Vitamin D: Vitamin D helps the body absorb calcium, and calcium is needed to build bone; the new ligament heals into this bone. In Dr Emad’s programme 1000 to 2000 units a day are taken for 3 months; do not take more than this.
- Vitamin C: The body needs vitamin C to make collagen and to heal wounds and tissue. In Dr Emad’s programme 1000 milligrams of vitamin C a day are taken for 6 weeks.
- Write down each medicine and the time of each dose, and if a dose is missed, do not double the next one.
- Do not add a new medicine, supplement or herbal product without asking your doctor or pharmacist, because it may interact with your clot-prevention medicine.
- While you are taking alprazolam, gabapentin or an opioid pain medicine, do not drive and do not drink alcohol, and keep opioid pain medicines out of children’s reach. If severe sleepiness or slow breathing occurs, the people with you must call emergency services right away; the emergency number is in the “Seek emergency help” box in the warning signs section.
🧊 Managing pain and swelling
Some swelling, bruising and warmth around the knee is common at first. The overall trend should be towards improvement. If today’s activity leaves pain or swelling clearly worse the next morning, reduce the amount of activity by one step.
More detailLess detail
- Apply a cold pack for 15 to 20 minutes per session and, in the first days, repeat after every exercise session and after every walk. Keep a thin cloth between the pack and your skin, and do not exceed 20 minutes per session.
- Check skin colour and sensation after each session. Marked whitening, persistent numbness or burning pain means remove the pack and wait until the skin is normal before using it again.
- When resting, place the calf and heel on several pillows so the knee is above heart level. Do not put the pillow directly behind the knee; the knee needs an opportunity to regain full extension.
- A compression wrap should support the leg, not squeeze it. The toes should remain warm, pink and normally sensitive; loosen a wrap that is too tight.
- Do not stay completely still. Alternate rest with brief, regular movement to reduce knee stiffness and sluggish circulation.
🚶 Walking, brace and everyday activity
Because your meniscal tear was a complex one, no weight goes on the operated leg for the first six weeks: you walk on two crutches and the foot only touches down for balance. The crutches are needed for six weeks. This rule holds in every section and exercise of this guide. Every patient is given a brace: locked straight for walking and for sleeping, opened for range-of-motion exercises, and in this version left off at the end of week six, when the non-weight-bearing period ends. The early goal is short, safe walks on two crutches, with no weight on the operated leg.
More detailLess detail
- Take several short walks through the day. When turning, use small steps; do not pivot on the operated leg or change direction suddenly.
- Do not stop using the crutches before the end of week six. In this version six weeks is a floor, not a target; after that the condition is still that you can tighten the front-thigh muscle firmly, keep the knee straight while walking, and walk without a limp or increased pain or swelling. Drop one crutch first, then the second a few days later.
- On stairs, lead with the sound leg going up. Going down, put the crutches on the lower step first, then bring the unoperated leg down, keeping the operated leg on the step until the last moment so that it controls the descent. Use the rail until balance is reliable.
- Begin ankle pumps (gently pointing the foot up and down) and tightening of the muscle at the front of the thigh (the quadriceps) in several short sessions during the first days. Keep the knee straight when resting and do not place a pillow directly underneath it.
- Keep pathways at home clear and well lit. Remove loose rugs and cables, keep essentials within reach and switch on a light for night-time trips to the bathroom.
🦾 PRP injections: a treatment made from your own blood
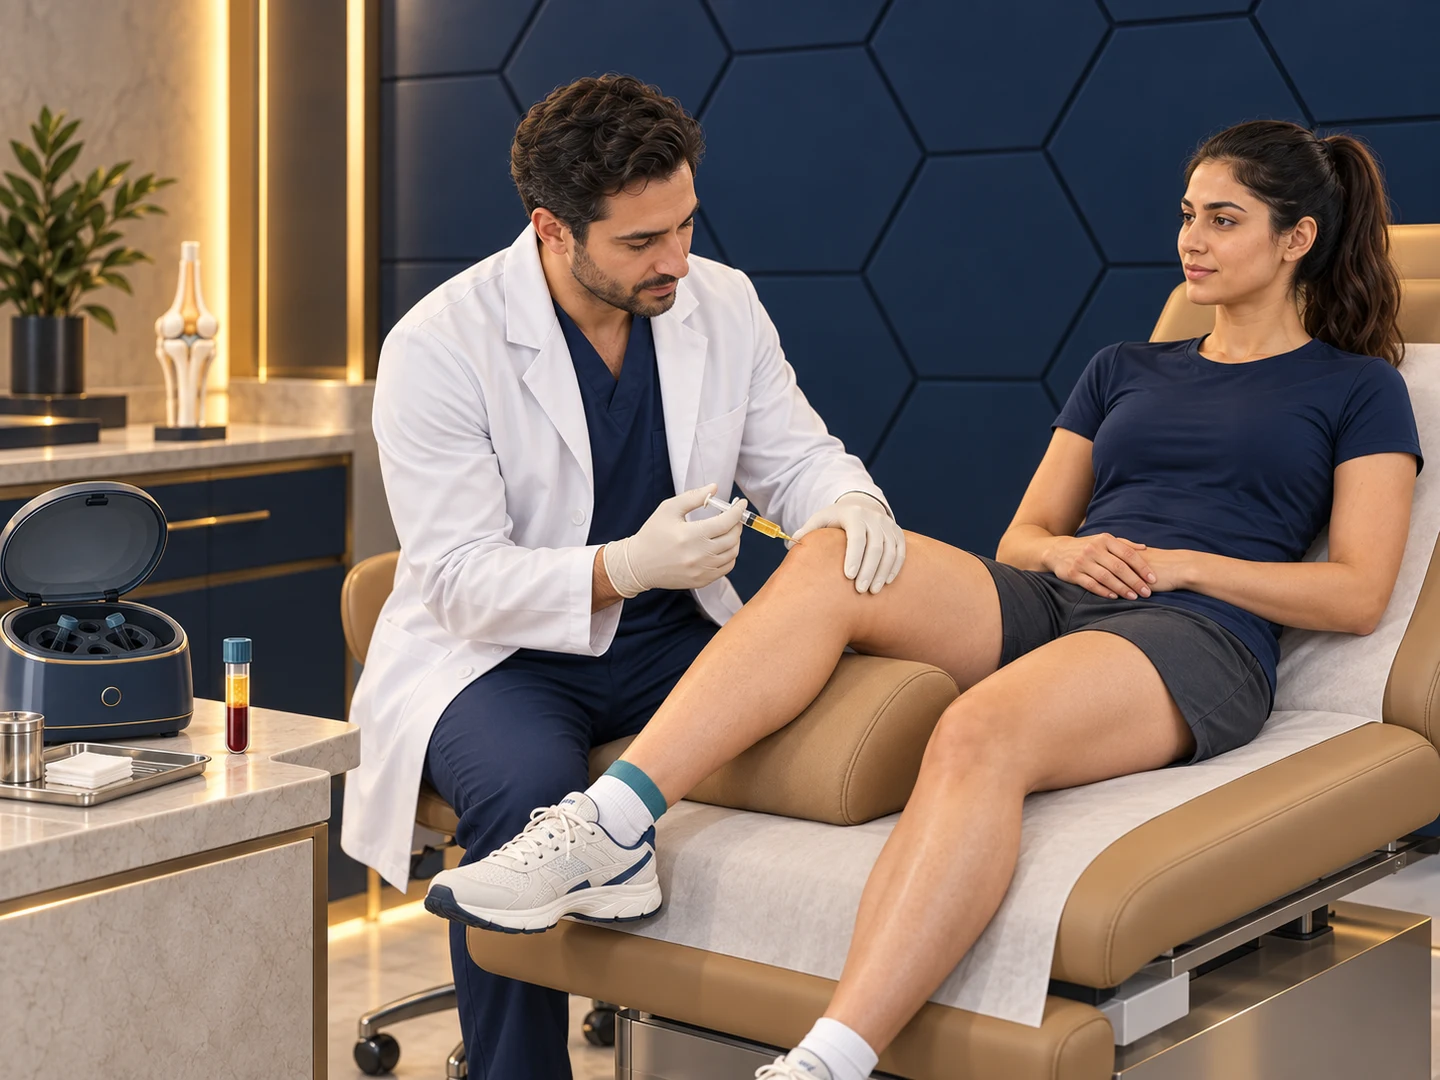
In Dr Emad’s programme, alongside your exercises, platelet-rich plasma (PRP) injections are used: a treatment made from your own blood to help the knee heal.
More detailLess detail
- Help from your own blood: Platelet-rich plasma (PRP) is a part of your own blood in which the platelets have been concentrated, and it can help your body heal. Platelets carry hundreds of proteins called “growth factors” that are very important in healing injuries. To prepare PRP, a small amount of your blood is drawn and spun in a machine so that the platelets separate and reach 5 to 10 times their usual concentration. This fluid, made from your own blood, is then injected into the knee.
- A more mature new ligament, and doing better in sport and recreation: The new ligament has to heal gradually into the bone and turn into living, strong tissue. In a trial of 120 patients who had PRP injected into the knee after surgery, the new ligament looked more mature on MRI six months later, and patients were doing better in sport and recreational activities.
- Less pain in the first months: In a review of 24 trials, knee pain three months after surgery was significantly lower in the PRP group. In these studies PRP was given during surgery or shortly afterwards.
- If your meniscus was also repaired: Parts of the meniscus, the cartilage cushion inside the knee, get little blood; PRP brings the growth factors of your own blood right into the knee. Research is still ongoing, and every body responds a little differently.
- PRP at Dr Emad’s clinic: In Dr Emad’s programme, PRP is given as an injection into the knee after surgery, not during the operation. It is usually injected 2 times after an ACL reconstruction on its own, and 2 to 3 times if the meniscus was also repaired. The first injection is given about 2 weeks after surgery, and the spacing between injections is set according to your condition and the treatment team’s judgement. Whether PRP suits you is decided according to the condition of your knee.
🛡️ First two weeks
In this version no weight goes on the operated leg for the first six weeks and the knee does not bend past 90 degrees. Every exercise in this stage is done lying or sitting and fits both rules.
During the first two weeks, the goals are to control pain and swelling, keep the knee able to straighten and activate the front-thigh muscle. Start simple movements and short walks with the prescribed aid; do not pivot on a planted foot or place a pillow directly under the knee.
Each exercise carries its own starting condition on its own card. Reduce activity if pain or swelling is worse by the next day. The brace stays locked for walking and is opened for range-of-motion exercises; in this version it is left off altogether at the end of week six, and the crutches also stay until the end of week six, because until then no weight goes on the operated leg. Wherever you see “the reference rehabilitation protocol”, that means the published programmes listed in this article’s sources.
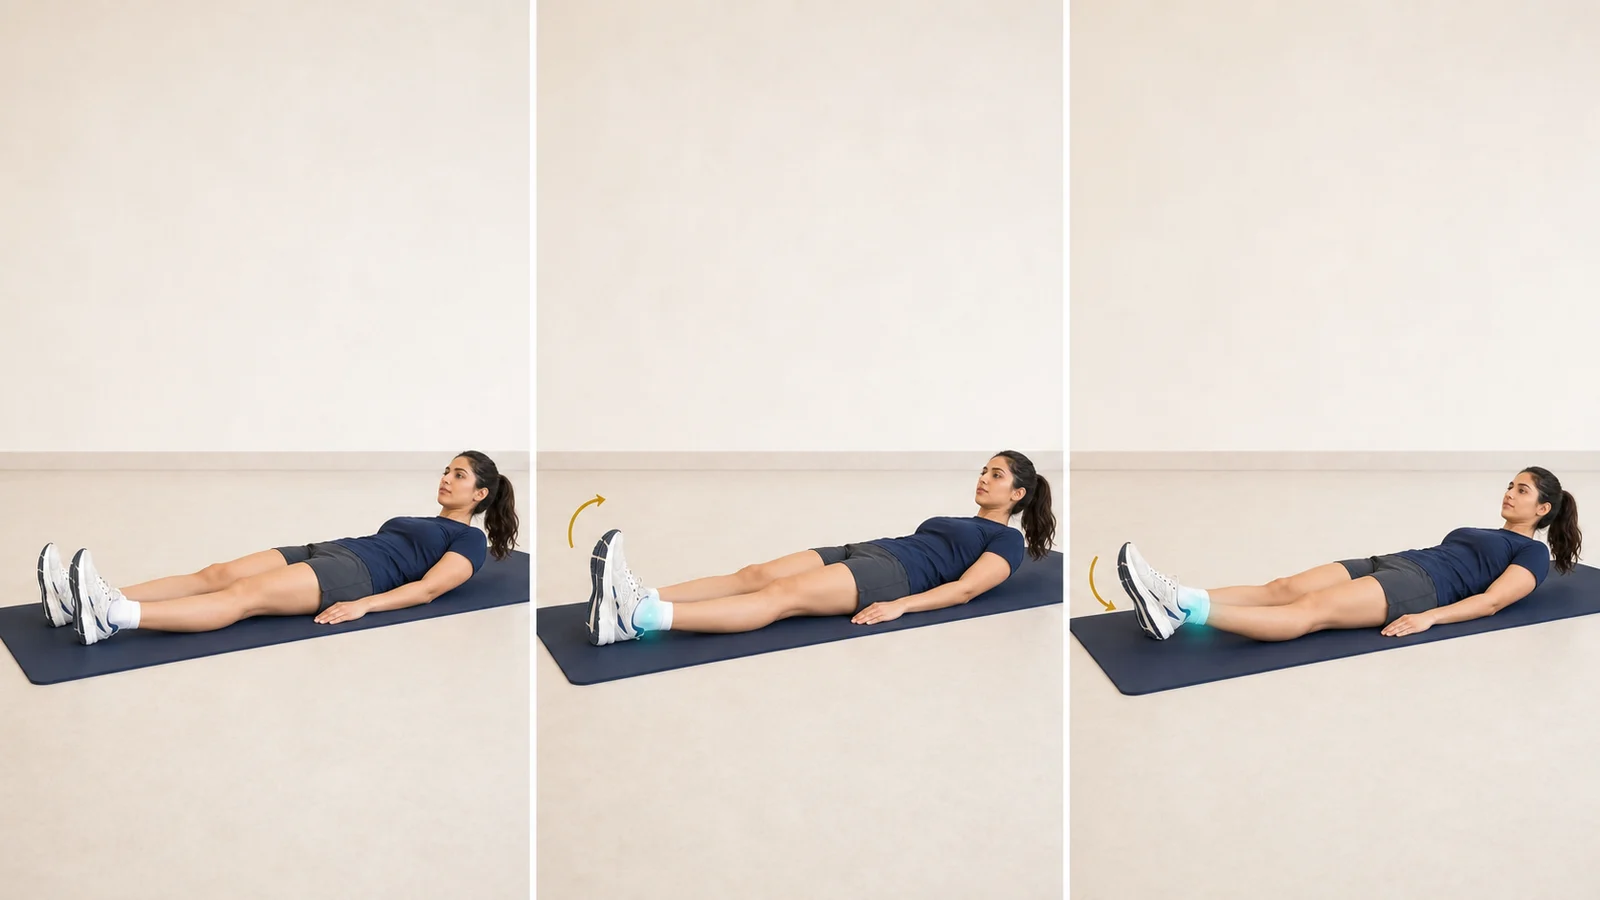
1) Ankle Pumps
Moving the ankle keeps the calf muscles active during the low-movement period. From the first hours after you are alert, 15 repetitions every waking hour. Stop if you develop new calf pain or tightness, new or increasing swelling in one leg, new local warmth or redness, or shortness of breath, and act immediately as described in the warning-sign section.
More detailLess detail
Before you start: Moving the ankle keeps the calf muscles active while you are less mobile and helps blood return from the leg. From the first hours after you are alert, lie on your back or recline with your calf and heel supported and your brace in its prescribed position. No equipment is needed; free the ankle from the bedclothes.
How to do it:
- Keep the thigh and knee still; only the ankle is meant to work.
- Draw the toes slowly toward your face until you feel a mild stretch behind the calf.
- Without rotating the leg, point the toes away from you.
- Return to the middle position and start the next repetition without any jerk.
Movement tips: Move only the ankle, slowly and steadily; keep the thigh and knee still and do not rotate the leg. Breathe freely and do not force the end of the movement. A mild calf stretch is expected; if the calf becomes tired, rest briefly and elevate the leg, with the support under the calf and heel, not under the knee.
Amount, repetitions and progression: In the reference rehabilitation protocol, 15 repetitions every waking hour. Do not drop this exercise; keep it up during long periods of sitting and travel.
Stop immediately if: you develop new calf pain or tightness, new or increasing swelling in one leg, new local warmth or redness, or shortness of breath; the warning-sign section explains what to do.
Common mistakes: Fast, jerky movement, holding the breath, and rotating the whole leg instead of moving the ankle.
Easier version: Make the range smaller and move only as far as is comfortable; even a short movement beats staying still.
2) Tightening the front thigh muscle without moving the knee (Quadriceps Set)
Activates the front thigh muscle so the knee can stay straight. 12 repetitions, three times a day. Stop if you develop sharp knee pain, or the knee swells more than it did before the exercise.
More detailLess detail
Before you start: This exercise helps reactivate the front-thigh muscle and control a straight knee. From the first day, lie on your back on a firm bed with the operated leg straight and toes pointing toward the ceiling. Protect the wound and brace; resting a hand on your thigh helps you feel the contraction.
How to do it:
- Keep the toes pointing up and do not rotate the leg.
- Tighten the front thigh muscle; the kneecap usually moves slightly upward.
- Bring the back of the knee closer to the bed without lifting the heel.
- Hold the contraction for as long as you can feel the muscle firm under your hand, then release slowly.
- Let the muscle relax completely before the next repetition.
Movement tips: Keep the knee straight and heel on the bed; a visible muscle tightening or slight kneecap movement indicates contraction. Breathe out as you tighten and fully relax between repetitions. Brief thigh fatigue is expected; do not squeeze the buttocks instead of the thigh or open the brace without instructions.
Amount, repetitions and progression: In the reference rehabilitation protocol, 12 repetitions three times a day. Hold each contraction for as long as you can feel the muscle tighten under your hand. If pain lasts into the next day or increases, reduce the number of sessions. Once the contraction is clear and the knee stays straight while you tighten, move on to the straight leg raise.
Stop immediately if: you develop sharp knee pain, or the knee swells more than it did before the exercise.
Common mistakes: Pushing with the buttock instead of the thigh, holding the breath, lifting the heel off the bed, and not releasing the muscle fully between repetitions.
Easier version: Use a shorter, gentler contraction, or rest your hand on the thigh so you can feel it working; if you still cannot tighten the front thigh muscle, tell your physiotherapist.
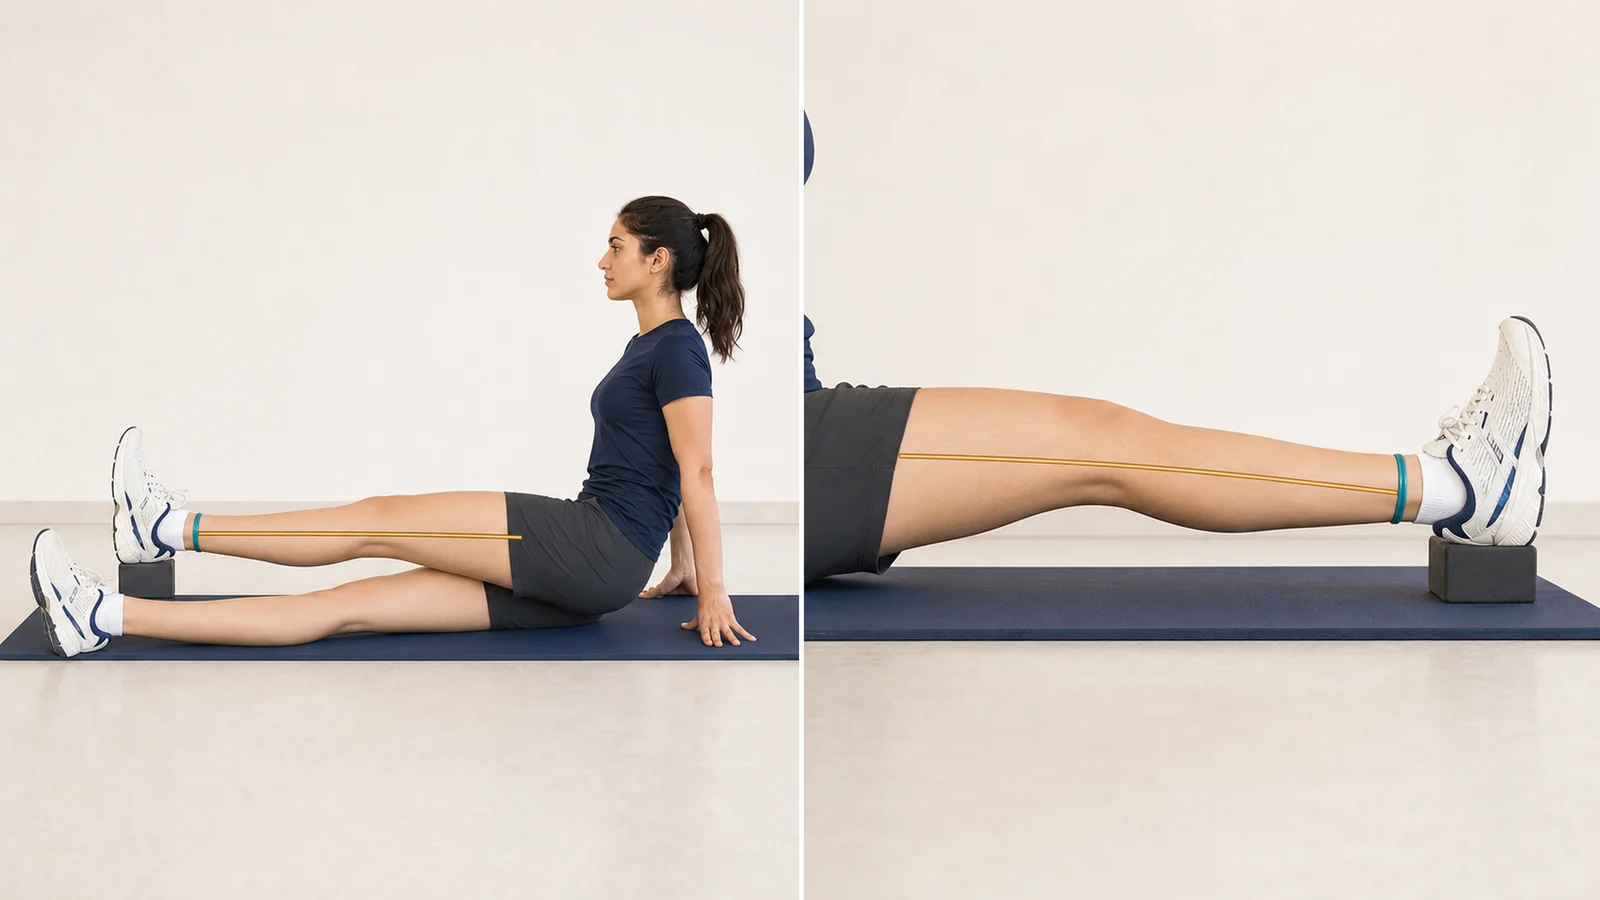
3) Heel Prop
Uses the lower leg’s weight to help the knee straighten. The reference rehabilitation protocol suggests about 5 minutes of gentle stretch. Stop if you develop pins and needles, numbness, a colour change in the foot or sharp pain; if it does not settle once you take the leg off the support, follow the warning-signs section.
More detailLess detail
Before you start: The aim is to restore straightening of the operated knee. From the early days, lie on your back or recline. Place a folded towel or firm pillow under the heel only, leaving the knee unsupported and toes pointing up. If your meniscus was repaired, follow the knee-bend limit given in the meniscus answer.
How to do it:
- Place the heel on the support so the back of the knee touches nothing.
- Let the thigh muscles go completely; this exercise works by relaxing, not by forcing.
- Allow the weight of the lower leg to draw the knee slowly toward straight.
- Do not press the knee down with your hand or a weight.
- To finish, use the sound leg to help the operated leg off the support.
Movement tips: Let the lower leg’s weight create a gentle stretch behind the knee; do not push the knee backward or put a weight on it. Breathe calmly and remain still. Between sessions, rest the leg comfortably and move the ankle. The knee should gradually straighten further, without sharp pain. If the knee is slow to straighten, do the same stretch lying face down as well: lie on your front on the bed with the thigh supported to just above the kneecap and the lower leg hanging over the edge, and let its weight open the knee slowly. In that position the muscle must be completely relaxed, and put nothing under the ankle.
Amount, repetitions and progression: In the reference rehabilitation protocol, about 5 minutes of gentle stretch per session, and 20 to 30 minutes in the prone version. Do this stretch two to three times a day. Do not increase the time or the pressure yourself; once the knee is as straight as the other leg, hold on to that range.
Stop immediately if: you develop pins and needles, numbness, a colour change in the foot or sharp pain, especially behind the knee; if it does not settle once you take the leg off the support, follow the warning-signs section.
Common mistakes: Putting the support under the knee itself instead of the heel, pressing the knee down by hand, and keeping the thigh tight the whole time.
Easier version: Use a lower support or halve the time; if the back of the knee is sensitive, stay there only a few seconds at first.
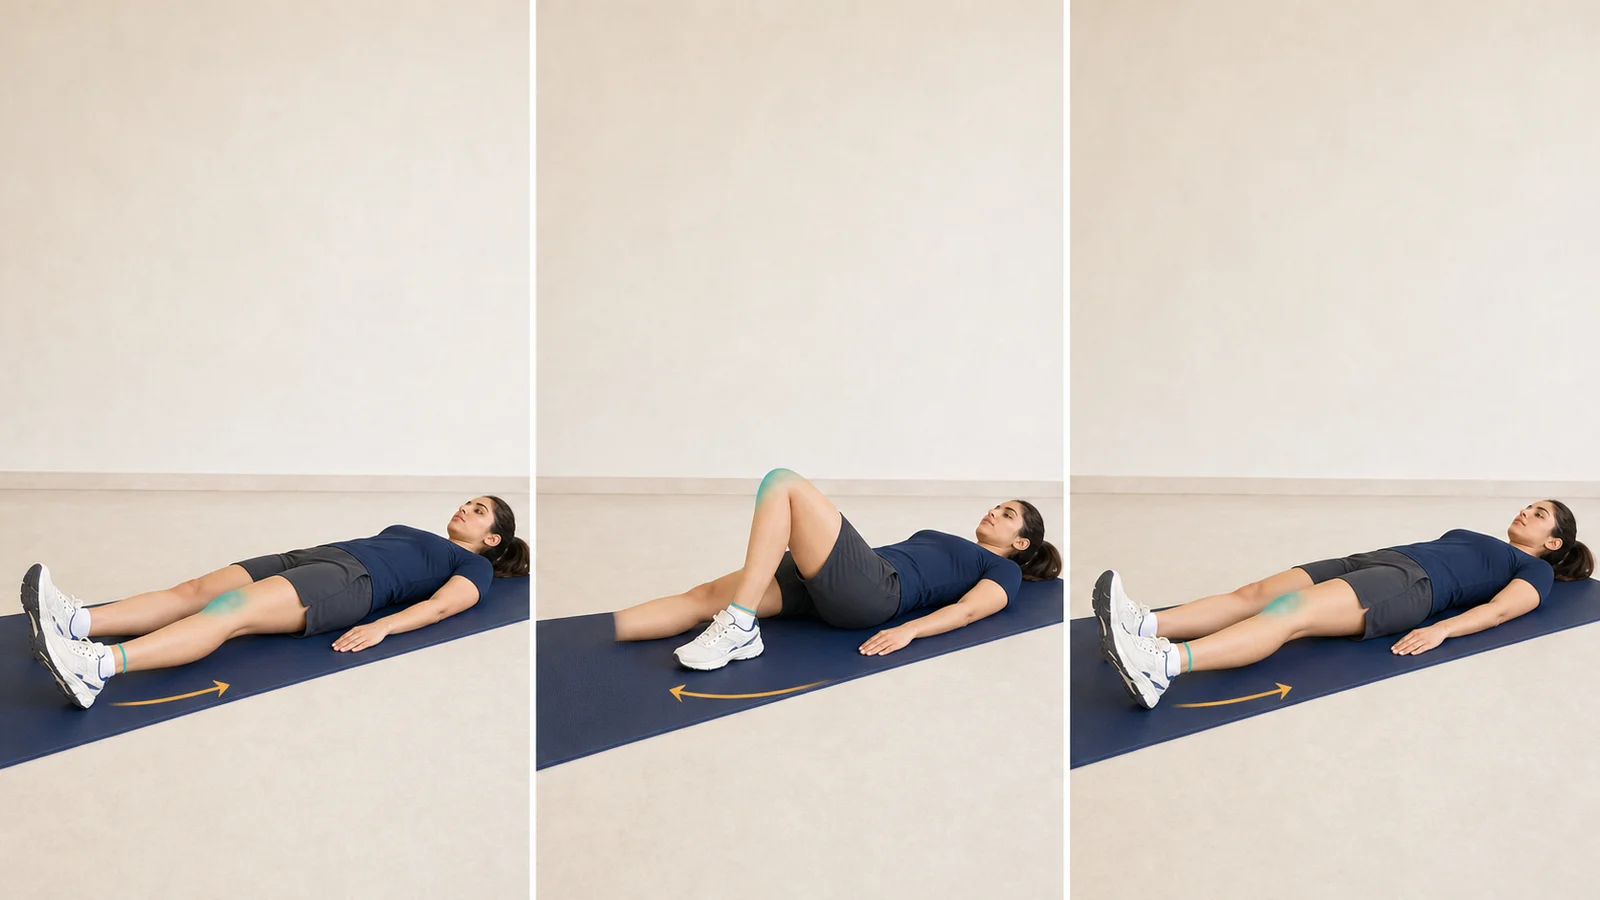
4) Heel Slides
Helps restore knee bending within the permitted range. In the reference rehabilitation protocol, 10 to 20 repetitions, three to four times a day, within that week’s permitted range. Stop if you develop sharp pain or a locking sensation.
More detailLess detail
Before you start: This movement restores knee bending within the permitted range and is used from the early days of rehabilitation. Lie on your back on a bed or a clear, level floor, with the operated heel on a towel or sliding surface, pelvis level and toes pointing up.
How to do it:
- Slide the heel slowly toward your buttock; if you cannot manage it on your own, loop a sheet or long towel around the foot and help gently with your hands.
- Keep the knee in line with your toes and do not let it fall inward.
- Pause briefly at the permitted limit, without forcing the stretch.
- Slide the heel back under control until the knee is fully straight.
- Take one calm breath before the next repetition.
Movement tips: Move only within your permitted range, without rotating the leg or moving the pelvis. Breathe out as you bend and in as you return; a mild stretch is acceptable, sharp pain is not. Rest with the leg straight between sessions. For a hamstring graft, the reference rehabilitation protocol uses a towel or sheet to assist so the hamstrings do not contract actively. Learn the assistance technique from your physiotherapist and do not force the knee to bend.
Amount, repetitions and progression: In the reference rehabilitation protocol, 10 to 20 repetitions, three to four times a day. In this version the knee stays within 90 degrees until the end of week six and no further; after week six, if your doctor or physiotherapist clears it at an examination, the goal becomes 120 degrees. If clear swelling remains after exercise, reduce the range.
Stop immediately if: you develop sharp pain or a locking or catching sensation; if the sharp pain, locking or catching does not settle once you stop the exercise, follow the warning-signs section.
Common mistakes: Pulling the sheet suddenly and hard, lifting the pelvis off the bed, rotating the foot outward, and snapping back to straight.
Easier version: Use a shorter range, or use the sound leg behind the operated leg to keep the movement controlled.
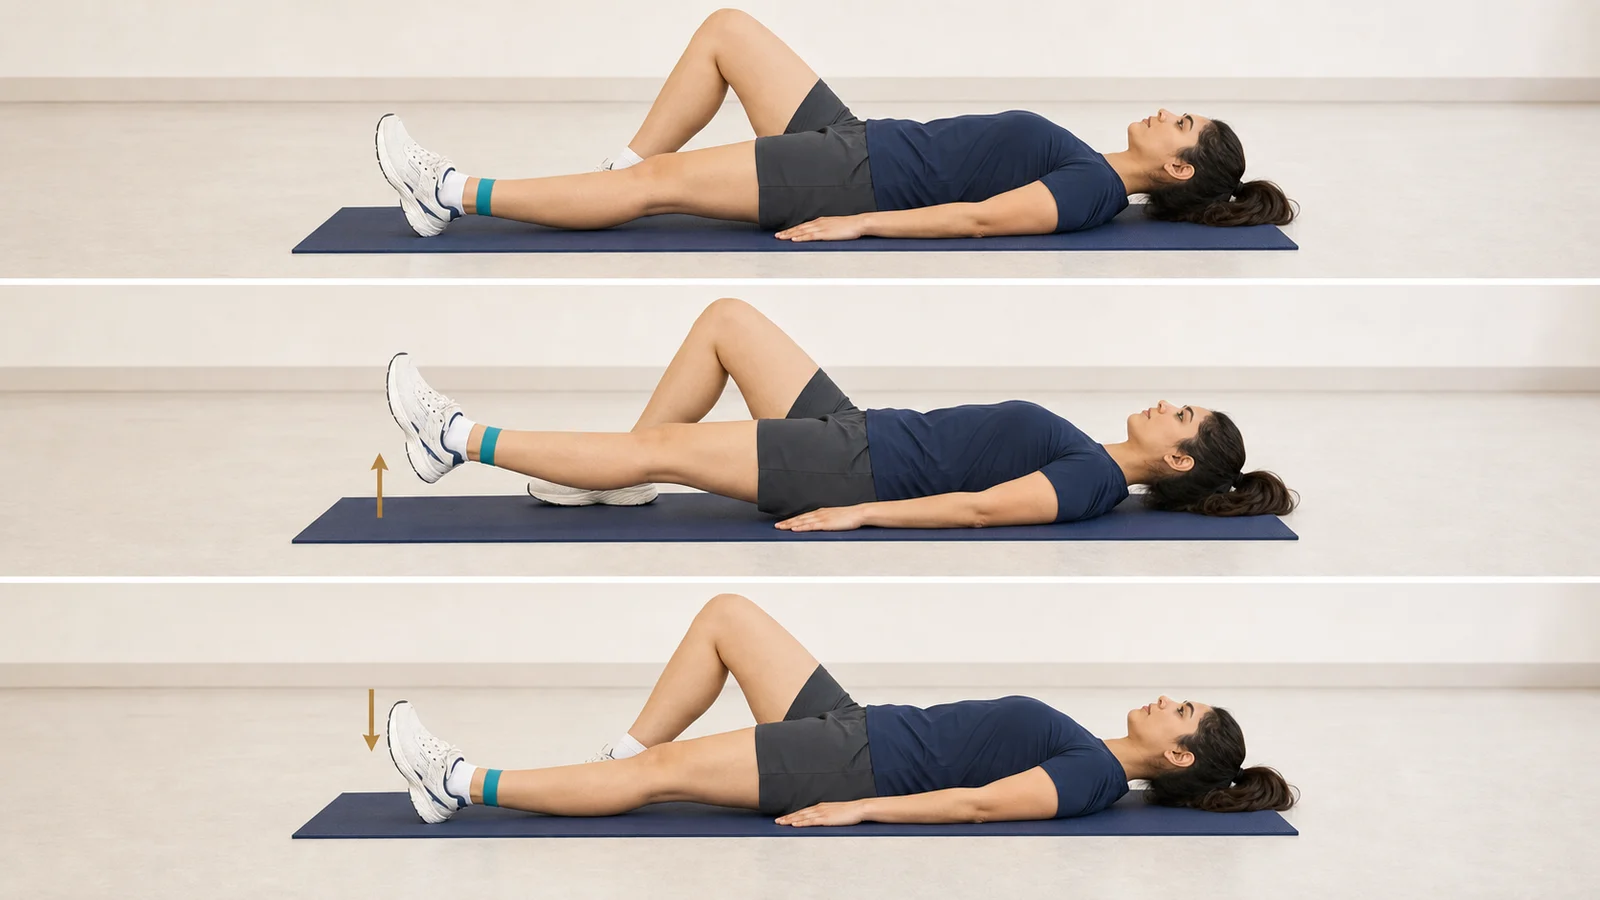
5) Straight Leg Raise
Keeping the knee straight while lifting the leg shows front-thigh muscle control. 12 repetitions, three times a day. Stop if the knee bends during the movement or you develop sharp pain.
More detailLess detail
Before you start: Lifting the leg with a straight knee practises front-thigh muscle control. Start once the muscle contracts clearly and the knee stays straight while you tighten it, usually from day two or three. Lie on your back on a firm surface, with the sound leg bent and its foot on the bed, and the operated leg straight with toes pointing up. Keep the brace fastened and have someone beside you for the first sessions.
How to do it:
- Tighten the quadriceps fully so the knee stays firm and straight.
- Check that the knee is straight before you lift.
- Lift the whole leg as one piece, a few centimetres, without the knee bending.
- Pause briefly and keep the pelvis still.
- Lower the leg slowly and release the muscle before the next repetition.
Movement tips: Lift only as high as you can keep the knee straight and pelvis still; do not arch your back or swing the leg. Breathe out to lift and in to lower. Rest the leg on the bed and relax the thigh between sessions. Mild front-thigh fatigue is expected; sharp pain or a painful stretch behind the knee is not.
Amount, repetitions and progression: In the reference rehabilitation protocol, 12 repetitions three times a day. If pain or swelling increases after exercise, reduce the repetitions. Add an ankle weight once you can do the 12 repetitions smoothly and without the knee bending, and start with the lightest weight you have.
Stop immediately if: the knee bends during the movement, you develop sharp pain, or you feel a painful stretch behind the knee; if it does not settle once you rest the leg on the bed, follow the warning-signs section.
Common mistakes: The knee bending as you lift, arching the lower back, jerking or swinging the leg, and helping with a hand under the thigh.
Easier version: Go back to the quadriceps set, or lift even less than a few centimetres so the knee stays straight.
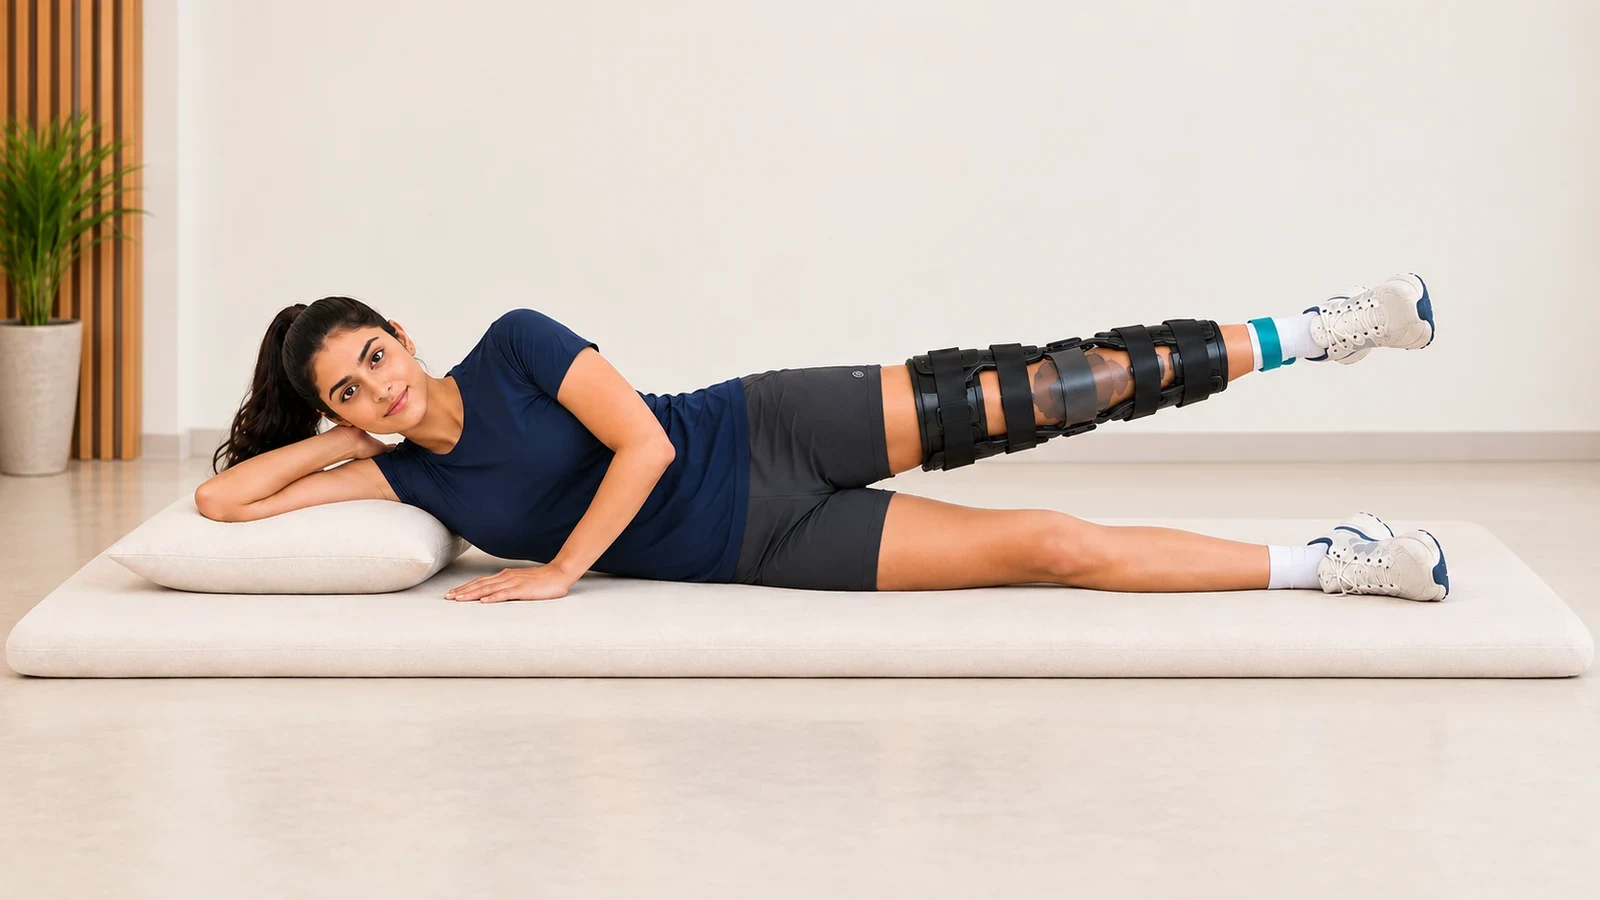
7) Multi-Direction Straight Leg Raise with Brace
Raise the straight leg outwards and inwards. The brace must be fastened and the knee must stay straight throughout. 12 repetitions in each direction, one to three times a day. Stop if the knee bends inside the brace or you develop sharp pain.
More detailLess detail
Before you start: This exercise works the hip muscles while keeping the knee straight. Start with the prescribed brace fastened once forward straight-leg raises can be performed without knee bending or next-day swelling. Use a firm bed or mat with a pillow under your head and have someone with you initially. Lie on the sound side for the outward lift and on the operated side for the inward lift.
How to do it:
- Before lifting, tighten the front-thigh muscle so the knee stays straight as the leg rises.
- Lying on the sound side, lift the operated leg straight and a few centimetres up; keep the toes pointing forward and do not roll the leg toward the ceiling.
- Pause briefly, then lower the leg slowly without letting the pelvis rotate.
- For the inward lift, lie on the operated side. Bend the sound leg and place its foot on the bed in front of you. Lift the straight operated leg underneath slightly off the bed, then lower it slowly.
Movement tips: Practise only outward and inward lifts at this stage. Lift a short distance without swinging; keep the pelvis still and the toes forward, and stop the brace from rotating. Breathe out to lift and in to lower, relaxing the leg between sessions. Side-hip fatigue in the outward direction and inner-thigh fatigue in the inward direction are expected; the knee should not hurt. The backward leg lift is added from week four and is done lying face down. If the graft was taken from the hamstrings, week four is also the earliest it may start.
Amount, repetitions and progression: In the reference rehabilitation protocol, 12 repetitions in each direction, one to three times a day. If pain or swelling increases the next day, reduce the repetitions. Add an ankle weight once you can do the 12 repetitions smoothly and without the knee bending, and start with the lightest weight you have.
Stop immediately if: the knee bends inside the brace, you develop sharp pain, particularly in the knee or groin, or the brace slips or rotates during movement; if the brace slips or rotates, before any further repetition, re-fasten the brace straight and tight, and if it slips again or the knee does not stay straight, set the exercise aside and contact your care team. If you get sharp pain, stop there, and contact your care team if it does not settle with rest.
Common mistakes: Rolling the toes toward the ceiling on the outward direction; letting the pelvis rotate to lift the leg higher; arching the lower back; and strapping the brace loosely.
Easier version: Reduce the height, or do only the outward direction for now. If lying on the operated side hurts, postpone the inward direction.
↔️ Weeks three to six
These four weeks are still without weight-bearing and the knee still stays within 90 degrees. You do this stage's exercises lying or sitting: the seated towel calf stretch, bending the knee over the edge of the bed, the double-leg bridge, and the prone hamstring curl. If the graft was taken from the hamstrings, do not start the prone hamstring curl before week four.
If swelling is controlled and movement quality is satisfactory, range and walking improve during this stage. Standing exercises with the foot planted are not done at this stage, because no weight goes on the leg; they start after the end of week six.
In this version the stationary bicycle starts after the end of week six, with a high saddle and low resistance, because pedalling needs more than 90 degrees of bend and loads the leg. This stage is not clearance to return to running.
8) Calf muscle stretch (Gastroc–Soleus Stretch)
Stretches the calf muscles so the ankle can bend more easily. Hold the stretch for as long as you feel a gentle pull behind the calf, several times on each leg. Stop if you develop sharp calf pain or pins and needles.
More detailLess detail
Before you start: This stretch helps calf flexibility and easier ankle movement. In this version do only the seated towel stretch until the end of week six, because the standing version puts weight on the operated leg; the standing version is added after the end of week six. When seated, loop a towel around the operated foot; when standing, face a wall with the operated leg behind you. Use a non-slip surface and closed shoes.
How to do it:
- In the seated version, pull the towel gently toward you so the toes come toward your face; in the standing version, with the heel of the back foot on the floor, shift your weight slowly toward the wall until you feel the stretch in the back of the calf.
- Keep the knee straight so the stretch reaches the upper calf muscle (gastrocnemius).
- Hold the mild stretch without bouncing or pushing suddenly.
- Then repeat the stretch with the knee slightly bent to stretch the deeper calf muscle, the soleus.
- Release slowly and take a breath before the next repetition.
Movement tips: Hold a gentle, steady stretch within your tolerance and breathe freely. Do not rotate the foot; keep the heel on the floor when standing and avoid stressing the knee. Fully relax the leg between repetitions. A mild calf stretch and easier ankle movement after release are expected.
Amount, repetitions and progression: Hold the stretch for as long as you feel a gentle pull behind the calf; several times on each leg, two to three sessions a day. Once the ankle bends comfortably in squatting and walking, keep the same stretch as a warm-up.
Stop immediately if: you develop sharp calf pain, pins and needles or numbness in the sole, or knee pain increases during the stretch; if the calf pain, pins and needles or numbness does not go away when you release the stretch, follow the warning-signs section.
Common mistakes: Bouncing the stretch, rotating the foot to get more of it, lifting the heel in the standing version, and forgetting the bent-knee version.
Easier version: Do a shorter, gentler stretch; until the end of week six the seated towel version is the only permitted one.
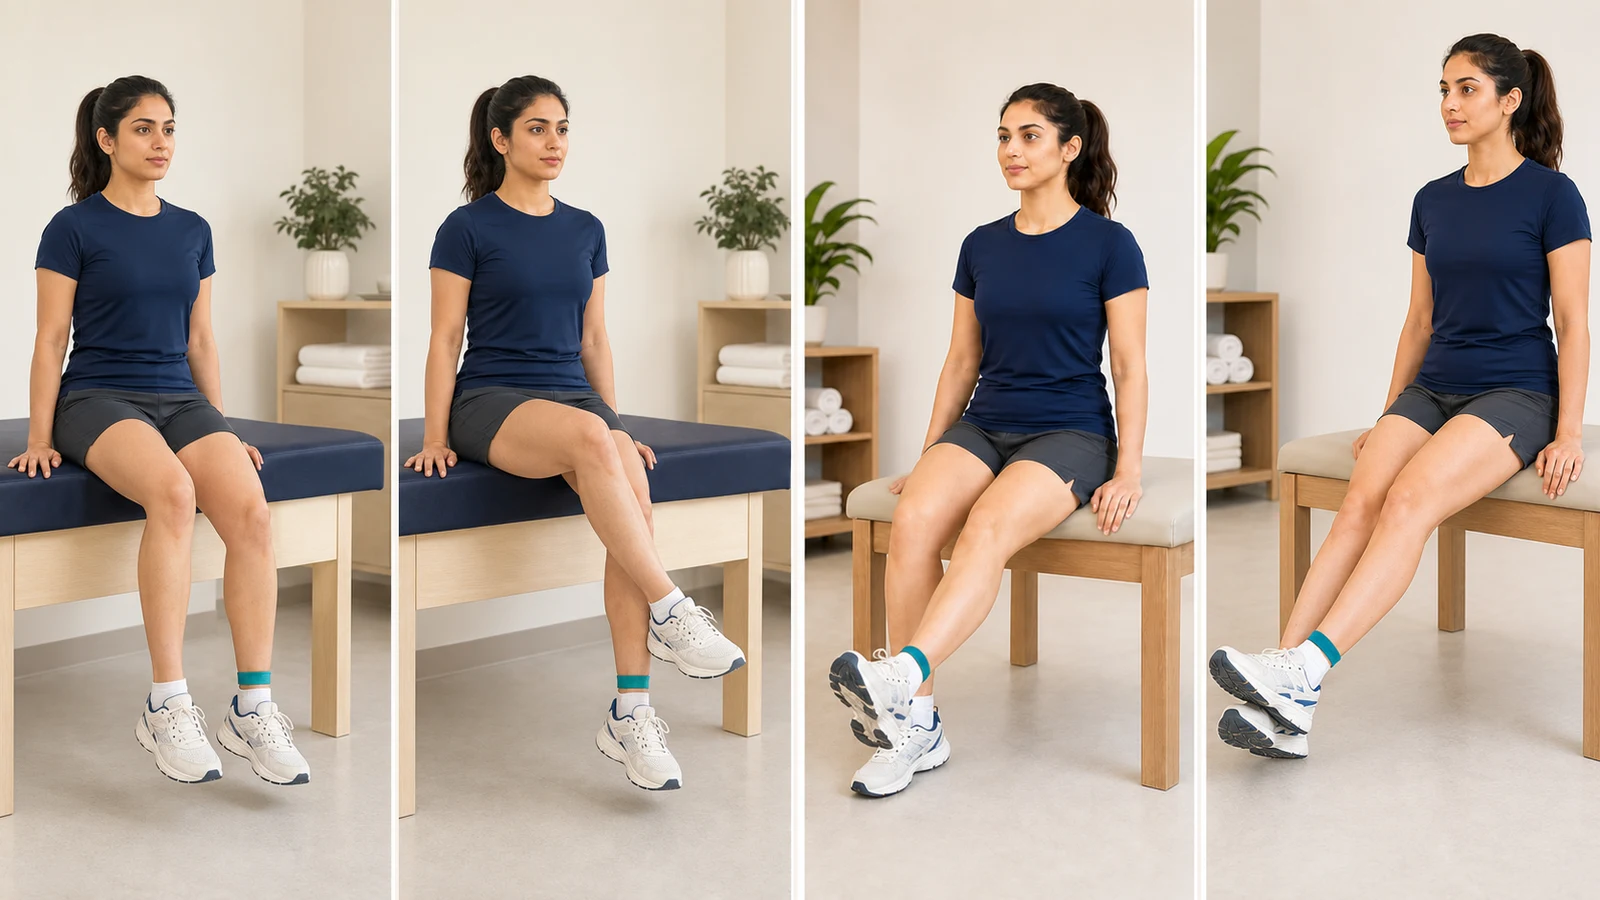
6) Assisted Seated Knee Flexion
The knee bends under the lower leg’s weight, with the sound leg helping it bend and return. 10 to 20 repetitions, three to four times a day, within that week’s permitted range. Stop if you develop sharp pain, locking or dizziness.
More detailLess detail
Before you start: This exercise helps bend the knee using the lower leg's weight and the sound leg. In the second week, if you can sit without dizziness and heel slides have not caused next-day swelling, sit on a high, firm bed. Support the thighs almost to the knees and let the lower legs hang; place a folded towel under the thighs if the edge presses on them. Because your meniscus was repaired, in this exercise too do not bend the knee past 90 degrees until the end of week six.
How to do it:
- Sit tall and do not lean back.
- Release the front-thigh muscle so the lower leg drops under its own weight and the knee bends.
- Rest the sound shin in front of the operated shin and add light, gradual pressure backwards until you feel a tolerable stretch.
- Pause a few seconds at the permitted limit, then ease off the pressure slowly.
- Hook the sound ankle from behind, under the operated ankle, and lift the lower leg back up to straight.
Movement tips: The sound leg should assist the operated leg with only gentle pressure. Stay within the permitted range and do not rotate the pelvis or leg. Breathe out while bending and in while returning, moving slowly both ways. Relax the lower legs between sessions. Movement should be smooth and the stretch should ease when released. Persistent pain or pins and needles mean you should not continue; next-day swelling means the amount was too much, so reduce the range.
Amount, repetitions and progression: In the reference rehabilitation protocol, 10 to 20 repetitions, three to four times a day, pausing a few seconds at the permitted limit each time. The range goal is the heel-slide card’s: in this version 90 degrees is the ceiling until the end of week six, and 120 degrees comes after that, once your doctor or physiotherapist clears it at an examination. Compare how far the knee bends with last time, not how hard you push. You do not have to go further at every session. If the knee swells after exercise, reduce the range.
Stop immediately if: you develop sharp pain, locking or catching, numbness or pins and needles, especially behind the knee, or dizziness when sitting up; if you feel dizzy, lean back or lie down and do not get off the bed without help; if the sharp pain, numbness, pins and needles or locking does not settle once you stop the exercise, follow the warning-signs section.
Common mistakes: Pushing hard or jerkily with the sound leg to the point of pain; lifting the leg with the operated thigh instead of the sound leg; and sitting on a low bed where the feet reach the floor.
Easier version: Shorten the time, or keep the sound ankle hooked under the operated one from the start so it carries part of the weight.
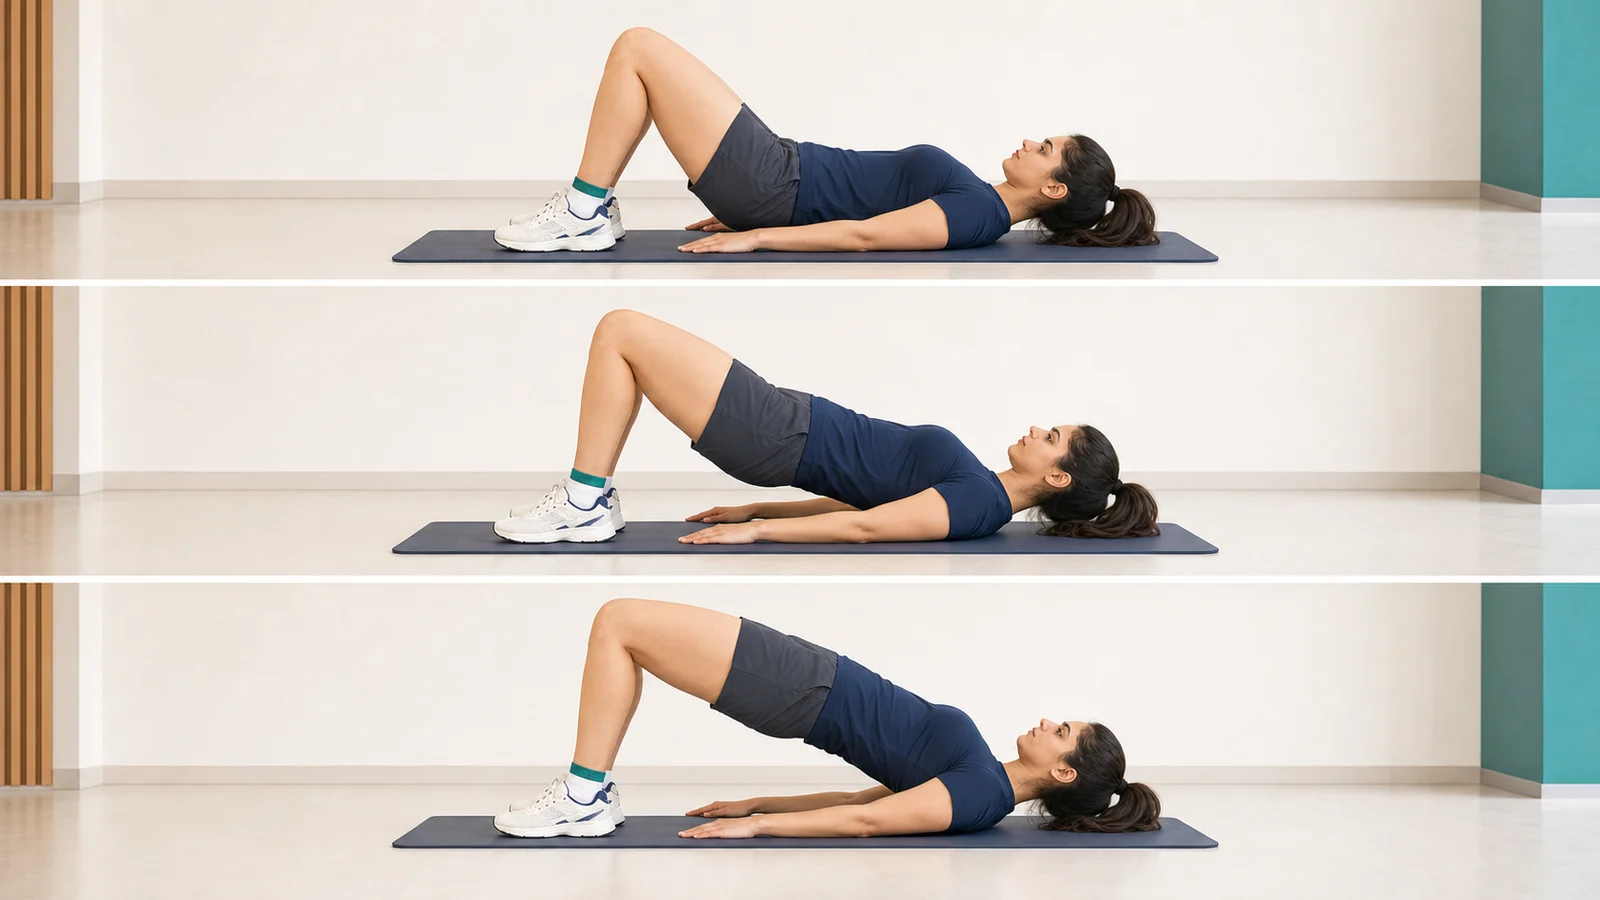
13) Double-Leg Bridge
Strengthens the buttocks and back of the thigh. 12 repetitions, one to three times a day. Stop if you develop pain in the knee, the back of the thigh, the lower back or the neck, or a persistent cramp.
More detailLess detail
Before you start: A double-leg bridge works the buttock and back-of-thigh muscles. Once swelling is controlled and lying down and bending the knee within the permitted range are comfortable, lie on your back on a firm mat. Bend the knees and place both feet flat, hip-width apart. If you have a hamstring graft, do not start this exercise before week four.
How to do it:
- Tighten the abdominal muscles very gently so the lower back does not arch.
- Pressing evenly through both feet, lift the buttocks off the floor.
- Raise the hips until the shoulders, hips and knees are in a straight line, no higher.
- Pause briefly without arching the lower back.
- Lower slowly and gradually, from the top of the lower back down to the pelvis.
Movement tips: Lift only until the shoulders, hips and knees align; do not arch the back or let the knees spread outward. Breathe out to lift and in to lower. Rest the pelvis on the floor and relax the muscles between sets. Keep pressure equal through both feet and feel the work in the buttocks and the back of the thigh, not the back or neck.
Amount, repetitions and progression: 12 repetitions, one to three times a day, pausing for a moment at the top. Start the single-leg version once you can do 12 double-leg repetitions with the pelvis completely level.
Stop immediately if: the knee hurts, the back of the thigh hurts (especially if the graft was taken from the hamstrings), the lower back or neck hurts, or hamstring cramp persists.
Common mistakes: Arching the back to lift higher, pressing into the neck and shoulders, letting the knees splay outward, and loading the sound leg more.
Easier version: Reduce the height or shorten the hold; you can start by simply tightening the buttocks without lifting the hips at all.
16) Isolated Hamstring Curl
Strengthens the hamstrings separately. 12 repetitions, one to three times a day. Stop if you get sharp pain in the back of the thigh, pain at the graft harvest site, a painful hamstring cramp, or pain behind the knee.
More detailLess detail
Before you start: This exercise strengthens the hamstrings. With a hamstring graft this exercise does not start before week four. With other grafts, start once bending the knee within the permitted range is pain-free. In this version do this exercise lying face down on a bed, because standing on the operated leg is not allowed in these weeks. Start without weight and build up the band or machine from the lightest resistance.
How to do it:
- Keep the pelvis still and do not let the thigh swing forward as you move.
- Draw the heel slowly toward the buttock.
- Pause briefly within the permitted range.
- Return the leg slowly and under control to straight.
- Release the muscle completely before the next repetition.
Movement tips: Bend the operated knee slowly within the permitted range, without forcing the end position or moving the pelvis or back. Breathe out to bend and in to return. Fully relax the hamstrings between sets. Mild fatigue behind the thigh is expected. If the muscle cramps, stop the movement there and let the leg relax; do not continue that session with a painful cramp, and at the next session use less resistance and rest longer between sets. If the cramp comes back, tell your physiotherapist.
Amount, repetitions and progression: 12 repetitions, one to three times a day. If the graft was taken from the hamstrings, do not start this exercise before week four. Start without weight. If pain or swelling increases the next day, reduce the resistance by one step and stay there until the knee settles. Once 12 repetitions are complete and pain-free with no increase in next-day pain or swelling, add one step of resistance at a time.
Stop immediately if: you develop sharp pain in the back of the thigh, graft-harvest-site pain, painful hamstring cramp or pain behind the knee.
Common mistakes: Bringing the thigh forward to curl further, arching the lower back, letting the leg drop on the way back, and starting with heavy resistance.
Easier version: Start with no band and only the weight of the leg, or use a shorter range.
🌱 After week six: days 43–60
Exercises that load the leg or need more than 90 degrees of bend start after the end of week six: the stationary bicycle, the heel and toe raises and the wall squat. This is the first time weight goes on the operated leg, so start all three carefully and next to a support, and each one only once you meet the starting condition on its own card.
Goals are to maintain full extension, advance flexion gradually, walk without a limp, control swelling and build muscle strength. Moving past this stage depends on good movement quality and on pain and swelling not increasing after exercise; reaching day 60 is not enough on its own.
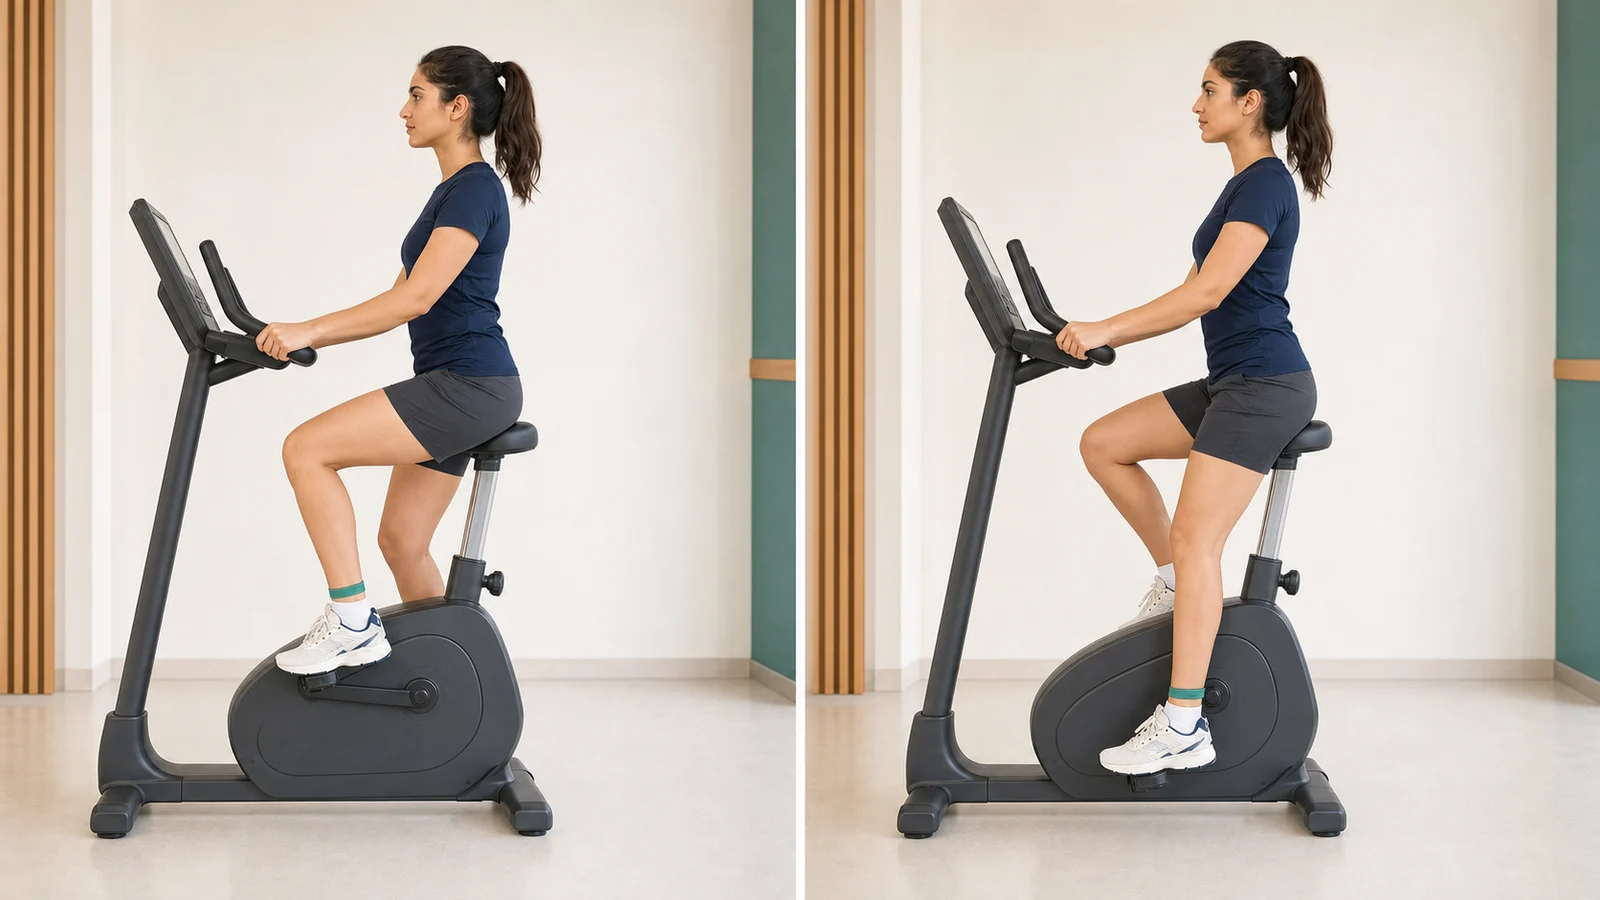
9) Stationary Bike
Stationary cycling is a low-impact exercise that helps smooth knee movement and improve fitness. In the reference rehabilitation protocol it starts at low or zero resistance and at 5 minutes, and builds gradually to 20 minutes a session. Stop if you have sharp pain or knee catching.
More detailLess detail
Before you start: A stationary bike helps smooth knee movement and restore fitness. Start the bike in this version after the end of week six, once the 90-degree ceiling has been lifted and weight-bearing is free. Choose a stable bike with a relatively high saddle. Use support to mount. Adjust the saddle so the knee is nearly straight at the bottom of the pedal stroke and the pelvis stays still.
How to do it:
- Start with the lowest resistance.
- Turn the pedals slowly and evenly.
- If after the end of week six a full revolution is still not possible, rock the pedal forwards and backwards as far as it goes until the range improves; before the end of week six do not get on the bike at all.
- Keep the pelvis still and the knee tracking forward; the pelvis must not move up and down with each revolution.
- Slow down gradually, then get off using the support.
Movement tips: Pedal slowly and evenly, breathing normally. Do not stand on the pedals or use heavy resistance. Lower the saddle only within your permitted range and keep the pelvis from shifting each revolution. If a long session is tiring, shorten it and elevate the leg between sessions. Pedalling should be smooth and should not cause next-day swelling.
Amount, repetitions and progression: In the reference rehabilitation protocol, you start at low or zero resistance and at 5 minutes, and raise the time slowly until you reach 20 minutes a session; raising the resistance begins two to three weeks after you start the bike. Pedal once or twice a day. At each step raise only one of the two — time or resistance — never both together. If pain or swelling increases the next day, go back to the previous amount and review the plan with your physiotherapist.
Stop immediately if: you develop sharp pain or knee catching, front-of-knee pain begins, or you move the pelvis up and down to pedal.
Common mistakes: A saddle set too low, heavy resistance from the start, pedalling while standing, and pushing on through front-of-knee pain.
Easier version: The permitted back-and-forth movement, zero resistance, or less time; even a few minutes is an acceptable start.
10) Heel and Toe Raises
Heel and toe raises strengthen the muscles at the back and front of the lower leg in standing: the same muscles that drive the body forward in walking and keep the toes lifted off the floor. Two sets of 12, once a day, keeping a hand on the support. Stop if balance is not safe or the knee hurts sharply.
More detailLess detail
Before you start: This standing exercise strengthens the muscles at the front and back of the lower leg. After weight-bearing is permitted and you can stand on both feet without sharp pain, face a fixed counter or rail. Wear closed shoes on a non-slip surface, place your feet hip-width apart and rest your hands lightly on the support.
How to do it:
- Pressing evenly through both feet, lift the heels slowly off the floor.
- Pause at the top for a moment and do not let the ankles roll outward.
- Lower the heels slowly and under control.
- Then shift the weight slightly back and lift the toes off the floor.
- Lower the toes gently and begin the next repetition.
Movement tips: Both feet should work together and equally. Keep the knees almost straight and do not roll the ankles. Rise only as far as you can balance. Move slowly, breathing out to rise and in to lower. Stand and relax the calves between sets. Mild fatigue is expected, but do not continue through cramp.
Amount, repetitions and progression: In the reference rehabilitation protocol, two sets of 12 on both legs, once a day. The single-leg version is 12 repetitions twice a day, and starts once the double-leg repetitions are smooth and even and you no longer need support.
Stop immediately if: you lose balance, develop sharp knee or ankle pain, or experience painful calf cramp.
Common mistakes: Hanging on the hands, shifting weight to the sound leg, letting the ankle roll outward at the top, and dropping the heels suddenly.
Easier version: Less height or more contact with the support; if needed, do only half the range at first.
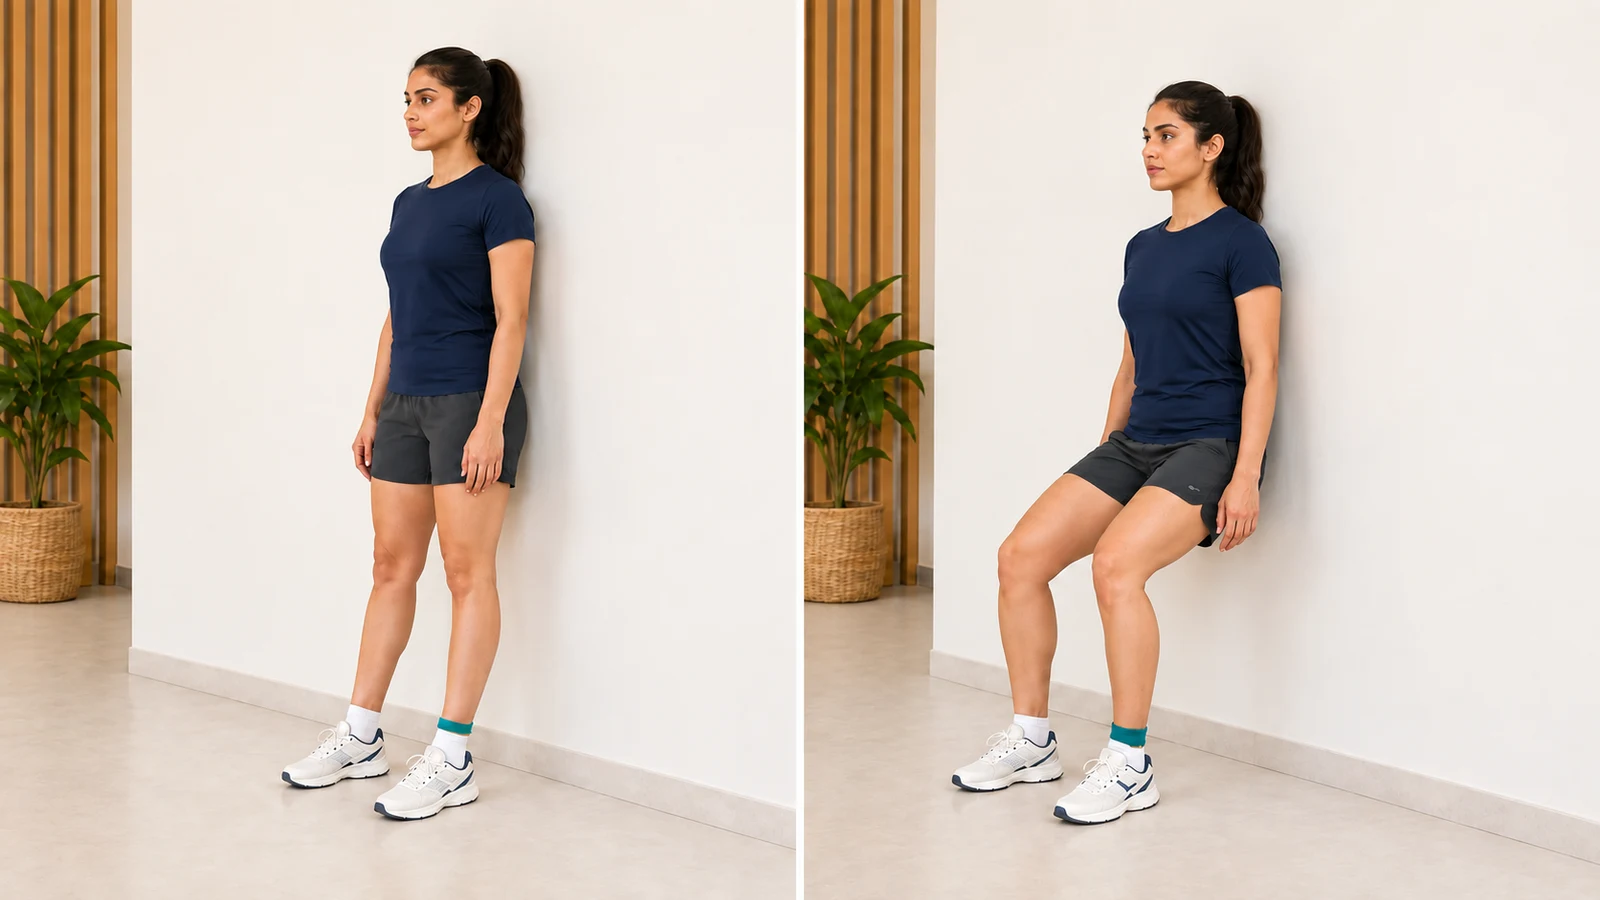
11) Wall Squat
With support from the wall, strengthens the quadriceps in a shallow, fully controlled range. 12 repetitions to the depth permitted at this stage, one to three times a day. Stop if the knee hurts or the knee gives way.
More detailLess detail
Before you start: A wall squat strengthens the front-thigh muscles, with the wall helping your balance. Start after weight-bearing is permitted, swelling is controlled and you can walk without a limp; in this version it starts after the end of week six. Wear closed shoes on a non-slip surface and stand against a flat wall, feet hip-width apart and slightly forward, with your back and buttocks touching the wall. Use a ball behind your back only if your physiotherapist recommends it.
How to do it:
- Share the weight across both whole feet.
- Slide your back down the wall and lower yourself slowly.
- Go down only within your permitted range; the knees must not travel past the toes.
- Keep the knees over the line of the second toe and do not let them fall inward.
- In the static version of this exercise, instead of going down and up, stay at the permitted depth until you feel mild thigh fatigue, then stand up; repeat this hold 12 times.
- Press up evenly through both feet, without pushing off with your hands.
Movement tips: Lower only a short distance within your allowed range. Keep the heels down, weight equal on both legs and knees aligned with the feet. Breathe in to lower and out to rise; breathe freely during holds. Stand upright and relax the thighs between sets. You should feel the front-thigh muscles working. Stop if the knee itself hurts or shaking disrupts control.
Amount, repetitions and progression: 12 repetitions, one to three times a day. Keep the depth shallow. The step-by-step plan for gradually deepening the squat in the 2024 international meniscus rehabilitation consensus is written for a vertical tear, not a complex one, so in this version you do not follow such a plan: the depth stays shallow until the end of month four, around 30 to 45 degrees. If the knee swells after exercise, reduce the depth or the repetitions.
Stop immediately if: the knee hurts, the knee gives way, or shaking disrupts your control of the movement.
Common mistakes: Going deeper than permitted, letting the knee travel past the toes, letting the knees fall inward, lifting the heels, and holding the breath in the static version.
Easier version: Less depth or a shorter hold; you can start by going down only a few centimetres and coming straight back up.
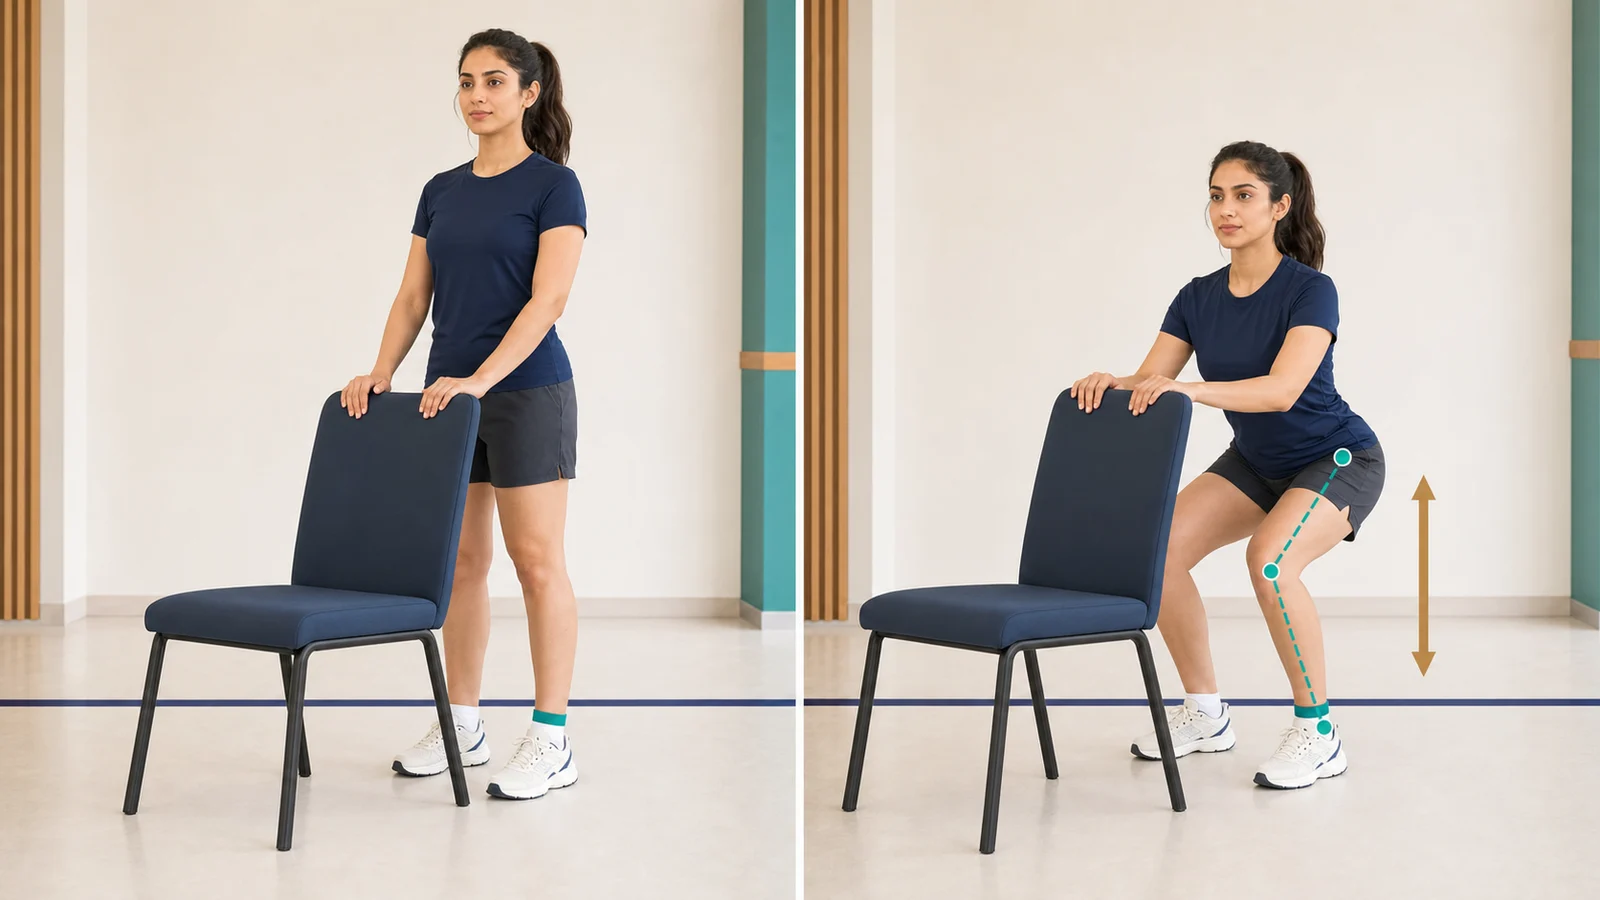
12) Supported Mini Squat
Helps distribute weight evenly between both legs. 12 repetitions to a depth of 30 degrees, one to three times a day. Stop if you develop sharp knee pain or a sensation of the knee giving way.
More detailLess detail
Before you start: With a mini squat, you practise sharing weight between both legs. Start once weight-bearing is permitted, swelling is controlled and you walk without a limp; in this version it starts after the end of week six. Wear closed shoes on a dry, non-slip surface and face a fixed counter or rail, with feet hip-width apart and both feet flat.
How to do it:
- Rest your hands lightly on the support; do not hang from it.
- Take the hips back slightly, as if you were about to sit.
- Bend the knees only within the permitted range.
- Keep the knees in line with the toes and the weight on both legs.
- Press up slowly and evenly through both feet.
Movement tips: Keep the movement shallow and within your plan, with a level pelvis, heels down and similar pressure through both feet. Lower slowly while breathing in and rise slowly while breathing out. Stand upright between sets. Mild thigh fatigue is expected, but rest if shaking disrupts control.
Amount, repetitions and progression: 12 repetitions, one to three times a day. The depth at this stage is up to 30 degrees, that is, the knee bends only slightly. If the knee swells the next day, reduce the depth or the repetitions.
Stop immediately if: you develop sharp knee pain, a sensation of the knee giving way, or shaking disrupts your control of the movement.
Common mistakes: The knee falling inward, shifting weight to the sound leg, hanging on the hands, and lifting the heels.
Easier version: Use less range or take more support from your hands, but still do not hang from the support; you can start by practising the weight shift alone, without bending the knees.
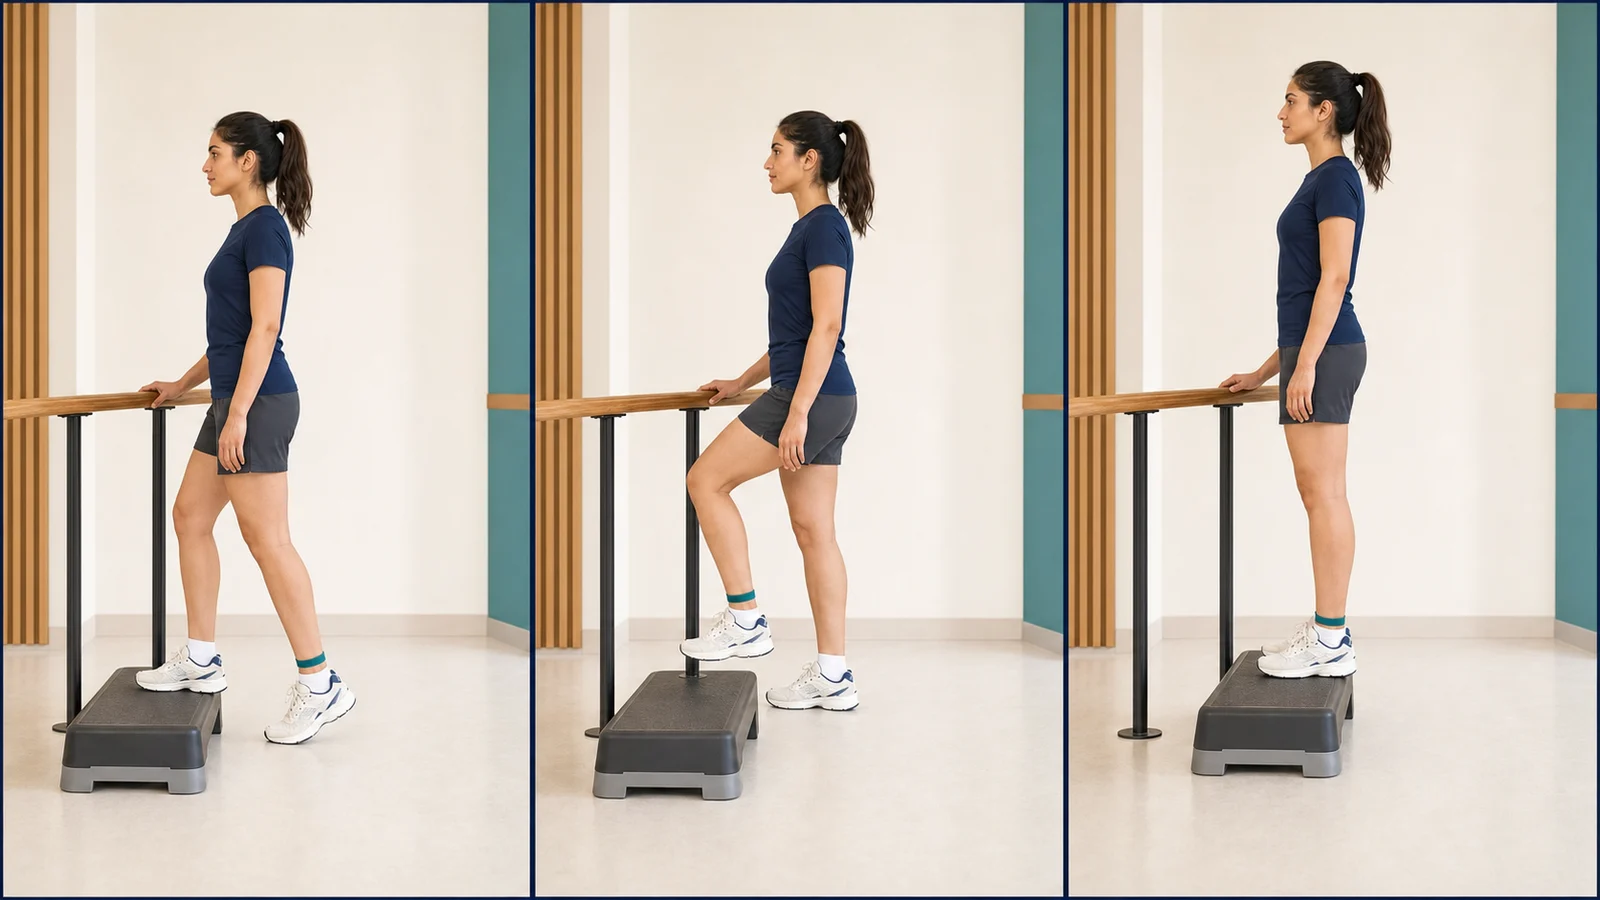
14) Low Step-Up
Strengthens the quadriceps in standing and helps you control the knee when climbing a step. 12 repetitions on each leg, on the lowest step you have. Stop if the knee gives way or hurts sharply.
More detailLess detail
Before you start: Stepping up trains the front-thigh muscle and knee control. Once you walk without an obvious limp and perform a mini squat correctly, start with a permitted low step. It must be stable, non-slip and beside a rail; wear closed shoes. Face the step, place the entire operated foot on it and keep a hand near the rail.
How to do it:
- Transfer the weight gradually onto the operated leg.
- Keep the knee pointing in the same direction as the toes and do not let it fall inward.
- Press through the whole foot and come up without any hop.
- At the top, level the pelvis and stand still for a moment.
- To come down, lower the healthy leg to the floor first and slowly; the operated leg stays on the step and controls the descent until that foot touches down.
Movement tips: The step must not be high enough to cause pain or the knee to fall inward. Keep the pelvis facing forward and level. The back leg should help balance without pushing you up. Breathe out to rise and in to lower more slowly. Stand or sit between sets to let the thigh relax.
Amount, repetitions and progression: In the reference rehabilitation protocol, 12 repetitions on each leg, one to three times a day. Start with the lowest step you have and, once you go up and down smoothly without using your hands, move to an ordinary stair step. If the knee swells after exercise, reduce the height or the repetitions.
Stop immediately if: the knee gives way or you develop sharp pain.
Common mistakes: Hopping off the back leg, placing only half the foot on the step, letting the knee fall inward, and coming down by suddenly releasing the weight.
Easier version: Choose a lower step or take more help from the rail; you can start by practising only the weight transfer onto the step.
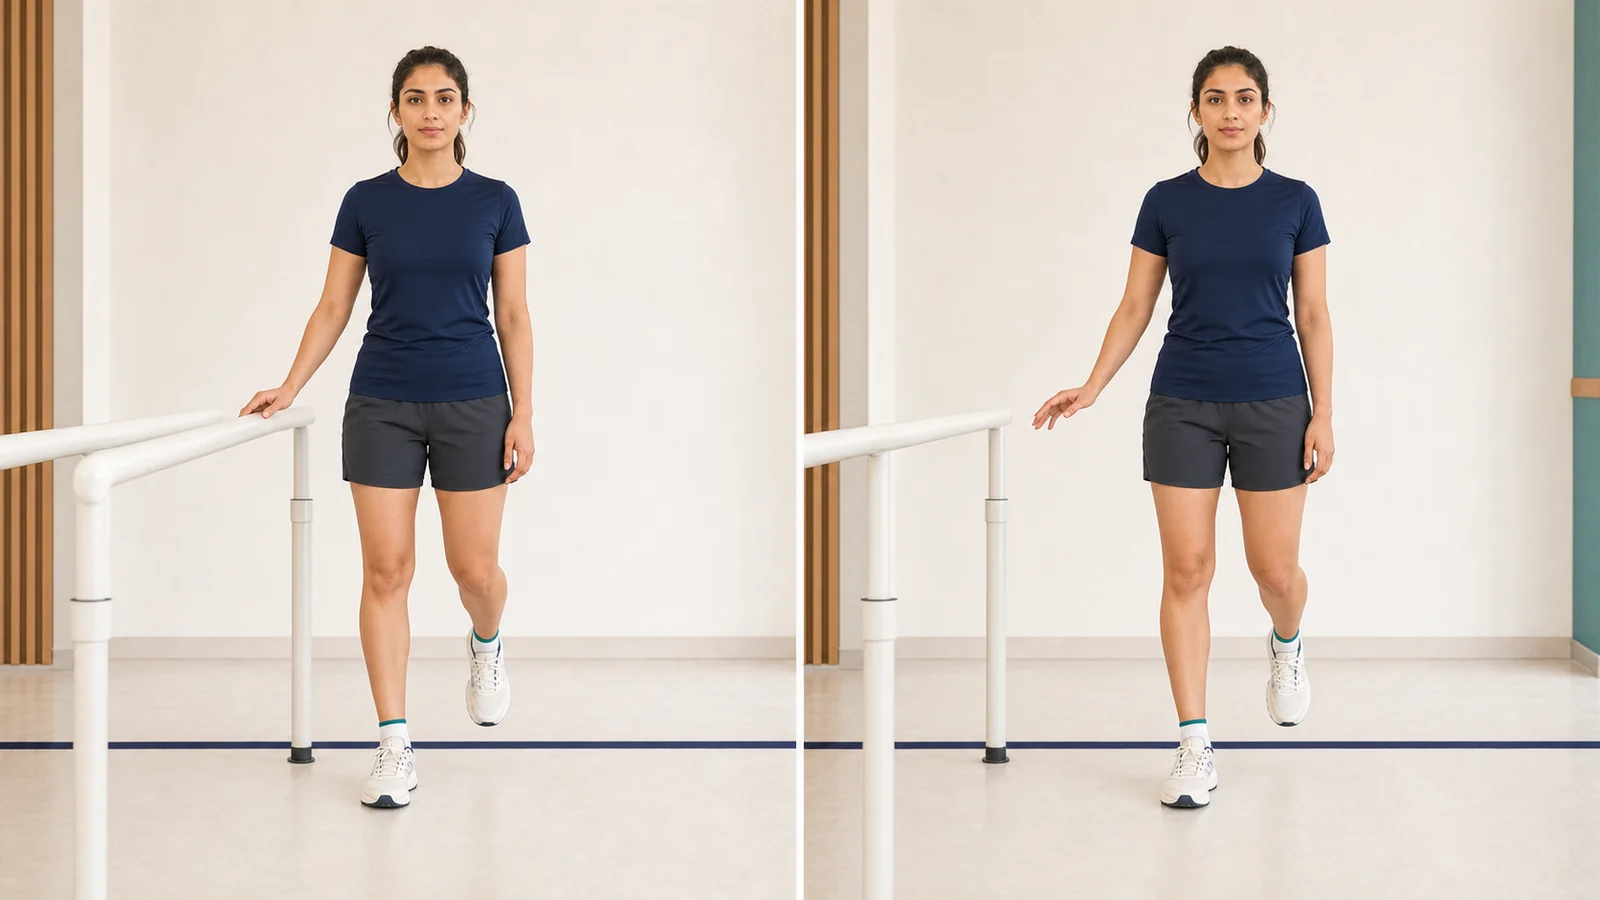
15) Single-leg balance with a support within reach
Trains joint-position sense and hip and knee control. Several sessions on each leg, for as long as you can stand without touching the support. If the knee gives way, you feel dizzy or you cannot stand safely, put the foot down and stop.
More detailLess detail
Before you start: This exercise practises awareness of knee position and balance control. Start on a flat, non-slip surface once loading the operated leg is permitted and safe and you walk without a limp. Wear suitable shoes and stand beside a firm counter or rail, with the operated foot under the hip and the knee unlocked.
How to do it:
- Transfer the weight slowly onto the operated leg.
- Lift the other foot slightly off the floor.
- Keep the standing knee slightly bent and the pelvis level.
- Look at a fixed point in front of you.
- Put the foot down when you can no longer keep the hip and knee in the correct position.
Movement tips: For now, stay on a stable surface and breathe freely. Keep the pelvis level and rest the hand only lightly on the support. Small balance adjustments are expected, but large sways are not; if the sway becomes large, put the foot down and do the next repetition with more weight resting on the support. Stand on both feet between repetitions to relax the thigh and calf. Mild fatigue in the calf and sole may occur.
Amount, repetitions and progression: Several sessions on each leg, one to three times a day; quality matters more than duration. Once you can stand without your hand touching the support and without wobbling, the next step is the same balance on an unstable surface: a balance board, or a half foam roller (a foam roller cut in half along its length). In the reference rehabilitation protocol, single-leg balance work on a balance board sits at weeks four to eight; in this version no weight goes on the operated leg until the end of week six, so this exercise does not start before then.
Stop immediately if: the knee gives way, you feel dizzy or you cannot stand safely.
Common mistakes: Locking the standing knee, letting the pelvis drop to one side, leaning heavily on the hand, and moving to an unstable surface too soon.
Easier version: Take more help from the support, or keep both toes on the floor and practise only the weight shift.
🏋️ Month 3: days 61–90
The focus shifts toward strength, single-leg control and greater activity tolerance. Sudden pivoting, contact sport and starting to run on your own are still inappropriate. In this version running starts from week twelve onwards, with the same three conditions: swelling minimal or resolved, range of motion normal, and walking and mini squats pain-free and without a limp.
Deep knee bending, jumping and twisting of the knee are left out for at least four months. The 2024 consensus plan for gradually deepening the squat is for a vertical tear, not yours, so in this version the depth stays shallow until the end of month four: squat to a chair higher than the knee, keep the lunge with the front knee at no more than 45 degrees, and do not go deeper.
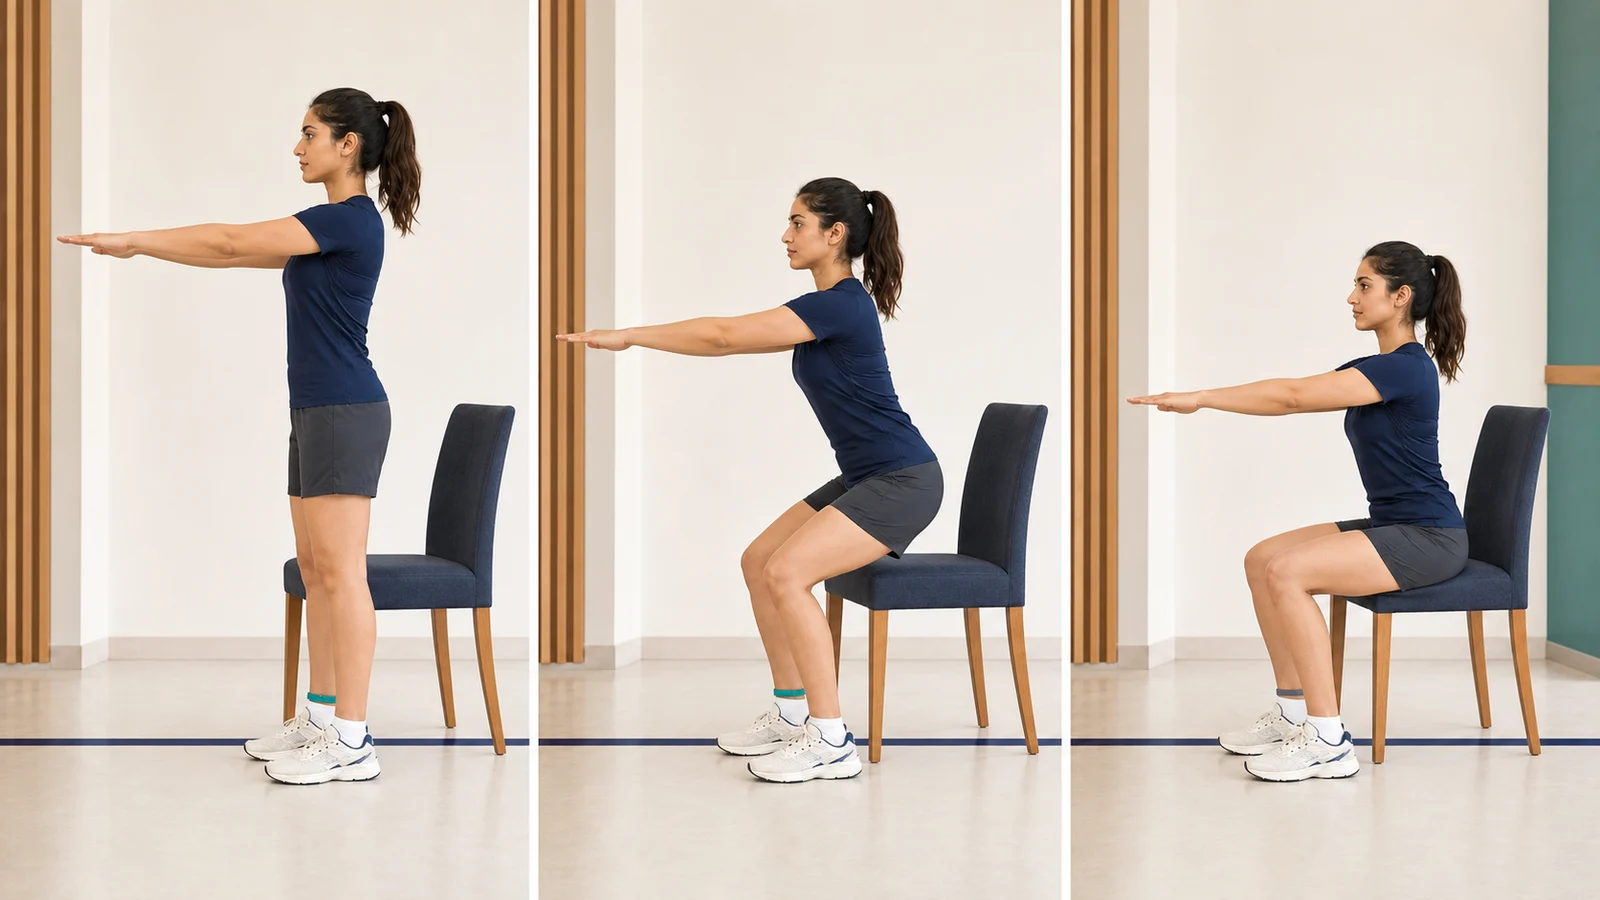
17) Squat to Chair
Builds two-legged strength and control of sitting down and standing up: the movement you repeat dozens of times a day. 12 repetitions to the depth permitted at this stage, one to three times a day. Stop if you develop sharp knee pain or the knee gives way.
More detailLess detail
Before you start: Controlled sitting and standing trains strength in both legs. Once you have mastered the mini squat without increased pain or swelling, place a firm chair without wheels against a wall. Wear closed shoes on a non-slip surface and stand with your back to the chair, feet hip-width apart and weight through the whole of both feet.
How to do it:
- Share the weight across both whole feet.
- Take the hips back and let the trunk come slightly forward.
- Keep the knees in line with the toes and lower within the permitted range.
- Make light contact with the chair; do not drop onto it.
- Press up evenly through both feet.
Movement tips: The chair must be high enough to sit within your permitted range. Keep the heels down and weight equal on both legs, touching the chair gently. Breathe in as you lower slowly and out as you stand. Sit or stand between sessions and relax the thighs. Do not continue when fatigue reduces control.
Amount, repetitions and progression: 12 repetitions, one to three times a day. In this version work with a chair higher than the knee until the end of month four and do not go deeper; after month four, once you can do 12 repetitions without dropping onto the chair and without using your hands, use a lower chair. If the knee swells after exercise, reduce the depth or the repetitions.
Stop immediately if: you develop sharp knee pain, the knee gives way, or fatigue reduces your control of the movement.
Common mistakes: Dropping suddenly onto the chair, the knees collapsing inward, shifting weight to the healthy leg, and lifting the heels.
Easier version: Use a higher chair, or rest a hand lightly on a counter so the path stays controlled.
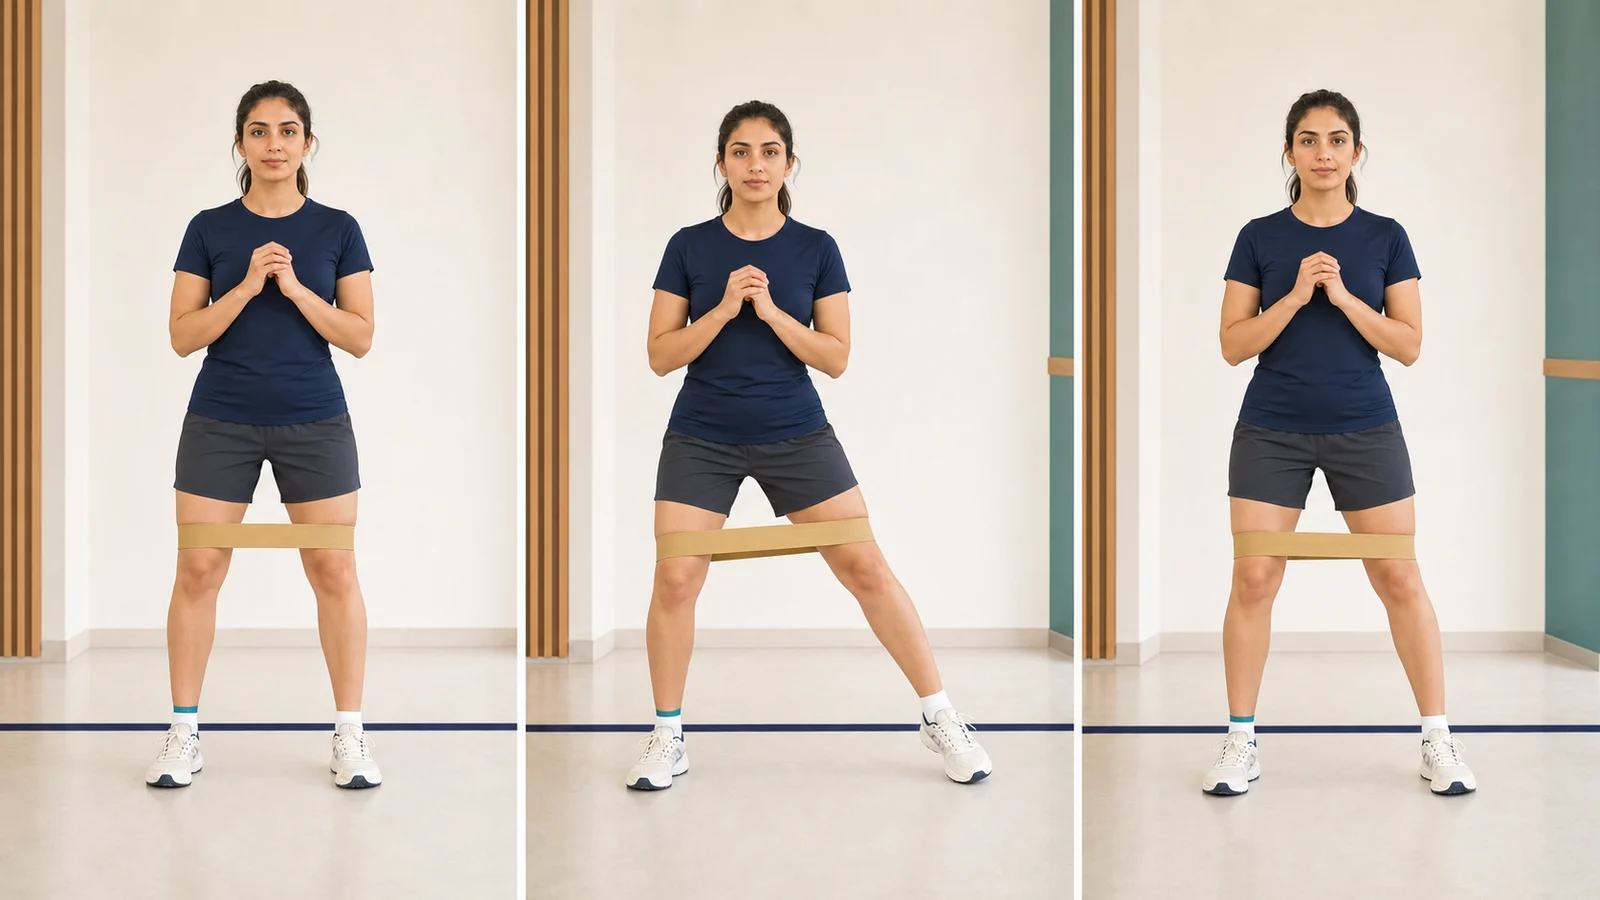
18) Lateral Band Walk
Strengthens the side hip muscles so the knee does not fall inward when you walk. 12 steps in each direction, with the lightest band. Stop if you feel pain, the knee gives way, or you cannot keep the correct body position.
More detailLess detail
Before you start: Sideways steps with a band train the side-hip muscles. Start after mastering single-leg balance and shallow squats with correct alignment. Place the band above the knees and start with the lightest resistance; placing it around the ankles loads the knee more and belongs to later stages. On a flat, clear path, keep the feet parallel and hip-width apart, knees slightly bent and band lightly stretched.
How to do it:
- Keep the band under slight tension so there is resistance the whole way.
- Take the hips back a little and keep the trunk still.
- Take a short step sideways.
- Bring the second foot in without letting the band go completely slack.
- Keep the toes and kneecaps pointing forward throughout.
Movement tips: Take short, equal steps in both directions. Keep the trunk from rotating or leaning sideways and the knees aligned with the feet. Breathe normally and move without bouncing. Release the band and stand upright between sessions. Mild fatigue or burning at the side of the hip is expected, but if this burning turns into pain, stop the exercise.
Amount, repetitions and progression: 12 steps in each direction, one to three times a day. Start with the lightest band and, once you can take 12 steps with the knee in line with the toes and the trunk steady, move to a firmer band. If the knee or the side of the hip swells or hurts after exercise, reduce the distance or the resistance.
Stop immediately if: the knee or side of the hip hurts, the knee gives way, or your body position changes clearly, for example if the toes turn or the trunk leans.
Common mistakes: Dragging the foot along the floor, taking long steps, letting the toes turn out, and leaning the trunk sideways to compensate.
Easier version: Use a lighter band, keep it above the knees rather than moving it to the ankles, and take shorter steps. Coordinate this change with your physiotherapist.
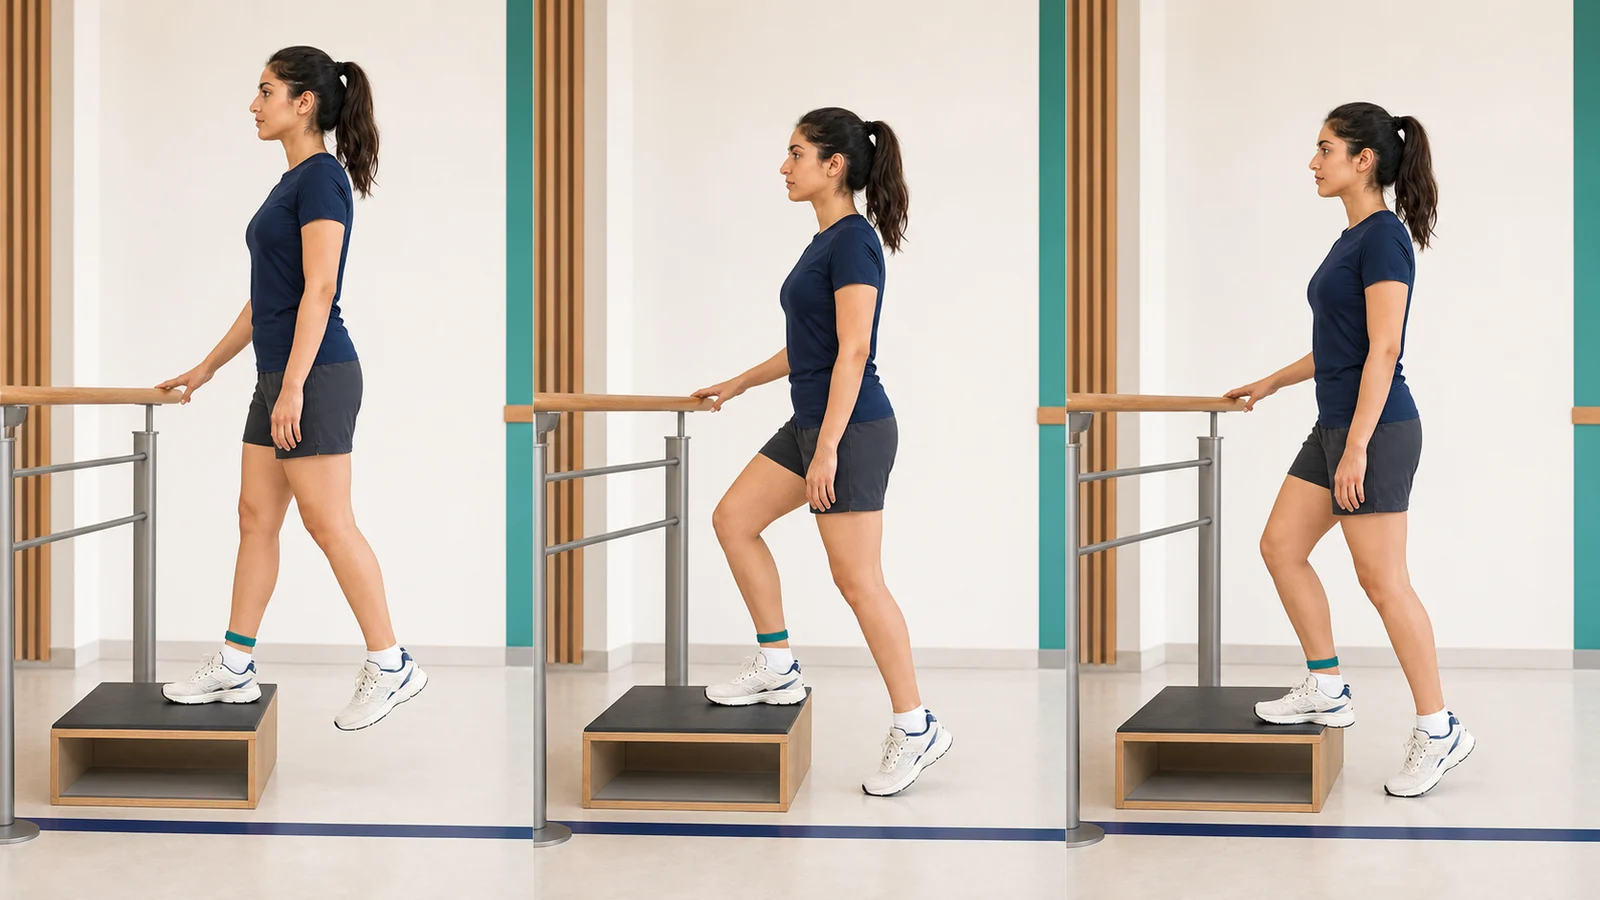
19) Controlled Step-Down
Strengthens the front thigh muscle to control body weight while stepping down. 12 repetitions on the operated leg on the lowest step you have, one to three times a day. Stop if you develop front-of-knee pain or giving way.
More detailLess detail
Before you start: This exercise improves the front-thigh muscle's ability to control lowering your body. Start after mastering pain-free step-ups and squats with correct alignment. Wear closed shoes and stand on a low, stable step beside a rail, with the entire operated foot on the step, pelvis facing forward and a hand near the rail.
How to do it:
- Keep the weight on the operated leg.
- Keep the pelvis level and guide the knee of the operated leg in line with the toes.
- Bend the operated knee slowly so the other foot travels down.
- Let only the heel of the other foot touch the floor lightly; do not put weight on it.
- Return up by pressing through the operated leg, without any hop.
Movement tips: Choose a step low enough to prevent the pelvis dropping or knee falling inward. Breathe in as you lower slowly until the healthy foot touches the floor lightly and quietly; breathe out to return. Relax the thigh between sessions. Stop if fatigue makes alignment difficult to maintain. Raising the step too soon may increase pain at the front of the knee.
Amount, repetitions and progression: 12 repetitions on the operated leg, one to three times a day. Start with the lowest step you have and, once you can do 12 repetitions with the pelvis level and the knee in line with the toes, move to an ordinary stair step. If the knee swells after exercise, reduce the height or the repetitions.
Stop immediately if: the front of the knee hurts, the knee gives way, or fatigue makes keeping the alignment hard.
Common mistakes: The knee falling inward, the free-side pelvis dropping, pushing off with the other foot, and releasing the weight suddenly at the end of the range.
Easier version: A lower step or more help from the rail; you can start by going down only a few centimetres and returning.
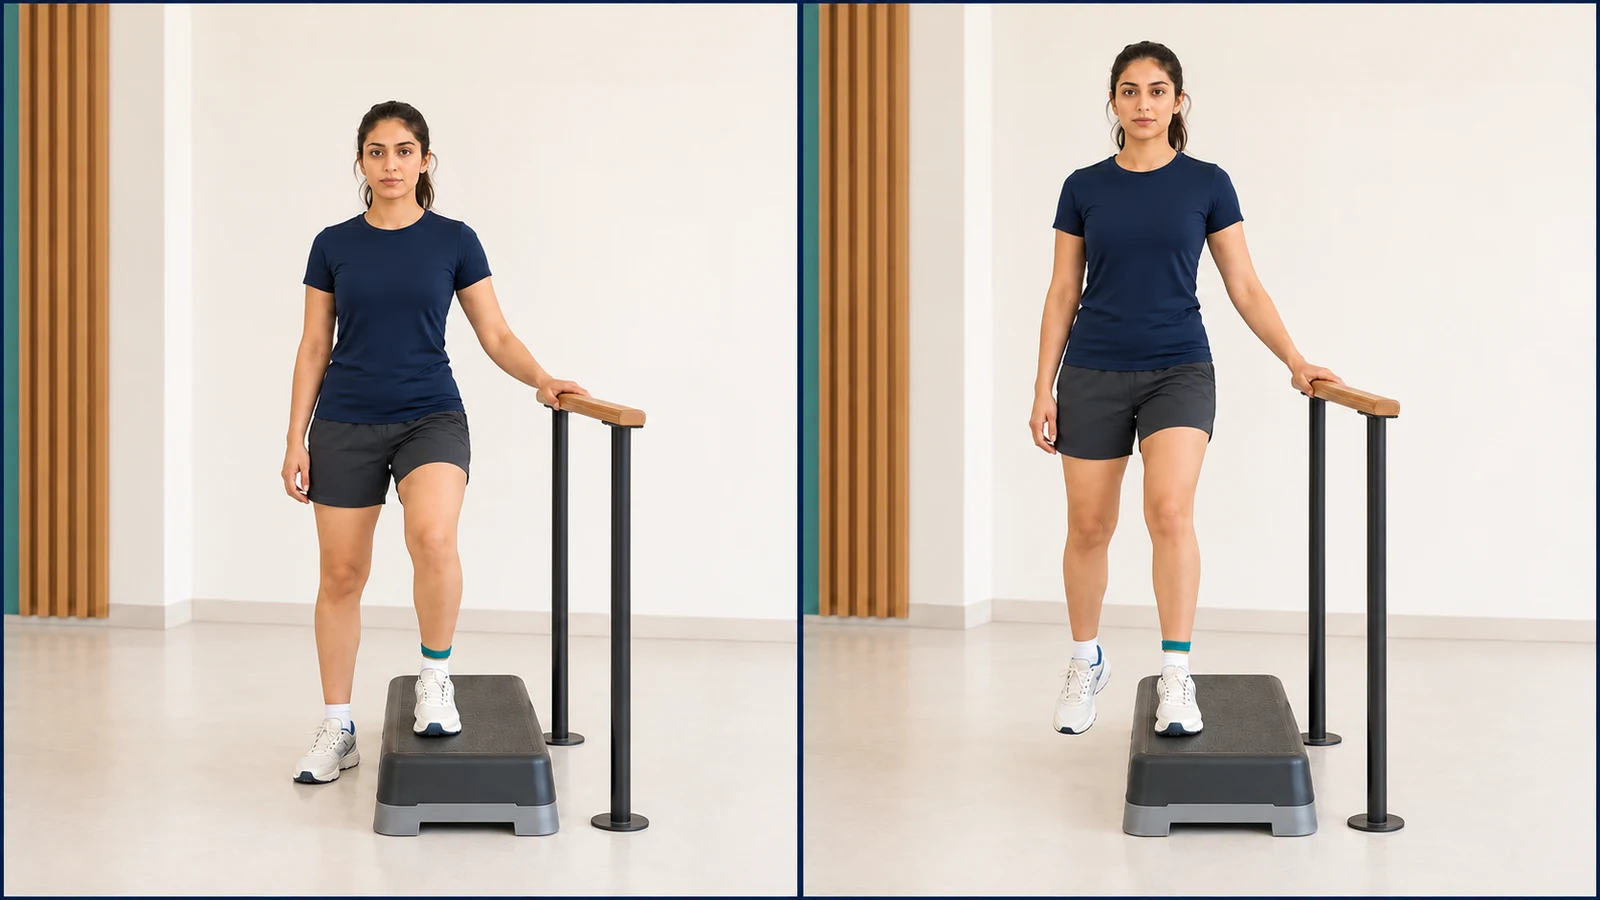
20) Lateral Step-Up / Step-Down
Practises stepping up and down sideways; the knee should not fall inward during the movement. 12 repetitions on each leg, on the lowest step you have. Stop if the knee gives way, hurts sharply, or falls inward even after you try to correct the movement.
More detailLess detail
Before you start: In this exercise you practise knee control during sideways movement. Start after mastering forward step-ups and step-downs without pain and with correct alignment. Wear closed shoes and stand beside a low, stable step with a rail, operated leg nearest the step, pelvis facing forward and a hand near the rail.
How to do it:
- Place the whole operated foot on the step.
- Transfer the weight gradually onto that leg and keep the knee in line with the toes.
- Without pushing off with the other leg, press through the whole foot and come up.
- Stand still at the top for a moment and level the pelvis.
- Bend the operated knee slowly and lower the other leg under control to the floor.
Movement tips: Keep the step low. Do not let the knee fall inward, the free-side pelvis drop or the trunk lean sideways. Breathe out as you rise and breathe in as you lower more slowly. The healthy foot should touch the floor lightly. Relax the thigh and side-hip muscles between sessions so fatigue does not disrupt alignment.
Amount, repetitions and progression: 12 repetitions on each leg, one to three times a day. Start with the same low step. If pain or swelling increases the next day, reduce the repetitions and keep the height as it is. Raise the height only when the pelvis does not drop, the knee does not fall inward, and pain or swelling does not increase the next day.
Stop immediately if: the knee falls inward despite your attempts to correct it, or it gives way or hurts sharply.
Common mistakes: Pushing off with the healthy leg, leaning the trunk sideways, letting the free-side pelvis drop, and choosing a high step from the start.
Easier version: A lower step or more help from the rail; practise only the step-up first and add the step-down later.
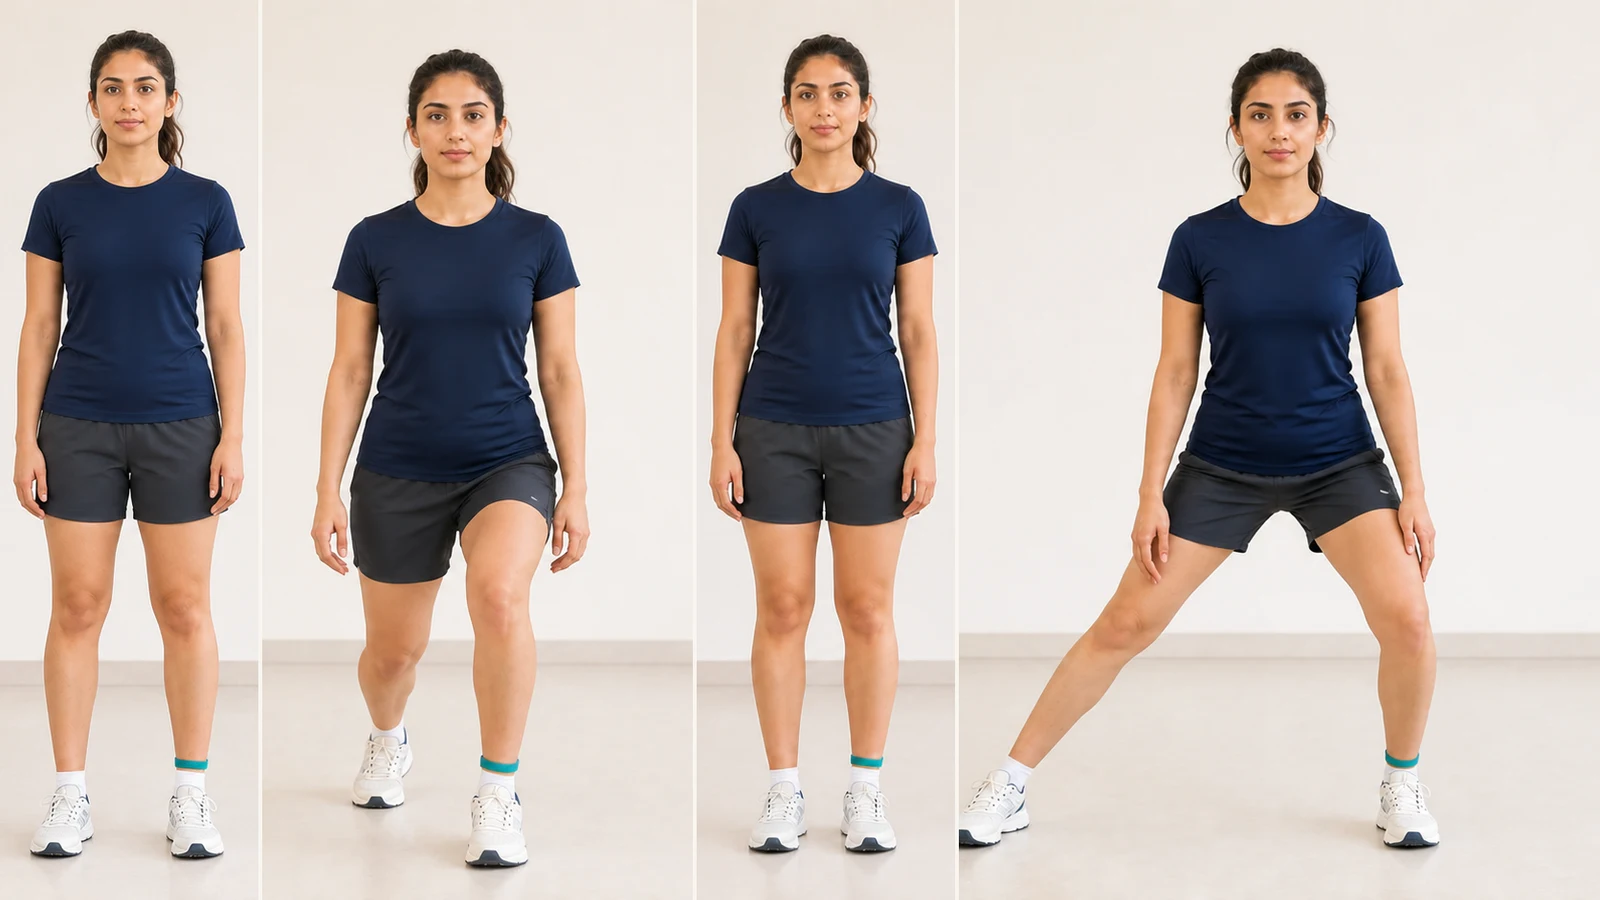
21) Front and Side Lunge
Trains leg strength and control with one leg in front of or beside the body. 12 repetitions on each side, front knee to 45 degrees. Stop if the knee falls inward or gives way, hurts sharply, or you are not sure of your balance.
More detailLess detail
Before you start: A lunge practises leg strength and control with one foot forward or to the side. In this guide it follows established single-leg control in the third month; pain-free chair squats and step work must be mastered first. Wear closed shoes and stand near a support in a flat, clear area, feet hip-width apart and trunk upright.
How to do it:
- For the front lunge, step forward with the operated leg and land heel first; once the repetitions are done, do the same with the sound leg.
- Bend the front knee only within the permitted range and keep it in line with the toes.
- Press through the front foot to return to standing.
- For the side lunge, step sideways with the operated leg and take the hips back while the other leg stays straight; do this on both sides too.
- Press through the outside foot to return to the starting standing position, keeping the trunk upright throughout.
Movement tips: Keep the step short and the movement shallow. At this stage, the front knee should not pass the toes or fall inward. Do not pivot on a planted foot. Breathe in to lower and out to return slowly without bouncing. Stand upright and relax the thighs between sessions. Return without wobbling and keep the knee aligned.
Amount, repetitions and progression: 12 repetitions on each side, one to three times a day. Take a step the length of a normal walking stride, and at first bend the front knee only to 45 degrees; in this version stay at 45 degrees until the end of month four; after that, if you have trained for several sessions without wobbling and pain or swelling has not increased the next day, go on to 90 degrees. If pain or swelling increases the next day, reduce the depth or the repetitions.
Stop immediately if: the knee falls inward, hurts sharply or gives way, or you are unsure of your balance.
Common mistakes: A long step, the knee falling inward, the trunk folding forward, landing on the toes instead of the heel, and going straight to a deep lunge.
Easier version: A shorter step and less depth, or performing the movement beside a wall with one hand on a support.
🎯 After 90 days: running and return to sport
A return to pivoting sport does not happen before six months and, beyond the time, requires these criteria: no pain or swelling, full and symmetrical range of motion, knee stability on examination, quadriceps and hamstring strength at least 90 per cent of the sound leg, squatting and landing with the knee in line, hop testing, and psychological readiness. In a study of young athletes, returning before nine months was associated with a higher rate of a second tear. In the American Academy of Orthopaedic Surgeons (AAOS) guideline, a test of how well you perform a movement, such as a hop test, may be considered as one factor in this decision. The guideline itself gives that statement with limited evidence, so no single test result is on its own a clearance to return.
In a study of athletes aged 15 to 30, those who returned to knee-strenuous sport before 9 months had more second ACL injuries during follow-up than those who returned later. Over the same follow-up, second injuries in the group that returned early were several times more common than in the group that returned later; the researchers reported that difference as a figure of about 6.7, using a measure called a hazard ratio. The number does not predict your own probability of injury, and because the study was only observational it does not prove cause either. Both healing time and strength and movement-control criteria should guide return; reaching 9 months alone is not enough.
22) Gradual Return-to-Jogging Program
Reintroduces running step by step in short sessions, not all at once. In this version start from week twelve onwards, after meeting the three conditions of this stage. If the knee gives way, feels unstable or hurts while you are running, stop there and contact your care team; if swelling or a limp returns after running, go back one stage.
More detailLess detail
Before you start: Returning to running is gradual and, in this version, starts from week twelve onwards, provided range of motion has normalised, pain and swelling are minimal, and you can walk and do mini squats without pain and without a limp; reaching the date alone is not enough. Wear suitable shoes and start on the softest surface: grass or a track first, then asphalt. Warm up with walking and calf stretching.
How to do it:
- Begin with short walk–jog intervals on a soft, shock-absorbing surface or a treadmill.
- In every session watch your stride: short steps, a soft landing and no limp.
- Rather than increasing speed, first increase the share of jogging slightly within the same time.
- Once you have run on your current surface for several sessions without pain and without next-day swelling, move to a harder surface.
- After each session check swelling and knee pain into the next day; if either has increased, take the next session back to the previous week.
Movement tips: For now, run straight without steep slopes. Sudden direction changes, rapid stops and contact sport are outside this exercise. Keep the pace easy enough to talk and breathe regularly. Do not put two running sessions on consecutive days. Steps should be symmetrical, controlled and without limping, and no swelling should appear the next day. Follow the cold-treatment instructions in the care section.
Amount, repetitions and progression: A few sessions a week, never on consecutive days. Start with short running bouts with walking in between; each week make the running share a little longer and the walking share shorter, until you can run continuously. Increase the duration before the speed. If swelling or a limp returns, or you have pain after running, go back to the previous week.
Stop immediately if: you develop pain while running, or the knee gives way or feels unstable.
Common mistakes: Starting on asphalt, increasing speed and distance at the same time, not following the session spacing in your physiotherapy plan, and ignoring next-day swelling.
Easier version: Go back to brisk walking, or continue the preparation stage: backward treadmill walking with your physiotherapist's teaching and supervision and the bike for endurance.
23) Backward Running
Running backwards trains step control in another direction. From week twelve, on a safe path, and after you have tolerated straight-line running for several sessions without pain or swelling. Stop if balance is unsafe, the knee gives way, or you develop pain.
More detailLess detail
Before you start: Backward running practises step control in another direction. Start from week twelve and after tolerating straight running without pain, swelling or a limp. Wear suitable shoes and choose a flat, clear route; on a treadmill, do this only with the side rails and at low speed. Stand facing away from the route, trunk upright and knees slightly bent. In the reference rehabilitation protocol, backward running is placed in weeks twelve to sixteen.
How to do it:
- Start by walking backwards with short steps until you get the feel of the route and the rhythm.
- Land on the ball of the foot first and transfer the weight onto that foot slowly.
- Do not lock your knees; allow them to bend and straighten as you step.
- Once your steps feel confident, build the speed gradually up to a light jog.
- To finish, reduce the speed gradually and return to normal walking.
Movement tips: Follow a short, straight route with short, controlled steps; do not turn quickly or change direction. Breathe freely and keep the pace easy enough to talk. Walk between sets until breathing and calves settle. Keep the trunk upright and knees aligned with the feet.
Amount, repetitions and progression: A few runs along a short marked stretch, never on consecutive days. Build the length of the stretch first and the speed afterwards. If pain or swelling increases the next day, go back to the previous distance. Each time you add distance or speed, keep full control of every step.
Stop immediately if: you are unsure of your balance or lose it, the knee gives way, the knee or calf hurts, or you are unsure the path behind you is safe.
Common mistakes: Repeatedly looking back and twisting the trunk, long steps, locking the knees, and training on a busy or uneven path.
Easier version: Only walk backwards, with short steps, preferably on a treadmill with a hand on the rail.
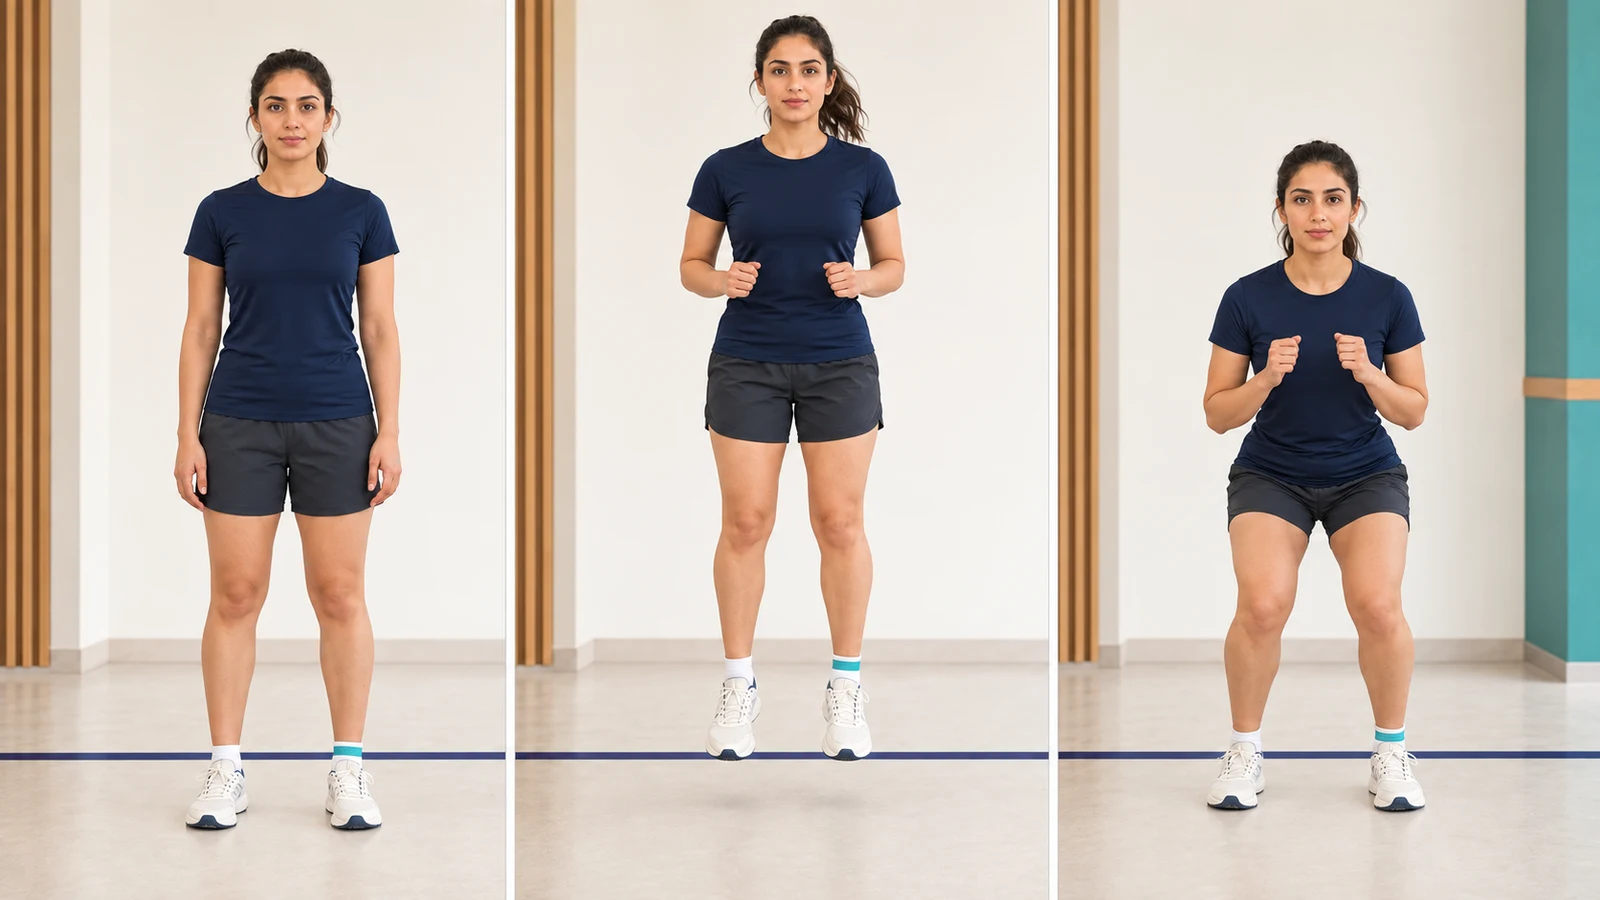
24) Progressive Jumping Drills (Plyometric Drills)
This exercise brings you back to jumping and landing step by step; landing quality matters more than jump height. Practise only under a physiotherapist’s supervision. Stop if the knee falls inward on landing or the landing is loud.
More detailLess detail
Before you start: The aim of progressive jumps is to practise controlled landing. In this version it does not start before the end of month four, and then only when prescribed and directly supervised by your physiotherapist, after tolerating the running programme and meeting strength and control criteria. Wear sports shoes and stand on a flat, slightly resilient surface in a clear area, feet hip-width apart, knees slightly bent and trunk upright.
How to do it:
- Begin with very small two-footed jumps on the spot.
- As you land on both feet, keep your knees and hips slightly bent to cushion the landing gently.
- Keep the knees over the line of the toes on landing and do not let them fall inward.
- Settle the landing quality over several sessions before increasing the height.
- Single-leg jumps are added only with permission and after two-footed landings are fully controlled.
Movement tips: Keep jump height and number low. Do not turn in the air, jump down from a height or land on one leg without permission. Move rhythmically and breathe freely. Land softly and quietly, knees aligned with the toes and balance regained immediately. Rest fully between sets so fatigue does not reduce landing quality. Cold-treatment instructions are in the care section.
Amount, repetitions and progression: In short bouts, never on consecutive days; end each bout while the landings are still controlled and quiet. Start with two-footed jumps on the spot; more height or a single-leg jump is added after several sessions of controlled landing. If the knee swells after exercise, reduce the number of jumps.
Stop immediately if: the knee falls inward on landing, landing becomes heavy and loud, or the knee hurts or gives way.
Common mistakes: Starting with too much height, landing with straight and locked knees, continuing when tired, and adding single-leg jumps too early.
Easier version: Go back to very small jumps on the spot, or even fast heel raises, until landing control settles.
25) Change-of-Direction and Sports Movement Programme (Cutting and Agility Program)
Trains changes of direction with lateral movement, crossover side steps and figure-of-eight paths. In this version this stage runs a few weeks after the end of month four, after the jump drills, because twisting the knee earlier is too soon for a repaired meniscus. Stop if the knee feels unstable or gives way.
More detailLess detail
Before you start: This programme prepares the knee for planned changes of direction. Start this programme a few weeks after you start the jump drills; the jump drills themselves do not start before the end of month four. To start it, you must tolerate running and the jump drills, and your front-thigh muscle strength must be at least 90 per cent of the sound leg. Use a flat, non-slip sports surface, sport-appropriate shoes and route markers. Warm up with walking, light jogging and stretching, then stand at the start of the route.
How to do it:
- Begin with lateral movement in a straight line at low speed.
- Add carioca (crossover side steps) slowly with a steady trunk.
- Run the figure-of-eight path with wide curves at low speed.
- Gradually tighten the curves and increase the speed; change only one of the two in each session, not both together.
- Add drills specific to your own sport last, once you can do the three patterns above without next-day swelling.
Movement tips: Practise only predetermined routes while breathing freely. Contact, reacting to an opponent and actual match situations belong to a later stage with separate permission. Direction changes should be smooth, the knee aligned with the foot and balance maintained after each change. Rest long enough between sets to prevent fatigue reducing movement quality.
Amount, repetitions and progression: A few repetitions of each pattern per session, never on consecutive days. Start with changes of direction at slow speed and a wide angle, and increase one thing at a time: speed first, then the sharpness of the angle. A full return to pivoting sport does not happen before six months and also requires passing the strength and movement-control criteria; in young athletes, returning before nine months has been associated with a higher risk of a second injury. If swelling returns after a session, go back one stage.
Stop immediately if: the knee feels unstable or gives way, you develop pain, or movement quality clearly declines.
Common mistakes: Increasing speed and tightening the curves at the same time, changing direction on a planted foot with a straight knee, starting without a warm-up, and going straight to competition without this stage.
Easier version: Go back to lower speed and wider curves, or practise only straight lateral movement.
🚗 Driving, work, prayer and daily activities
For each daily activity below you will find the usual timing and the condition you need to meet. The figures come from published research and from the clinic’s own programme, and you should read them together: reaching the date without meeting the condition is not enough.
- Driving: Drive only when you can react quickly and make an emergency stop safely, when no brace or crutch interferes with controlling the car, and when you are not taking an opioid painkiller, alprazolam, gabapentin or another sedating medicine. In Dr Emad’s programme, driving starts about 6 weeks after surgery, whether the right or the left knee was operated on and whether the car is manual or automatic. In this version do not drive before the end of week six, because until then no weight goes on the operated leg and you need the crutches. Before your first drive, practise an emergency brake a few times with the engine off.
- Work: in Dr Emad’s programme, desk work starts between weeks two and four, provided you can travel safely and keep the leg elevated during the day; and, in this version, standing or stair-based work starts from month three, because no weight goes on the operated leg until the end of week six. Separately, in a study pooling the published work on returning to work, most patients were back within 90 days.
- Prayer: because your meniscus was repaired, ordinary kneeling starts after the end of month four, on a soft mat and once you can bend down and get up without strain or loss of balance. Until then pray seated or on a chair; follow your own religious authority’s guidance in choosing the alternative.
- Sexual activity: after about two to three weeks, once the wound has closed and pain is controlled. Choose a position in which the operated knee is not deeply bent and does not take your body weight; you may take the brace off for this and refasten it afterwards. Stop if the knee hurts or feels unstable.
- Long travel: while you are still taking the prescribed anticoagulant, postpone long flights and road trips of more than a few hours where you can, because the risk of a leg clot is highest in that period. If you must travel, get up and walk regularly, or at least pump the ankle up and down several times, drink enough water, and keep taking any anticoagulant you were prescribed exactly as prescribed.
❓ Frequently asked questions
1) When are the sutures removed?
Under Dr. Emad’s plan, sutures that require removal are taken out 2 to 3 weeks after surgery. Do not remove sutures or wound adhesive yourself; they are taken out at your clinic appointment.
2) When can I shower?
You can take a short shower from 48 hours after surgery, provided the wound is dry and the waterproof cover is intact.
3) When will full flexion return?
In this version the goals are: full straightening and at least 45 degrees of bend in week one, and then staying under the 90-degree ceiling until the end of week six. 120 degrees, and after it a full bend matching your other knee, come after week six and once an examination clears them. Forcing the knee to reach these angles sooner is harmful, especially if the meniscus was repaired.
4) Is clicking dangerous?
Painless clicking without swelling is common in the first months and is not dangerous; it usually settles as the muscle gets stronger. But clicking together with the knee locking, giving way, sharp pain or new swelling should be raised at your next appointment, because it can point to a meniscus catching.
5) Can I run in month three?
In this version light straight-line jogging starts from week twelve onwards, and reaching that date is not enough on its own. The conditions are that knee range of motion has normalised, pain and swelling are minimal, and you can walk and do mini squats without pain and without a limp. Running with changes of direction, and pivoting sport, are separate and do not happen before six months.
6) What if my meniscus was repaired?
Your tear was a complex one, and this guide is written for exactly that. For this type the 2024 international consensus advises no weight-bearing for four to six weeks and knee bend kept to 90 degrees over the same period; in this version Dr Emad takes the six-week end, the more cautious end of that range. Deep squatting, jumping and twisting movements of the knee are also left out for at least four months. In this version the crutches are needed until the end of week six, because until then no weight goes on the operated leg.
7) How long is knee swelling expected?
Knee swelling lasts for months, and that is normal. It is worst in the first days and then decreases, but disappearing entirely takes time: in a study of reconstruction with a hamstring graft, about a quarter of patients still had slight knee swelling at one year. What matters is the trend, not the swelling itself: if today’s activity makes tomorrow clearly more swollen, reduce the amount. Sudden or progressive swelling, especially with calf pain or shortness of breath, requires immediate action as described in the warning-sign section.
8) When should I change the dressing?
Do not open it yourself. The dressing stays on until your first clinic visit, 10 to 14 days after surgery, and is changed there. Only replace it earlier if it is wet, dirty, loose or bloody, and call for an earlier appointment.
9) How long will I need crutches?
Six weeks, because for that whole period no weight goes on the operated leg. After that the date alone is still not enough: you stop the crutches when you can tighten the front-thigh muscle firmly, keep the knee straight while walking, and walk without a limp or increased pain or swelling. One crutch first, the second a few days later.
10) Must the brace stay on all the time?
No. The brace stays locked straight for walking and for sleeping, but you open it for range-of-motion exercises. In this version the post-operative brace is left off at the end of week six. For returning to sport, a separate sports brace is prescribed. Do not change the lock setting yourself.
11) When does physiotherapy start?
The simple exercises in this guide start on day one, and formal physiotherapy sessions begin from the second day after surgery. If the meniscus was repaired or you had an associated injury, the exercises are the same but the weight-bearing and knee-bend limits in the meniscus answer apply.
12) When can I drive?
Only when you can perform an emergency stop promptly and without pain, no brace or crutch interferes with control, and you are not taking an opioid painkiller, alprazolam, gabapentin or another sedating medicine; if you are not sure whether yours is one of these, check the medicines section or ask your pharmacist. In Dr Emad’s programme this is about 6 weeks after surgery, for the right or left knee and for any type of car. In this version do not drive before the end of week six, because until then no weight goes on the operated leg and you need the crutches.
13) When can I return to work?
In Dr Emad’s programme, desk work starts between weeks two and four, provided you can travel safely and keep the leg elevated during the day; and, in this version, standing or stair-based work starts from month three, because no weight goes on the operated leg until the end of week six. Separately, in a study pooling the published work on returning to work, most patients were back at work within 90 days of surgery, and the mean with a hamstring graft was about 84 days. Heavy work, and work involving kneeling or repeated climbing, starts later and closer to return to sport.
14) When can I kneel or pray in the usual position?
Because your meniscus was repaired, kneeling comes after the end of month four, on a soft mat, and once you can bend down and get up without strain or loss of balance. Until then, pray seated or on a chair. Pain at the front of the knee, which is more common with a patellar tendon graft, may delay this further.
15) What should I do if the knee will not fully straighten?
Do not leave a pillow directly under the knee; put it under the calf and heel so the knee straightens under its own weight. Do the straightening exercises in this guide several times a day. Full straightening is the goal of the first week. If straightening is not improving week by week, or has got worse than the week before, call that same week rather than waiting for your next appointment. A knee that does not straighten is harder to treat later and is the single most important goal of the first weeks.
16) When can I resume sexual activity?
After about two to three weeks, that is, once the wound has closed and pain is controlled. Choose a position in which the operated knee is not deeply bent and does not take your body weight; you may take the brace off for this and refasten it afterwards. Stop if the knee becomes painful or feels unstable.
17) Will I need a follow-up X-ray after surgery?
In Dr Emad’s programme, a routine follow-up X-ray is not needed. If an examination or a new symptom calls for one, it is requested at that visit.
✅ Summary and appointments
Recovery after ACL reconstruction progresses through regular wound care, swelling control and restoring movement and strength. Perform exercises with good form and within your plan; both knee readiness and the time needed for healing guide progression.
If you are still deciding about surgery or preparing for it, the guide to ACL reconstruction before surgery explains the injury, what may happen without surgery, preparation, surgery day, graft choices and decisions about the meniscus.
If you have a sign from the “Same-day contact with your care team” list in the warning-signs section, contact them that day. For questions about knee straightening, swelling or your exercise plan, call Dr. Jalil Emad’s office at 09137825207, or book an appointment online. In an emergency, do not wait for a response from the office.
For more about this area of treatment, visit the related service page: Knee arthroscopy.
This content is provided for general education only and does not replace an examination, advice from your treating clinician, your discharge sheet or your surgeon’s specific protocol. Timing, range of motion, weight-bearing and the amount of exercise vary with the procedure, any other treatment carried out during the same surgery and each person’s condition. Do not change medication, dressing care or your exercise plan without consulting your care team.
📚 Scientific references
View scientific references
- Brophy RH, Lowry KJ: AAOS Clinical Practice Guideline Summary: Management of Anterior Cruciate Ligament Injuries. J Am Acad Orthop Surg 2023;31(11):531-537 (PMID 36727995)
- Aspetar: Clinical practice guideline on rehabilitation after ACL reconstruction (2023). Br J Sports Med.
- Montefiore: Anterior Cruciate Ligament Reconstruction: Accelerated Rehabilitation Protocol
- Armando Vidal, MD: ACL Rehabilitation Protocol (MOON-based version)
- MOON Knee ACL Research: ACL Rehabilitation Phase 1
- Cambridge University Hospitals: Caring for your surgical wound
- Beischer et al.: Young Athletes Who Return to Sport Before 9 Months After Anterior Cruciate Ligament Reconstruction Have a Rate of New Injury 7 Times That of Those Who Delay Return (2020). J Orthop Sports Phys Ther.
- Return to Driving After Anterior Cruciate Ligament Reconstruction: A Systematic Review (2021). Orthop J Sports Med.
- AAOS OrthoInfo: Heat or Ice for Your Pain
- FDA: What to Ask Your Doctor Before Taking Opioids
- NHS: Pulmonary embolism
- WHO EMRO: Crisis support contacts: Iran medical emergency number
- Aspetar: Recommendations on rehabilitation after ACLR
- Cambridge University Hospitals: Anterior cruciate ligament (ACL) reconstruction rehabilitation
- MOON Knee ACL Research: ACL rehabilitation phase 3
- KneeTech (UK): ACL Rehab Protocol — stationary bike progression
- NHS SPS: Advising on missed or delayed doses of medicines
- FDA: Acetaminophen
- MedlinePlus: Pain medications: narcotics; medication safety and side effects
- Özbek EA, Dursun Savran M, Baltacı Ç, et al: Return to Work After Anterior Cruciate Ligament Reconstruction: A Systematic Review. Orthop J Sports Med 2024;12(5):23259671241249086 (PMID 38745916)
- Pujol N, Giordano AO, Wong SE, et al: The formal EU-US Meniscus Rehabilitation 2024 Consensus: An ESSKA-AOSSM-AASPT initiative. Part I—Rehabilitation management after meniscus surgery (meniscectomy, repair and reconstruction). Knee Surg Sports Traumatol Arthrosc 2025;33(8):3002-3013 (PMID 40353298)
- Ogura T, Asai S, Akagi R, et al: Joint effusion at 6 months is a significant predictor of joint effusion 1 year after anterior cruciate ligament reconstruction. Knee Surg Sports Traumatol Arthrosc 2021;29(11):3839-3845 (PMID 33475806)
- Everhart JS, Hughes L, Abouljoud MM, et al: Femoral nerve block at time of ACL reconstruction causes lasting quadriceps strength deficits and may increase short-term risk of re-injury. Knee Surg Sports Traumatol Arthrosc 2020;28(6):1894-1900 (PMID 31317214)
- DailyMed (US FDA label): Cephalexin capsules
- MedlinePlus: Cephalexin
- DailyMed (US FDA label): Apixaban tablets
- DailyMed (US FDA label): Aspirin
- DailyMed (US FDA label): Famotidine tablets
- DailyMed (US FDA label): Pantoprazole sodium delayed-release tablets
- Bischof K, et al. Impact of Collagen Peptide Supplementation in Combination with Long-Term Physical Training on Strength, Musculotendinous Remodeling, Functional Recovery, and Body Composition in Healthy Adults: A Systematic Review with Meta-analysis. Sports Medicine 2024
- PubMed search: collagen supplementation after ACL reconstruction (searched 2026-09-24)
- DailyMed (US FDA label): Alprazolam tablets
- MedlinePlus: Alprazolam
- DailyMed (US FDA label): Gabapentin
- MedlinePlus: Gabapentin
- DailyMed (US FDA label): Acetaminophen and codeine phosphate tablets
- DailyMed (US FDA label): Oxycodone hydrochloride tablets
- AAOS OrthoInfo: Platelet-Rich Plasma (PRP)
- Ye Z, et al. Intra-Articular Platelet-Rich Plasma Injection After Anterior Cruciate Ligament Reconstruction. JAMA Network Open 2024
- Zhang Y, et al. The impact of platelet-rich plasma injection on anterior cruciate ligament reconstruction: a systematic review and meta-analysis. Frontiers in Bioengineering and Biotechnology 2025
- Dave U, et al. Platelet rich plasma augmentation for meniscus repair reduces failure but not complication rates or outcomes: A systematic review and meta-analysis. Journal of Orthopaedics 2026
- MedlinePlus: Vitamin D
- MedlinePlus: Vitamin C

Dr. Jalil Emad
Orthopedic specialist and surgeon, board-certified in bone and joint surgery; years of experience in knee and hip replacement, sports injuries and arthroscopy in Isfahan.
Related articles
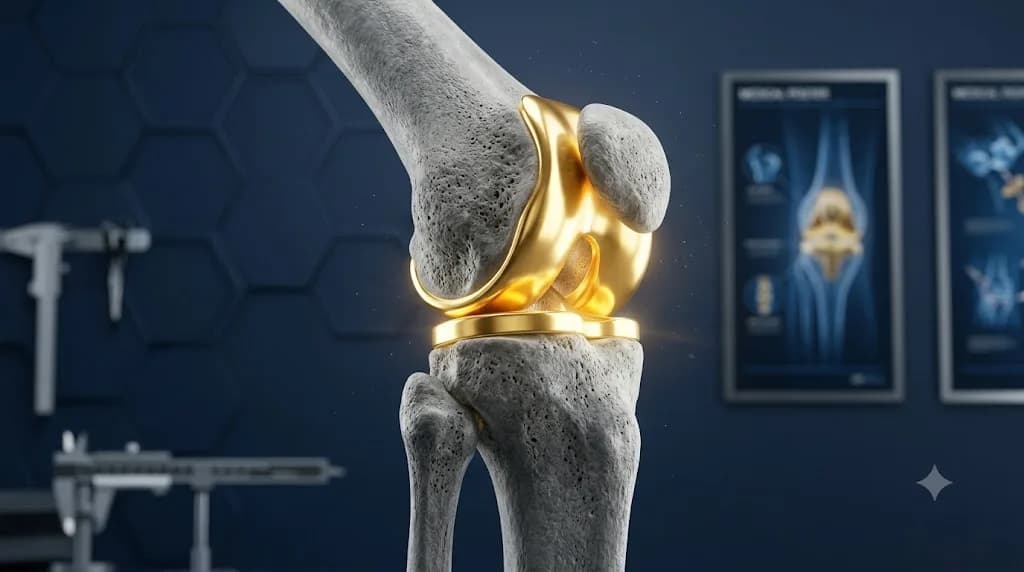
Total Knee Replacement Surgery: Postoperative Care and Rehabilitation
Read knee replacement recovery step by step, from wound care and medicines to exercise. Progress depends on pain, swelling and movement.

Total Knee Replacement: The Pre-Operative Guide
What to know before knee replacement: what knee osteoarthritis is, what happens if you do not operate, how to prepare, what takes place in the operating room, and answers to 20 questions about returning to daily life.
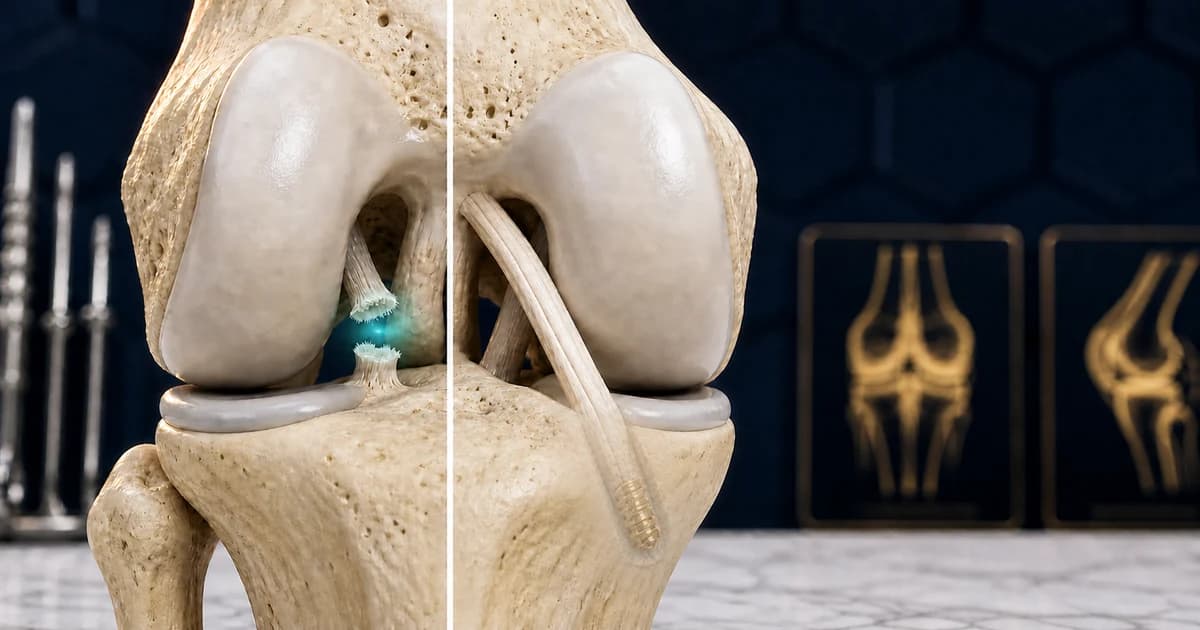
ACL Reconstruction: The Pre-Operative Guide
What to know before ACL surgery: what the ligament does, what happens to the meniscus and cartilage if you do not operate, how to prepare, what takes place in the operating room, and answers to 20 questions about returning to daily life and sport.